
Palantirion
-
Posts
84 -
Joined
-
Last visited
Content Type
Profiles
Forums
Events
Gallery
Everything posted by Palantirion
-
06-29-22 This, even though it looks pretty bad, is actually a big improvement over the previous sanding rounds (go ahead, scroll back up). And I improved it further. Mostly by...doing more. Sanding more, polishing more. Done with polishing. It's not perfect, actually far from perfect, but it looks ok. And it didn't. As long as it isn't a distraction to the cockpit detail below then I will call that mission completed. There were little chips in the frame's interior, which needed painting. Thankfully no filling/sanding was required. More chips up front, which were also fixed. DONE! And ready for pickup.
afternewsandingpolishingtechnique.jpg.0144eacd8cf8213bdbf36b7d3c40f846.jpg)
newtechniqueaftercompoundingandwaxing.jpg.0161487cdcd118003df6df983d361222.jpg)
scratchrepairfinished.jpg.ec4d49a0549c89664efa754528faea0a.jpg)
canopynicksandchipstofix.jpg.a71ed1ce23fa4a23b560664326c9fc74.jpg)
canopynicksandchipstofix.jpg.c9a1ee849b8dd6161daa3e39c72fbd85.jpg)
packed.jpg.f76d48899504e12a4ece9bb2be4f03e6.jpg)
-
06-20-22 Another week+ of sanding and polishing, trying new techniques or variations of techniques. I can't really show these differences clearly via photo. Suffice it to say that I kept a log and of the 80 hours the project took, 17 of those hours were sanding and polishing this damn canopy. Which would have been FAR easier (on my wrist) if it hadn't been so thin, and concave. Looking better still.
newpolishingtechnique.jpg.01408e90dd493c150ebaeea4000c7675.jpg)
newpolishingtechnique.jpg.3b532aeb1c45211d9bc42198264ac0e3.jpg)
-
06-08-22 Much time, few pics. Because polishing! Yeah it pretty much looks the same. But it doesn't. Not in person. Note the time jump, a full round of sanding many grits and then full polishing led to this marginal improvement. Still a bit of haze, although it looks pretty good from this angle.
-
05-31-22 (ALMOST DONE!)...(sort of)... I didn't think the shield looked quite right. I decided it needed a little more unifying detail. So I used a scriber to add additional, much smaller, fracture lines coming away from the points of impact. Then painted and stained them. Another angle, showing how they help make the piece more cohesive. A crappy picture of it hanging on my wall. I don't think it looks very good in the picture, but it looked really good in person. I especially like the colors in the heat staining, which don't show up well on camera. But, here it is finished!
addingmorestresscracks.jpg.8d653f5cad6f6929a317078d3bfb596d.jpg)
addingmorestresscracks.jpg.3683ed317c3dbd6a466cb7aca959f51e.jpg)
finshedandhung.jpg.ff6a748292e908e646a0742ddb976b85.jpg)
-
05-30-22 On to the shield. As a reminder, we decided I would turn this into wall art based on Farewell, Big Brother. The first step was to stabilize the big fracture. I believe this shield is cast PVC, so if allowed to keep flexing it could lengthen the tear. Below you can see where I drilled to pin it. The pin was more cut paper clip, then superglued in place. This also let me set the width of the crack. I wanted it to look more like something that happened as a byproduct of being shot, not like it was torn or hit with a truck. Once the crack was stabilized I grabbed these extra picture hanging inserts and glued them onto fairly meaty areas. Then wired it for hanging. I looked up the episode and when Roy is shot the "laser" blasts come from about 7-8 o'clock only slightly higher than his VF-1. Also, they aren't lasers. The closest I could think of would be plasma. Sort of doesn't matter, but it helps me better visualize the damage knowing what's causing it. I used a soldering iron to burn through the shield from the direction and AOA close to what was pictured on screen (some artistic license). And I used a lighter to bubble and melt the surface to emphasize the direction of impact and impart a more obvious sense of the areas being overheated. As there was more than 1 burst fired I also placed these three further up. These, not the bigger ones, were the ones that went through the cockpit's rear bulkhead and into Roy's back. I carefully painted the impact areas (and crack interior) with silver, then heat stained them with Liquitex inks (a glaze would have worked similarly). The color range is similar to what you see on overheated exhaust (header) pipes; blue->red->yellow. Then I used the lighter brown oil paint to weather the skull and bones. In this pic the skull is done, but not the bones, so you can see the subtle difference it makes. I also used the silver paint to make various tiny nicks in the paint. This adds detail, but also will help to unify the piece with its damaged areas. Paints used on the shield.
crackpinnedandgluedtosetdistance.jpg.b367d589886cf3794e765b38c07cd26b.jpg)
crackpinnedandgluedtosetdistance.jpg.dd86eb2bea16e7c6512fab8e1ce220be.jpg)
wiredforhanging.jpg.90d243111ee4bf5a69e3d22a5ca940aa.jpg)
holescarvedwithsolderingironpaintburntwithlighter.jpg.0c01a14f5c499826bc40f0314b006abe.jpg)
holescarvedwithsolderingironpaintburntwithlighter.jpg.969f346eb0e189d6915805005a405f1e.jpg)
paintedwithheatstaining.jpg.7176f1090e1c64d71da52c61e0a63aa6.jpg)
weatheringskull(notbonesyet).jpg.7fd01c94fe589f2db6ad5eb7909942a9.jpg)
scratchesandchipping.jpg.349eefdc3418ebec645062abf00210bc.jpg)
paintsused.jpg.2d42cbb1c67ae76787f9d58a57b8cad4.jpg)
-
Thanks! And your instinct is correct: People, for the most part, won't know how much work went into this restoration. What I'm showing here is very much just the cliff notes, or like watching a cartoon with 3/4 of the cells removed.
-
05-26-22 The new HUD panels, 1 polished the other only cleared. Both polished. Clarity sample. The new HUD panels, fitted to the upper console. Other angle.
newpanelspolished.jpg.25b7a01ca81c7a9d2d7d33539200e874.jpg)
newpanelspolished.jpg.469f7615322155518d2c4a0a1dbf1f6a.jpg)
newpanelsfitted.jpg.cd04699e5bcbbc77f99dc5d1757c0764.jpg)
newpanelsfitted.jpg.00244e5c2b7c8785324bfff00b2015ed.jpg)
-
05-25-22 To finish the panels I first brush painted the edges with Tamiya clear green. In my mind I wanted the end result to look like tempered glass. In hindsight, I'm not sure HUD panels are made with tempered glass. But these looked cool when they were done, so...it's ok? Clamping them by the edges to then airbrush a ghost edge around the perimeter. Also using Tamiya clear green. Painting finished. Then I clearcoated them with Tamiya gloss, because I knew I wanted to polish them and the polish would immediately dissolve the paint. Speaking of paint, these are all the paints used in this restoration. If you want more details, just ask.
paintingHUDpaneledges.jpg.1889c952e97140f2a8b8edd7090a2808.jpg)
airbrushingHUDghosting.jpg.0cd7b9edb96d54b8b4ca464e6301cbcc.jpg)
finalpanelspainted.jpg.ed871ead91f958d50d9c2b336ddff822.jpg)
newpanelscleared.jpg.90ce6fbe7e8a90b2da60a22631fa1085.jpg)
paintsused(updated).jpg.31cb01081a8222be190207fe6b7af453.jpg)
-
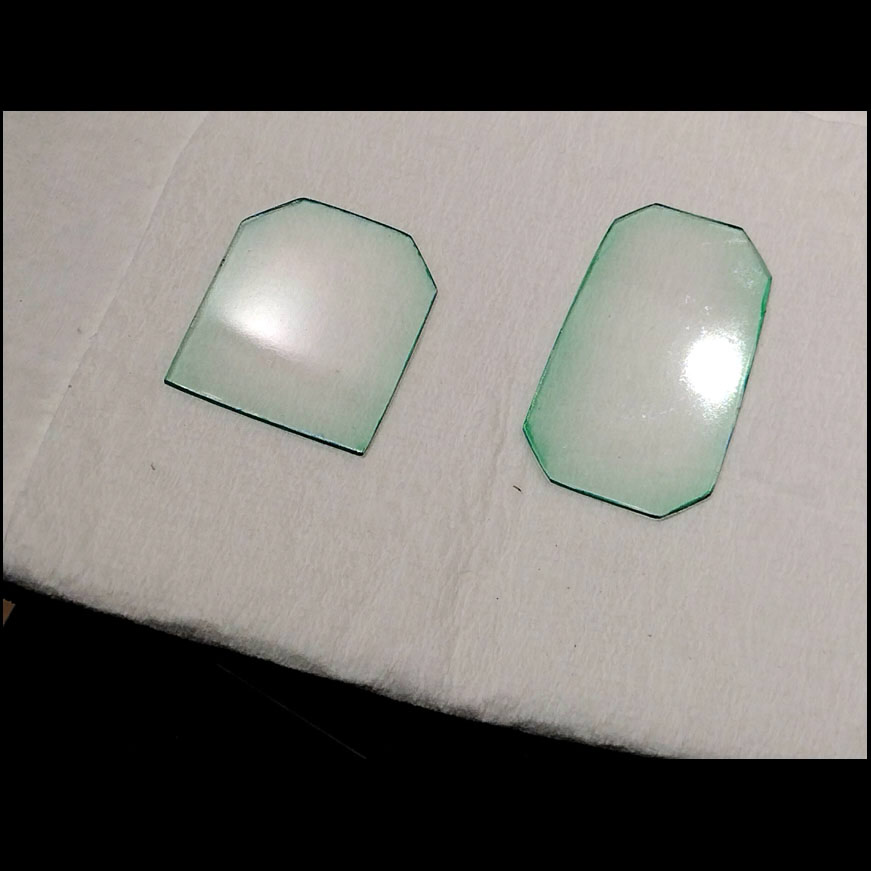
05-24-22 The repaired HUD panels, fitted. From this one angle, the crack isn't quite so obvious. But overall, the repair option sucked. So I got an old CD case that was the same thickness as the Kidslogic HUD panels and cut new panels. The first one wasn't quite the right shape, so I used it for testing other steps. Here are the 3 I cut and the 2 original, damaged ones.
repairedHUDpanelsfitted.jpg.ed5732369812c00f2447590b65f6e1df.jpg)
makingreplacementHUDpanels.jpg.f1c5dfbdcc5fc0c85c185a456787e26e.jpg)
makingreplacementHUDpanels.jpg.8fd2bf2a3bfd500a32275d7740179578.jpg)
-
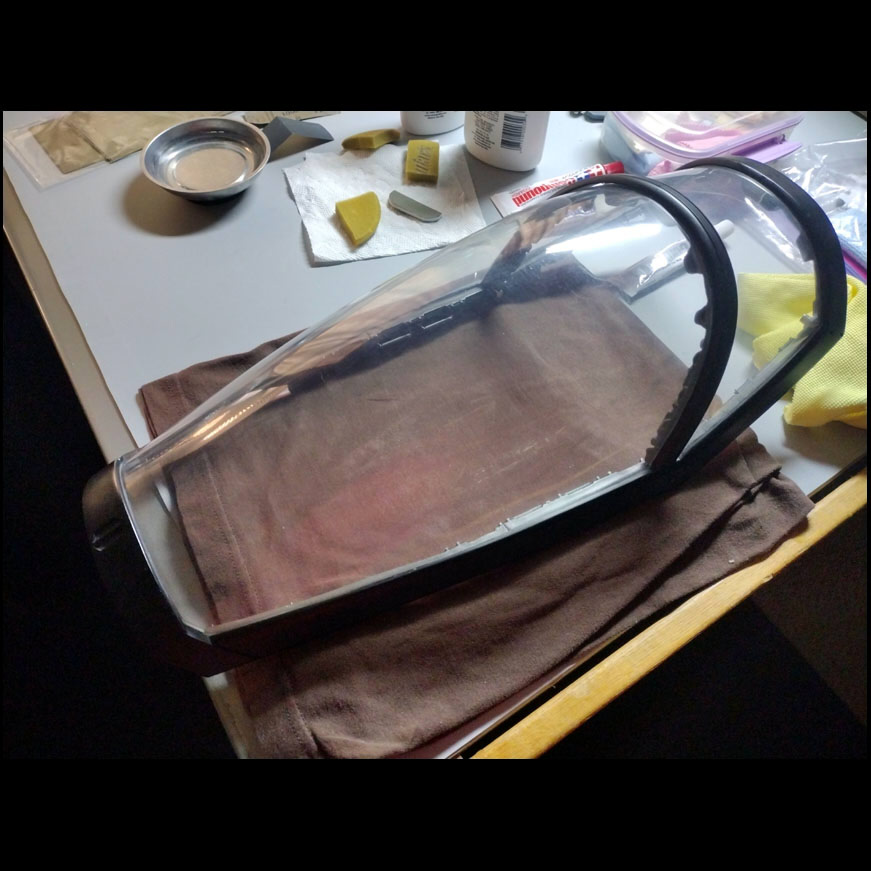
05-23-22 So I thought at this point I was done with repairing parts, needing only to fix the canopy and shield. However in packing the parts in the styrofoam I discovered this other arm, and its missing finger. So, like the thumb before, I drilled and pinned... ...then used Apoxie Sculpt to form a new finger. While that cured I turned my attention to the canopy. Essentially starting over after bumping into Frank Ippolito at a Propstore event and asking his advice. I switched from the foam-backed sandpaper pads I used before to sanding sponges. And I went with a much more aggressive grit to do my best to completely remove the deeper scratches. I did have to be very very careful though, because the canopy itself is VERY thin, and the frame is VERY weak. So whenever I sanded I had to support the opposing side with my hand. You can see here I got it to a fairly uniform haze. This is the whole canopy done with that grit. Then I polished it, as a quick test, and while the polish is still wet it looks damn good. The same, after the polishing compounds solvents evaporate. They acted like a temporary clearcoat, making it look clearer than it really was. However, as you can see here the polish did actually do a good job against very extreme sanding... ...such that there no longer are scratches deep enough to cast shadows! So, to that end this was a success. However there is still a clearly visible haze to the canopy and that needs to be dealt with. The new finger, sanded, primed and painted.
Royfingerpinned.jpg.1462cc09917b6a67ca0195ba3c7a6ed4.jpg)
Royfingersculpted.jpg.63873983fc8a4ac89fc559e84b24ce19.jpg)
moreaggressivegrit.jpg.c305f7b1fbbc7afb363c0eb90ceb386c.jpg)
canopysanded.jpg.8ce01c4400a60014303f4f9ed4343a1d.jpg)
polishingstillwet.jpg.ccda2e178164468afac5a848333af310.jpg)
polishingafterevaporation.jpg.6b71df29b2bd6a8acff2429965f44956.jpg)
scrachesnolongerdeepenoughtocastshadows.jpg.efcd7904566110f1f39a7c90d5562a4f.jpg)
fingersandedandpainted.jpg.8a03c68632d9522ae9033310197036a5.jpg)
-
Thanks guys! 05-21-22 My first attempt to fix the broken HUD panel. Using clear PVA (so as to not fog the acrylic), the pieces were laid on a silicone mat and clamped gently with 1-2-3 blocks. The idea was that the clear glue and clearcoat after would fill the crack and make it much less obvious. In short: This idea would fail.
gluingbrokenHUDpanels.jpg.013425b762f203a36462fafaa061730c.jpg)
-
05-20-22 I lied. This is the final coat of paint on Roy's collar. It needed to be evened out slightly more. Sanding the repaired slat. Non-pro pro tip: Use a dry swiffer sheet to catch fine dust particles so you don't have to sweep them out of all the crevices below. Slats installed. And painted. This consisted of the custom gunmetal as a base, then drybrushing antique gold across the leading edges. Long shot. One might notice that one of the slats doesn't sit in perfect alignment to the others. That is because where it broke a little bit of material was lost and this changed its angle slightly when I glued it back into place. I could have removed it and made a new one, but there is some risk involved with that. We mutually concluded that since it is very close to correct that it was fine to leave it as-is. The error is only visible from one specific angle, which is not a primary one.
Royscollarfinalcoat.jpg.09b95484d784135b0f4f3bb2739af240.jpg)
sandingbrokenslat.jpg.e7c64e4dafb7d134670b7bd29275646f.jpg)
slatsinstalledsandedandpainted.jpg.5d0fcba11ffaffbf90b9bab8be70dde3.jpg)
slatsinstalledsandedandpainted.jpg.9c9f891efc07c3b886cf1be76012340f.jpg)
slatsinstalledsandedandpainted.jpg.c0848dd852ba053f346a4853ffa48838.jpg)
-
05-18-22 The lower center console, finished. Painting the side console's silver. Sanding the side console edges, fine tuning. And the other one. From time to time I'd use my dehydrator to speed up paint cure times. Relatively inexpensive, one of my unexpectedly best tool purchases. Especially useful for quick-curing oil washes (not relevant to this project). After fixing so many things I then noticed that there were a lot of minor scratches on the black of the cockpit... ...so I went around painting and feathering them. Painting side console details. These would be all the chips that weren't part of the silver; various spots within the black, the gray, and a couple clear red and orange. I lightly sanded and painted Roy's collar again. Done now. These 4 vent slats had been broken off. One of which was lost. So I matched up the ones that remained and glued them back in. Thankfully resin fractures without much elasticity, so it's fairly easy to fit parts back together if you have them. Some more touchup on this side console. All these parts are finished now (not the shield or canopy). This is a new vent, made from styrene. It was tricky to get the side angles to match, a fair bit of eyeballing and then trial and error refinement. Based. This other slat was damaged, so I used putty to rebuild part of its edge. The replacement slat, painted with a custom mix black/antique silver to match the dark (almost black) gunmetal used throughout the model.
smallconsolefinished.jpg.0248274f05eb6c01dad82cdc8c84a71d.jpg)
refiningandpaintingsideconsoleedge.jpg.a6ab2dac3aa0f043f51ee6f610dd7c4b.jpg)
refiningandpaintingsideconsoleedge.jpg.aabdc3f95539aa4865288162518a22f2.jpg)
refiningandpaintingsideconsoleedge.jpg.60e3195ce08957eae9fc3aaef1458426.jpg)
sideconsolesindehydrator.jpg.bf5358e17f439ef32cef5a89220bd625.jpg)
cockpitinteriorscratches.jpg.fb6ba3df76a17d086bf09ae9c5a8341f.jpg)
spotpaintingscratches.jpg.ddc6e89f736b743ee785346112af2b1c.jpg)
paintingothersideconsoledetails.jpg.73349894b513de84e2ad34979c02c823.jpg)
Royscollarpainted.jpg.f5a596e87cf9eeba591ef395c2c2888f.jpg)
replacingbrokenventslats.jpg.a8550e30d086f4bcde139041255d69e2.jpg)
replacingbrokenventslats.jpg.04344365d366fe2f7a63dc33cc45edaf.jpg)
refiningsideconsolepaint.jpg.df04491a3f9329386f5fbee5b078e8d5.jpg)
finishedparts.jpg.f423762d1ecfa67d2b94d09a126e722e.jpg)
shapingreplacementslat.jpg.3399ea940b5bbae1780c60c07244c962.jpg)
replacementslatbasecoat.jpg.5a406f2ced92f1d248b892f809d21c5d.jpg)
repairingdamagedslat.jpg.58df513a137894bc3ff7cab0ff3be421.jpg)
replacementslatmetalliccoat.jpg.38c493e513f00f7fadc28d9fd80e64fd.jpg)
-
05-17-22 Sanding the sides of the console edges. There were small chips and in some cases this meant that the paint was just lifted. But it all had to be sorted out and unified before repainting. Yes, more sanding. Did some touchup on the lower console, pulling the base metal color over some of the candy to clean up the edges. Painting the side consoles' silver.
sandingsideconsoleedges.jpg.5d1411c4b57b3fb26eeba12867bdbfff.jpg)
sandingsideconsoleedges.jpg.ab3d9ec3afdf51843b8f92ebbf197cec.jpg)
smallconsoletouchup.jpg.0292b2fe345b0dc51deeba5408a8d18e.jpg)
paintingsideconsolessilver.jpg.d08f64e8fbf419e010ddeea8bf5e005f.jpg)
paintingsideconsolessilver.jpg.f2eb1b8284bb18daff4581c32c7bfe4d.jpg)
-
05-16-22 Pedals are now repainted. Lower center console, at the beginning of painting the candy red (and blue) buttons/switches. The left dome is Tamiya clear red over the silver base, the right one is with only the base. A nice effect, and really easy to to. Small details done. Because of some very shallow chips I ended up doing a light repainting of the center console frame.
paintingpedals.jpg.fa252d5572f3d71e39189ec26e6a05ce.jpg)
paintingsmallconsoledetails.jpg.00343bf9361518244e84148eeebb41e3.jpg)
paintingsmallconsoledetails.jpg.0a99d3726f28f8cdde03c434a2a4f1d2.jpg)
paintedLCDconsoletrim.jpg.62a04b5d142c271cf68e37a3d4aa707c.jpg)
-
05-15-22 Found yet another chip, up in the far front. Sanded it down. More sanding and painting of that console support. Finally looking decent. The new front chip is painted, and the front details are repaired.
frontchipsanded.jpg.f7bb72cdce1c2e75c44a20209ee7a3ff.jpg)
standsandedandpaintedagain.jpg.78ab046b9f49c667a9fb78e0f1184b31.jpg)
frontfinished.jpg.c51b702f34a0382ff64b86e0068a9991.jpg)
-
05-13-22 Second try at painting the console stand. Front detail painted again. The obligatory overhead shot. There was a lot of touch up required on the dark rounded areas on both sides of the cockpit floor. After painting.
standpaintedagain.jpg.2694e826e6b8c7553baecc150c0455a6.jpg)
frontdetailpaintedagain.jpg.994d2eccfd2de2f5181f174a178d2679.jpg)
overhead.jpg.51b724d85a49f89011834d10d099df5e.jpg)
touchuponcockpitsides.jpg.ec008fce2a7b6a55edafdbf8a5b35b9b.jpg)
-
05-12-22 DOH! I was done and then saw that I had missed small chip. on this seat rail. Here it is filled - more carefully than other areas because it is so hard to sand/file around there. Makes more sense to take more care with the putty application than spend additional time having to remove material. Thought I was done with the console stand, but it needed more material. After sanding. Rail, sanded. Console stand, painted. More to come, it's not a great color match and needs more coats anyway. Rail repair painted.
missedseatrailchipfilled.jpg.2f8b5456ec6f0a423f66fec74bffb4fc.jpg)
morematerialaddedtosmallconsolestand.jpg.de84e66348caf6d9fde6bc9509e20792.jpg)
sanded.jpg.d1c312800d06c20b71030d40fd2e2879.jpg)
seatrailrepairsanded.jpg.41c9a8e99271eef87c82895d06fea29a.jpg)
standpainted.jpg.3153258935bd2cc492465d28644fb83b.jpg)
railrepairpainted.jpg.1949c197130883626543350f9dd5d10c.jpg)
-
05-10-22 That corner detail, primed and sanded. Lower center console, sanded. HUD supports primed... ...and painted. Lower center console, painted. Not finished, but base paint is done. Front detail painted. Again? Yes. I realized that my earlier mix of slightly metallic black paint had the wrong tone (was too warm) and wasn't a perfect match. So I repainted it. The corner, painted. Overhead pic, showing the various areas. I started taking pics from this angle later on in the project. Doesn't do much for seeing detail, but shows relation of elements well.
sidedetailsanded.jpg.9d857e00d262308005d3dbfeca5be9cf.jpg)
smallconsolesanded.jpg.66e228353c1079a428184fd9d8ffe01c.jpg)
HUDsupportsprimedandpainted.jpg.8a5137526b7d8a27291c4fac943f525c.jpg)
HUDsupportsprimedandpainted.jpg.8f60f0472829b1ba4343b3df16986fc7.jpg)
smallconsolepainted.jpg.12c191a1521441944cb06de19877fa80.jpg)
frontdetailrepainted.jpg.dd9867ec79ca0f1c7a15eafb90e1897b.jpg)
sidedetailpainted.jpg.98fb276e3a16aa01c89da21fb872a3f7.jpg)
overheadpic.jpg.8428849512b4b06137dd2e8f05ae0dae.jpg)
-
05-09-22 Filing closer to the final shape for this rear detail. Working on shaping a new surround for the left red dome, and smoothing out the flat area in the middle. There was more sanding needed. Yep, more. Filed and primed the repairs on the lower center console. Not all the way yet, but closer. Still needs fine tuning, and a replacement of the missing section at the far lower left. Refining the hole. Filled that lower left area. Rear detail painted, finished. Seat rails all finished. Floor paint not complete yet. Priming and more sanding on the center console stand. Painted that left front detail. You may notice that the contour of the hole's cross section is different than the middle version. Apparently, it is. The left and right versions of that detail have a sharper inner edge, the middle a softer rounded edge. Their sizes are slightly different too.
sandingreardetail.jpg.4004b28a995b5e22ade81f2179d8c5b3.jpg)
sandinglowerconsole.jpg.1487f2285c064f85331bb4cbdbd8cd02.jpg)
seatrailrefinedandprimed.jpg.ecc5132bcbcffc7d0d48b91e87254640.jpg)
smallconsolerefinedandprimed.jpg.3e78d909eb350c76ad44c28a62a731d8.jpg)
frontdetailprimed.jpg.f0dd9443aa2bc2ca164e76f1282e240d.jpg)
morefillingonsmallconsole.jpg.15492c279ec92a4f2ca56fc8cf892ce2.jpg)
reardetailpainted.jpg.cbbb39c732684ad077e02d3babb67fd8.jpg)
seatrailrepairspainted.jpg.d62e3315983b509d7cb51e86dd51f968.jpg)
sandingandprimingsmallconsoleandstand.jpg.2be4192c07668e21c2c428fc86720e60.jpg)
frontdetailpainted.jpg.9229f58d0c0b95f743a6844f30ea57c9.jpg)
-
05-08-22 Sanding and priming the HUD supports. Went through a few rounds of this to fine tune them. Also, I forgot to mention before that I used the existing, cracked, HUD panels as a spacer to ensure that when I glued the supports back on they had the original width at the top. Reverse angle. Notice the small gap in the far support. To be fixed. Filing this corner repair again. Another area that seemed simple but went through at least 3 revisions before I was satisfied. More seat rail refinement. And more center console support refinement. Dremelled-out the hole in this repair. And by Dremelled I don't mean Dremel. Far too big and clunky, and too powerful. I used a $15 nail polishing rotary tool via Amazon. They accept 2.5mm shafts and are super easy to use for more delicate and precise applications than a Dremel. Seems like the styrene-to-resin hardness range is pretty similar to the nail-to-horn hardness range.
sandingHUDsupports.jpg.1a5a7c4bc7907687942ca452bbca42f6.jpg)
sandingHUDsupports.jpg.d1b8cbe6b57f3aa7120f0b0c4d794f19.jpg)
sandingleftsidecockpitrepair.jpg.b5ad436ab95879c04e801ddd40a9ad04.jpg)
sandingseatrails.jpg.a420e567a4e15ab98714408899df7dde.jpg)
sandinglowerconsolestand.jpg.09b96611b37b914ebf23a172d43faeb8.jpg)
sandingleftfrontdetail.jpg.49c52a7cc125431ff0d141ce811612e3.jpg)
-
05-06-22 Sanding that lower edge of the center console, starting to look pretty good. It may not be clear from the pics, but there is an angled miter fillet toward the more open area that also needed to be shaped through putty and filing. Putty beginning on the HUD supports. Port seat rails filed.
sandinglowerconsolestand.jpg.262993fb938f229cc252112dc7415f29.jpg)
sculptingrepairsonHUDsupports.jpg.5b859f9f17a71fe754b19c742b0fe26c.jpg)
sandedseatrails.jpg.917011b1efd7923cabc958aa002fa810.jpg)
-
-ROFL, I spent so much time looking that I never actually read the sign! Thanks for pointing it out.
-
05-05-22 This was a fun day, finally got to see some parts reach their fixed state. But not this one, not quite yet. I did find a good color match though. Also touched up various scratches on the seat cushion and the ejection handle. Roy moved around a lot. Repainted the damage done to both decals. I thought that was going to be really hard, but actually it wasn't too bad. Thankfully I didn't have to repaint any lettering! Painted the purple on Roy's leg... ...and collar. And yes, you can still see the inner support of the replacement pieces if you look closely from certain low angles. It's the best I could do at the time. At least they are invisible from the more common higher viewing angles. Turning my attention back to the side consoles, sanding deep chips in the paint. And more sanding. But technically filing. Diamond files are small enough to get into little detail areas, and fine enough that the resulting surface is smooth enough for painting. I also went through and refined the contours of all the replacement rivets. Painting the blue trim on Roy. You thought it was painted before, but not well enough. That was the base coat. You don't believe me, scroll back up and look at the difference. Both HUD panel supports had been broken off. And some of them was missing as debris. So I began their repair by gluing them back into location via the snapped, but otherwise undamaged, rear supports. From the other angle. Putty will be used to fill the gaps, just like all the other repairs. Some small chips on the throttle. Painted. Also, notice the slight red overpainting onto the silver? I wanted to fix that, but it's original Kidslogic application, so I left it. Otherwise where do I draw the line on "fixing" their imperfections.
improvingseatrivetsilver.jpg.b2c6f8d17acabfddf6998c0c03c69f6f.jpg)
paintedscuffsonseatcushionandpullring.jpg.ae4d31d02fd85bf20e35f38647ffb2d1.jpg)
painteddecalrepair.jpg.29d8bee5a6a8e95c54c71c69cf128dbb.jpg)
paintingRoypurple.jpg.96e068f18578bdf69ea19d6860c06610.jpg)
paintingRoypurple.jpg.0777021b24c22bc5edce3a4fe1f08de2.jpg)
sandingsideconsoleedges.jpg.1663e8a023f531f01c8d031c276732cd.jpg)
sandingsideconsoleedges.jpg.bbf966563483606f68051c08cf947506.jpg)
refiningsideconsolerivets.jpg.5711d389c32e1a4749c2ddea90f3b0bd.jpg)
paintingRoysblue.jpg.6a6829246d335b7971dc42dd499ca5f4.jpg)
HUDsupportsgluedbackon.jpg.a6d444c2a107c92fe480abbf415f7058.jpg)
HUDsupportsgluedbackon.jpg.0ead55fae1d9b903bc35e78082b76afc.jpg)
paintingthrottle.jpg.4897645fe8f8a70c619ed61bff9bbfae.jpg)
paintingthrottle.jpg.b6e4e0c36888bb45d8f7c1a36b298bef.jpg)
-
05-04-22 When is purple not purple, but it's purple? Various shades of acrylic paint (especially blues) will vary in how they darken as they dry. This [can] make it very difficult to dial in a perfect purple color match. I used the inside of this arm to test swatches and dial in the right ratio. A hair dryer helped speed up the time lag to see color shift. More sanding on the collar, far finer grit now, just unifying transition areas. Painted the seat rivets with a base silver. Not close to the correct color, but at least the base coat lets me see any defects in the repair. The main LCD panel joysticks. One had to be repaired and touched up. The two primary joysticks, display and two-piece to go in the hand.
purpletestswatches.jpg.76eb4571c89768b4c1c273087d097184.jpg)
refiningcollar.jpg.5c47eed0185b0459513ef49265ed7823.jpg)
paintingseatrivets.jpg.b920d5262daec82f2a5c8ae98ce6a6a3.jpg)
paintingrepairedLCDconsolejoystick.jpg.4bbba6b030214ce76f3a477881acdce7.jpg)
paintedalternatejoystick.jpg.e7fd828c90d65b3bc0191220ad7120a6.jpg)