Anasazi37
-
Posts
2029 -
Joined
-
Last visited
Content Type
Profiles
Forums
Events
Gallery
Everything posted by Anasazi37
-
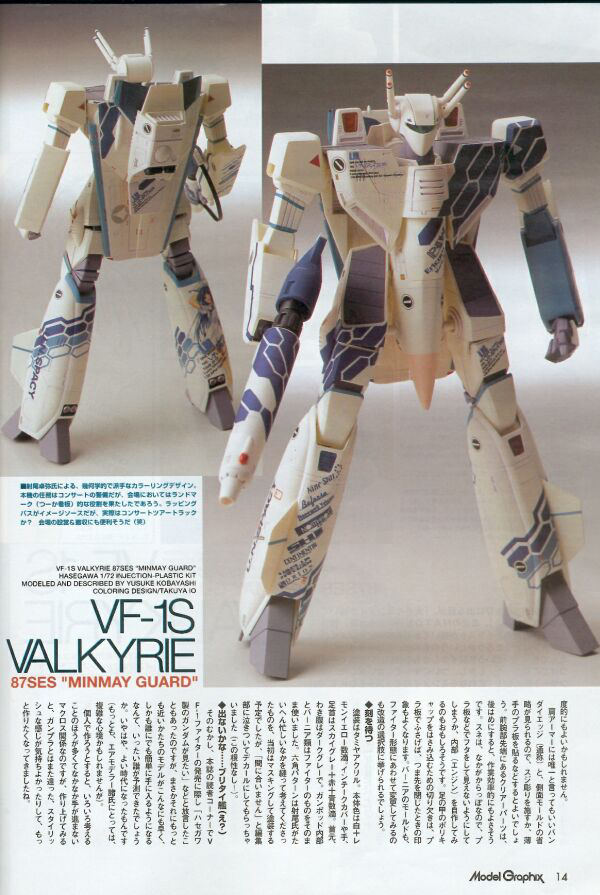
wm cheng indeed used the waterslide decals that I make. It brings tear to my eye to see something that beautiful....*sniff*....If I can make my strike look even half as good as his I'll be happy. To answer your questions, combined arms: Yamato "Stock" Stickers - Pro: Easy to apply (peel 'n stick). Con: Tend to fall off after a few years (due to the finish on their valks). Custom Stickers - Pro: Only slightly less easy to apply (cut, peel, stick). The adhesive on these is a lot stronger and won't peel off nearly so easily. The design work and overall quality on these also tends to be much better. Both Takatoys and I make sets for most valks. Con: They're still stickers, which means that no matter how thin they are they will still stand out a little against the surface of the valk. Custom Decals - Pro: The designs look painted on and you can't generally tell where the decal ends and the valk begins. For detail nuts (like me and many others here at MW), this is the way to go. If the decals are properly sealed with a good clearcoat, they will last indefinitely. Con: Application is a time cosuming process and you should have at least basic modeling skills.
-
The Angel Birds valk would not be very hard for Yamato to do. All they would need to do is change the paint job on a white VF-1A. My 1/60 AB custom, which used a Max 1A as a base, wasn't terribly difficult (once I finished the decals): Changing paint jobs and selling variants of the same valk is nothing new to Yamato (they are masters at it), but I agree with many here who think that it's too much of a "niche market" valk that relies greatly on personal taste (many don't like the color scheme). Not that I wouldn't do backflips if Yamato released one (especially since Hasegawa already has), but I'm not holding my breath....
-
Check out this thread.
-
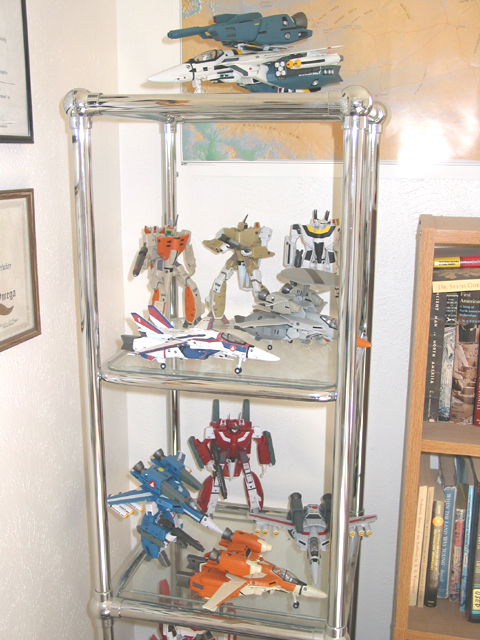
And here's a pic of the custom with the rest of my Yamato collection. I'm building a better display case right now, especially since I have 1/60 Minmay Guard and Blue Roses Strike customs on the way....

-
Yeah, my girlfriend would just love that. <_< I actually have a Tanmen 1/72 Fanracer kit....
-
Tempting. Very tempting. I could make a diorama with the whole squadron in formation (and Hikaru's Fanracer flying up through the middle of them).
-
The color I used isn't purple, it's blue. The exact same blue Hasegawa used for their kit, actually (I scanned in the decal sheet and replicated it). The lighting in the pictures don't do it justice, nor does the picture of the decal sheet--the blue on the custom is pretty darn close to the "light" blue in the fist picture you posted. I believe that picture is from the box art for the Hasegawa kit. The blue of the decals also matches Tamiya's Flat Blue, which is definitely not purple.... Thanks for posting those pics.
-
I was wondering if someone was going to notice that mistake. I fixed it shortly after taking the pics in battroid mode. If you look at the pics in fighter mode the feet are oriented properly.
-
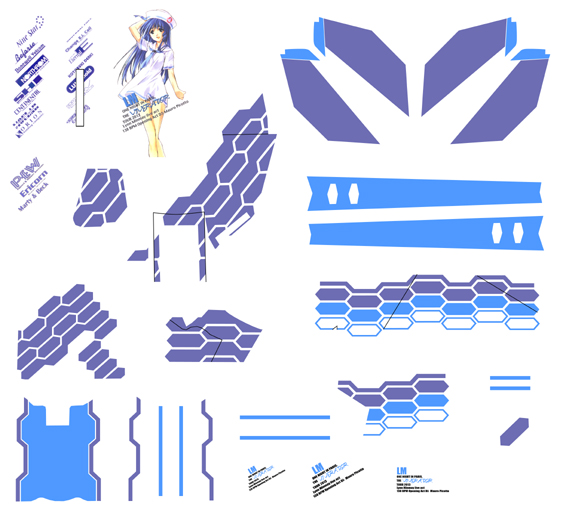
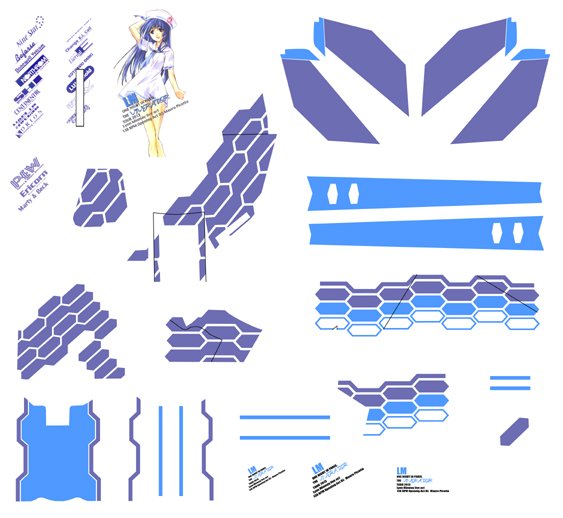
A bitch and a half, to be precise. Those were a HUGE headache to create. The only solution that seemed to work was to mask the hip intake section in several stages, remove the pieces of tape, slap 'em on a sheet of paper, scan them in, trace their outlines in Illustrator, then render the designs.... BTW, this is the same process I use for the Minmay Guard sets--very time consuming. Of course, they don't fit precisely right (does anything ever?) because there are so many variable surfaces, but the blue of the decals matches Tamiya's Flat Blue perfectly so I was able to dab a little paint here and there to fill in the micro-gaps.
-
Thanks for the kind words, guys. The Angel Birds valk definitely doesn't get enough attention from toy companies. Some customizers (Jung, for example) have made 1/55 versions of this valk but they're aren't many out there. I was actually surprised when Hasegawa decided to make a 1/72 version, but I'm glad they did. I don't think this custom would look nearly as nice if the Hasegawa decals and designs weren't available. Truth be told, if trueblueeyes hadn't commissioned me to make these decals I wouldn't have done them--especially so that you didn't have to use paint. It was quite the challenge, but a lot of fun, too. It really tested the limits of my abilities. The 1/60 Minmay Guard stickers/decals are pretty much done and will be available for purchase in about a month. I'm still tweaking the 1/55 and 1/48 versions. I'm planning on making two 1/60 Minmay Guard customs: one to keep, one to sell. Those won't be done for at least a month or two. Right now I'm waiting for the two valks-to-be-customized to arrive....
-
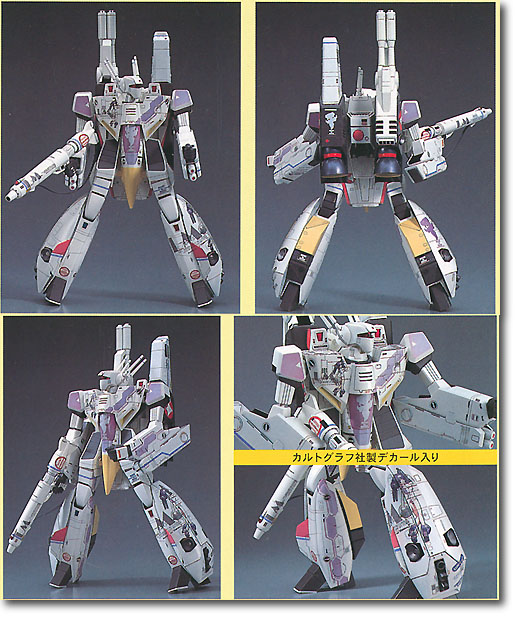
Okay, here are some pics of this custom in fighter mode:
-
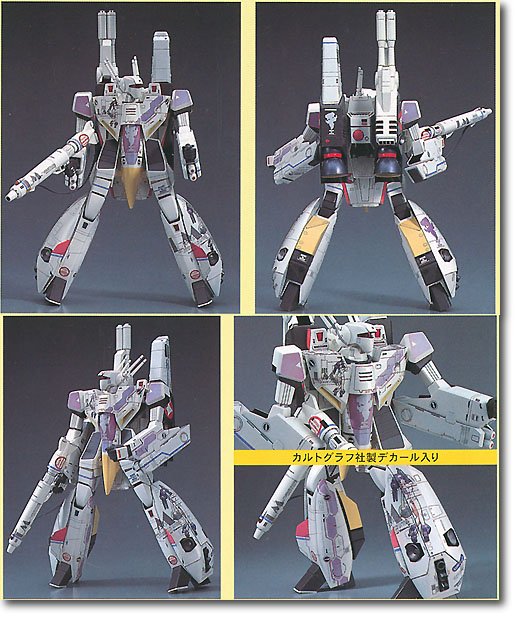
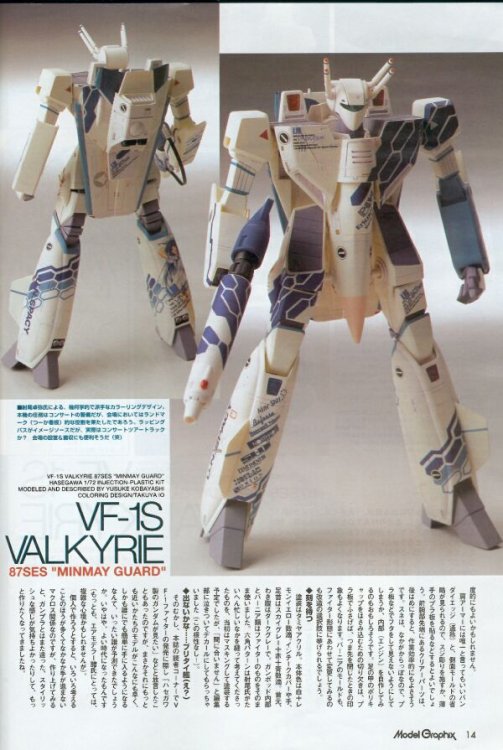
Believe it or not, this whole custom was done using only decals. That's right--just decals. I did have to strip down the Max 1A and repaint the whole thing white, but I don't really count that step. The decals were commissioned by trueblueeyes75 almost a year ago for a custom she was working on, but she was kind enough to allow me to use a set for a custom of my own since I fell in love with this valk while working on the designs for her. This was proably the easiest custom I have ever done. That is, once I finished the decals. That was probably the toughest decal project I have ever taken on. Headaches galore, but you can see that the end result was worth the effort. Here's what the decal set looks like: And here's the original Hasegawa kit the custom is based on: The custom took me about a week to complete and I have only been working on it between filling decal orders. I'll post some pics of it in fighter mode once I get a chance to do a little touch-up work.
-
Yeah....I figured if people want the pink nosecone, they can paint it on themselves. It's also very difficult to make a decal that can wrap around a conical surface without looking really cheesy....
-
Just a quick update. I made a few small modifications to the designs yesterday, especially the large tire tread pattern that goes across the chestplate and nosecone. It now looks even better than before. I also finished up the standard set of decals that will come with it (panel lines, hatches, kite symbols, etc.). I decided to go with a low-vis color scheme so they don't steal the show away from the more specialized designs. I'll post a pic this evening.
-
Anyone willing to part with a 1/60 VF-1S, or at the very least a head from a VF-1S? I want to make a proper Minmay Guard once this set is ready and I'm fresh out of VF-1S valks and Crazy Canuck custom VF-1S heads. I'm willing to pay cash or trade stickers/decals for what I need.
-
If someone can lend me the decal sheet that comes with the model, I'd be happy to scan in the Minmay and print a few stickers for those who are interested. Edit: If someone's willing to do a high-res scan (600dpi, ~300% magnification) and email it to me, that would work, too.
-
I haven't decided yet. I don't know if I like the new one. The design work on the original, including the Minmay, is so much more aesthetically pleasing to me.
-
And a view of the back
-
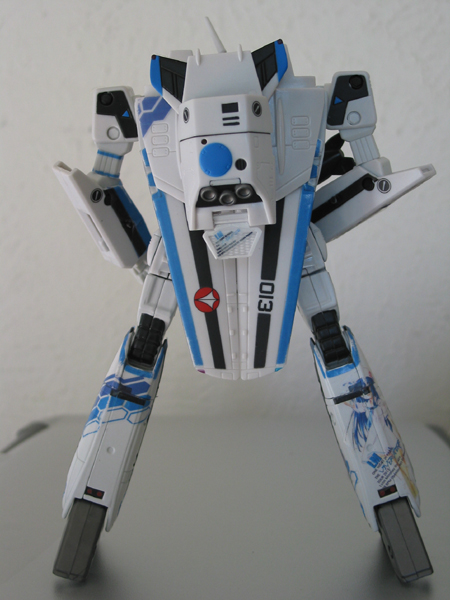
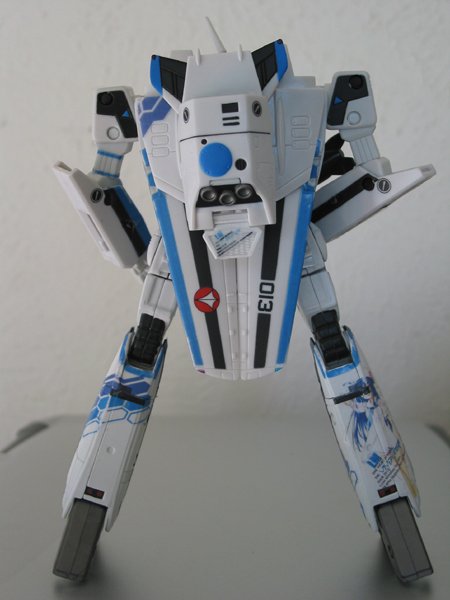
Had a little time this morning and decided to slap on the sticker versions. Some designs are hard to see because of Max's black paint job, but the most important thing is that everything fits! Whew! I also did not coat the stickers with a protective sealant because I was too impatient, so as a result they didn't stand up too well to repeated handling and transformation. The final versions will be coated--don't worry. Max never looked so good:

-
Thanks (?)
-
They could, but I deprioritized that set since Hasegawa released their own armored Minmay Guard model and the option decal set with the basic Minmay Guard markings. If there's enough interest I'll make the 1/72 set as well. Don't worry, I've got you down for the 1/72 Blue Roses set.
-
The thin black lines you see are guides for cutting the larger decals into smaller parts to account for the Yamato transformation process. And here's what the original Hasegawa model looks like:
-
For those of you who have been following this project for almost a year, the wait is almost over. I was hell-bent on finishing at least one of the Minmay Guard sets this week. I chose the 1/60 because it was the most difficult. The 1/55 and 1/48 sets will be a walk in the park by comparison and I should have those done before the end of the month. I haven't had a chance to test drive these yet, but will do so this weekend. I'll most likely just print out a sticker set and slap 'em on a sacrificial Max 1A I have lying around. I will definitely post pictures. In the interim, here's what the set looks like so far. I took care of all the specialty stuff today (Minmay, "tire treads", lettering, etc.) and will put together the basic details and markings stuff tomorrow. I'm afraid you'll still have to paint the rear section of the gunpod and the nosecone, but everything else is taken care of. PLEASE DO NOT PM ME ABOUT THIS SET. MY INBOX IS VERY FULL AT PRESENT DUE TO THE MASSIVE AMOUNT OF DECAL/STICKER ORDERS I HAVE RECEIVED THIS WEEK. I WILL POST A THREAD IN THE FOR SALE FORUM WHEN I AM READY TO SELL THESE SETS.
-
Nice job! Very original, Shan. Glad to see that those custom stickers I made worked out so well. B)
-
I'm back from vacation and ready to take orders for those who are interested. http://www.macrossworld.com/mwf/index.php?...t=ST&f=9&t=1967