

Deadzone
-
Posts
243 -
Joined
-
Last visited
Content Type
Profiles
Forums
Events
Gallery
Posts posted by Deadzone
-
-
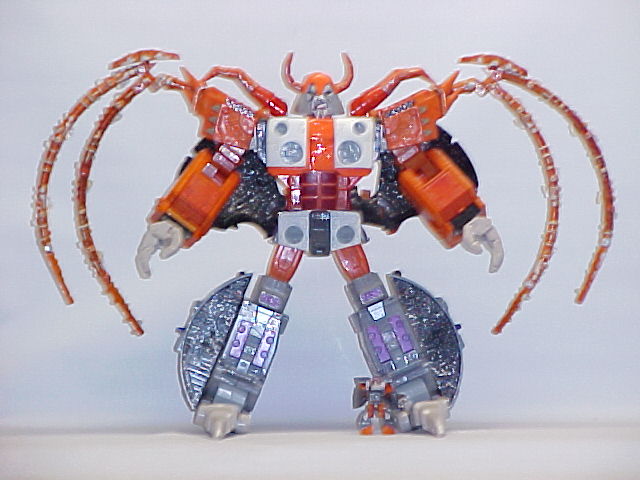
I saw this custom Unicron done by TF Master, or Bashmaster on the transformers forum. I thought he did a really good job on resculpting the chest plate and face. I also liked the way he repainted the rings. Wish he had repainted the purple on the legs and put a yellow eye in for planet mode. However, it is tough to complain when you see all the good things about what he did. So why am I so Pissed off. Well, because I did a custom Unicron that got ripped apart on a lot of the Transformer boards. Yeah, TF Master Unicron is definitely more accurate in robot mode. It also looks like he put in a lot more work than I did with the resculpting and full body repaint.
However, people on the TF boards made it sound like my repaint was a piece of crap. Of course, a lot of people also gave me praise for my repaint. But there were several that were giving me grief to no end. These people really piss me off considering that they did not put other customizers on the board to the same standards. Of course, I put my custom on ebay to sell instead of posting pics in the actual forums themselves. I guess it is easier to tear something apart when you don't have to answer to any of the members.

-
To be honest? I thought the original paint scheme looks bad. But it turns out for the best.
I honestly do miss the chestplate V-stripe though, and the sight of the Skull-and-Crossbones where the Kite normally is placed is really strange.
I think you did a good job on it. Looks really clean. The Skull and Crossbones on it only look strange
because everyone is used to seeing the flags there. If you block images of Macross out of your mind,
I think it looks perfectly fine from an aesthetic point of view.
-
Great workmanship! I guess I should expect that from you. Just wondering. How much do you charge to do something like that and how long does it normally take?
-
I honestly plumb forgot about the hands (they were retracted when I painted it). The hands will be the same color as the rest of the valk, just heavily weathered. Unfortanately, with the weather the way it is in Texas right now, I can't put sealant on the sucker for a while, because when you try to use clearcoat in humid conditions, it turns cloudy. Booooo. I am considering using Future on this valk because it shouldn't turn cloudy, but I've never used it before, and i don't want it to attack the decals or the acrylic paint. Anybody use it before?
Yeah, I use future all the time. It doesn't protect as well as envirotex does, but it is much easier to use than envirotex. If you have an airbrush, the best thing to do is spray from around eight inches away depending on the weather. I didn't have any problems with it attacking the acrylic paint or the decals. However, I used the decals from the sticker sheet that came with the valk, not the water slide decals a lot of people make. I still doubt it will harm the decals since the stuff is pretty mild, but I would do a test. If you spray it on, don't even worry about future attacking the paint job. Just don't spray future on bright white. It tends to show a slight yellowing on bright whites. All other colors are fine (especially black).
My experiences with future have been alright in general. The important thing to do is spray until there is a smooth wet coat on, then let it dry. If you spray too much, you will get drips. Spray too little, and the surface will orange peel. It's really not too hard. However, in terms of protection, I find you have to put several layers on before you get that glossy tough barrier. Even then, I think the Envirotex protects better. If you didn't sand the pieces properly though, nothing will prevent chipping between parts that really rub up against each other. If you have sanded properly, then Envirotex is the way to go if you can take your valk apart and spray each piece individually. I think the stuff is too hard to use on a put together valk. If future is the only option, I would still reccomend taking the valk apart first and spraying each individual piece. The good thing about future is that if a glob does form, you can wipe it off real quick without much harm done (That is if you used high quality Tamiya paints).
BTW: How did you paint that valk. Did you take the valk apart at all or just sprayed it while it was together. What kind of paints did you use?
-
Hey Greatmouse,
Where did you get those teeth? Are they stickers or an incredibly great paint job? Makes me want to make a tiger version myself except with a 1/55 Bandai (can't afford to make 1/48 customs). That is one kick ass job. The shark does look unusually happy, but who cares? If you like it, that's what matters. I also think it is kind of cool having a happy shark blowing enemy pods away. It's like the Joker from Batman, happy but one mean SOB. Keep up the good work.

-
By Mock battles I meant actually moving the toys around and going "Bang, Bang!" Stuff I did when I was a kid but not anymore. Just putting the toys in a battle scene is more like displaying them in a more realistic setting.
-
I saw a thread where this became a heated issue. However, playing with a toy can mean so many different things. I thought we should clarify what people actually meant. Personally, I am the one who does the second to last choice (maybe because I don't have any battle pods to have them fight against). Hey, Hikaru was playing with a toy in the final episode of Macross. Of course, I thought he should have been playing with Minmei.
In my opinion, if you want to display your piece or play with it, doesn't really matter to me. It is just preference. However, certain toys do lend itself better for handling than others, but we've covered that to death.

-
To be honest, I don't really like the yamato line that much. It may be more accurate, but I still think the proportions are off aesthetically. The chest piece and nose cone are a little too big, and the bony girl arms just accentuate this fact. The new TV hands and armor hide this a little better beefing up the arms, but I'll stick with my 1/55 bandai's. I always liked how they looked and the durability can't be beat.

-
hey deadzone, how much to make another one of those? I would love to have one like that! Let me know. thanx

Sorry,
At this moment, I never want to make another VF-1D again. It is just too much of a hassle. I might change my mind when I come back from Hong Kong later next year. At the moment though, I am so burnt out on custom making. BTW: Thanks everybody for all the kind words.
-
A close shot of the head which was cast by mslz22. If one side of the green visor looks slanted a little, it is because I sanded it down too much. Not mslz22's fault. It's my own.

-
Wow, This topic almost fell off of the map. It was on page 10 when I found it. The strange things is, I wrote VF-1D in the search engine, and it didn't pop up. I find the search engine on this site to be a bit screwy.
Well, although most of you probably don't care anymore, I promised a couple of guys that I would post some pics of the finished project when I was done. Really hate to give this thing away to my sister, but I sort of short changed her on Christmas presents the last few years. She better like this thing or I am taking it back.

-
The words "Holy Crap!" come to mind. Wow, when I saw your place, I knew you had a lot of toys, but not that many. I guess since most of them were packed away, it was hard to tell. Everything looks great.
-
okies guys the answer i needed was jsut yay or nay? and personally its a lil disgusting to c why everyone is so harass agaisnt the robotech yes i said it / it was an inspired by macross and thus trying to get american fans / u guys shouldnt be hating this just sounds like a bunch of lil kids to me
I hear ya man, the Macross snobs are out of control. Whether the toys carry the Macross or Robotech moniker doesn't really make a difference, they're all based on the same thing. I could understand if he was asking a question about a Transformer or something, but it's still a Valk toy, whether the package says Robotech or Macross.
I agree. A valk is a valk under either name. What's the big friggin deal?

-
Does anybody know where I can find this bootleg locally in Los Angeles? All I really want is the box and styrofoam insert to protect my VF-1D in transit. They sell these things on ebay for around $15.00, but that's a lot to pay for just an ugly box. Help would be appreciated.
-
Hey Phatslappy, Thanks for the nomination.
When I cracked my display disk, I called creative displays and told them what happened. They were very friendly and actually sent me a new one. If I were you, I would give them a call too. Doesn't hurt to try. The number is on their website. Later

-
I thought your original skyfire looked good. Now it is going to look amazing!
-
Alright, this is my tribute to the Simpson's half-assed guide to foundation repair. I just finished doing my third Valk, and I think I got the hang of it. This guide is not for people who want to become expert customizers like WM Cheng, Xstoys, and Kidkorrupt. I paint my valks to look like they came straight out of the factory. No frills or extras, just a nice looking valk with a different paint scheme. I only do 1/55 reissues because they are my favorite and surprisingly affordable. So for anyone who ever thought about doing a simple custom repaint, here we go.
TAKING APART THE VALK:
Taking apart a 1/55 is fairly easy. Most of it is just unscrewing parts and pulling them apart. The biggest challenge is to separate the nosecone and the back section that hold the wings in place. For the nosecone, you're going to have to go in from behind. Stick a screwdriver in and slowly work the two parts open. It will take some force as the pegs are held in pretty tight.
The back section holding the two main wings has two parts that are screwed together and glued together. Remove all the screws, then use a screw driver to pry open the parts glued together near the shoulder area of the robot. This will also take some force. I'm surprised I didn't crack the plastic separating the two.
SANDING THE VALK:
This step is probably the most important to prevent chipping. Essentially, all the clear coat, primer, and superglue in the world will not prevent chipping if you have areas of high friction. To prevent this, you have to sand down those pieces that would scrap against each other during transformation. The vital areas include:
1.The plastic around the leg swing bars. If you notice, there are two indented holes made for the leg pegs to lock into when in fighter mode and in robot mode. I sanded the bottom half of the nosecone/canopy part on the sides from one indented hole all the way to the next indented hole. I also sanded around the hole for the swing bars.
2. The inside of the hips where they contact the upper leg. When the hips are screwed in tight, they will pinch the upper leg and cause friction when moving the legs around. You want to sand behind the area where those side guns are. (I think they are guns or missle launchers)
3. The insides of the shoulders. When the two shoulder pieces are put together, they will pinch the upper arm. Make sure the insides are sanded smooth. DO NOT sand away the ridges that allow the arm to stay in place and click when they are moved.
4. The two hook like pieces that hold the tailfins in place. Do not sand the bump that allows the tailfins to click in place. Only sand around them and the edges.
To find out if you have sanded enough, here is something I find useful. Take a piece of paper. If you like putting on multiple coats and heavy clear coats, take a thick piece of paper. If you can slide it in between two pieces without much trouble, you have sanded enough. If the paper gets caught in between two parts, keep sanding. A medium grade sand paper will do fine for the initial sand. For the final sand, use nothing lower than a 400 grit. (600 grit if you have it)
PRIMING THE PIECE:
1. You may not have to, but I like rubbing all the pieces with polishing paper. You can buy it at a hobby store for around $2.00 a sheet. The stuff feels almost like cloth. It is great for getting the shine off of the plastic which makes the primer stick better.
2. Now to prime. But what primer should you use. I have experimented with rustoleum, Krylon, and Tamiya. Tamiya is a great primer but very expensive. It dries smoother and preserves more surface detail. However, a small can runs around $7.00. You can get twice as much from a Krylon can that only costs $5.00. I find the rustoleum premium metal primer to be good on metal parts and plastic resin. The Krylon and Tamiya will chip off on certain resin parts. Although I never tried the rustoleum metal on the entire valk I imagine that it would be fine. The Reissues are made of ABS plastic that should withstand the metal primer. I would still do a test piece just in case. You should really choose the primer according to what you want to do. If you plan to use the primer as a paint, I would go with the Tamiya for the smooth coat. If you plan to paint something on top of the primer, it is hard to go wrong with the Krylon. If you are painting metal or resin (most custom heads are made of resin) go with the rustoleum premium metal primer.
3. People always say prime the pieces using light coats. However, what the hell is a light coat? At first I would go over a piece very quickly with a light mist, then bitch about how the coats were too rough. What you want to do is continually go over a piece until it looks smooth. Chances are it will also look slightly wet like a gloss paint. If the coat does not look smooth, keep spraying until it is. Sometimes, I have to go over a piece three times before I get the desired effect (And yes, I mean in one sitting I don't mean spraying, letting it dry, then spraying again) .
4. The can will tell you to hold the piece a certain distance away for spraying. The truth is, the proper distance depends on weather conditions. Hotter drier conditions means moving the can closer to maybe 8 inches away. Colder damper conditions may mean going to ten to twelve inches. It all depends on the weather. As long as you get the smooth result, it will be fine.
5. The best thing to do after priming is to let the stuff dry overnight. Yeah you could start painting within an hour, but to ensure a smooth surface, you need to polish the piece with polishing paper or maybe a 600 grit sandpaper. This requires the primer to be completely dry which normally takes awhile.
6. Clean all the dust particles off with warm water.
PAINTING FINALLY:
1.Type of paints: I like using Tamiya paints. They spray great and look great after drying. They also stick better than Createx which I think is crap.
2. Thinning paint: Buy the large 250ml Tamiya thinner. You will be using it and the big gas tank like bottle gives you the best value. There is no defined ratio of thinning that is best. The problem is, every color has a different consistency. Sometimes I buy two pots of flat white and each flat white has a different consistency. People say thin until the paint looks like milk. That's good for the airbrush. If you plan to hand brush anything, go a little bit thicker.
3. The airbrush you choose is very important. Personally, I like the Iwata Eclipse. If you can't spend that much, I hear a Badger or Paasche is good too. Whatever you do, do not buy an airbrush meant for fine inks. You will be in a world of hurt. Get one that can spray the thicker paints as opposed to watery inks.
4. When spraying, you want to do the same thing as priming. Get a coat that is smooth. As with priming, you will have to adjust the distance of the airbrush depending on the weather and thickness of paint. Never start spraying directly on a piece. First start spraying, then move the airbrush slowly across the targeted piece. (Sometimes paint collects at the tip of the airbrush causing spattering when the trigger is first pulled)
5. Glass cleaners like windex should be used to clean the airbrush.
6. If you make a mistake and get paint globs on your piece, you will have to get a Q-tip with windex and wipe out the mistake. Don't try to paint over it. That NEVER works.
MASKING:
1. Masking is fairly simple. Put tape on the part you don't want painted. The best masking tape I have found is this automotive masking tape by 3m Scotch. It is $3.00 a roll, but it works wonders. Press the masking tape firm against the surface with either your fingernail or a toothpick. The stuff works best on smooth surfaces which shouldn't be a problem on a 1/55 valk. Just make sure the paint underneath has properly dried. I usually give it a day to dry before I start masking.
CLEAR COAT:
1. By now you have painted your valk and think it is pretty good. However, how do you protect it? If detail is important to you and you don't plan on transforming your valk too often, future floor wax works pretty well. Spray it on with your airbrush until you get a smooth wet coat. Don't overspray otherwise it will cause unsightly globs. Since future has almost the consistency of water, you will probably have to spray farther than your Tamiya paints. Let it dry overnight before handling it again. DO NOT USE FUTURE ON BRIGHT WHITE. I did one one of my valks which slightly yellowed everything. It gives it kind of a weathered look, but I like my valks bright white.
2. For those looking for a stronger coat, try envirotex. This clear coat is the equivalent of almost five to six coats of future. The stuff dries rock hard and provides excellent protection for your valk. However, the coats are so thick that they do cover up some detail. Also, mastering the spraying technique will take some time. You have to spray until the surface is smooth. A light coat is actually pretty thick. If the coat looks like sugar, you are spraying too far. If it looks like an orange pell, you haven't sprayed enough. Keep spraying until the coat looks smooth, or prepare for a lumpy finish to your paint job. Touch envirotex before it dries and you are screwed. You will probably put an ugly finger print on it and have to strip the entire piece or wait for it to dry and sand the finger print down. Finger prints will also be left in future, but they are more easily corrected since the future coat is thinner and easier to reapply.
PUTTING IT TOGETHER:
1. Pretty self explanitory except for one thing. You should probably sand the leg pegs slightly to reduce friction when moving the legs into their locking positions for the fighter and robot modes. Also, sand the pegs so that they can actually slide back into the hole towards the spring but not too much or they will end up falling out. Replace the springs with ones that have more give. I bought some at the hardware store for around $1.50 for six.
Well, this is how I do my valks. If you have any questions, feel free to PM me. The half assed approach is still time consuming but should yield you good results. So after all my instructions, sexual innuendos, and your effort, you should have a descent custom valk.
-
The only thing I can say is, the color scheme is a little too gaudy for me. I know some people like the red white and blue. I like red white and blue on American flags, but not all over a valkyrie. It kind of reminds me of those guitars or automobiles with the american flag painted all over it. Of course, that hasn't stopped toy companies from releasing stuff before. I think the closest valk that resembles the Angel is that Takatoku French version, but that thing is hiddeous.
Personally, I would rather have someone release the Strike Eagle. Now there's a color scheme, simple yet elegant. -
Those are nice pics. So there is no way to get these English made movies?
-
I remeber watching force five when I was a kid. They had Danguard Ace, Star Avengers, Grandizer, and so forth. Does anybody know if they ever released DVDs of the American made movies? I know the movies are a severly abridged version of Force Five television shows, but I still like them. I imagine somebody here must know the answer.
-
1/48 customs
in Toys
Tough crowd... Even though the metallic doesn't look as good as the regular blue on the Max, you guys still have to admit he did a really good job on all of his 1/48. Those things look like they came directly from the factory which is hard to do. I am kind of curious why he put a VF-1A head on the Max while using the VF-1J color scheme, but it works. I hope he does more in the future.
-
deadzone if it's a 16 in unicron just use two of the glasses and the third bottom shelf leave it out to fit it for flexability. I'm planning to hang the 15" sdf-1 on it soon. I 'll show you a pix

That's a good thought. I might have to try that out.
-
Damn Sebastian,
Your place can almost pass for a toy store now.
-
I went to Ikea today to check out all the display cases. I saw the Notrop (SP?) Ingo, and the clear glass one standing side by side. The clear glass one looks the best for displaying valkyries. It doesn't have anything to obstruct the view, isn't too big, and looks descent. The only problem is that the shelves do not look like they are adjustable. For people wanting that flexability, they might want to stay away from the clear glass one. I can't buy the clear glass one because I have a 16 inch unicron to display. I think the shelves will accomodate up to 14 inches.
The Ingo selling for $79.00 I thought looked pretty bad. The design is fine but the wood they used was terrible. It's kind of like a toynami MPC
The Notrop was probably the best looking one in terms of just the appearance of the display case. The silver one only sold for $150.00 and is more modern to match the valkyrie toys. For a warmer wood feel, you have to pay more. The only problem is the beams obstructing some of the view. Otherwise, a nice piece but a bit pricey.
One PO'd Customizer!
in Anime or Science Fiction
Posted
A lot of people complained that I painted the planet plates grey which covered up the detail. I thought the grey looked good. Of course I didn't see any complaints about this one.