

Palantirion
-
Posts
98 -
Joined
-
Last visited
Content Type
Profiles
Forums
Events
Gallery
Posts posted by Palantirion
-
-
Then I did some proper dot filtering with the oils.
dotfiltering.jpg.d36d35d53de70705ec3d56d3d9f0c14d.jpg)
dotfiltering.jpg.75b3436d0476975e638301a3b4204312.jpg)
And drybrushed highlights.
drybrush.jpg.1489a1a0f5a0a838a4a4e27e425292cd.jpg)
Then used Musou Black for the edge.
Musouedge.jpg.ad2e81dd6eb18383135565c47dad2820.jpg)
Finished!
finished.jpg.7617636cdf651879e9764f592623c501.jpg)
No, wait, no I'm not. I also had to make a box with foam lining so Chris could transport it safely. The lid (not shown) has foam blocks that stop any Z axis movements.
boxed.jpg.67c61ebd4482c18d043c38e5ce3840d2.jpg)
-
THERE'S NO BASE! Oops. So....I stole a one from a Figma figure.
appropriatedfigmabase.jpg.bfe3aacc2a67b18391b01a18f620895b.jpg)
I textured it with Smart Mud and some sand pieces. The Smart Mud is awesome at being mud, but it's crap at holding on to anything else. So I have to thin down some canopy glue in order to make sure everything stayed put.
texturing.jpg.034812f0b148e45b5ecfe730ed8fcd45.jpg)
texturing.jpg.c6b581ada80485099088d9802ccd6271.jpg)
Then it primed it with MY NEW FAVORITE PRIMER. This is Molotow's One-4-All line of marker refills. I have had my issues with Molotow's marker paint before, but One-4-All is awesome stuff. It dries almost instantly, yet airbrushes really smoothly. It was so hard that I had to try really hard to scrape any off this base with my thumbnail. It's waterproof...but I didn't wet sand it so I don't yet know if its really waterproof. But this is now my go-to primer, particularly as it comes in various colors and can be mixed to create others - perfect for zenithal or preshading.
priming.jpg.cda907cde09cf687d027341b4d3a7b2c.jpg)
DOTS! Some wet-on-wet blending action using dot filter randomness. FYI I used a little too much paint.
dotwet-on-wet.jpg.4baed4575b0e628ae222a77a61e2f233.jpg)
dotwet-on-wet.jpg.78d4d87546be6d6c9d3d73cae7312949.jpg)
dotwet-on-wet.jpg.adecfa088fe8a33a3bc54feda69e57c1.jpg)
And dry.
dry.jpg.b31cda53bfc714c5896987cd8b0d8226.jpg)
-
Here are all the materials I used. If you have any questions just ask.
materials.jpg.903dea4b673eb59a42f3c6b658a44937.jpg)
Some final detailing touches.
detailing.jpg.78151aac7f74c0b7e9d8af2f4e70d970.jpg)
detailing.jpg.5fc0375932dfc07ad251a4a424802439.jpg)
finshed.jpg.43f7d9e56620f5ec6788becebfee6e05.jpg)
finshed.jpg.e83ec0a13be86a05b13cb55a1d93dbc4.jpg)
-
Then I used water-soluble oils to pinwash the panel lines.
pinwashing.jpg.04c0e80d5a88774d83813fb3e3604bf2.jpg)
And to add subtle heat stains to the thruster.
heatstains.jpg.8e34d0498d5d3bce77225395cb6e0472.jpg)
And to add some grime from sitting out on the tarmac for years.
addinggrime.jpg.59871c2c4eb81cc7b1da3aeaae3399fc.jpg)
Then final assembly.
finalassembly.jpg.0a9a586353efb6749d9c719bfcdac6fa.jpg)
finalassembly.jpg.3f0b6437843a1e76a3f3080f438d58b7.jpg)
finalassembly.jpg.f819d5b3df56d10cbc3fbcdca47f1eb9.jpg)
And gluing the canopy - because I didn't catch during parts prep that it's shape slightly interferes with the body cutout and this means it won't stay latched on its own.
gluingcanopy.jpg.71c06446f12552f965f2fafa8486f677.jpg)
-
So what now? As they say "It's not a flaw, it's a feature." So I pivoted to implying a story with this kit. Instead of simply being Rick Hunter's Fanracer, this kit will now be Rick Hunter taking a last ride in his previously years-long abandoned Fanracer before embarking on the Pioneer Expedition.
If you are a fan of Japanese (particularly WWII) aviation then you know what aotake is. And if not: It's a bright translucent (typically) blue/green laquer primer. My thought was to try to make it look like the aotake was showing through where the paint was worn or cracked. And in a few spots the base material (mostly yellow aramid fiber) would be seen too.
aotakeweathering.jpg.6cfb9e2c9b3f4e66ae66235d0239cbc0.jpg)
aotakeweathering.jpg.2859b8df8360978614d9465037bc28db.jpg)
aotakeweathering.jpg.781fe49a5cb478705c07d3f5671208de.jpg)
aotakeweathering.jpg.42313223d32c504f2b3bddd449e6a6e7.jpg)
aotakeweathering.jpg.eba49ba4f4c9323da169de05a360a57b.jpg)
aotakeweathering.jpg.f5a59183c86098a403a8130e2d4d89b1.jpg)
-
I then wet sanded the small parts with 6k then 10k (note: Japanese grit scale!), and polished with Tamiya's 3-step polishes.
wetsanding.jpg.6b3e1a619862b85a1560646f367ac625.jpg)
Liking the results I started wet sanding the main body...

And then this started happening! Micro cracks slowly appeared all over the kit. Looking back I now suspect that my airbrush's water trap was too full and had stopped trapping water, contaminating the Tamiya hybrid acrylic and changing how it cured, which then got trapped under the airtight Future clear and that led to this.
cracking.jpg.93f2742c00743b09bb9fe036eb34af6a.jpg)
I sanded, VERY carefully, through the cracked clearcoat and polished as best I could. Worked fairly well on some of the smaller parts.
sandingcracks.jpg.ef8881b8cabde207bb6d49188b203d46.jpg)
polishing.jpg.324e05a02dfbee4dde393639d408adfd.jpg)
But not as well on the main body. It was clear that the only way to get rid of the cracks was to sand down the the primer and re-shoot the model. BUT since I didn't know what had caused the reaction that didn't seem like a wise use of time.
aftersandingandpolishing.jpg.923c67e7be412eca457260a29a0f31a9.jpg)
-
If you don't yet have some Musou Black GET IT. Stupid web stunts aside it is an incredibly unique and valuable modeling tool. Unlike any other black paint it is both dark AND flat. Meaning you can use it to literally paint shadows. So in the case of these little exhaust vents that don't have recessed holes, a little Musou Black makes it very convincing.
MusouBlack.jpg.5c6d98906659138675d50fc28d9928e6.jpg)
Similarly the far depths of the thruster now have more depth.
MusouBlack.jpg.c28c9d9fdd4ba02092a3d98443dc7410.jpg)
I put the model into my dehydrator after clearing but didn't turn it on, just used it as a dust shield. I cleared it twice.
clearedagain.jpg.4ca6ed3ce1ef3c1197800162edc051cc.jpg)
Finished base painting Rick.
basepaintingRick.jpg.eddcc644073a62c1a2545c49dc6c29f8.jpg)
Unmasked after clearing.
unmasking.jpg.5bc9fe956bd44f45b2e444cdd01e0bc6.jpg)
Test fitting Rick.
testfittingRick.jpg.33c44b0579398b7eebf66c580b22dcfa.jpg)
Then I had to fix the red area behind the canopy that was partially covered by the mask. I did this by brush, thinning the Tamiya a little with Mr, Color leveling thinner. The gap of the canopy hinge will be painted Rubber Black later.
fixingmissedredarea.jpg.b3d85ba78a2c6967acc3ca7348d3c967.jpg)
Detailing Rick, weathering looks a little heavy up close but reads well at normal viewing distance.
detailingRick.jpg.fbfa800a3865e98535c9307bebc51bf5.jpg)
More Musou black for the engine and radiatior intakes.
MusouBlack.jpg.f4a9e04183527c2d6c64815b7a72547a.jpg)
MusouBlack.jpg.1e3347a279ac3975f71049f1a62bfb51.jpg)
Rick is now glued in place.
finishingcockpitandgluingRick.jpg.d82624b72bfe860cffdf97513ce36598.jpg)
-
I mixed an orange-red from these Tamiya colors.
sprayingred.jpg.41ea45736e907a23c5e4c8d845ec174f.jpg)
sprayingred.jpg.b5e5e2f61df4643b5e273383ce965b6b.jpg)
Unmasking the white, but leaving the canopy mask on for clearcoating. I cleared it, after letting the Tamiya cure a couple days, with Future. I've dipped with it before but not used it as a final clearcoat. It sprays beautifully, mists well and can also go on fairly heavy. On a small model like this I didn't use a retarder, so I can't comment on how it would react.
sprayingred.jpg.bac88ac487c6b219f17d46596777cec5.jpg)
sprayingred.jpg.f1c05aa8371c0c9745a731bfd94594c6.jpg)
sprayingred.jpg.6f8e5510c844a9a5dd8120a12c9865da.jpg)
Then I painted the fans a dark metallic gray. NOT a metal color! Even though that would have been prettier. I figured since this was an '80s show that the blades would have been ceramic, as Japanese ceramic knives and such were new and unique then. Granted a ceramic could be any color, but in the show they are dark gray - and not shaded as if they were metal.
paintingfanandthruster.jpg.8a78607689c24fbee2575fe7dffee0ad.jpg)
I added some directional glazes on the thruster, because it was just too plain.
detailingthruster.jpg.0e39ce064006a26e783d7a8a0d159aa7.jpg)
And little nicks and streaks to the blades.
detailingfanblades.jpg.7a56d3a647039fb9d5c5778b7f48055d.jpg)
Then I lined the booster pods with Rubber Black, partly as a heavy panel line accent and partly to represent a buildup of soot over many uses.
liningpods.jpg.fa5b654eaa76d52db40e938fd57fcc6e.jpg)
-
I wanted a somewhat heavy and splotchy preshade, closer to black basing, but this went a little overboard. Also, in hindsight I now see a issue here with the spray pattern that I think was the cause of the big issue later.
preshading.jpg.f6a60d7a5f9cfab6bdddb6cb3a88b1ff.jpg)
preshading.jpg.68cc6cafbf31fd7bf0e0a979cb8d58e3.jpg)
Then the white base coat, using Tamiya acrylic.
basecoat.jpg.0d77342ab3f15afcd3dfb96608b8b583.jpg)
basecoat.jpg.c1c5e9d6de960e1346719b9350b3353b.jpg)
basecoat.jpg.24f38d092360ece84b6a81cab3d33e69.jpg)
Then masking for the red color.
masking.jpg.eea64648c91b9e3273e6e89140fcc133.jpg)
masking.jpg.8208d8e9563b17941880e6805ec5ba42.jpg)
-
This was my first time scribing lines, and I didn't do a great job of it. These long curves panel lines under the wings were done freehand.
scribing.jpg.02fb946e826cc9d29949f7c720476857.jpg)
Priming.
priming.jpg.5a8a2fbcf2d4b6784da54a065d5281ec.jpg)
Scribing the front landing gear doors using scribing tape. Worked really well.
scribingfrontgeardoor.jpg.b509dfd1be30a326a71345b33ccf843e.jpg)
scribingfrontgeardoor.jpg.dc0b7d0803b376fd54f5e7e1065176f5.jpg)
scribingfrontgeardoor.jpg.97d949234f67356d61b058264962c447.jpg)
Then I masked around the cowl and airbrushed it. And also gave it a little interference blue to better tie it in with the rest of the cockpit.
paintingcowl.jpg.750ca6b12321c868738e460be30195e2.jpg)
-
I will point out that there are factory errors with this model. One is that the pilot's hands are both on side console controls but there is supposed to be a center control stick. And also the rear landing gear doors were scribed but not the fronts! I wanted to keep this a strict "what's in the box" build, so no scratch built bits.
I used a few layered drops of Tamiya Clear Blue to build up thickness and give the impression of gauges.
gauges.jpg.e5a702961e390797a92fc7d616b8a2fb.jpg)
gauges.jpg.6f91cd732bc0a4998acd45c78ad2839e.jpg)
I dipped the cockpit in Future. and then lined the underside lip with Tamiya's Rubber Black to represent a seal.
dippingcockpit.jpg.d8525b9eb28bfc3f7b182b67cc3b7066.jpg)
And then with the cockpit and canopy finished I joined the fuselage halves.
joiningfuselage.jpg.38dbca82aa2f3bbdb88fa11a5699fb54.jpg)
Very annoyingly the center seam goes right through the cockpit cowl. Which means I needed to fill and sand there, and then repaint without overspray onto the cockpit or canopy.
sanding.jpg.e3668670618c7bca320caa52d3f2da2e.jpg)
sanding.jpg.5114e8300c2fb80cbc29b17f77254be0.jpg)
-
I base painted Rick and the cockpit, based on screen shots from Macross. The colors are not consistent, nor is the lineart, so it's open to interpretation.
basepaintingcockpit.jpg.18ef7d150c877f603c5c8888ce2b3b44.jpg)
Then I thought the green was too green and so I desaturated it a bit, lightened the lighter green-gray, and repainted the cockpit.
colorchange.jpg.5e76fdfa5a75985f0513724cd8c51067.jpg)
colorchange.jpg.6f704ae04922d3e68d46aad1d3699259.jpg)
I used Molotow Chrome for the gauge bezels and two details that look like latches behind the seat.
addingchrome.jpg.2a76bb6725c581d0bbc0c1955fdf03a6.jpg)
addingchrome.jpg.b3d07f957d693a4efd8fb09c8694a1bc.jpg)
Then distressed the leather seat with thinned acrylic glazes.
leather.jpg.547b074c49c3b0a5849ac308faa1639d.jpg)
I still through the cockpit looked a little plain. Since the colors changed from shot to shot in the show I thought that maybe a little interference blue over the top of the lighter green would give it a subtle accent to catch the eye.
addinginterferenceblue.jpg.cfb559d19240fcf16a8c84794c3b9f19.jpg)
-
Greetings all. Below is the chronicling of my Fanracer kit build. This kit was given to me by Chris from Scorched Earth and I built it so he could review it with the Bandai DX toy for this video:
First, cleaning! I use Simple Green and a toothbrush (or strainer for tiny parts). It's cheap, available, rinses completely away with water, and won't react to any plastics.
cleaning.jpg.5119d45a261c9cc51b6aec7c32749b21.jpg)
Then priming. At this time I was still using Vallejo primer. I have since switched to a MUCH better primer, but more on that later...
primed.jpg.3d252e0e9e389eb27cba324ab06b0f78.jpg)
For gap filling I used homemade spru-goo. Not my favorite filler, as it shrinks a little, but it welds the styrene parts together making the seams stronger than a simple filler.
gapfilling.jpg.103ff75600a3b2652cb2e9e00470c945.jpg)
Sanding. And more sanding. Then some more sanding. But a note on sanding: Frank from Thingergy recommended 3M's "Flexible Abrasive Hookit Hand Sheets P400" and while very expensive they are AWESOME! Totally worth the price! They are flexible cloth so no sharp paper edges if you bend or fold them. They fold and refold without damage (unlike paper), wet sand (of course), and their tooth is much more durable than the Godhand foam pads I used to prefer. I used one little cutting from one sheet for this whole project and then used it on my next project too. They seem to be comparatively unkillable.
sanding.jpg.88e5d4898ca55caeb1709b1f13c94640.jpg)
Then priming again.
priming.jpg.1d401faaf0960521436d18b53318e930.jpg)
-
06-29-22
This, even though it looks pretty bad, is actually a big improvement over the previous sanding rounds (go ahead, scroll back up).
afternewsandingpolishingtechnique.jpg.0144eacd8cf8213bdbf36b7d3c40f846.jpg)
And I improved it further. Mostly by...doing more. Sanding more, polishing more.
newtechniqueaftercompoundingandwaxing.jpg.0161487cdcd118003df6df983d361222.jpg)
Done with polishing. It's not perfect, actually far from perfect, but it looks ok. And it didn't. As long as it isn't a distraction to the cockpit detail below then I will call that mission completed.
scratchrepairfinished.jpg.ec4d49a0549c89664efa754528faea0a.jpg)
There were little chips in the frame's interior, which needed painting. Thankfully no filling/sanding was required.
canopynicksandchipstofix.jpg.a71ed1ce23fa4a23b560664326c9fc74.jpg)
More chips up front, which were also fixed.
canopynicksandchipstofix.jpg.c9a1ee849b8dd6161daa3e39c72fbd85.jpg)
DONE! And ready for pickup.
packed.jpg.f76d48899504e12a4ece9bb2be4f03e6.jpg)
-
06-20-22
Another week+ of sanding and polishing, trying new techniques or variations of techniques. I can't really show these differences clearly via photo. Suffice it to say that I kept a log and of the 80 hours the project took, 17 of those hours were sanding and polishing this damn canopy. Which would have been FAR easier (on my wrist) if it hadn't been so thin, and concave.
newpolishingtechnique.jpg.01408e90dd493c150ebaeea4000c7675.jpg)
Looking better still.
newpolishingtechnique.jpg.3b532aeb1c45211d9bc42198264ac0e3.jpg)
-
06-08-22
Much time, few pics. Because polishing! Yeah it pretty much looks the same. But it doesn't. Not in person. Note the time jump, a full round of sanding many grits and then full polishing led to this marginal improvement. Still a bit of haze, although it looks pretty good from this angle.
-
05-31-22 (ALMOST DONE!)...(sort of)...
I didn't think the shield looked quite right. I decided it needed a little more unifying detail. So I used a scriber to add additional, much smaller, fracture lines coming away from the points of impact. Then painted and stained them.
addingmorestresscracks.jpg.8d653f5cad6f6929a317078d3bfb596d.jpg)
Another angle, showing how they help make the piece more cohesive.
addingmorestresscracks.jpg.3683ed317c3dbd6a466cb7aca959f51e.jpg)
A crappy picture of it hanging on my wall. I don't think it looks very good in the picture, but it looked really good in person. I especially like the colors in the heat staining, which don't show up well on camera. But, here it is finished!
finshedandhung.jpg.ff6a748292e908e646a0742ddb976b85.jpg)
-
05-30-22
On to the shield. As a reminder, we decided I would turn this into wall art based on Farewell, Big Brother.
The first step was to stabilize the big fracture. I believe this shield is cast PVC, so if allowed to keep flexing it could lengthen the tear. Below you can see where I drilled to pin it. The pin was more cut paper clip, then superglued in place.
crackpinnedandgluedtosetdistance.jpg.b367d589886cf3794e765b38c07cd26b.jpg)
This also let me set the width of the crack. I wanted it to look more like something that happened as a byproduct of being shot, not like it was torn or hit with a truck.
crackpinnedandgluedtosetdistance.jpg.dd86eb2bea16e7c6512fab8e1ce220be.jpg)
Once the crack was stabilized I grabbed these extra picture hanging inserts and glued them onto fairly meaty areas. Then wired it for hanging.
wiredforhanging.jpg.90d243111ee4bf5a69e3d22a5ca940aa.jpg)
I looked up the episode and when Roy is shot the "laser" blasts come from about 7-8 o'clock only slightly higher than his VF-1. Also, they aren't lasers. The closest I could think of would be plasma. Sort of doesn't matter, but it helps me better visualize the damage knowing what's causing it. I used a soldering iron to burn through the shield from the direction and AOA close to what was pictured on screen (some artistic license). And I used a lighter to bubble and melt the surface to emphasize the direction of impact and impart a more obvious sense of the areas being overheated.
holescarvedwithsolderingironpaintburntwithlighter.jpg.0c01a14f5c499826bc40f0314b006abe.jpg)
As there was more than 1 burst fired I also placed these three further up. These, not the bigger ones, were the ones that went through the cockpit's rear bulkhead and into Roy's back.
holescarvedwithsolderingironpaintburntwithlighter.jpg.969f346eb0e189d6915805005a405f1e.jpg)
I carefully painted the impact areas (and crack interior) with silver, then heat stained them with Liquitex inks (a glaze would have worked similarly). The color range is similar to what you see on overheated exhaust (header) pipes; blue->red->yellow.
paintedwithheatstaining.jpg.7176f1090e1c64d71da52c61e0a63aa6.jpg)
Then I used the lighter brown oil paint to weather the skull and bones. In this pic the skull is done, but not the bones, so you can see the subtle difference it makes.
weatheringskull(notbonesyet).jpg.7fd01c94fe589f2db6ad5eb7909942a9.jpg)
I also used the silver paint to make various tiny nicks in the paint. This adds detail, but also will help to unify the piece with its damaged areas.
scratchesandchipping.jpg.349eefdc3418ebec645062abf00210bc.jpg)
Paints used on the shield.
paintsused.jpg.2d42cbb1c67ae76787f9d58a57b8cad4.jpg)
-
2 hours ago, Gabe Q said:
She's really coming along! Great work on those HUD panels. I'm not sure people realize how involved this whole project is.
Thanks! And your instinct is correct: People, for the most part, won't know how much work went into this restoration. What I'm showing here is very much just the cliff notes, or like watching a cartoon with 3/4 of the cells removed.
-
05-26-22
The new HUD panels, 1 polished the other only cleared.
Both polished.
newpanelspolished.jpg.25b7a01ca81c7a9d2d7d33539200e874.jpg)
Clarity sample.
newpanelspolished.jpg.469f7615322155518d2c4a0a1dbf1f6a.jpg)
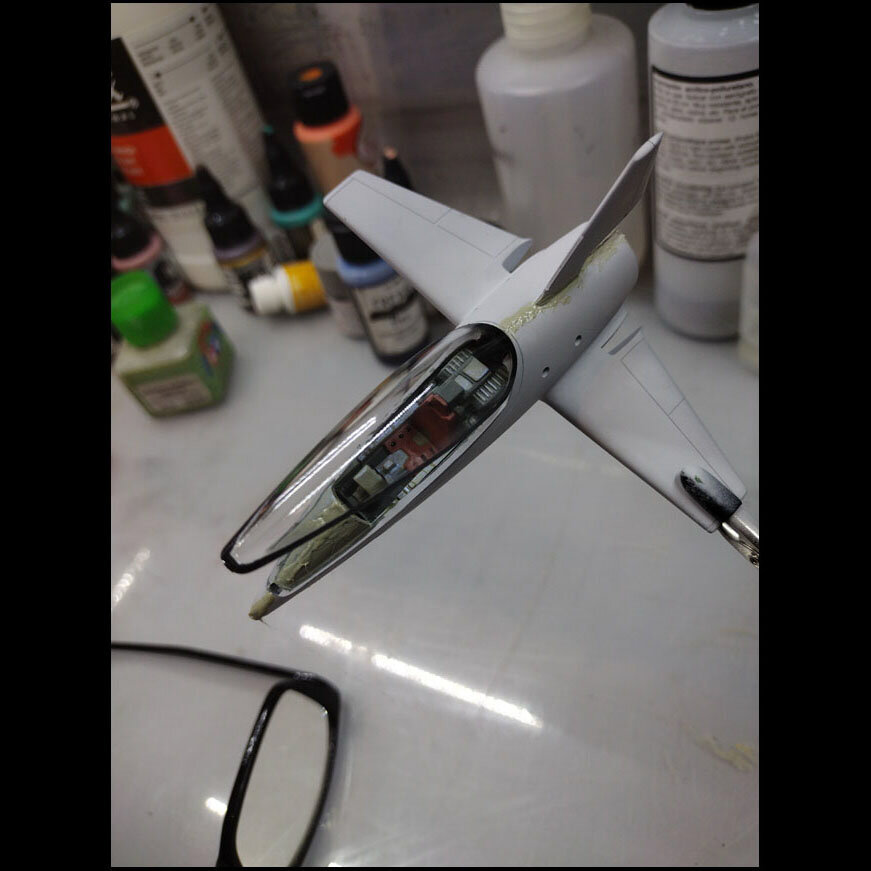
The new HUD panels, fitted to the upper console.
newpanelsfitted.jpg.cd04699e5bcbbc77f99dc5d1757c0764.jpg)
Other angle.
newpanelsfitted.jpg.00244e5c2b7c8785324bfff00b2015ed.jpg)
-
05-25-22
To finish the panels I first brush painted the edges with Tamiya clear green. In my mind I wanted the end result to look like tempered glass. In hindsight, I'm not sure HUD panels are made with tempered glass. But these looked cool when they were done, so...it's ok?
paintingHUDpaneledges.jpg.1889c952e97140f2a8b8edd7090a2808.jpg)
Clamping them by the edges to then airbrush a ghost edge around the perimeter. Also using Tamiya clear green.
airbrushingHUDghosting.jpg.0cd7b9edb96d54b8b4ca464e6301cbcc.jpg)
Painting finished.
finalpanelspainted.jpg.ed871ead91f958d50d9c2b336ddff822.jpg)
Then I clearcoated them with Tamiya gloss, because I knew I wanted to polish them and the polish would immediately dissolve the paint.
newpanelscleared.jpg.90ce6fbe7e8a90b2da60a22631fa1085.jpg)
Speaking of paint, these are all the paints used in this restoration. If you want more details, just ask.
paintsused(updated).jpg.31cb01081a8222be190207fe6b7af453.jpg)
-
05-24-22
The repaired HUD panels, fitted. From this one angle, the crack isn't quite so obvious. But overall, the repair option sucked.
repairedHUDpanelsfitted.jpg.ed5732369812c00f2447590b65f6e1df.jpg)
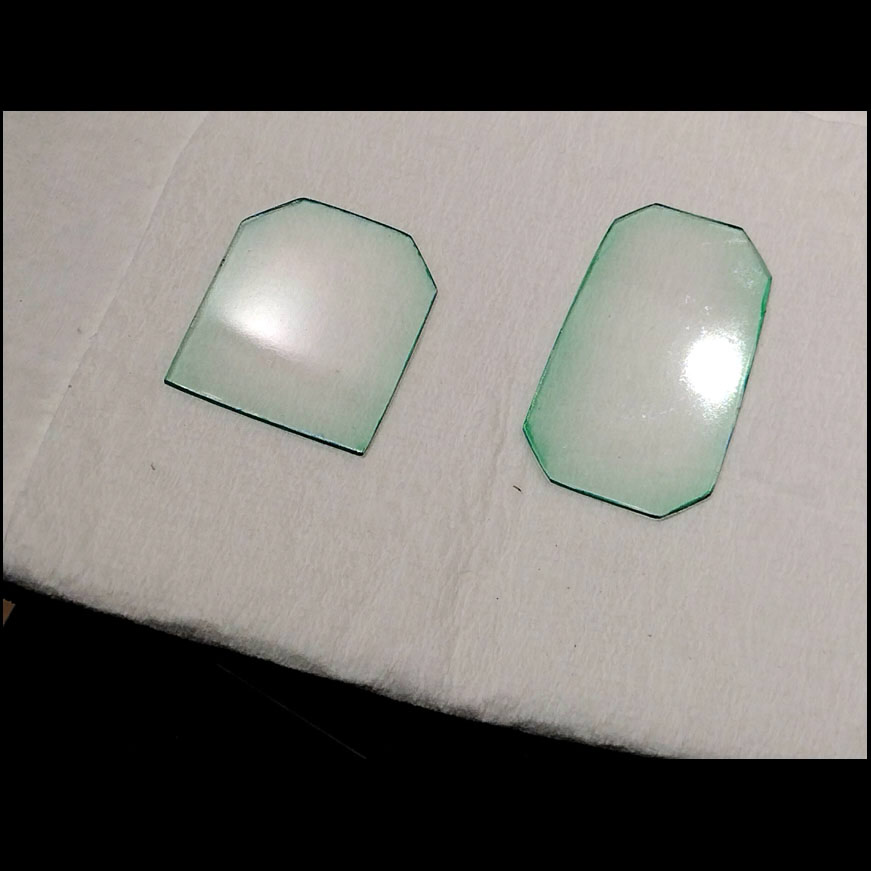
So I got an old CD case that was the same thickness as the Kidslogic HUD panels and cut new panels.
makingreplacementHUDpanels.jpg.f1c5dfbdcc5fc0c85c185a456787e26e.jpg)
The first one wasn't quite the right shape, so I used it for testing other steps. Here are the 3 I cut and the 2 original, damaged ones.
makingreplacementHUDpanels.jpg.8fd2bf2a3bfd500a32275d7740179578.jpg)
-
05-23-22
So I thought at this point I was done with repairing parts, needing only to fix the canopy and shield. However in packing the parts in the styrofoam I discovered this other arm, and its missing finger. So, like the thumb before, I drilled and pinned...
Royfingerpinned.jpg.1462cc09917b6a67ca0195ba3c7a6ed4.jpg)
...then used Apoxie Sculpt to form a new finger.
Royfingersculpted.jpg.63873983fc8a4ac89fc559e84b24ce19.jpg)
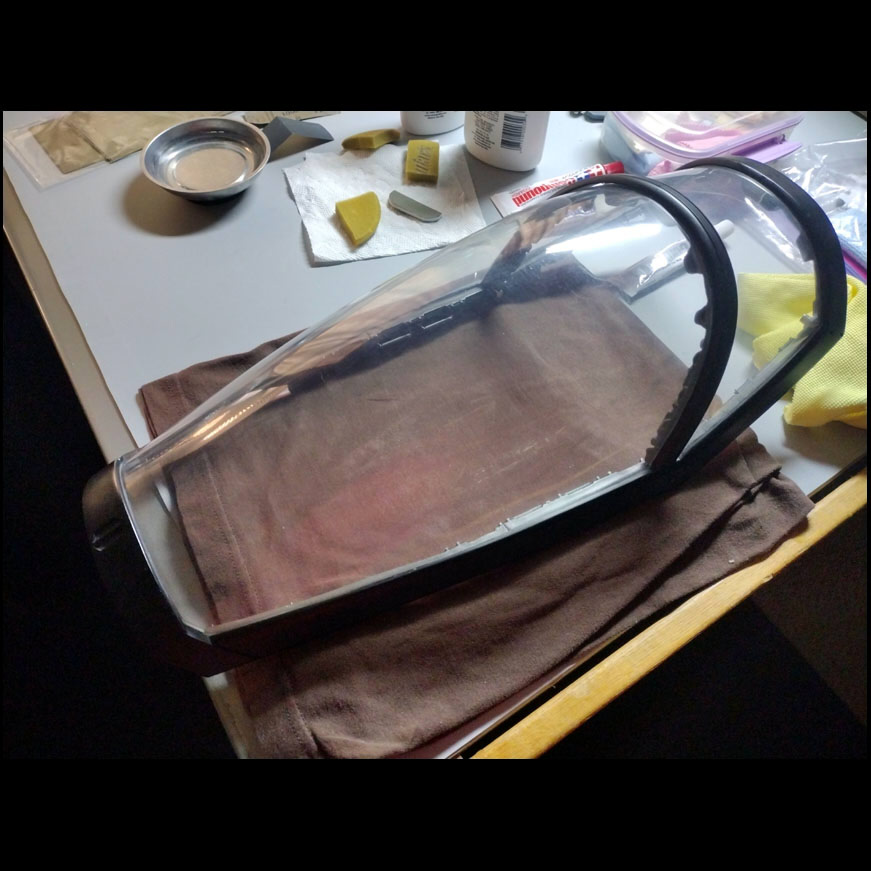
While that cured I turned my attention to the canopy. Essentially starting over after bumping into Frank Ippolito at a Propstore event and asking his advice. I switched from the foam-backed sandpaper pads I used before to sanding sponges. And I went with a much more aggressive grit to do my best to completely remove the deeper scratches. I did have to be very very careful though, because the canopy itself is VERY thin, and the frame is VERY weak. So whenever I sanded I had to support the opposing side with my hand. You can see here I got it to a fairly uniform haze.
moreaggressivegrit.jpg.c305f7b1fbbc7afb363c0eb90ceb386c.jpg)
This is the whole canopy done with that grit.
canopysanded.jpg.8ce01c4400a60014303f4f9ed4343a1d.jpg)
Then I polished it, as a quick test, and while the polish is still wet it looks damn good.
polishingstillwet.jpg.ccda2e178164468afac5a848333af310.jpg)
The same, after the polishing compounds solvents evaporate. They acted like a temporary clearcoat, making it look clearer than it really was. However, as you can see here the polish did actually do a good job against very extreme sanding...
polishingafterevaporation.jpg.6b71df29b2bd6a8acff2429965f44956.jpg)
...such that there no longer are scratches deep enough to cast shadows! So, to that end this was a success. However there is still a clearly visible haze to the canopy and that needs to be dealt with.
scrachesnolongerdeepenoughtocastshadows.jpg.efcd7904566110f1f39a7c90d5562a4f.jpg)
The new finger, sanded, primed and painted.
fingersandedandpainted.jpg.8a03c68632d9522ae9033310197036a5.jpg)
-
Thanks guys!
05-21-22
My first attempt to fix the broken HUD panel. Using clear PVA (so as to not fog the acrylic), the pieces were laid on a silicone mat and clamped gently with 1-2-3 blocks. The idea was that the clear glue and clearcoat after would fill the crack and make it much less obvious. In short: This idea would fail.
gluingbrokenHUDpanels.jpg.013425b762f203a36462fafaa061730c.jpg)
Fanracer kit build (PIC HEAVY)
in Model kits
Posted
Glamour shots, if we're being generous. I was pressed for time.