Aztek
-
Posts
267 -
Joined
-
Last visited
Content Type
Profiles
Forums
Events
Gallery
Everything posted by Aztek
-
Hmm. I’ll check into that. Thanks!!
-
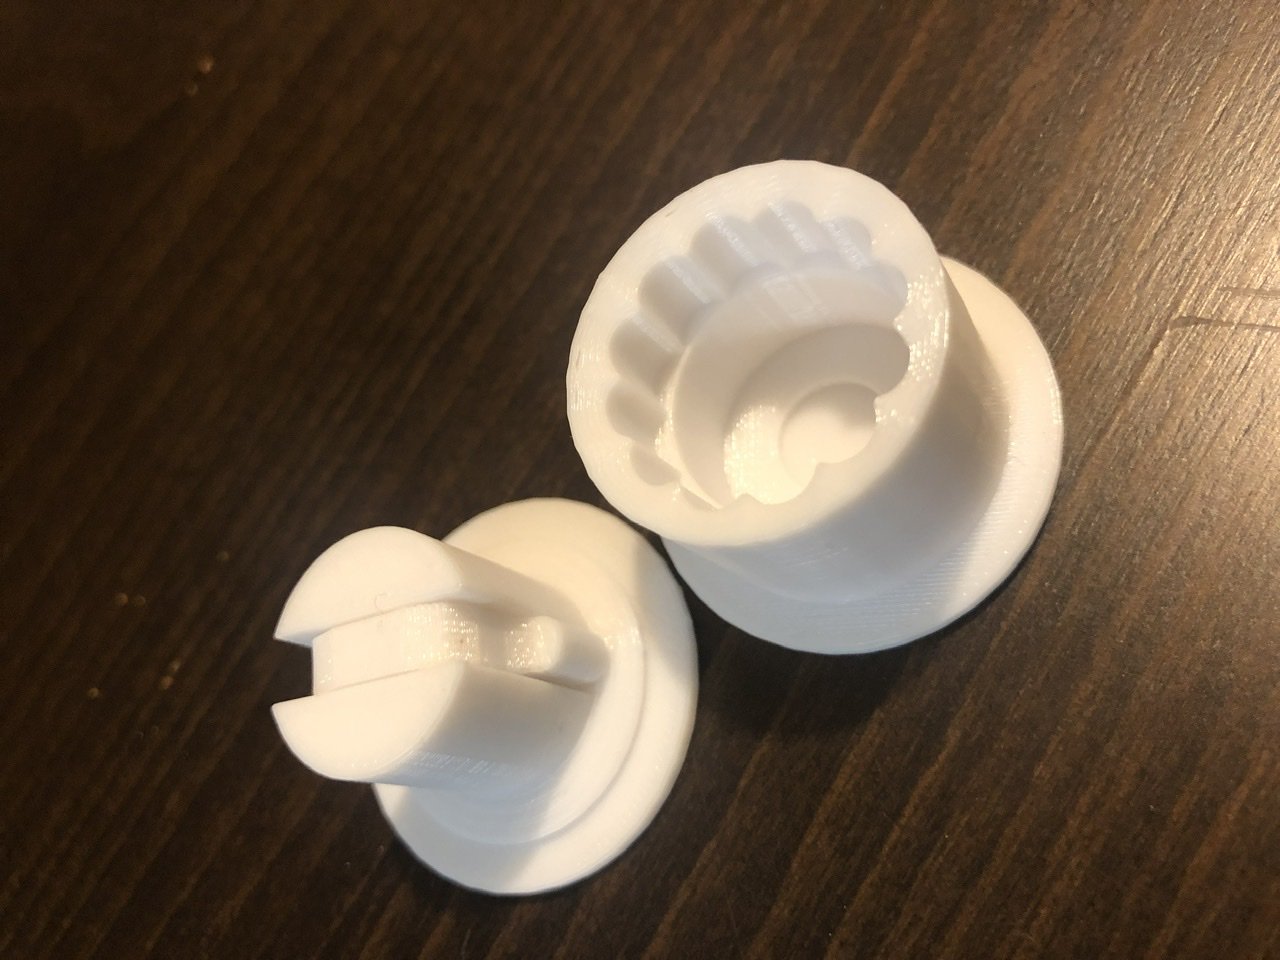
I have SLA for small and detail parts and FDM for the large structural parts. These joints look great. I just need ball joints/sockets that are 2.5mm diameter max to fit
-
Thanks! I’ll try those.
-
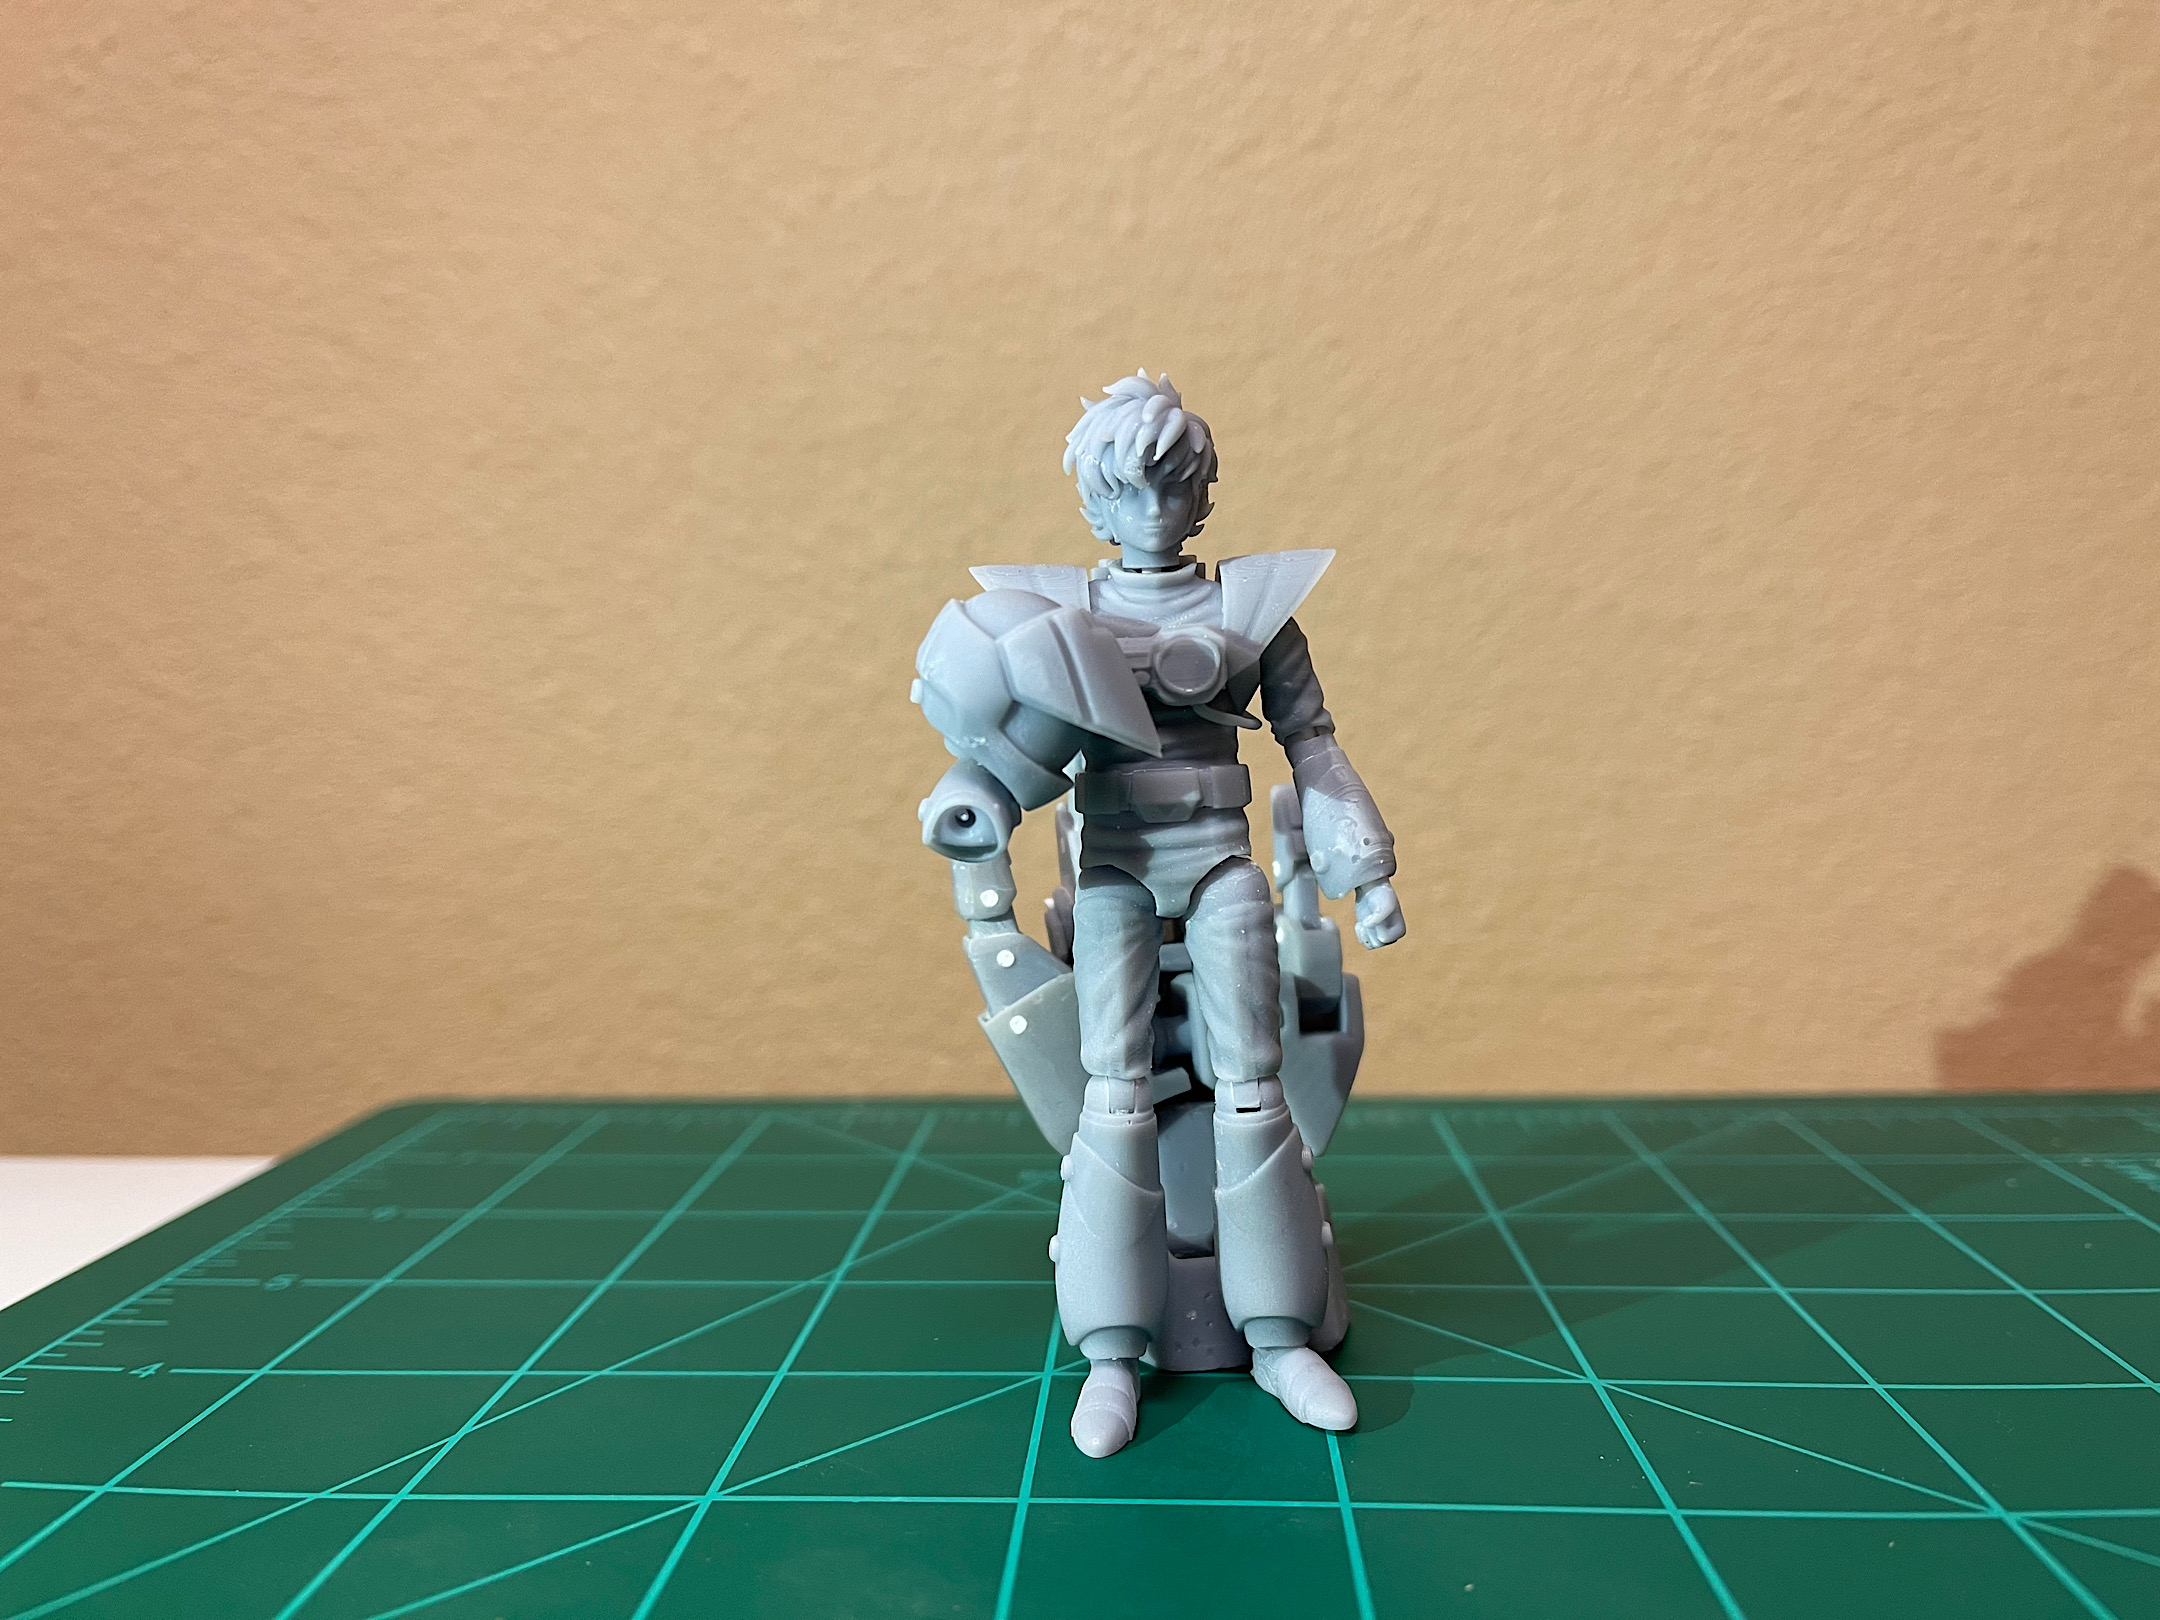
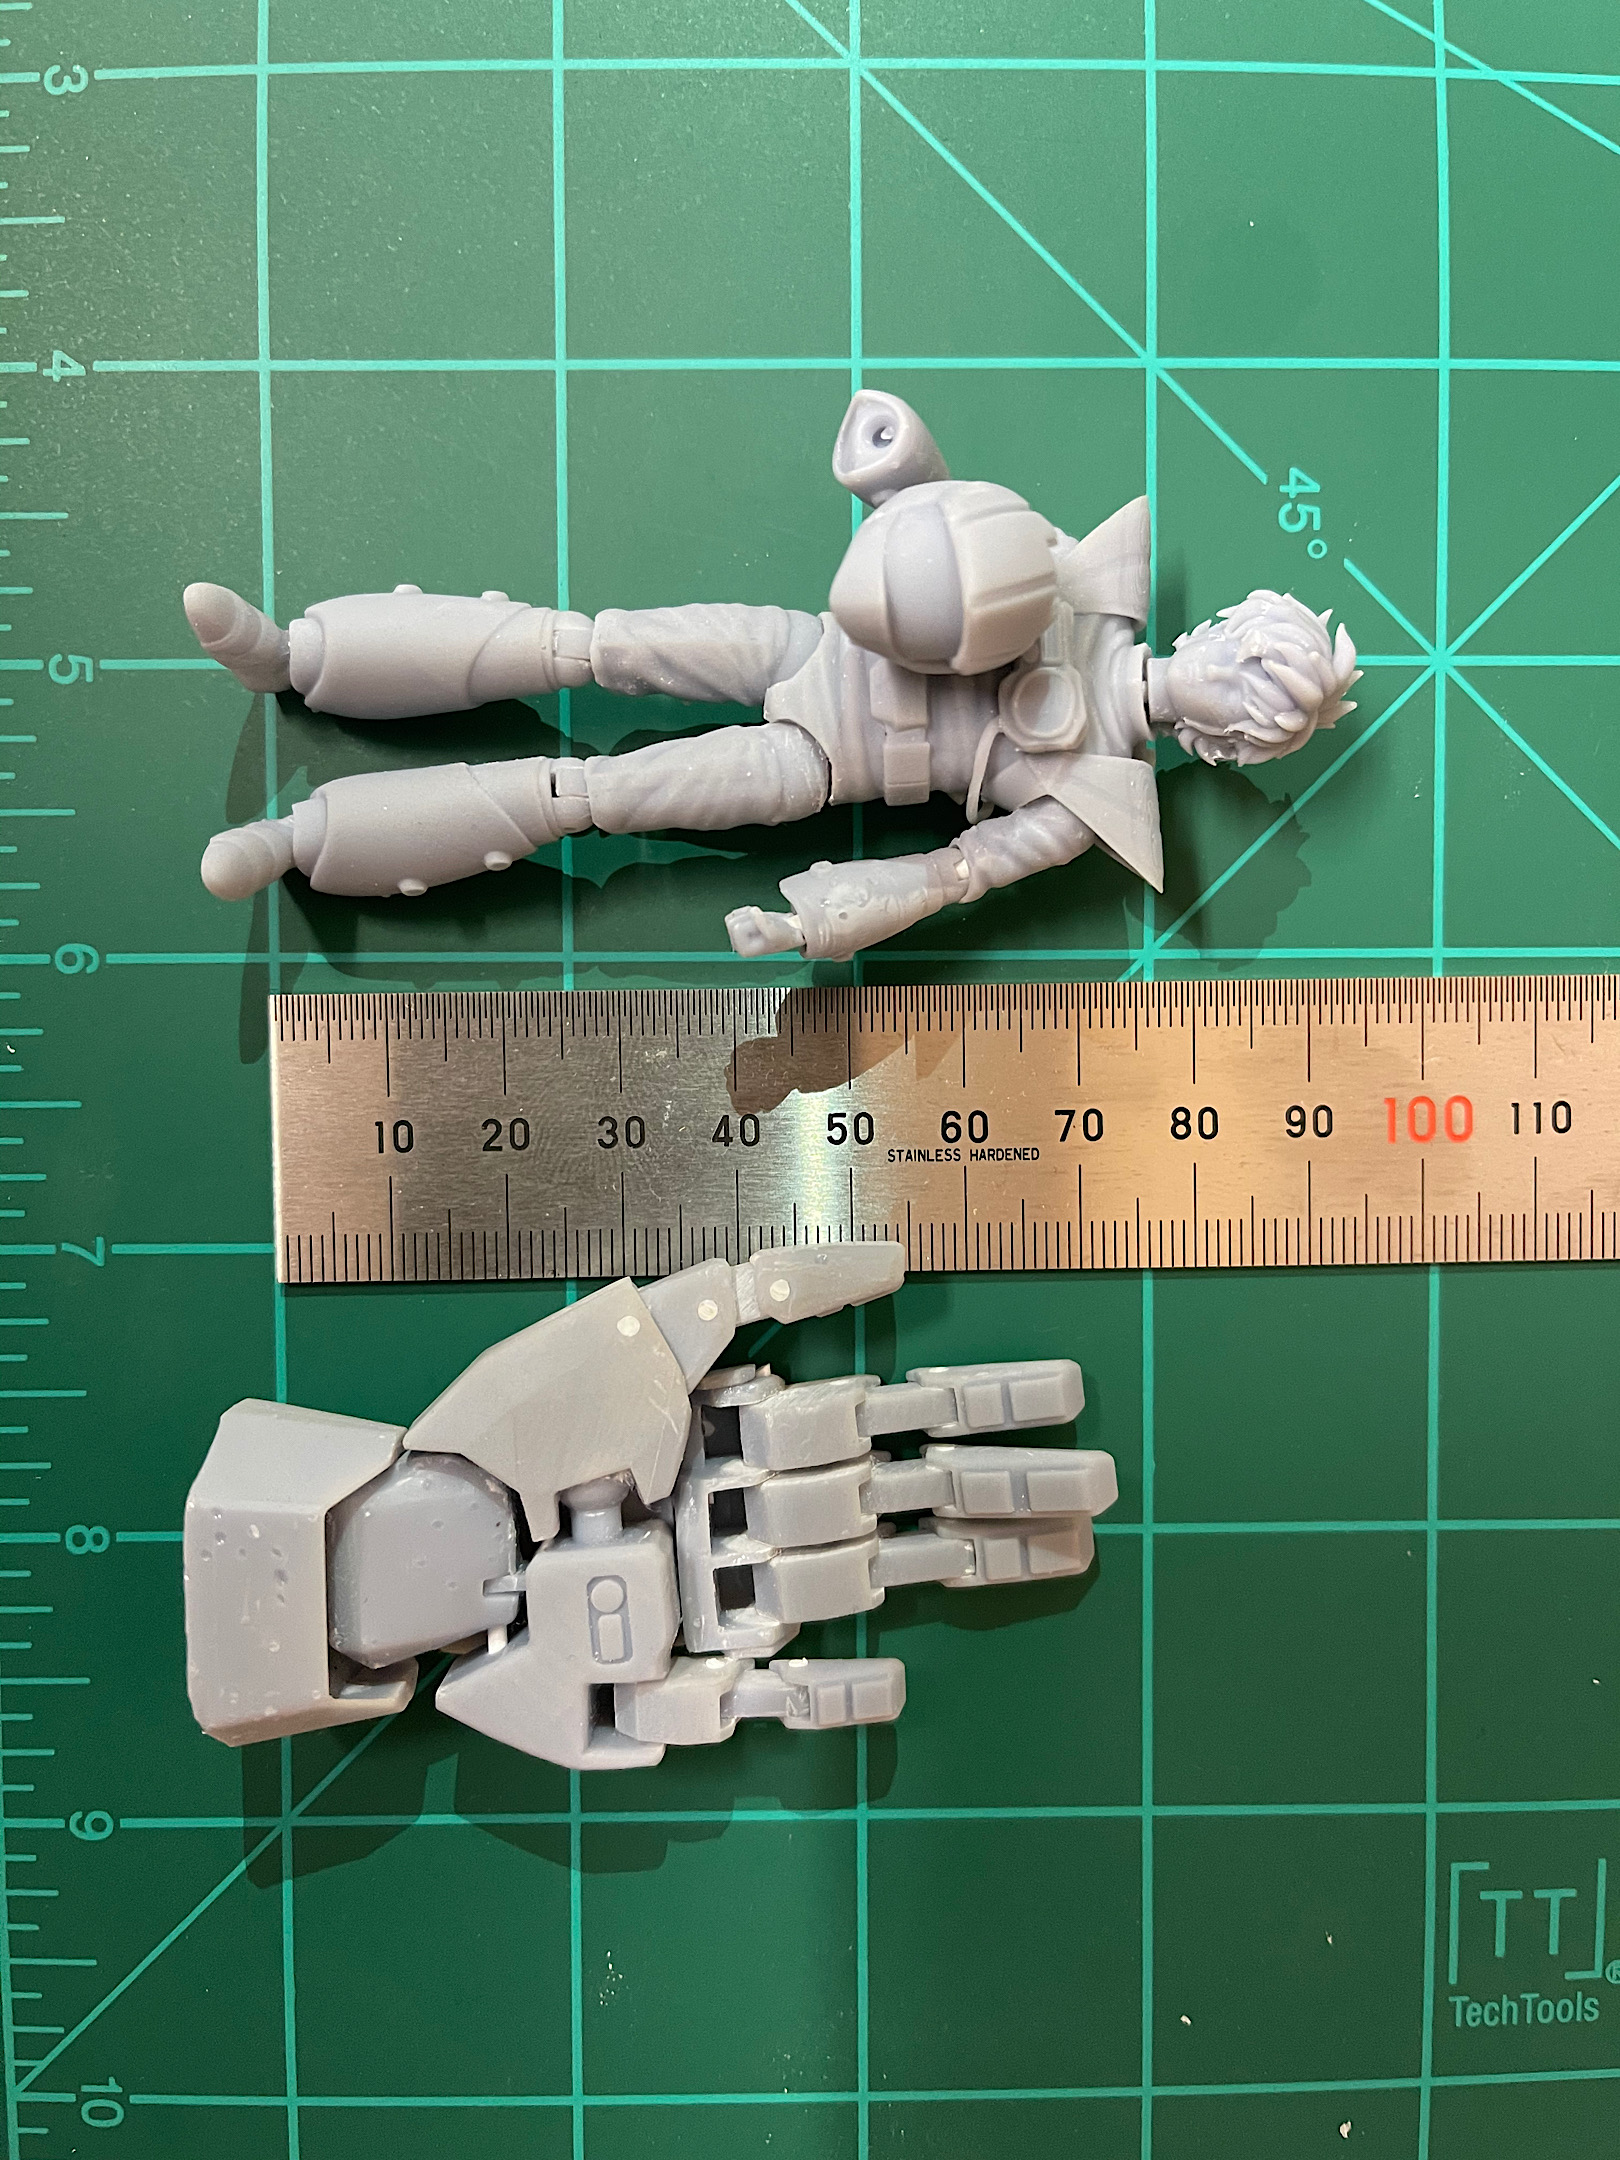
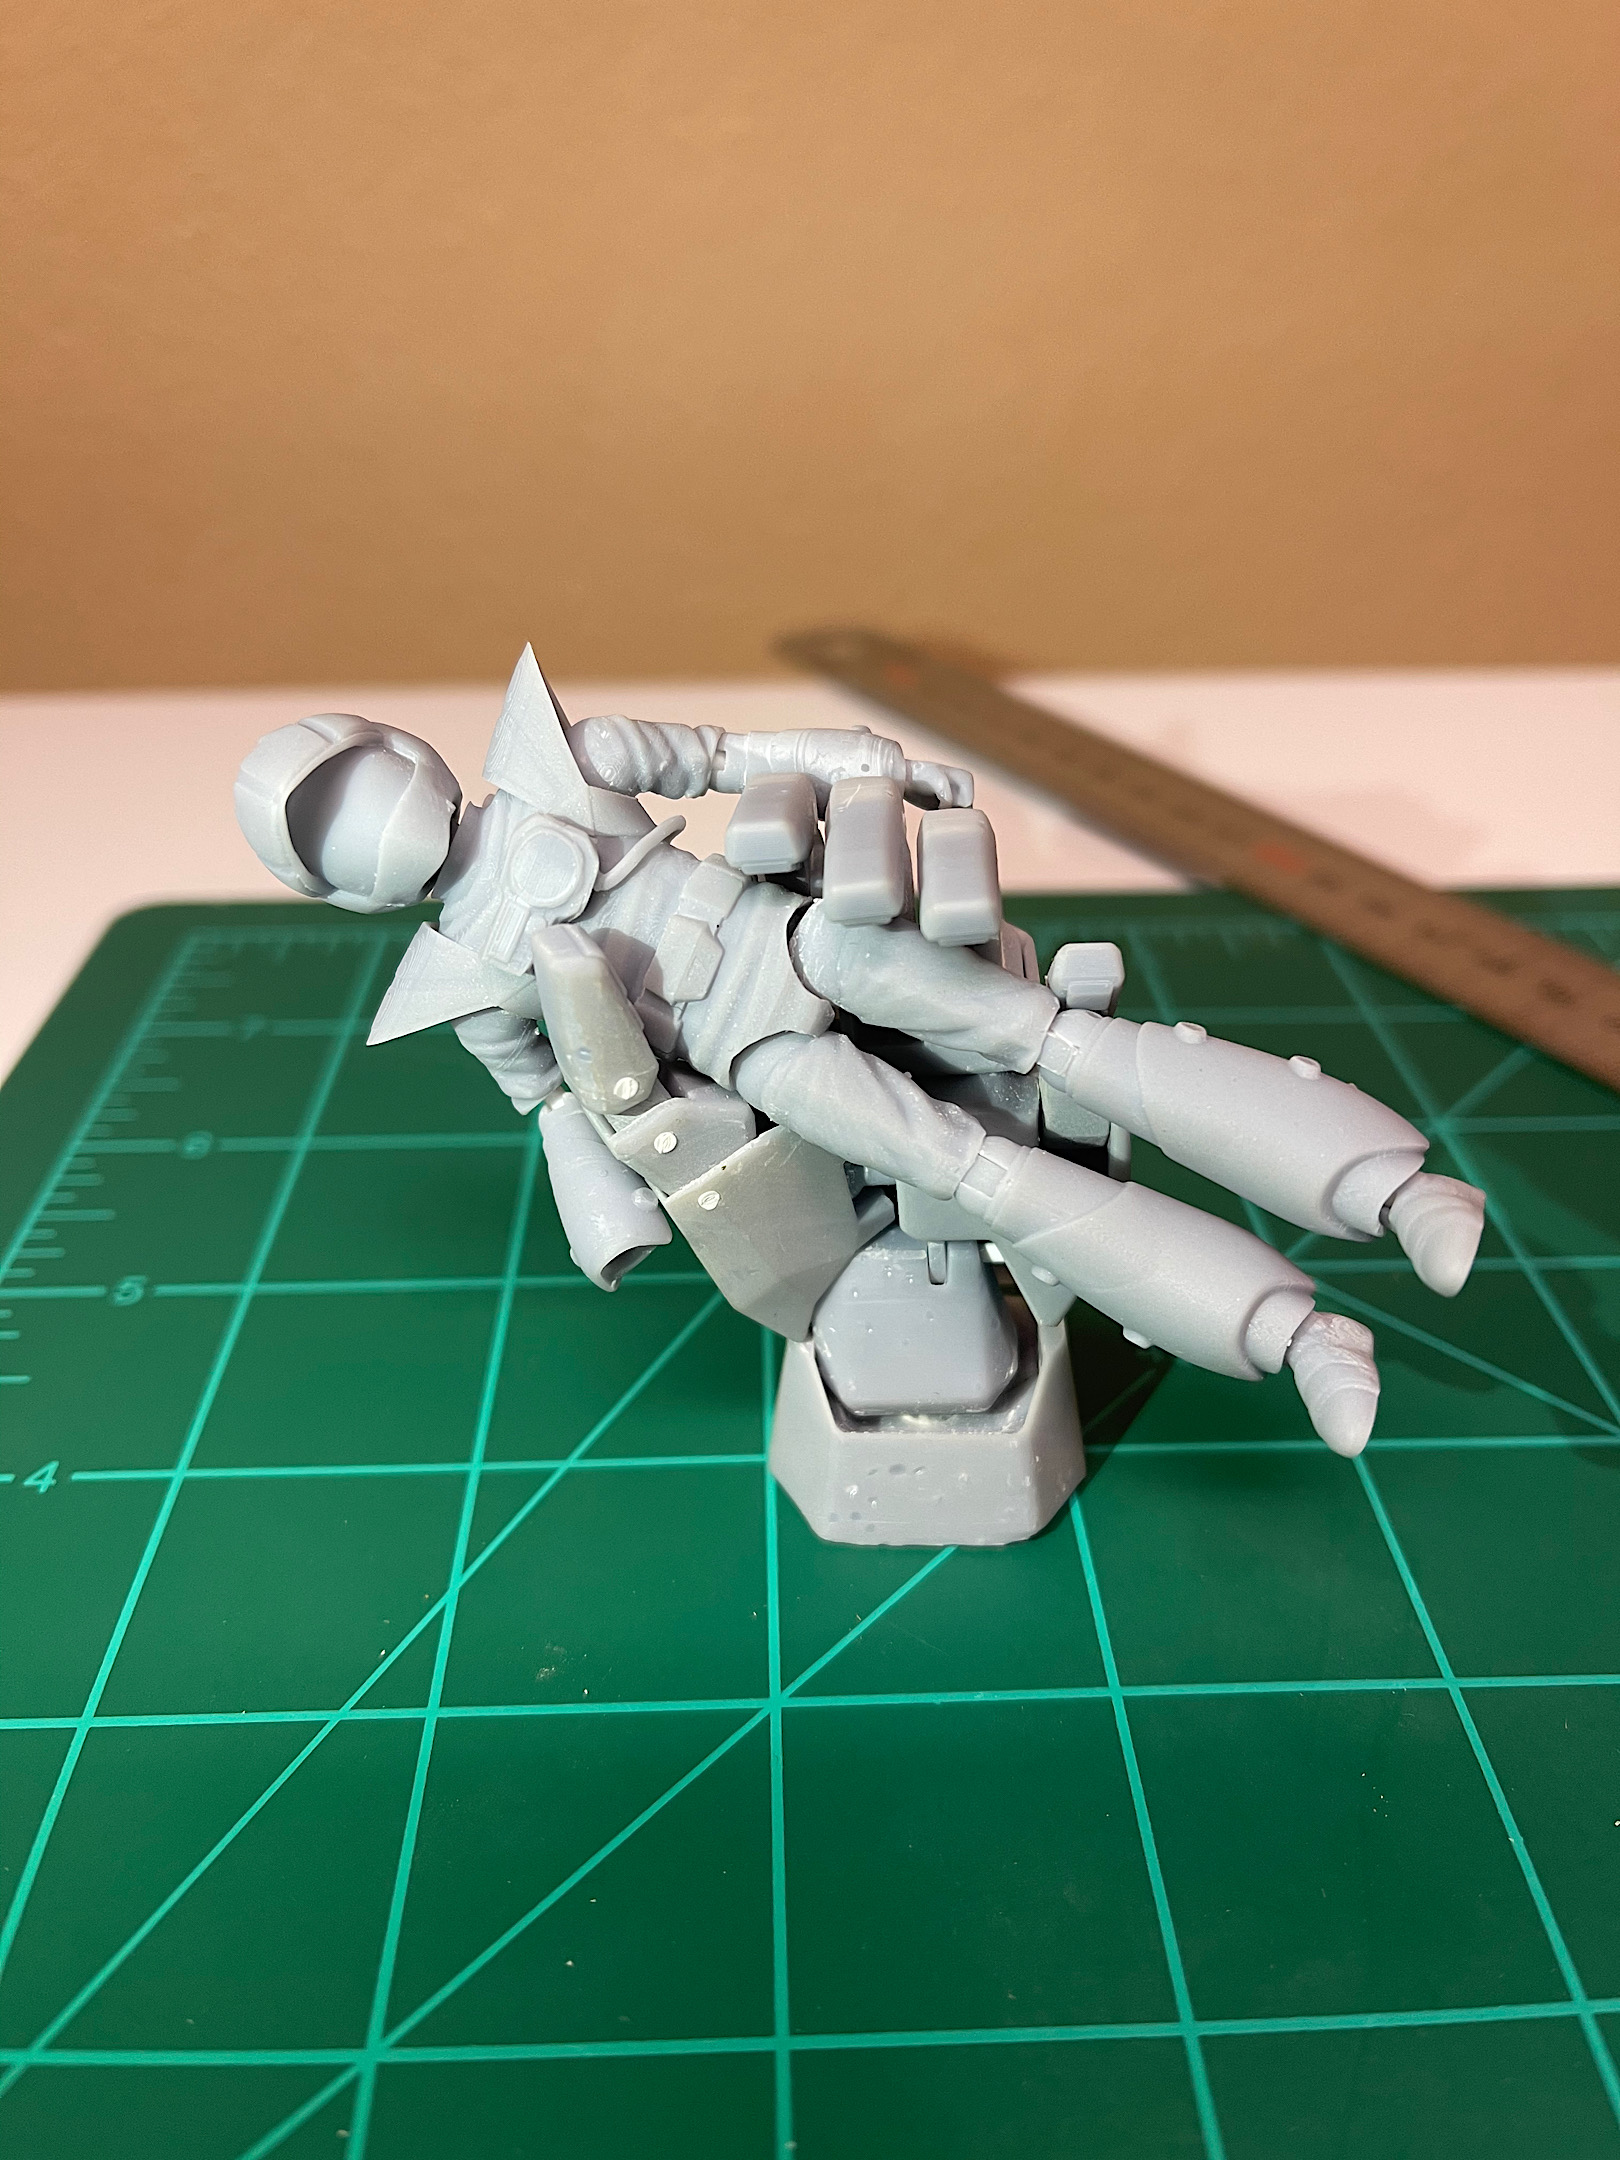
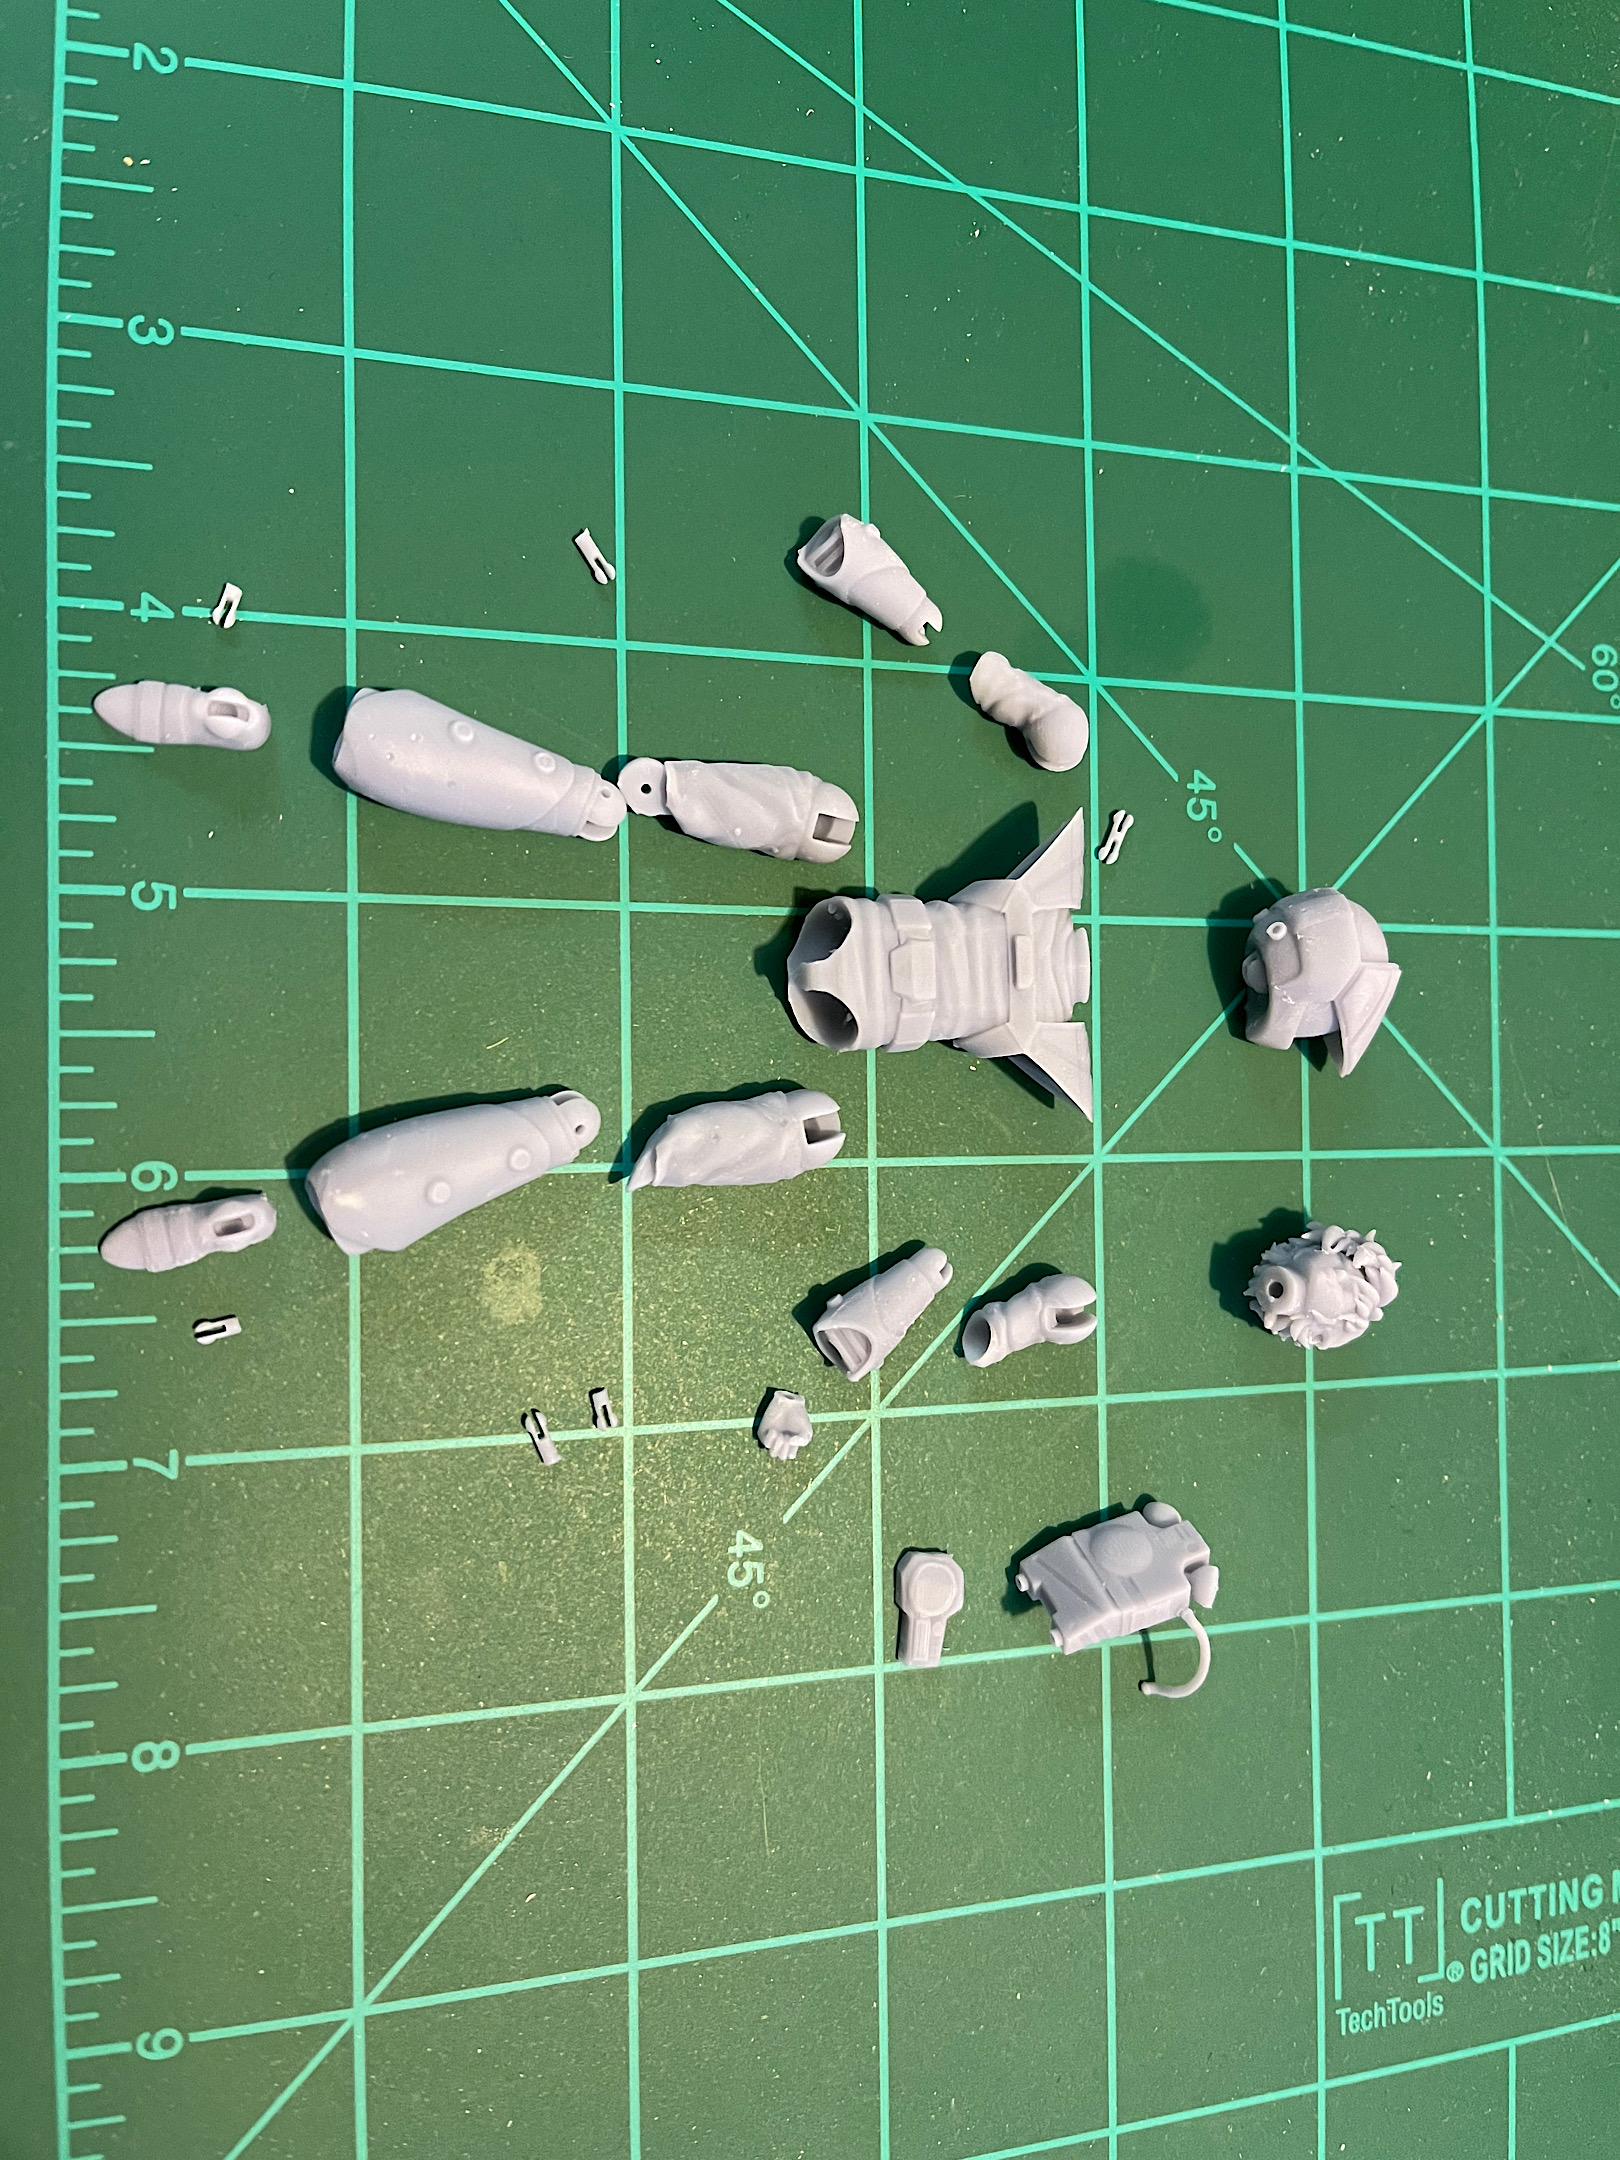
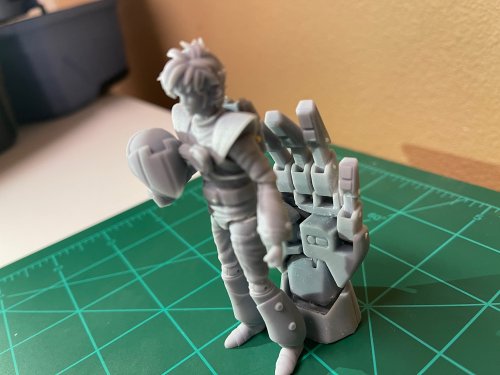
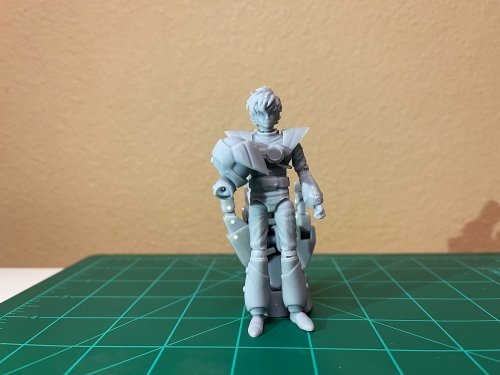
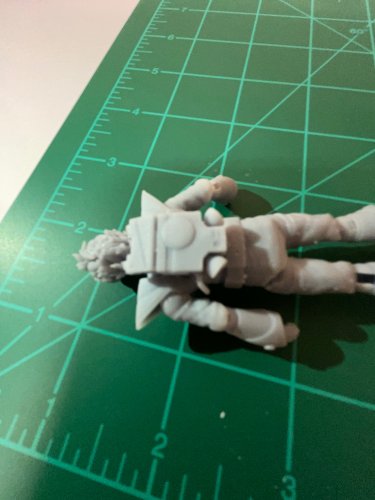
Minor update. Kinda Spent some time working on Hikaru to pilot this beast. I wanted a fully articulated action figure style pilot I could put in the cockpit or have standing outside. Trying to engineer the joints on such a small scale with a strong but brittle medium is a challenge. The stl is a static statue of Hikaru I got online but I split it and re worked the mesh at all the joints in an attempt for poseability. Hikaru stands at 8.9cm which is 1/20 of his canon 178cm hight. The hinge joints in the knees could work but be brittle. The elbow hinge joint is extremely small. Need to try a different approach. I have a small pin in the hand to attach to the forearm. It rotates ok. May upsize the hand a bit for strength. One of the photos has the pilot being held in my VF-1 hands. These are the old resin ones I did a while back. I’m still reworking the forearm mesh to account for the 8ish percent increase I scaled the hands based on the forum’s feedback. Do you guys have any ideas on the ball joint style that are in the shoulders, hip, neck and ankles?


-
I’ve been struggling to make time with work/family/holidays lately but there may be some opportunity to work on some updates soon. I’d like to move past the hands/storage/size issue right now. Thx for the line art@nightmareB4macross but I’m torn with the way to go on this. Can definitely make the hands slide out vs. rotate, might even open some space for a larger hand. Just can’t get past there not being an environmental door or hatch that keeps the hands sealed inside. Does anyone have any screenshots or line art that shows forearms with hands stowed from the rear? I searched a few episodes from Macross and DYRL. Was hoping for a shot of the 3D valks in Delta but the angles were off. Thoughts? -Az
-
I did a quick adjustment with the mesh. Will also post a render tomorrow. One question, in the cutaway schematic, left arm, the backhand faces outward, which way is the thumb? Up or down?
-
Thanks for all the references and input. Need to go back and look at the joints and see if its possible. The thumb and pinky will be the challenge.
-
@nightmareB4macross do you have a link to the poster you are talking about?
-
Man I’m trying really hard to see how that would work? I think I have an idea but think the washer contact area is too small for let’s say an elbow joint. It might need to be a rubber spacer 1cm wide or so.
-
@Sanity is Optional I’m not quite understanding that? Do you have a diagram or break down of one installed? I’ve taken apart a bunch of toys over the last several months and I’m not sure I’ve seen that yet.
-
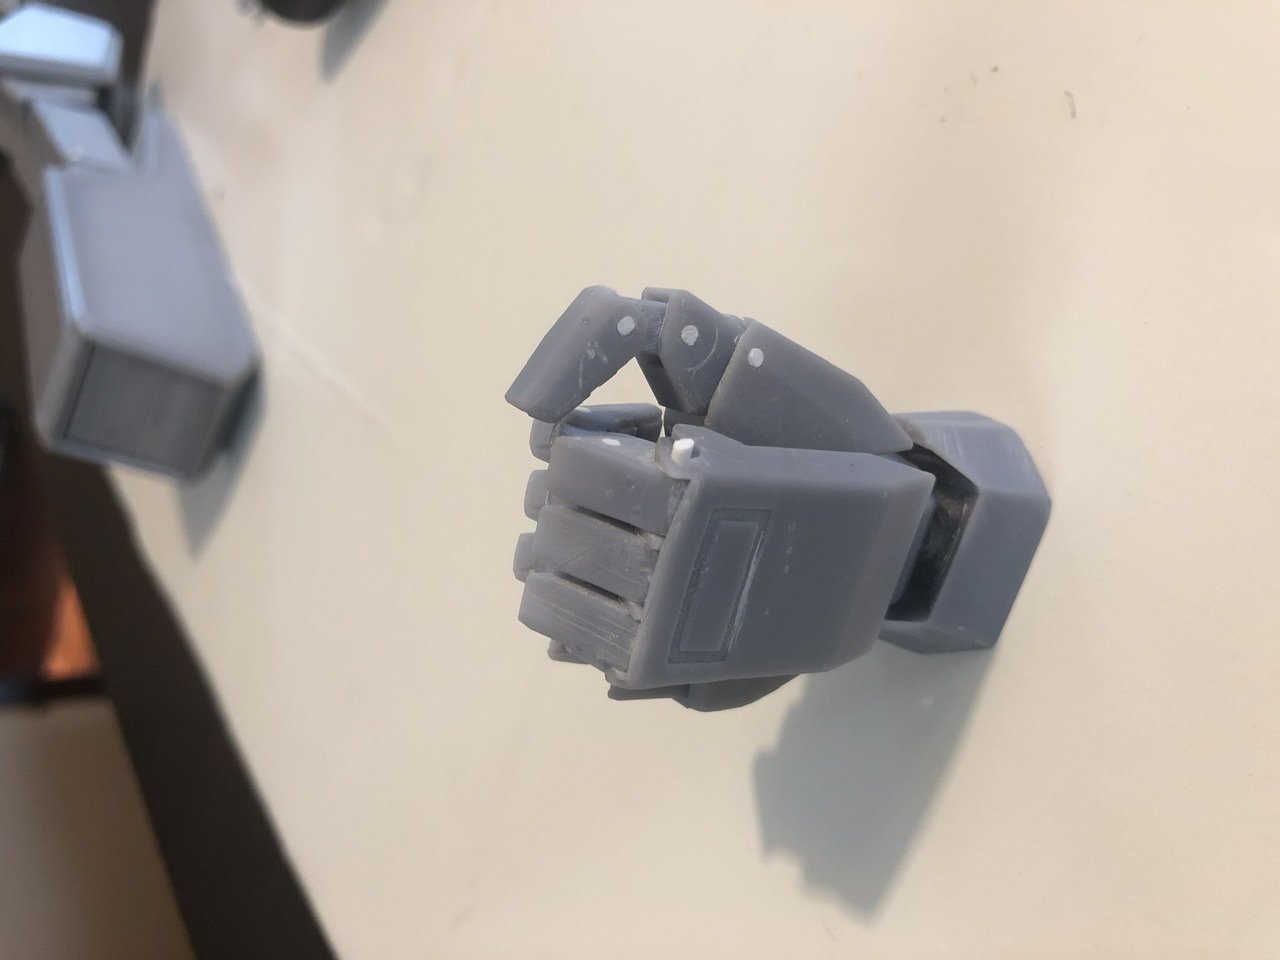
Thanks all! The pins in the fingers are 1.6 mm and interference fit. Might not be able to get a nut/bolt in there. I'm thinking of draft printing the nose section next. So may be a short while before I get an update as there are multiple tweaks to the mesh I need to do for the pivoting radome, leg connections, canopy, etc.
-
reposting


-
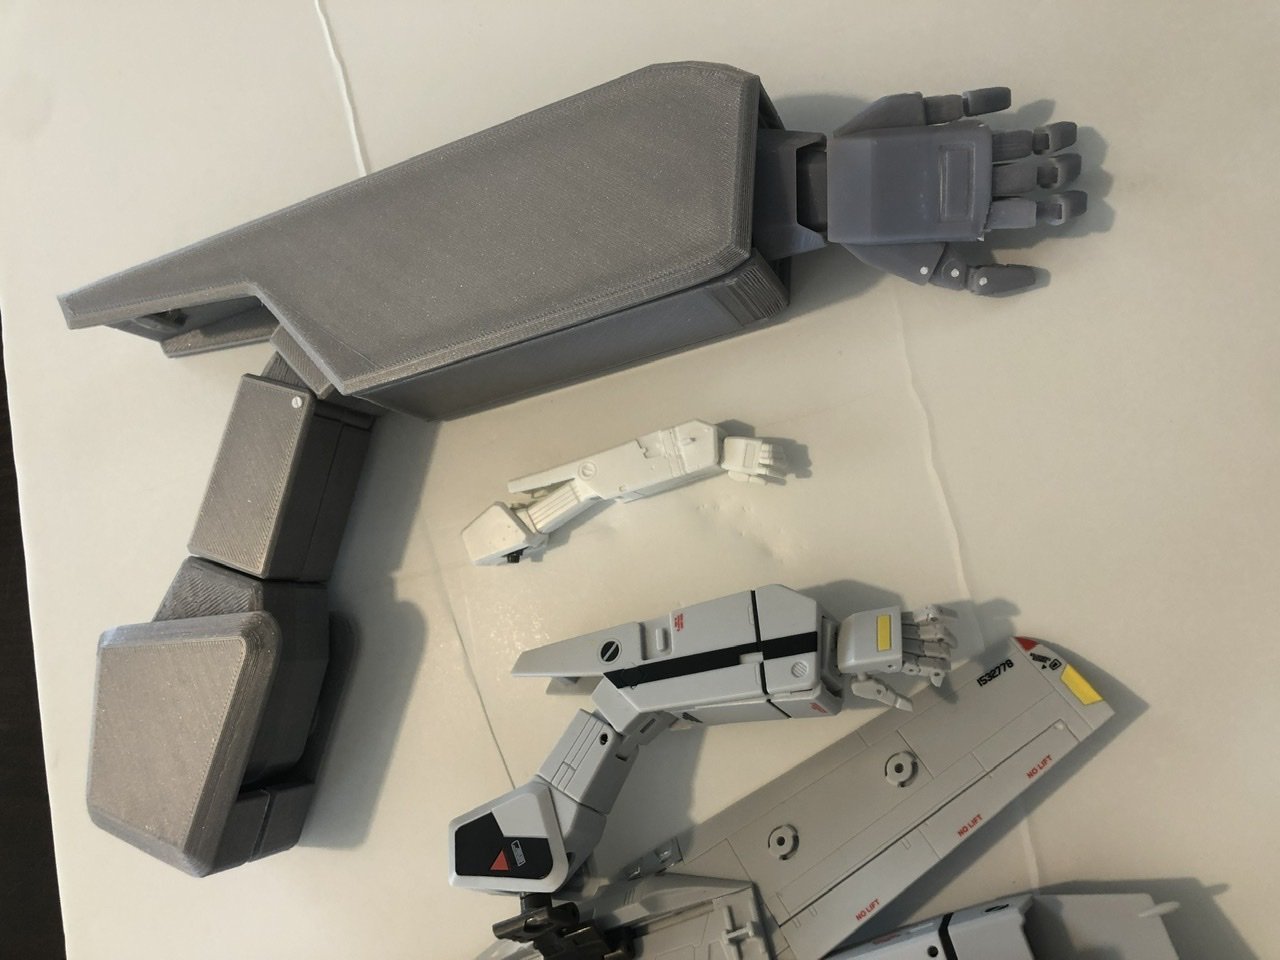
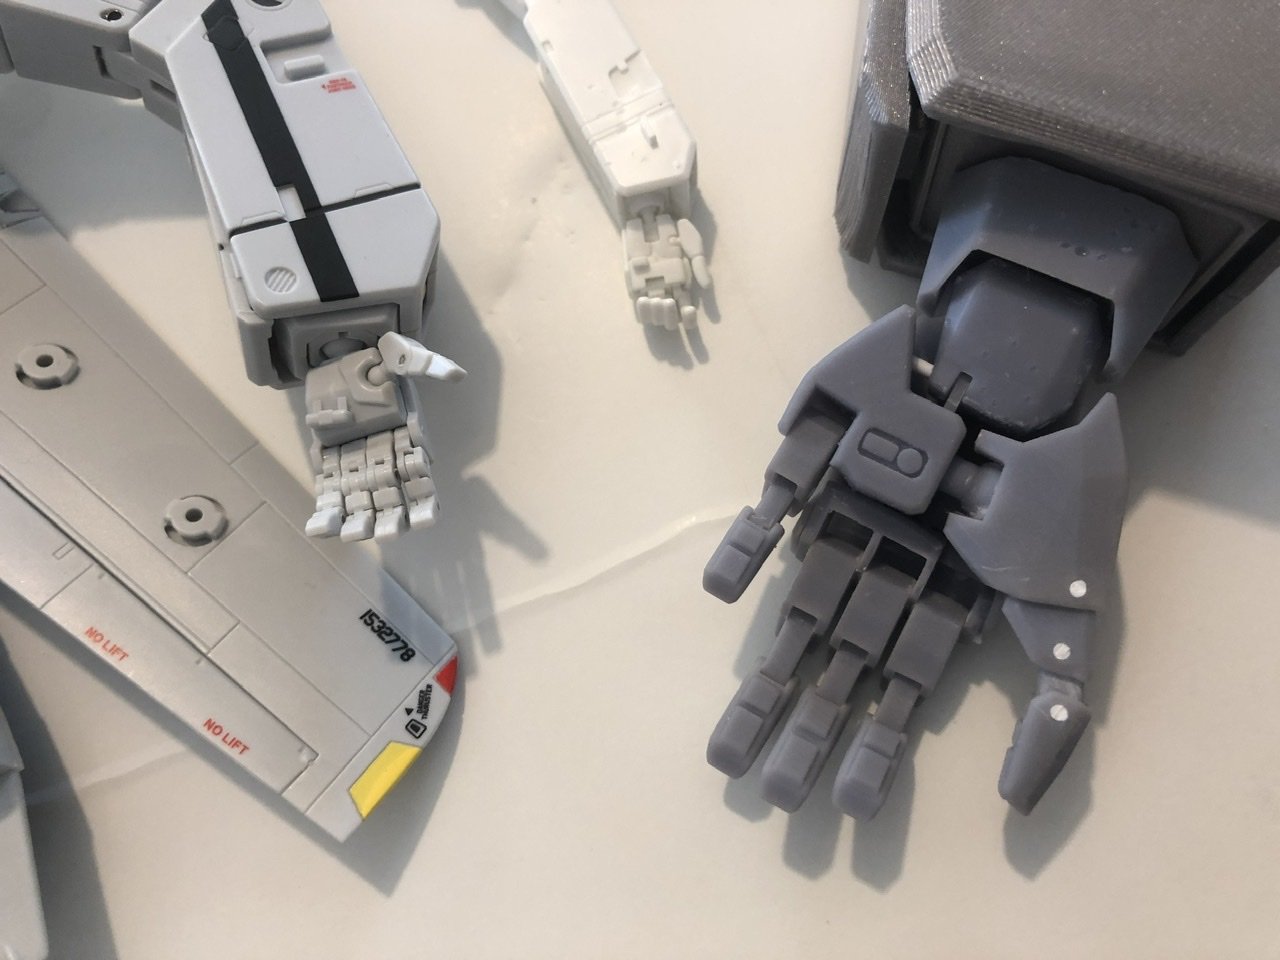
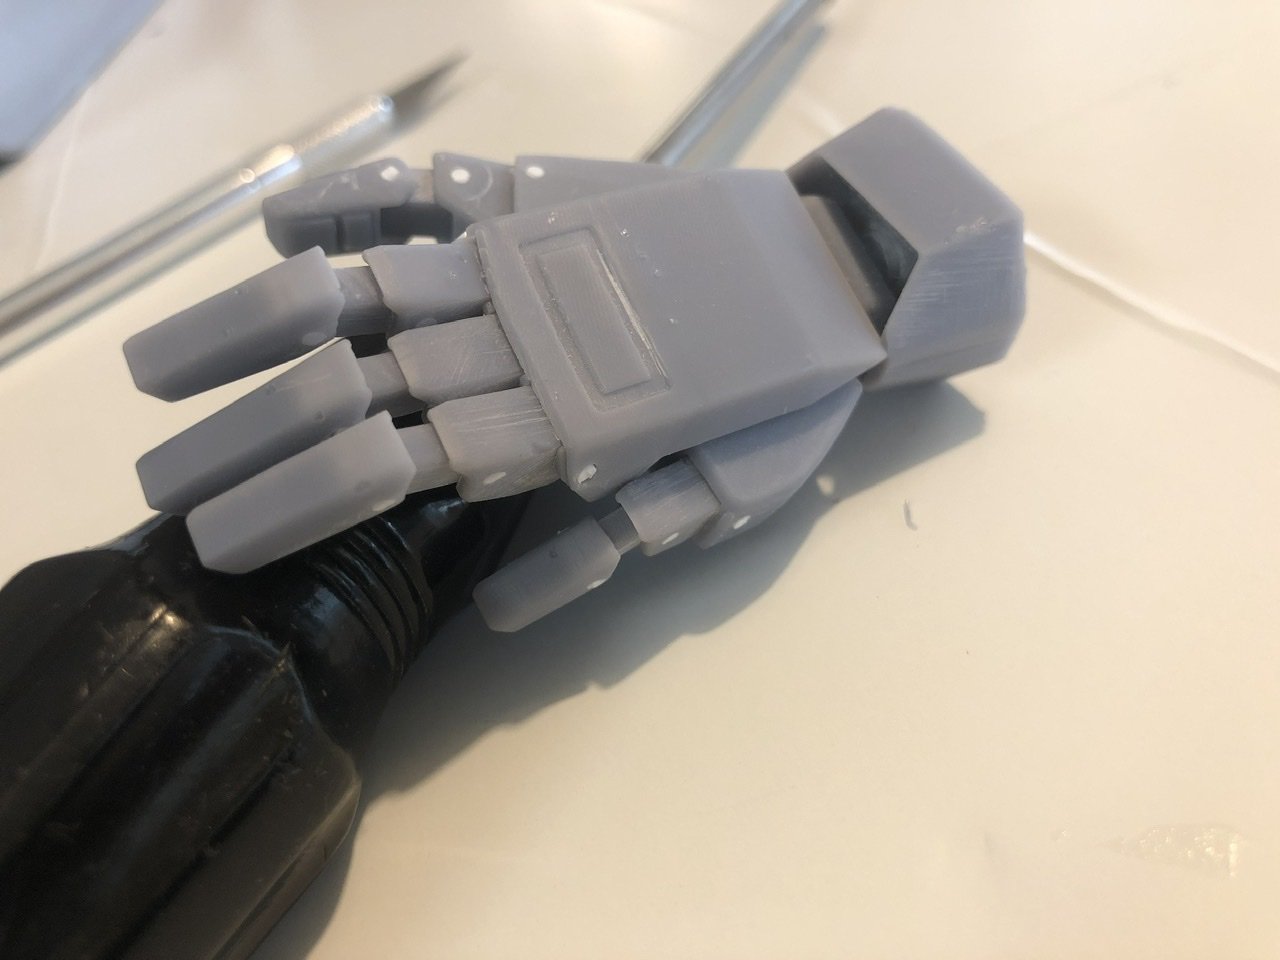
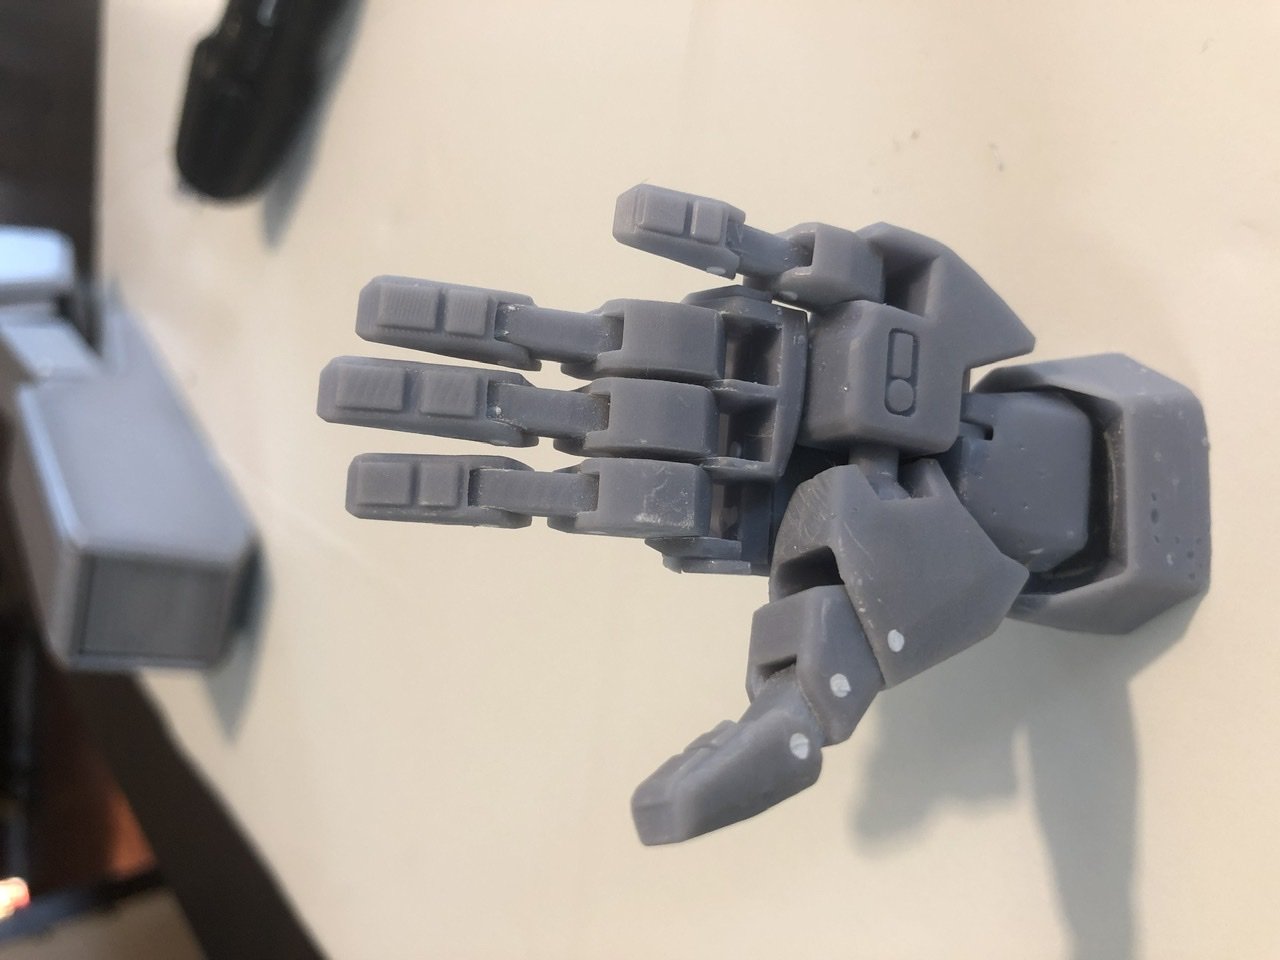
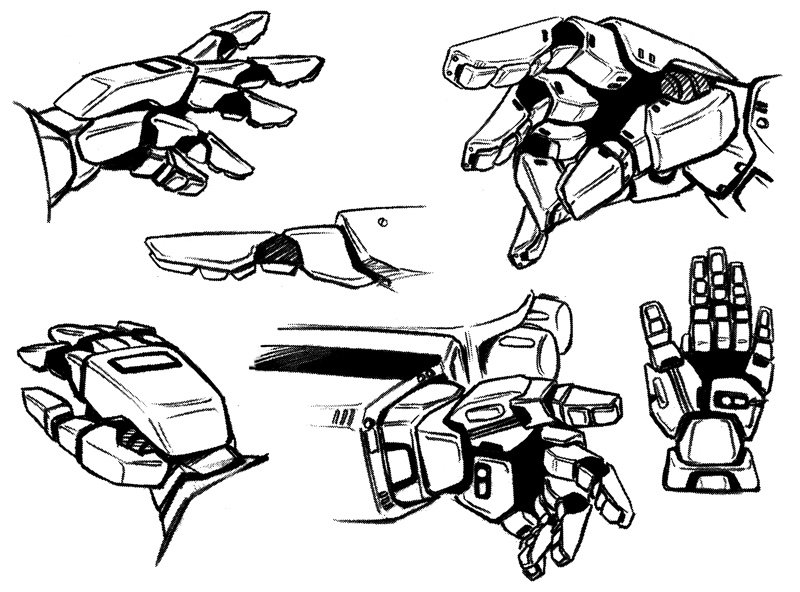
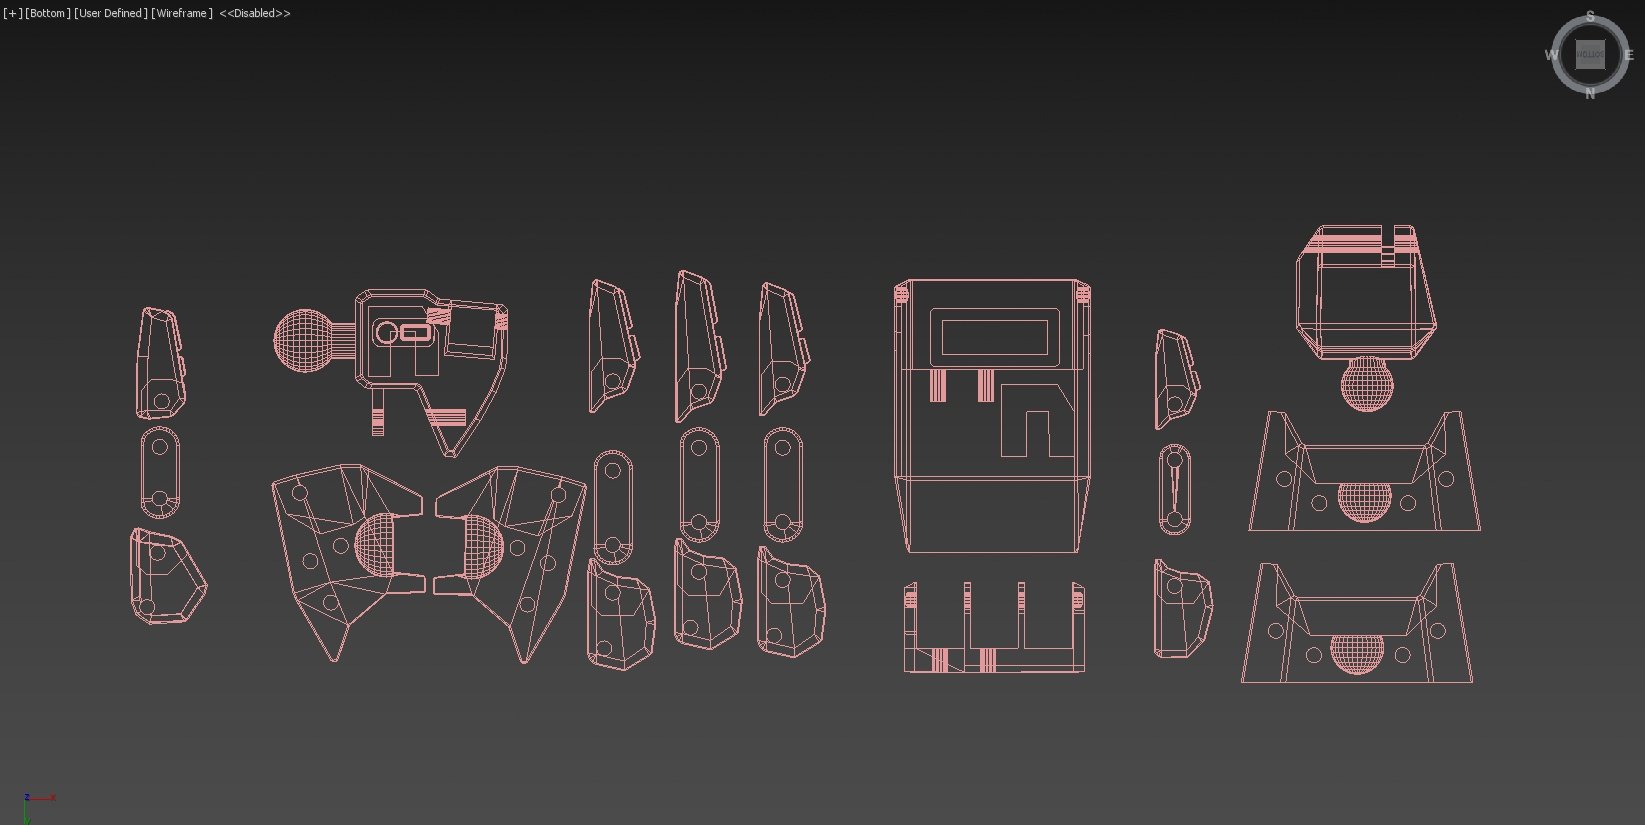
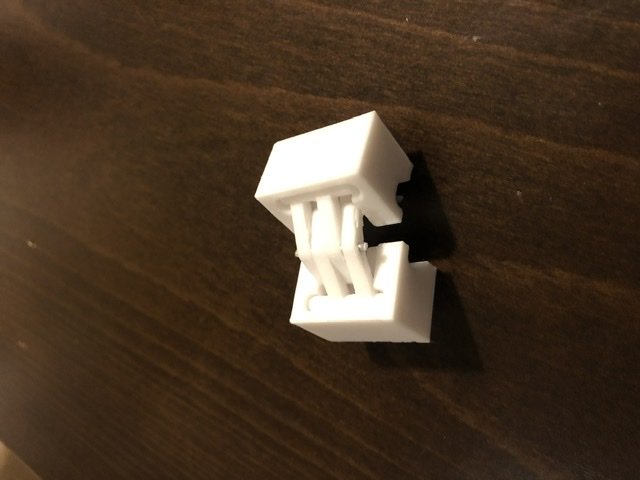
@MechTechnice! I'll post some prototyping below off I did off your original photos. I took a stab and instead of doing the flange pressing against the center housing I double flanged it. Printed in PETG, cycled a few hundred times bu hand. Great tension and no sign of serious wear! This joint will be perfect for the knee and may try to adapt for the shoulder joint. Your work is amazing. How strong is the styrene? The smoothness looks great in the photos. With FDM I'll spend a fair amount of time post processing. The SLA is awesome but not structurally consistent enough nor strong enough for the main structure. Today is a small but proud update. I got my SLA printer back up and wanted to do a detail test. I wasn't sure where to start. Since the hands are one of the more daunting things to get right (for me) I said screw it and jumped in to these over the 4-day weekend. The proud part is I used the attached line art to draw the original mesh back in '03 while deployed. The hands have hardly changed over the years and are one of my favorite creations. On the 1/20 scale I'm trying to get as close to DYRL canon as possible. Some things like the visible ball joints are required for function but the details like on the palm and back hand are critical. The mock up below has the 1/72 and 1/48 for comparison. The gray PLA arm assembly was the draft I first did so there are gaps and loose joints. The mesh is fixed but I don't want to print it again until I start panel lining, More photos following this post since I'm having a hard time not getting errors when uploading on my PC.

-
@MechTech would you mind taking a couple more pictures of that from an angle that can show me the way it’s built? I can almost make it out but would want to see the male and female pieces better.
-
@MechTech that joint looks awesome! I planned on nylon washers and metric screws with nylock nuts. How does it work for you? Strong enough? Does it break/chip? Is that SLA printed or FDM? I’ll look to reverse engineer. ☺️ I got my SLA back yesterday and have resin on its way. @Chronocidal I have an stl for a sliding/friction hinge and since the leg is so big I may go back and look at that as an option. Right now the model is easily over 500 objects. I’d like to optimize much lower and that just might help. Also I have the ratchet/nub inside the upper thigh portion to ‘notch” in the upper accordion grooves. Thanks!
-
XD after all the printing and finishing I'll have to freshen up on WM Chen's techniques
-
A quick mock up shows ~28 cm tall in fighter mode with landing gear extended. It is 71 cm from nose tip to feet in fighter.
-
SSP? Fast packs? Already have the geometry from my base model. Just need to convert to a printable/STL format once I get the final dimensions updated on this project The weight with everything is likely going to be pretty heavy. Snapping in to place may not be enough. I'm working on slide locks to secure the model in fighter mode. I hope in battroid the friction joints will be stable enough!
-
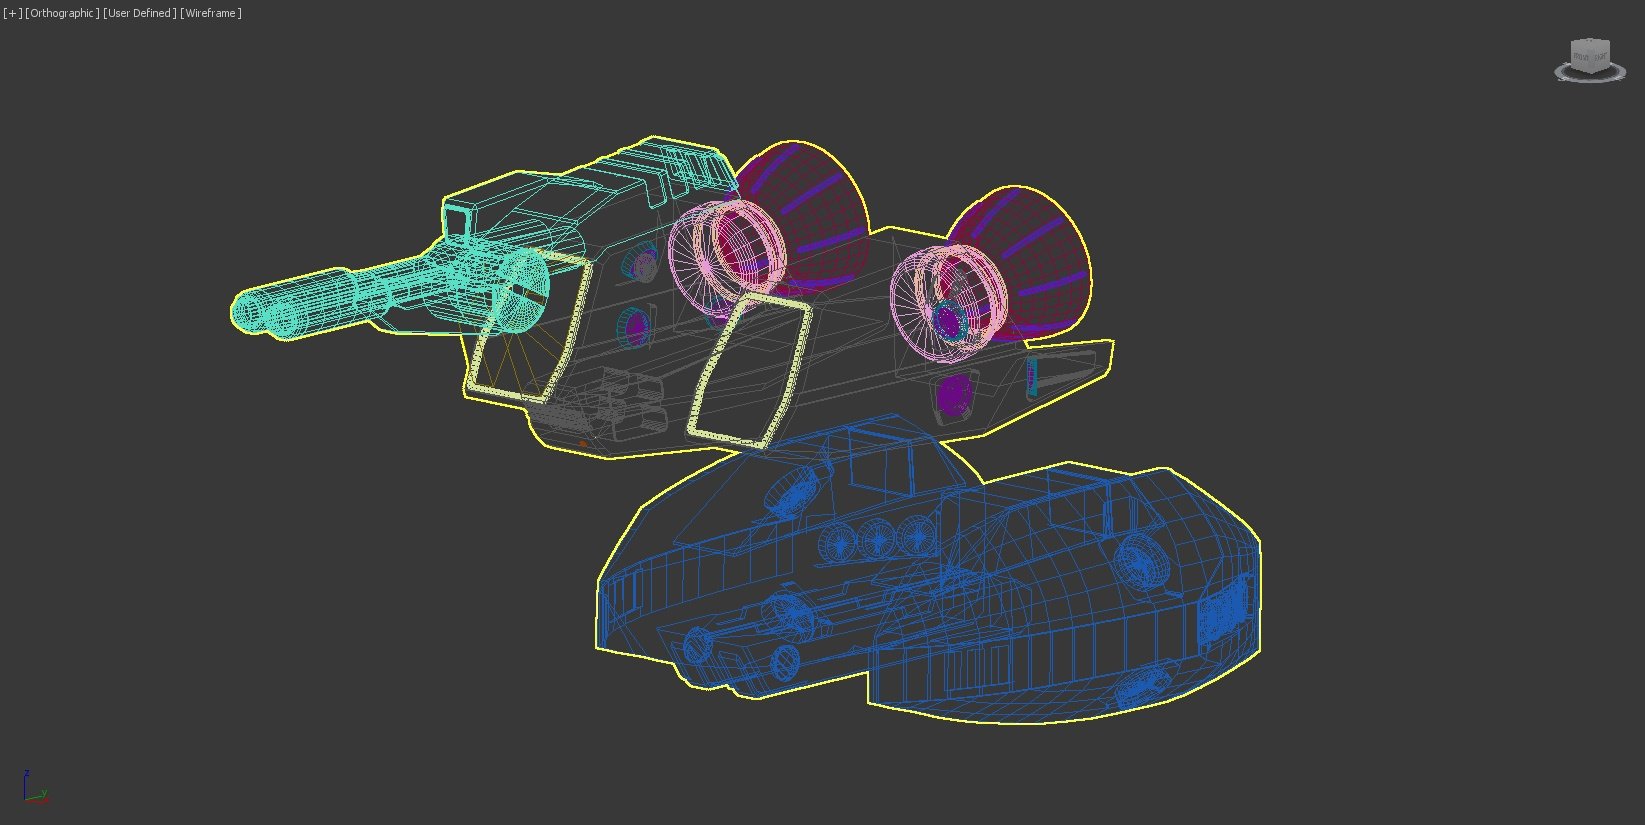
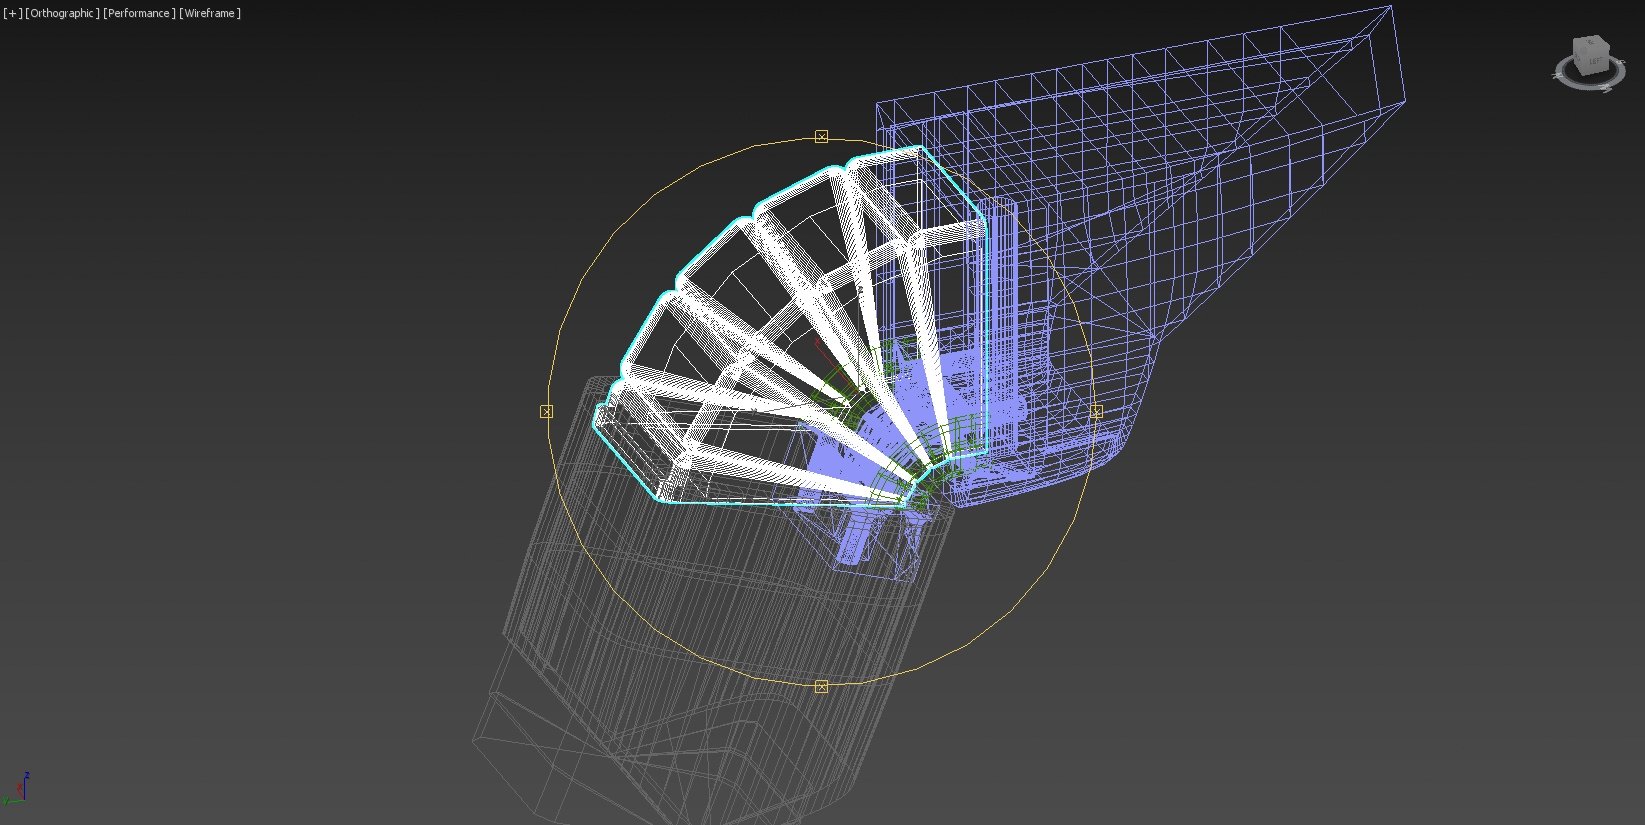
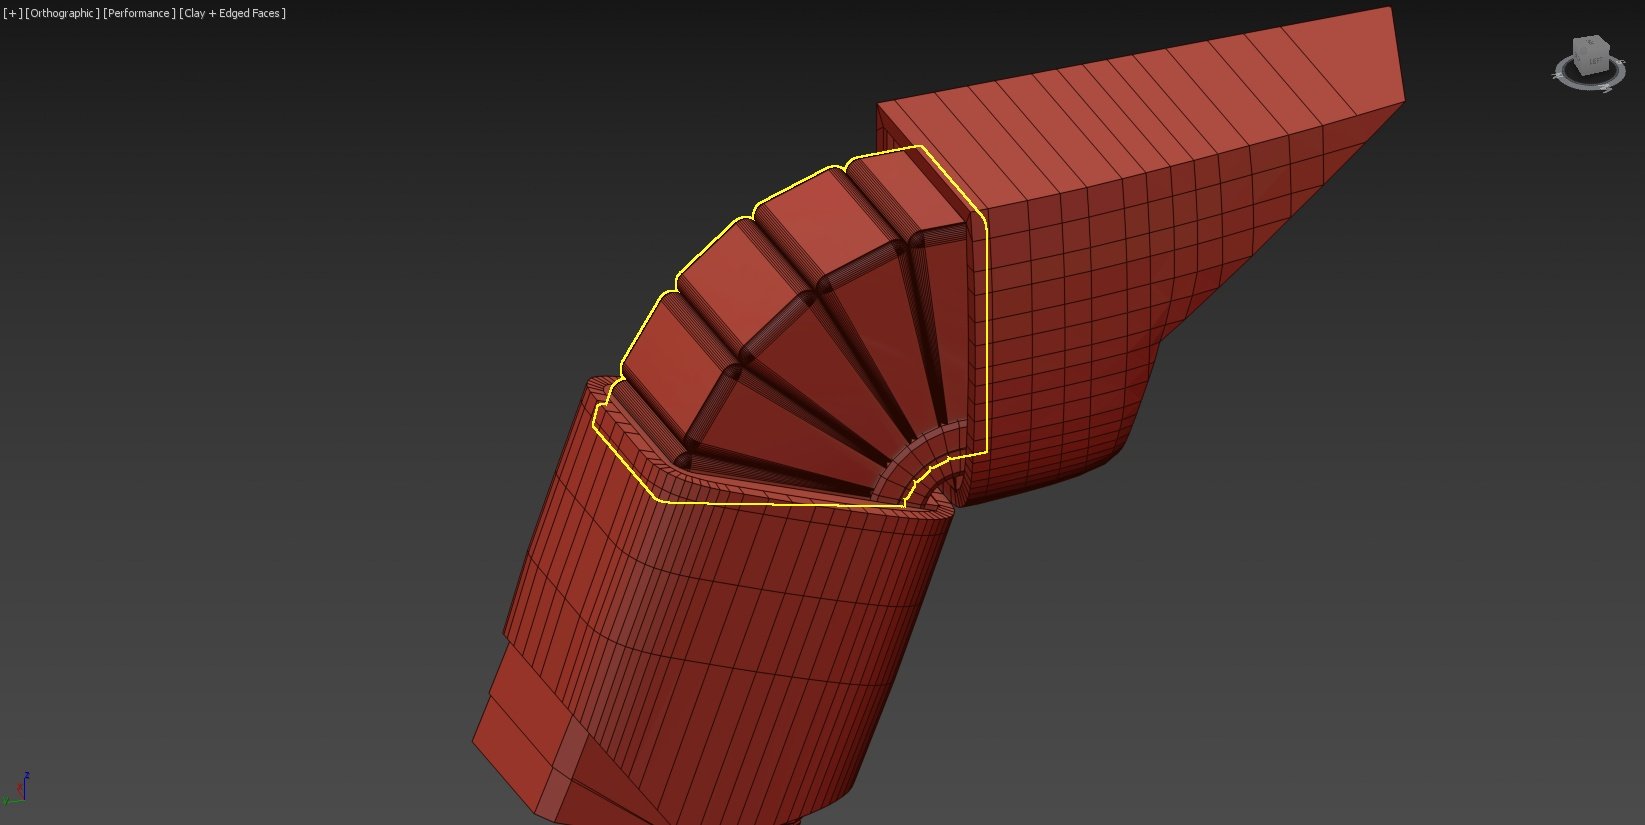
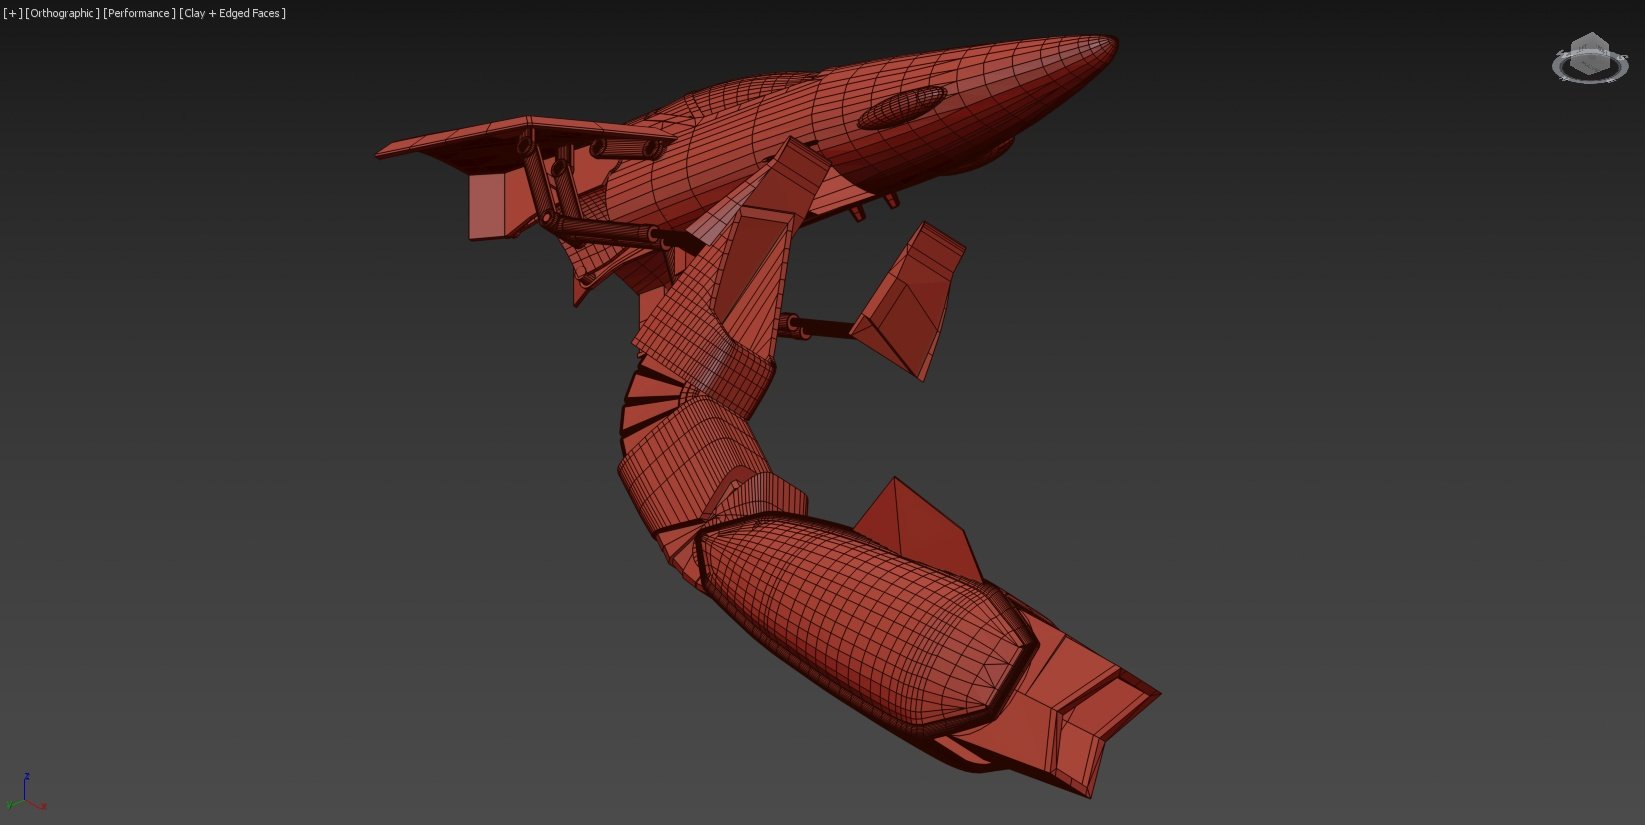
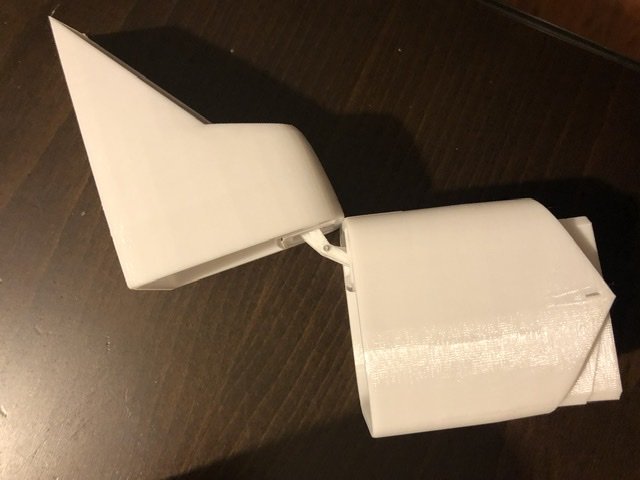
Here are some screen grabs. I'm not really sure if it captures the geometry that shows the "strength" of the joints. There are limit stops on the intake and upper thigh pieces that stop the quarter/half of the accordion looking piece. Like most toys it stays rigid/welded to the intake and the upper thigh rotates down along it. The Soss joint fits inside the accordion geometry and I'm working to strengthen/thicken it where able without jeopardizing the pivot points. To show how much other designing/engineering has been going along I attached a teaser of the swing bar for the legs that is stuffed under the chest plate. This is based on the Bandai 1/72 model that came out around 2014. I love the design and the larger scale allows for a better build. No new prints as I'm low on filament and am looking at either the legs or chest/back/wings next and it uses a bunch in the process!
-
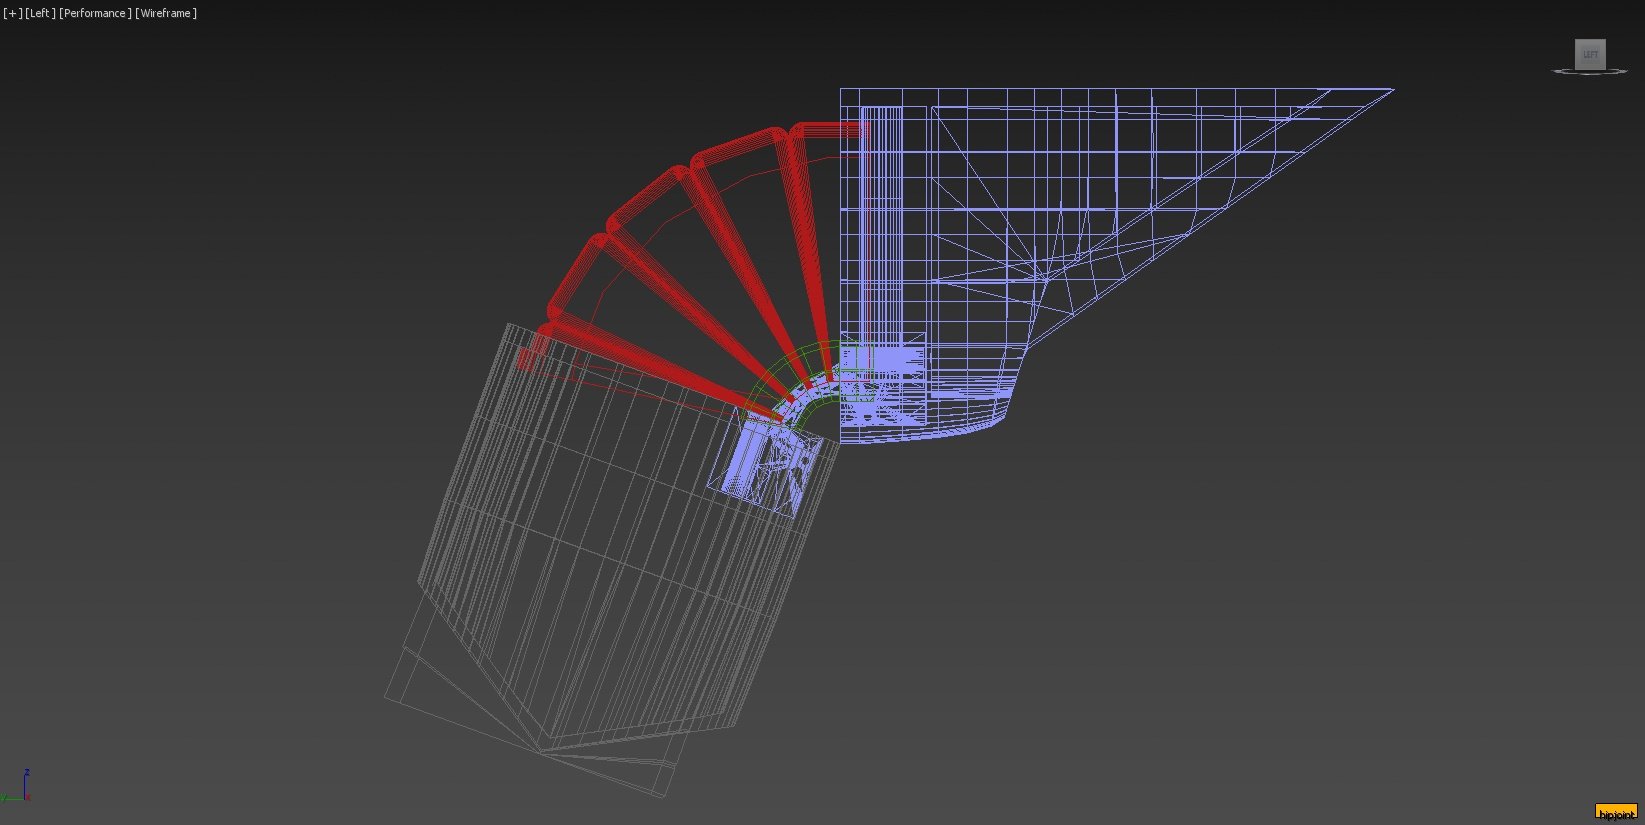
The accordion intake structure is the backup. I’ll try and post a screenshot from the software. The accordion acts like a shroud around the hinge concealing it completely. There are also tabs on the inside of the outer skin that are limit stops so it doesn’t overextend.
-
@MT it’s always been a dream to build or scratch build a large, detailed transformable VF-1. 3D printing has been my gateway to this and is an amazing hobby. Great support across the community when things aren’t printing right as well.
-
@sqidd In 3D scale is relative. The same file I drew in 2003ish is still largely here. The current proportions are a hodge podge of personal choices but using 1/48 Yamato and Bandai toys as well as 1/72 Hasegawa models. To get this right for 3D printing I chose a scale and use a website with a scale calculator that told me what tip to tail and wingspan “should” be for a 1/20 VF-1 based on canon data. I also have a micrometer to measure down to .01cm and use it on my 1/48s and 1/72s to verify everything is cross checking right. http://www.scalemodelersworld.com/online-scale-converter-tool.html ... is a godsend since I can measure in the software and all my real world reference objects and convert between everything. Long answer for some measuring by hand and some in the software and some from canon data. All done in metric centimeters for ease ... not choice
-
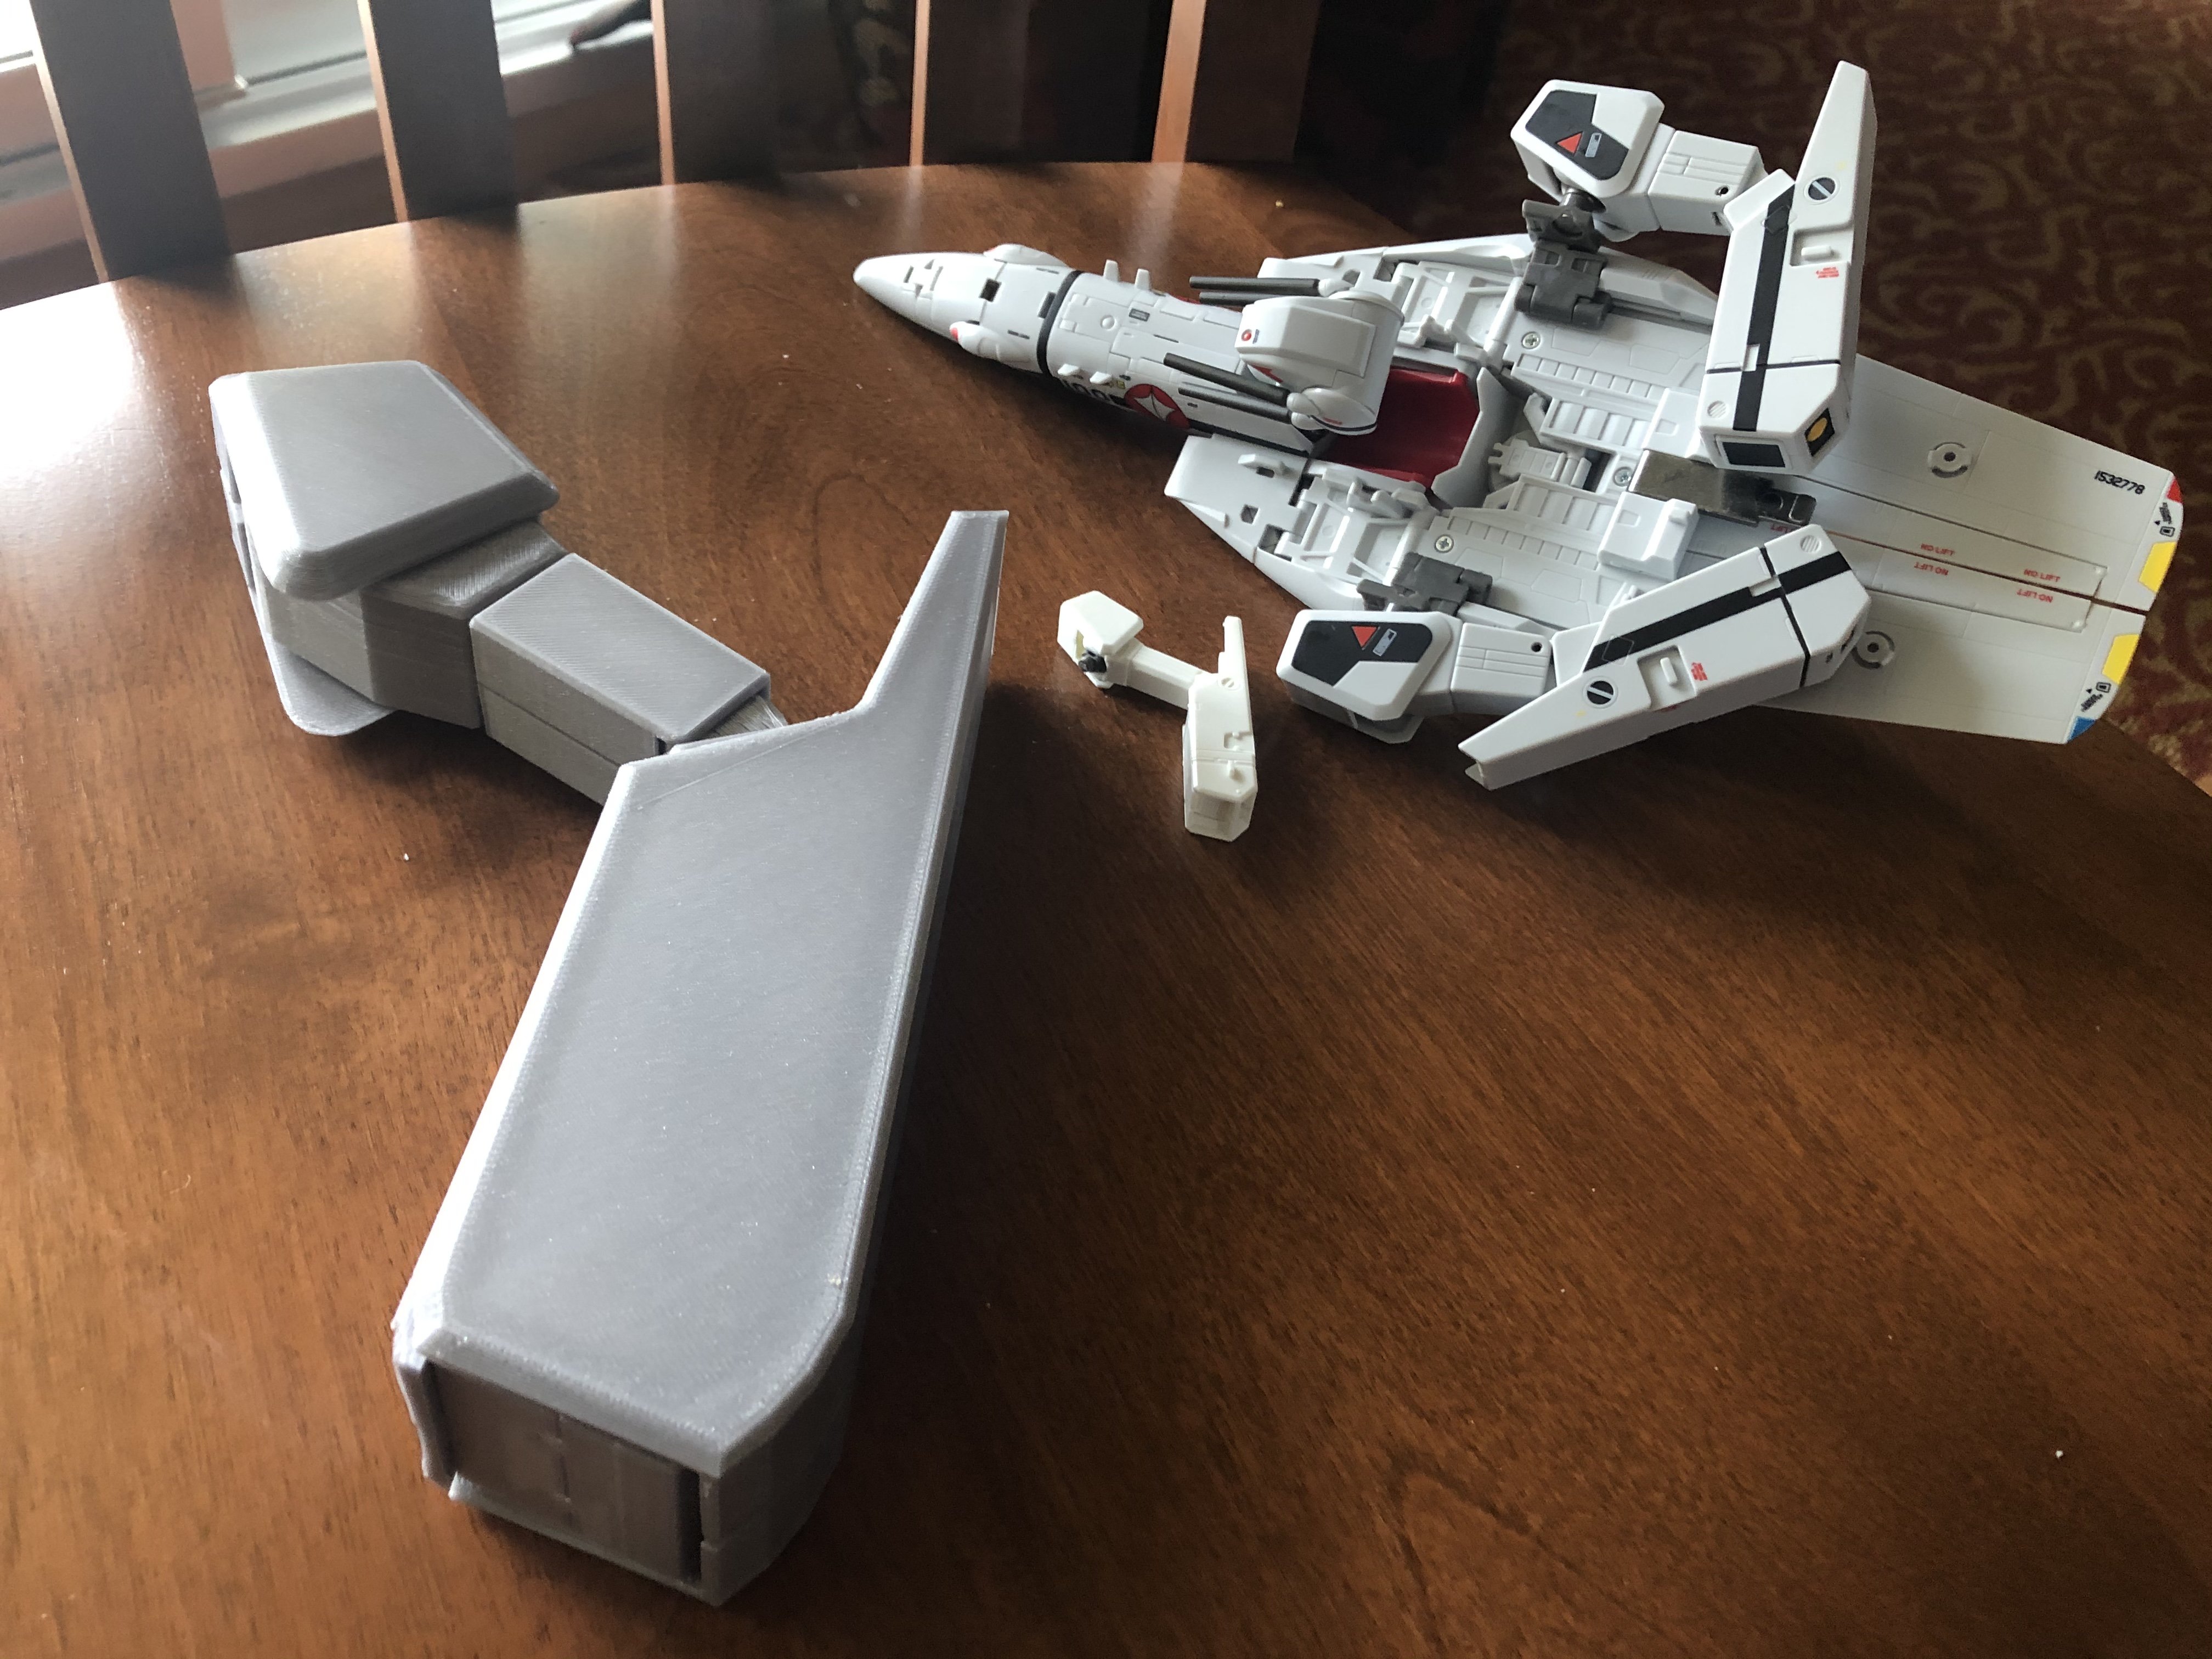
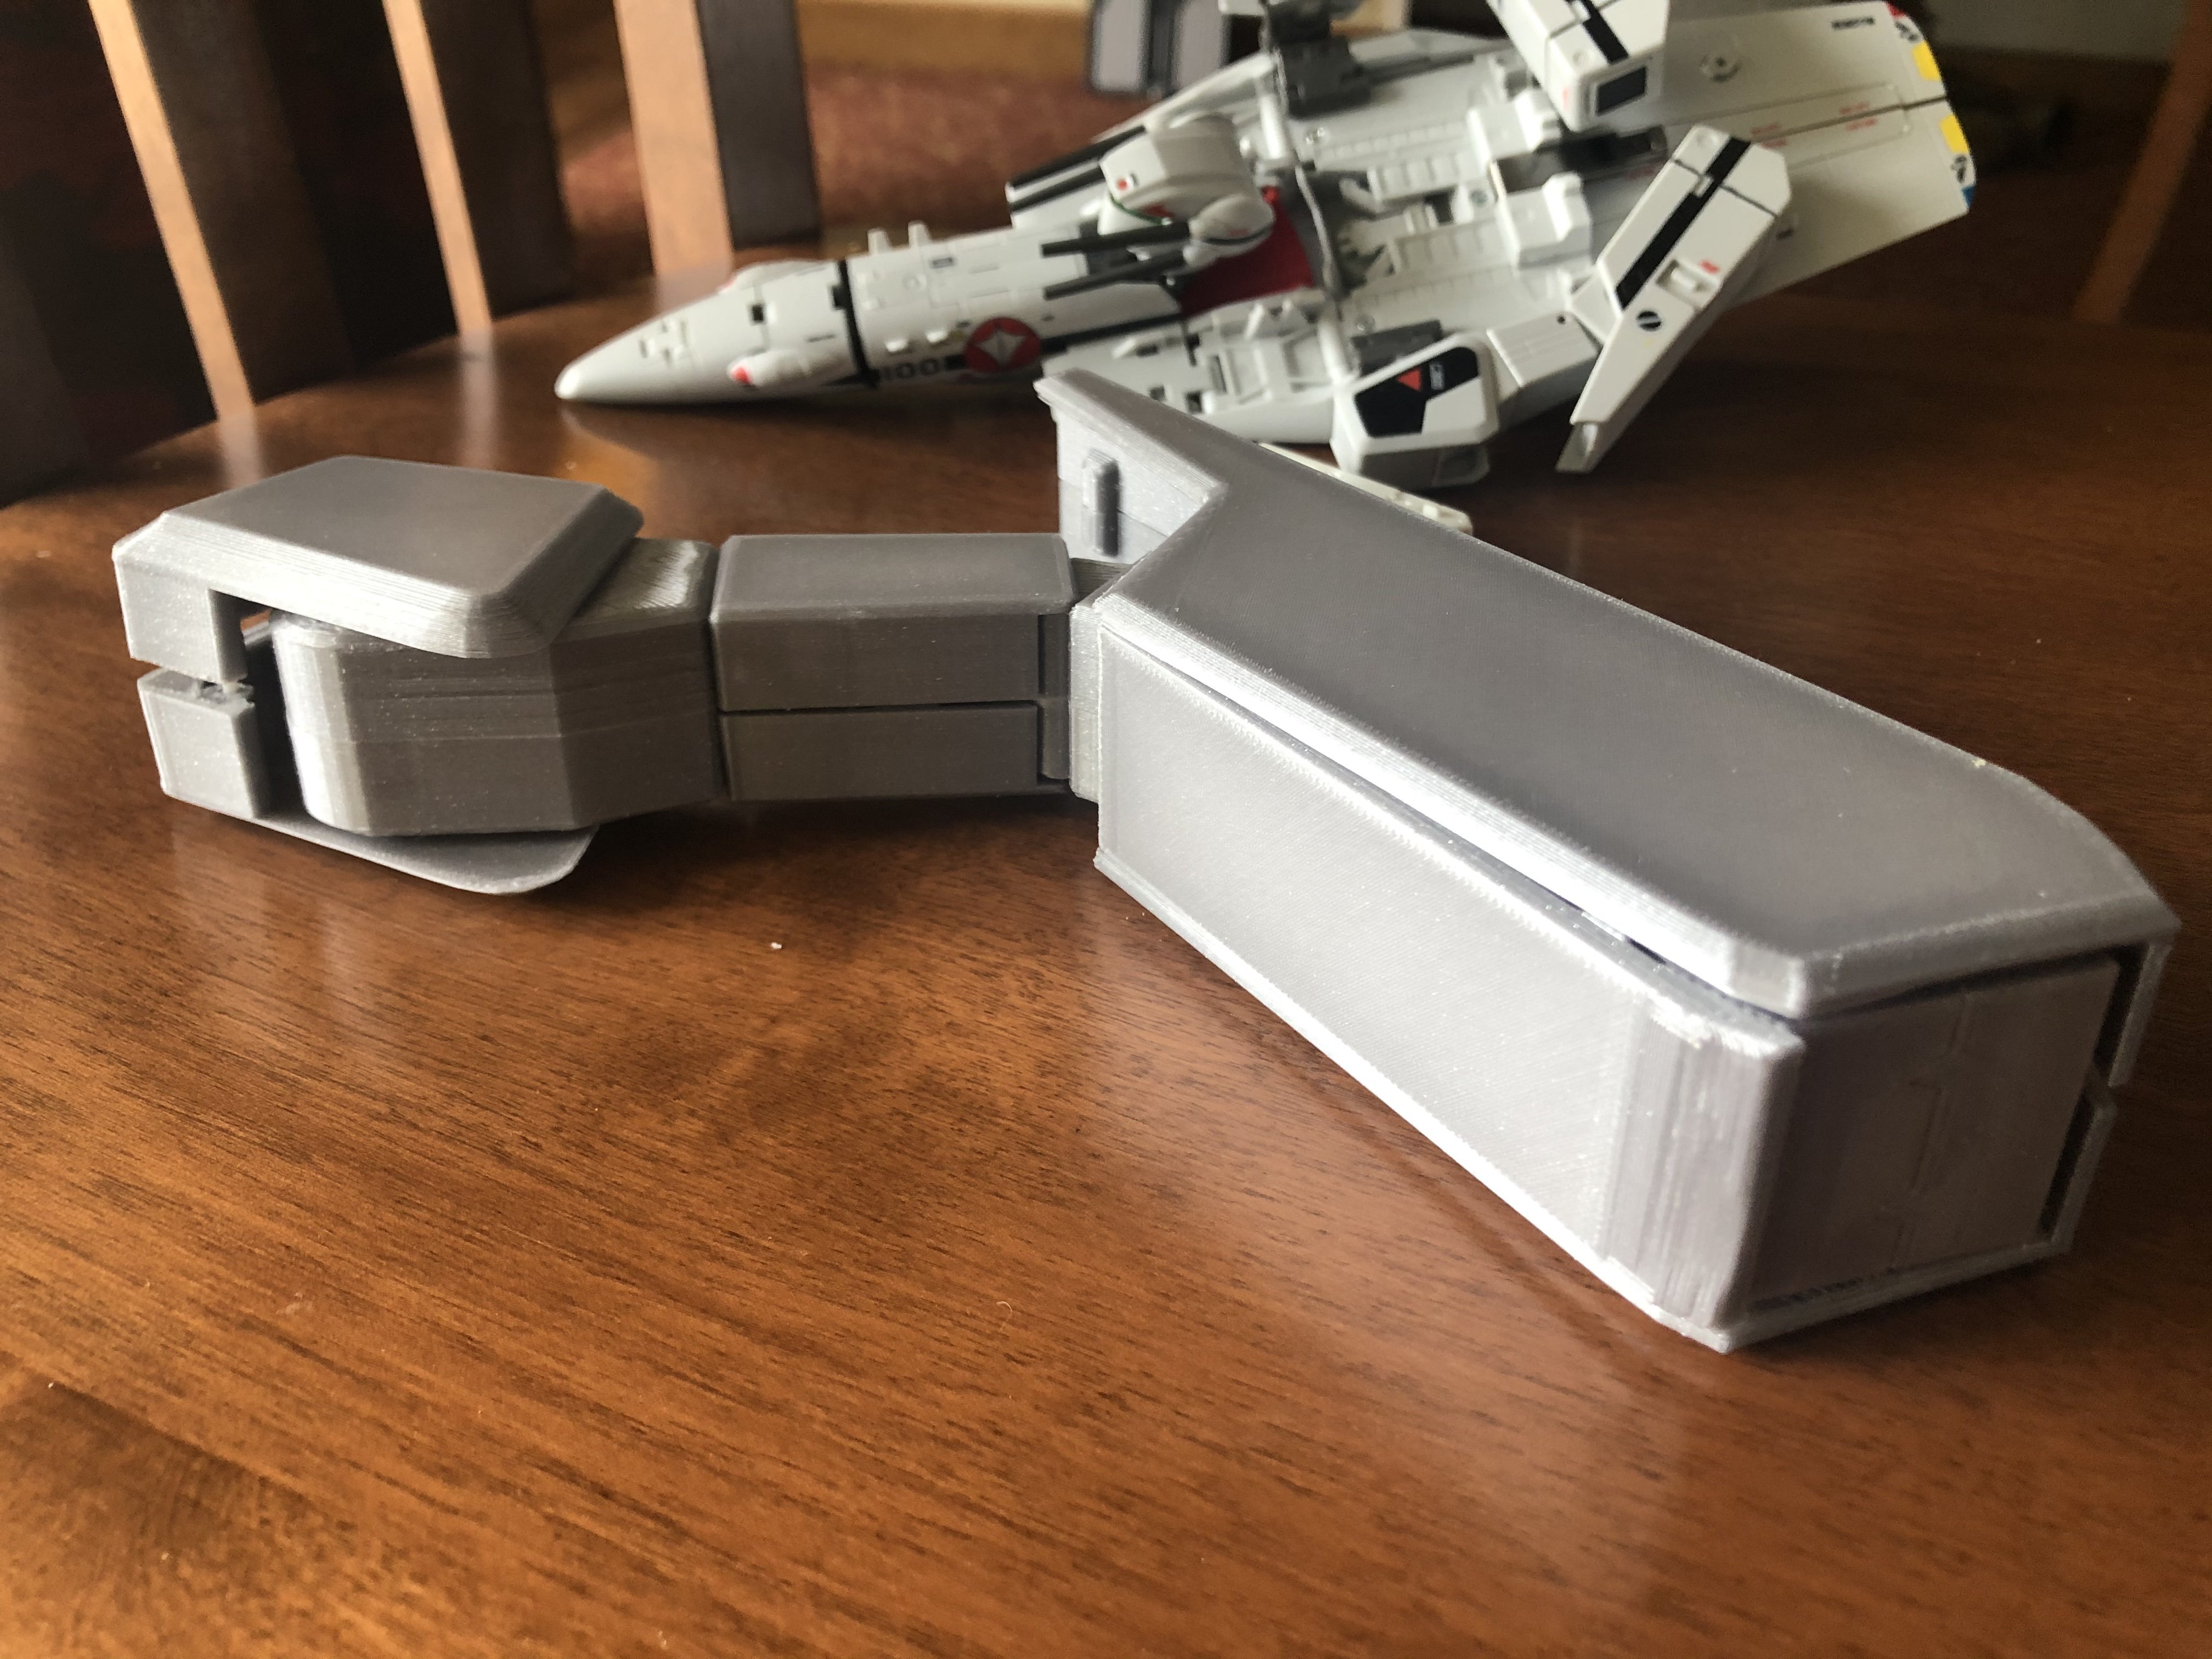
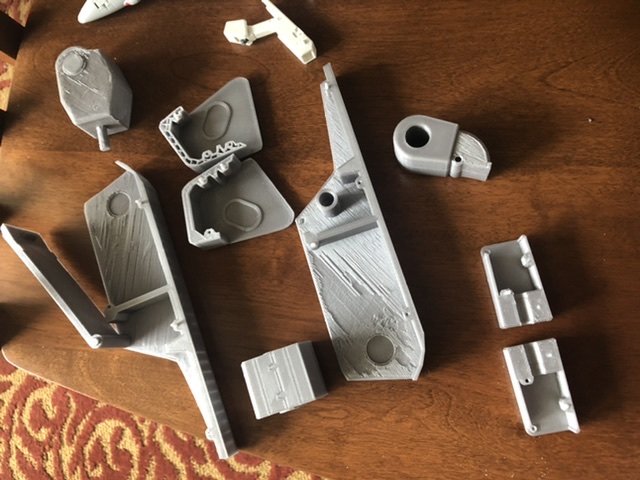
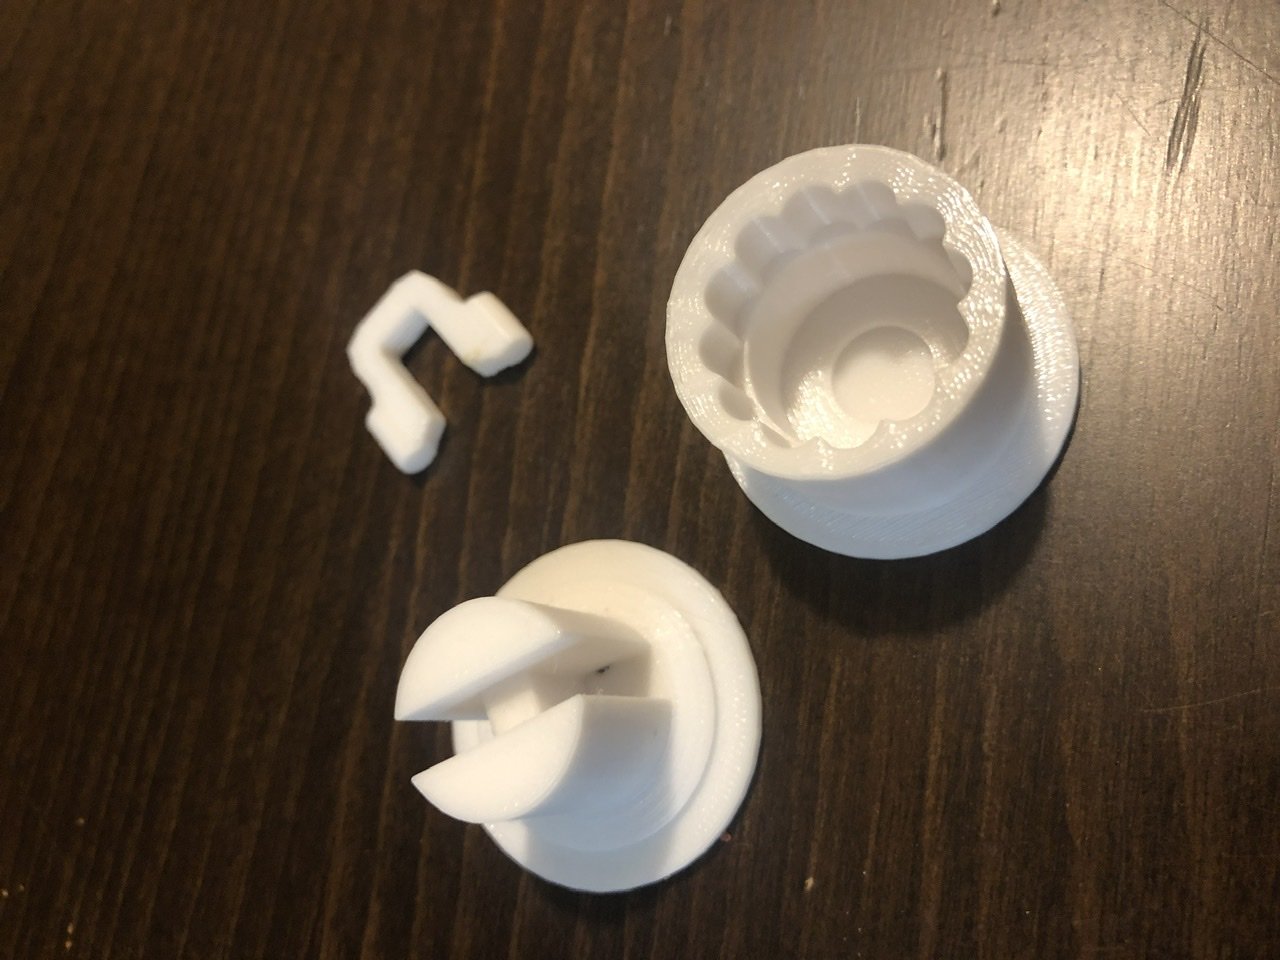
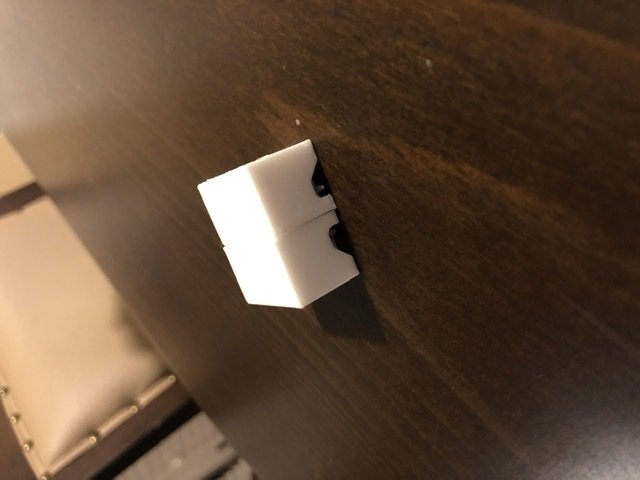
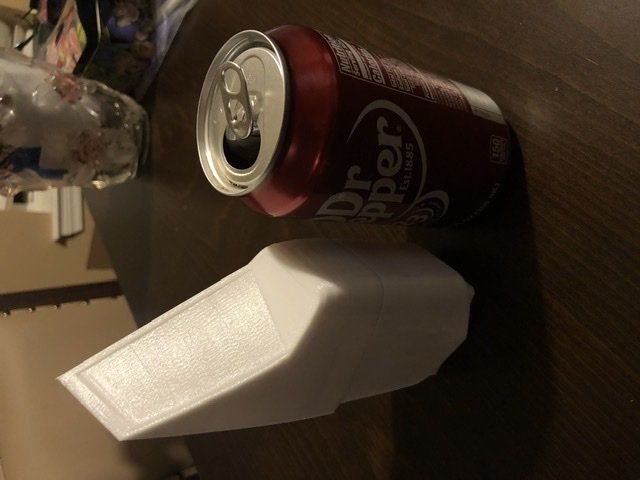
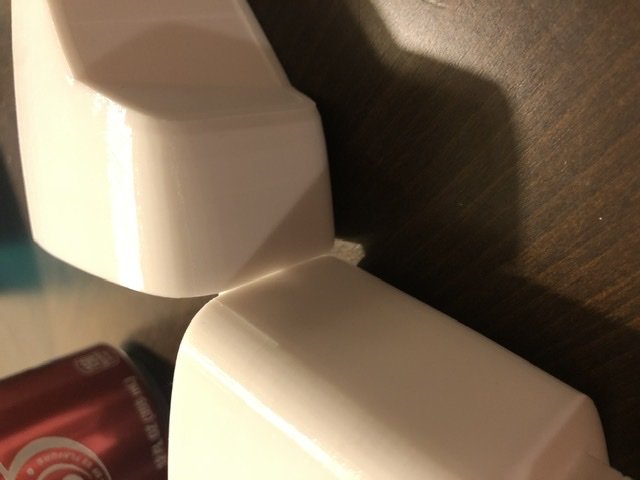
So I moved from Japan to the US and have had limited time to work on this with my printer. Spent HOURS working on the mesh since I had my laptop but only recently got the printer set back up. One of the parts that I wanted to engineer “right” was the hip hinge just below the intake. Most toys/models have it with a visible hinge but I really wanted a concealed/invisible hinge. Found a “Soss” hinge online and drew one to make it work. The pics are of the hinge itself and intake/upper thigh with a Dr Pepper for scale the joint is more stable than the photos make it look! Also drafted up the chest plate and joints/hinges underneath it for the heat shield, shoulder hinge and leg swing bar with true to anime function:)
-
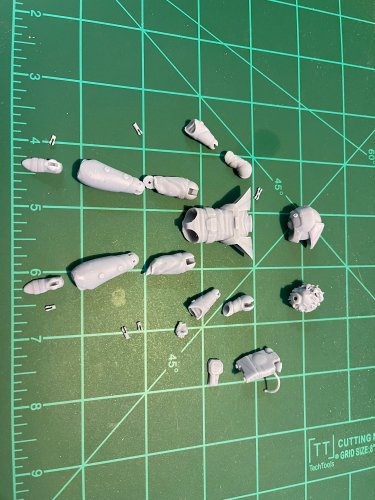
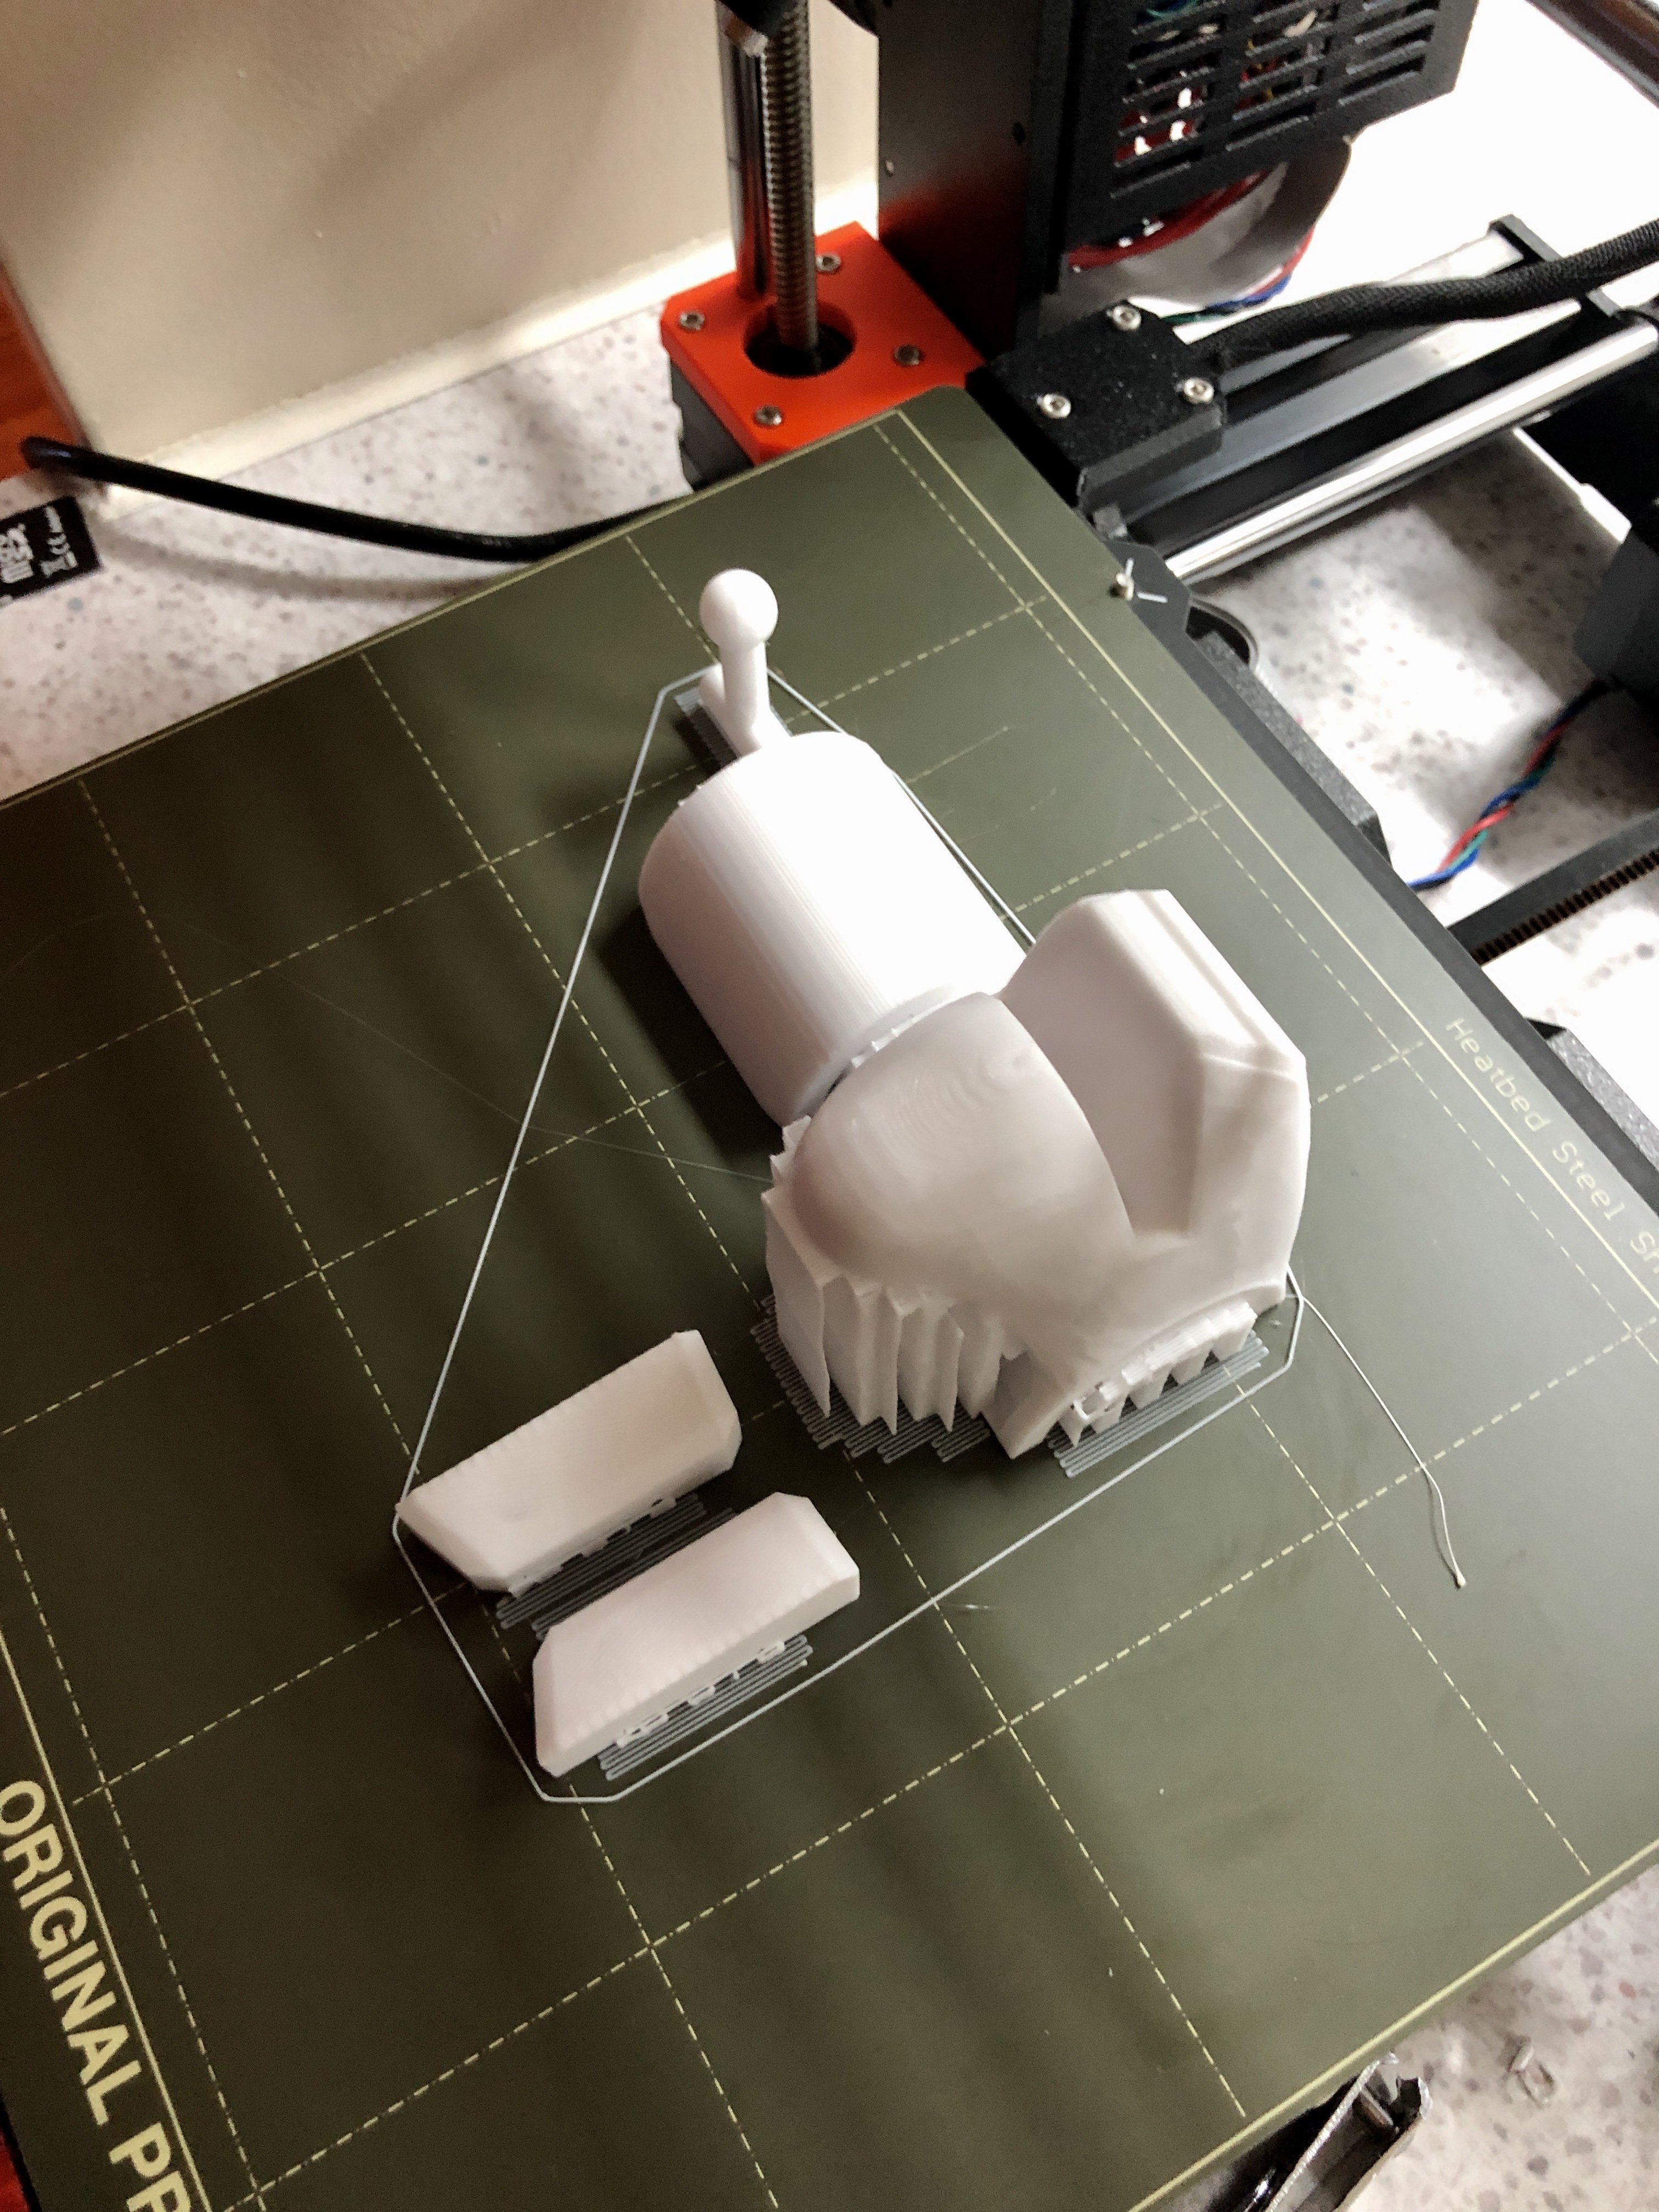
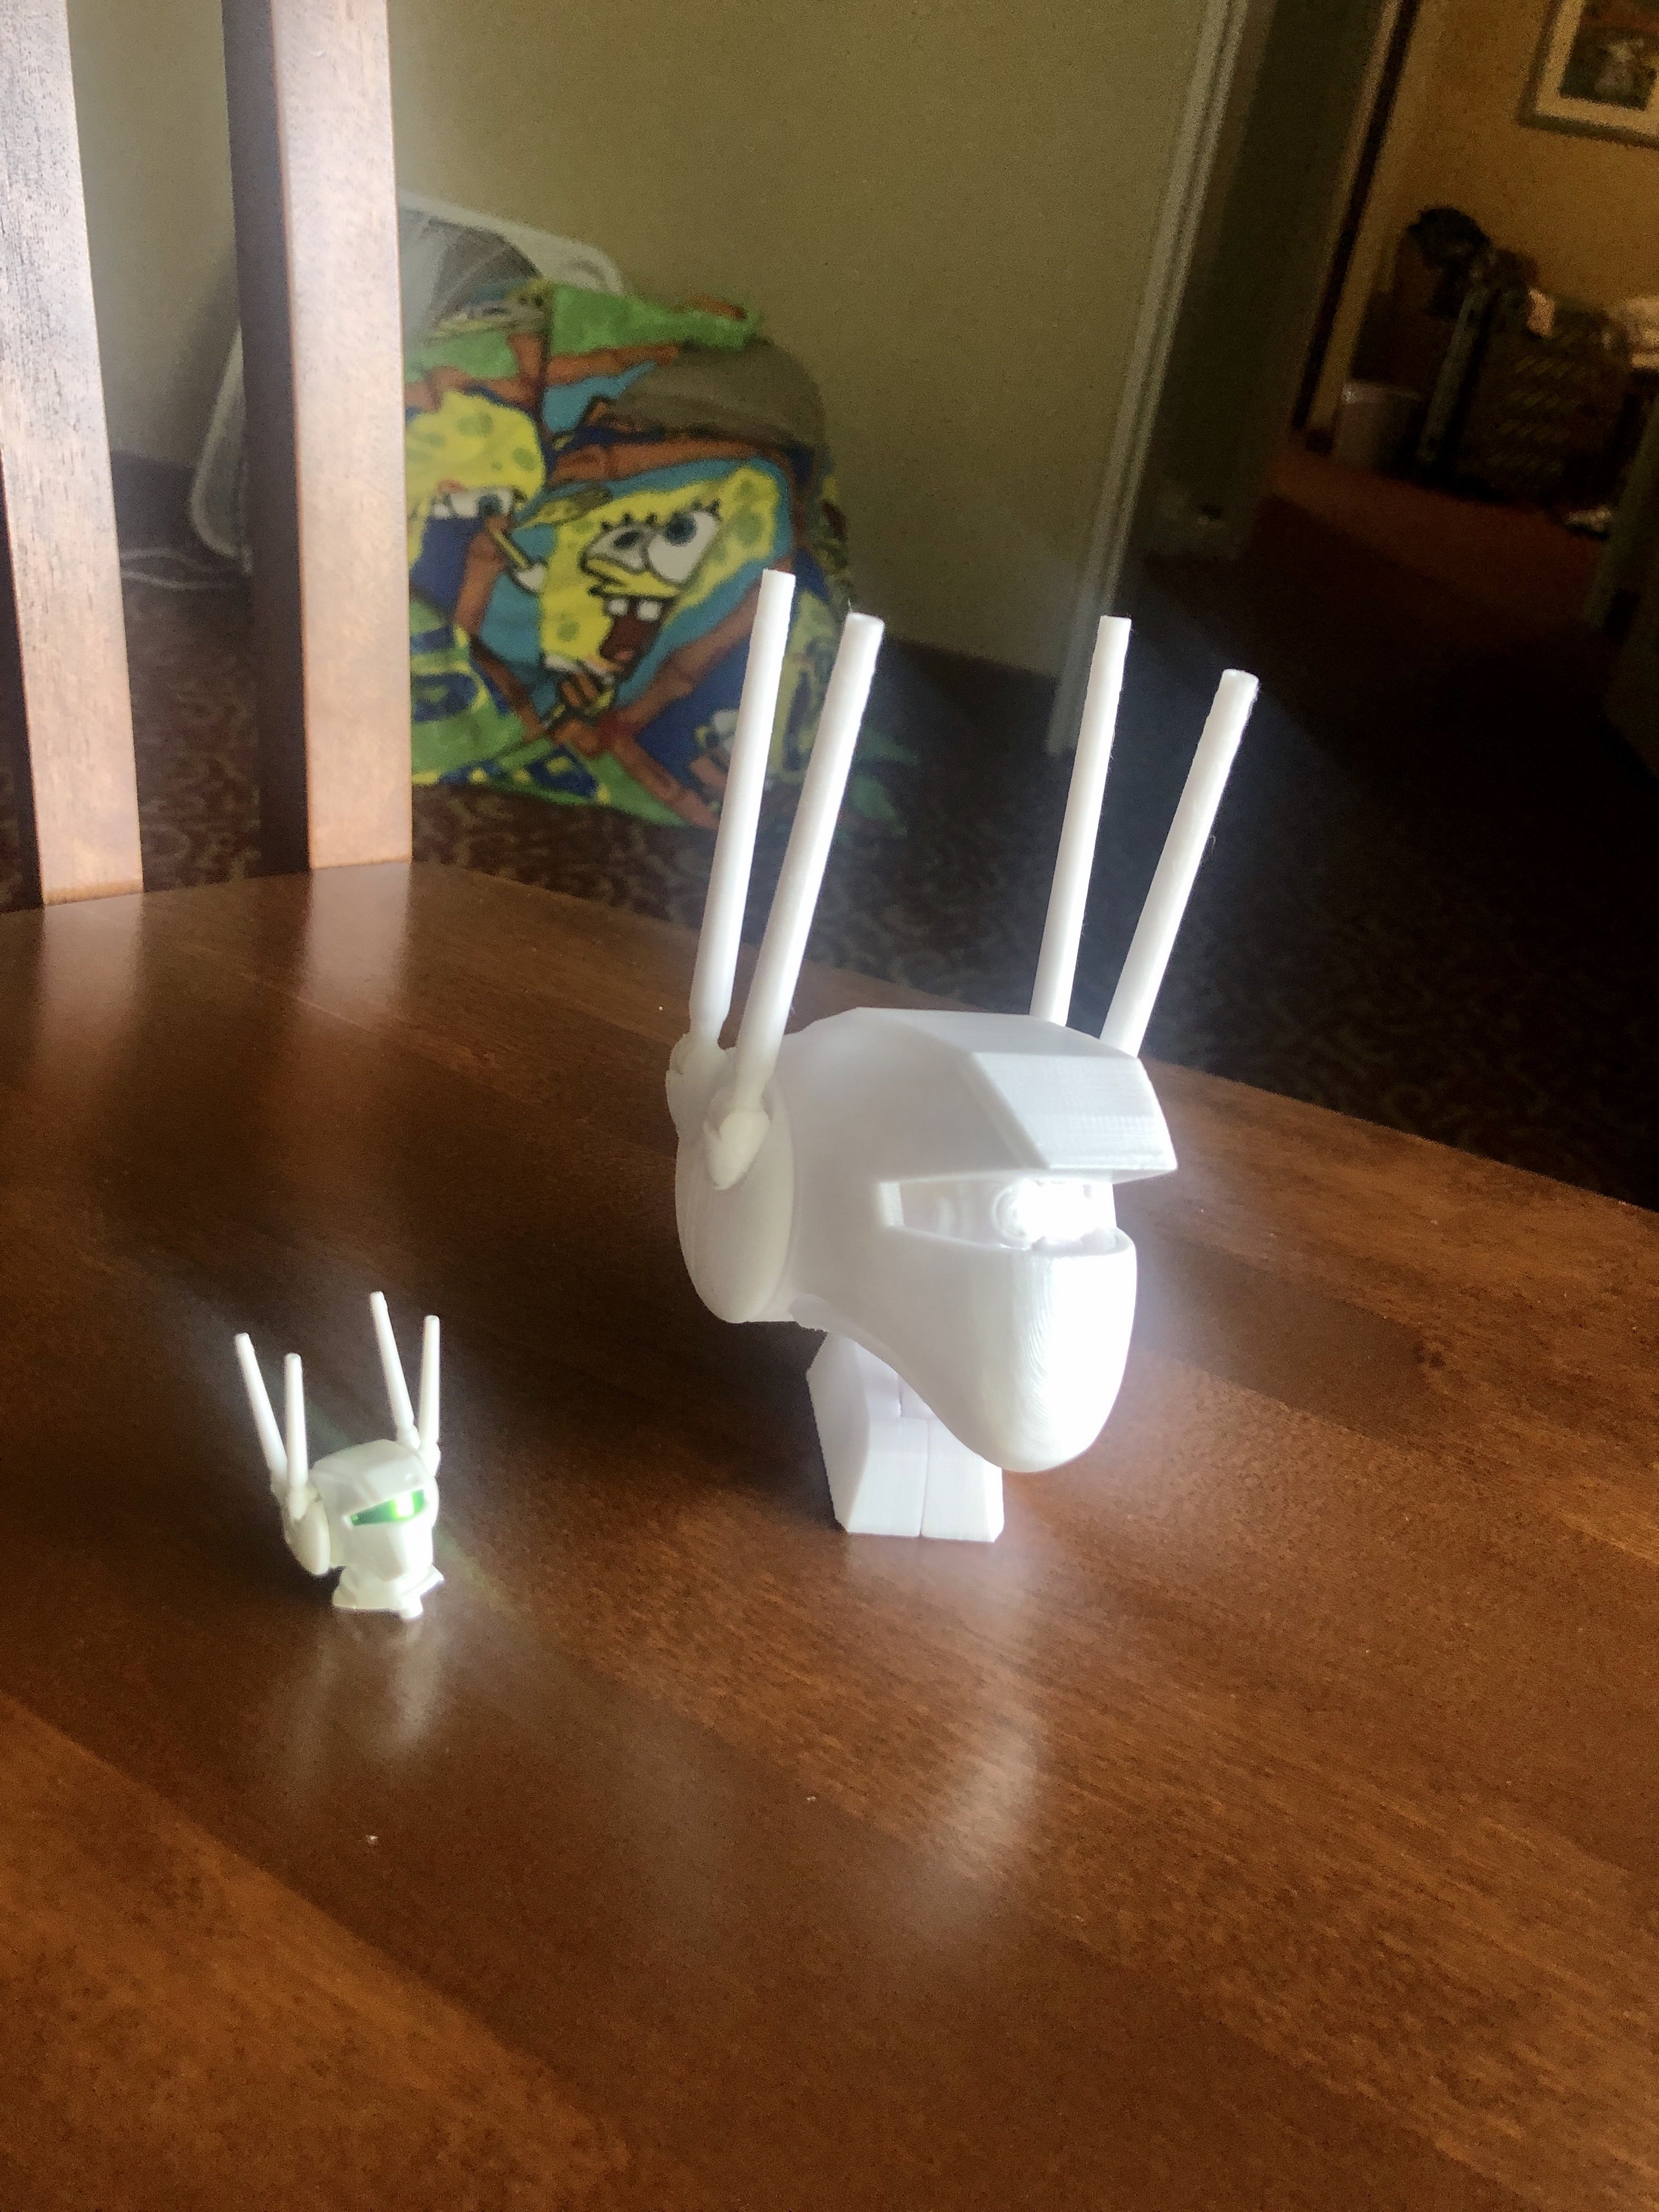
Thanks Chrono! I’ll look in to that. Here is an update I had to burn for motivation. One of the most iconic parts of the -1S is the head. All these parts are printed at draft quality and can go much finer. Goal will be to complete draft resolution mock up of the VF-1 to work out proportions/joinery/articulation and weight. After that I can go back in and edit in panel lines/removable panels/ gimmicks (moveable actuators on neck and gear doors?). Also switched to PETG on the head for more strength and heat resistance. Still dialing in the settings but wanted to post this mock up. Double chin, neck, laser base and individual lasers are all jointed. Also the neck has a vertical axis so that it seats deep/flush in fighter mode.


-
Thanks for the comments and copy that MT. In my opinion designing/drawing the STL files is the heavy lifting and thankfully I have a fairly complete VF-1 already. Even the Super/Strike/Elint mesh, just the elint isn’t textured. These photos have a bunch of lessons learned: 1. If the object can be printed as a solid instead of halves I’ll do it in the future. 2. PLA in draft resolution (speed, .20 layer hight) didn’t get me the clearances I wanted for the joints. I’ll have to redesign the slack or come up with better joint designs for the elbow and upper arm swivel as well as printing clearances in general. 3. The parts that are sandwiched between other parts like the bicep section between the forearm body and shoulder box needs to be thinner to not bind. On the bicep thats between the forearm and shoulder I forgot to narrow it and now the part that sandwiches it doesn’t close fully. Also need to factor in paint/primer clearances. 4. Always have spare filament. I ran out at 98% complete 5. If you look close you can see the alignment blocks on the part halves. I used scrap .175 filament as the alignment pins. I have a .170 mm pen drill that bores out these holes in post processing and it works like a charm. 6. I was upset with the print and design errors then realized it only cost me about 1.50 and an overnight print job. The VF-1 in one of the photos is the Bandai DX for reference. Note I liked the angle of the upper tip of the forearm piece as opposed to being 90 degrees in most toys. I attempted to mimic that but reversed the angle by accident. Currently re-modeling the upper chest plate since the transformation, hinges, heat shield clearances are tightest under that. I switched to PETG last night and have a long way to go to dial in the quality like I had in PLA. My benchy was a hot mess! If anyone has a good joint design that ratchets like the knee joint please let me know. I took an older transformer apart and have tried printing the ratchet mechanism with springs purchased online. They don’t grip and hold the same plus the material doesn’t seem strong enough to support the wear overtime. I wanted to avoid friction joints due to wear.