
winterdyne
-
Posts
189 -
Joined
-
Last visited
Content Type
Profiles
Forums
Events
Gallery
Posts posted by winterdyne
-
-
I like your low-vis. Are you interested in doing any work for me? PM me if so.

I might be tempted to take a commission - but the question is what's a good price for what standard of work?
-
well, maybe if he's weathered and battle damaged, it got blown off. That's what I'd do. Better yet, take a clear plastic sprue, cut a few small pieces and put them in the lost piece's place, make it look like it got shattered!
personally, I didn't think your first attempt was that bad. I would have worked with it rather than dissected it. the torso I thought actually looked pretty good, as did the head. But it's your model, so what you think is all that really matters.
I'd check the U-bend / drain trap first. It's surprising what gets left behind in there.
-
...If you can't find the Mr. Surfacer, I have used the Games Workshop primer with good results. It is a spray can and comes in white and gray, I think maybe black too. You should be able to find it where gaming miniatures are sold. It goes on very thin and will not obscure the fine detail on the Hasegawa kits...
Yeah, it's good stuff. I used it on my yammie. Tamiya paints stick to it very nicely. It does have a slightly grainy finish but it sands up nicely.
I wouldn't bother stripping - better to keep it as an example of what you were like. I have a rather embarrasing hand painted RX78-2 Gundam on my shelf for that reason. That said, there are still some details on it that I like.
-
Wow, great job on the paint.
It's funny, maybe it wasn't you who mucked up the "NO STEP" markings, but one of your little illiterate support crewman.

Keep us posted to the sweet and inevitable end.

Thanks! I've been meaning to ask you about getting some recast parts - especially a couple of heatshields as I've recarved mine and am not sure I like it. If I can get 'em in resin they'll be easier to carve grooves into.
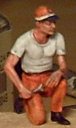
I'm also thinking of sculpting a standing Hikaru holding his helmet or set of pilot parts, which would be nice to get cast up, either in metal or resin.
Just had a nice mail back from HLJ, they can help with getting spares. Woot!
For the next project, I'm thinking of a VF-1D - is anyone still making the custom kit for this?
-
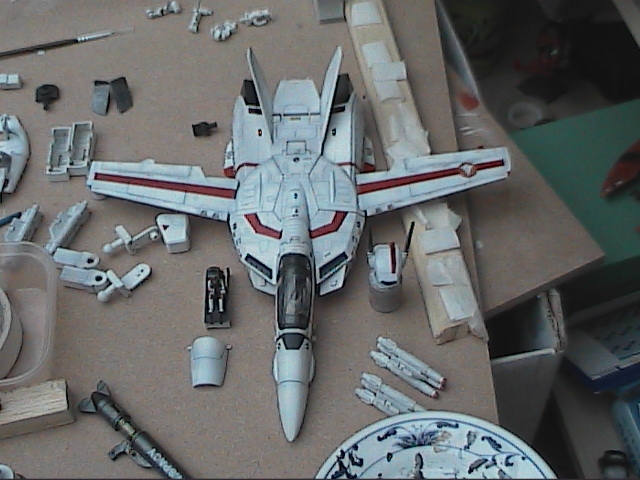
Ok, I've finished the transfers. I'm probably going to buy a spare set when I do the next valk so I can redo a replacement canopy. I need to apply a seal of future over these ASAP. Will probably do this as soon as soon as the paint on the micro missile pods is dry.
From above:
A good shot of the preshading.

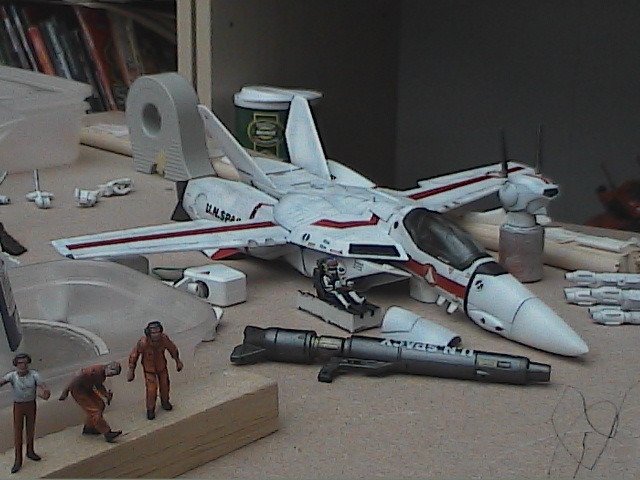
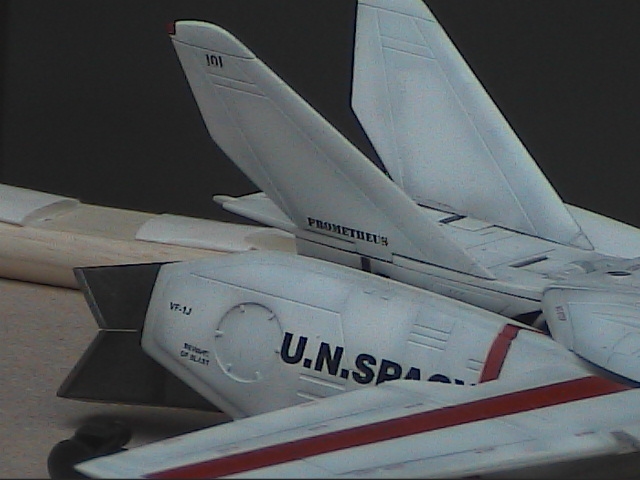
From front/right:
Yup, looks like a custom valk now.

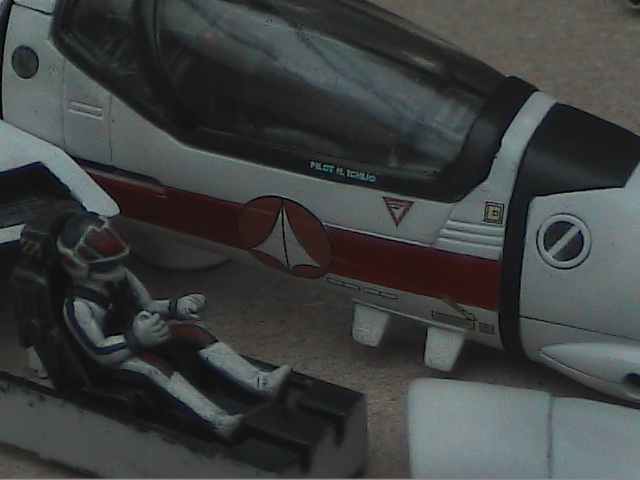
Canopy closeup:
Devin's transfers ROCK...

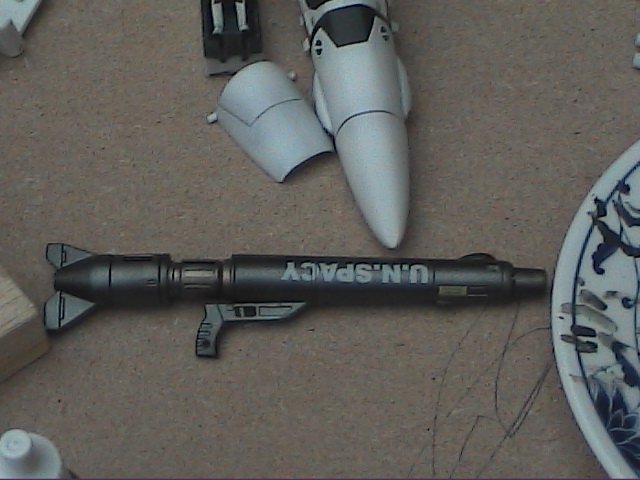
Gunpod closeup:
... as does vallejo bronze / tamiya gunmetal for contrast.
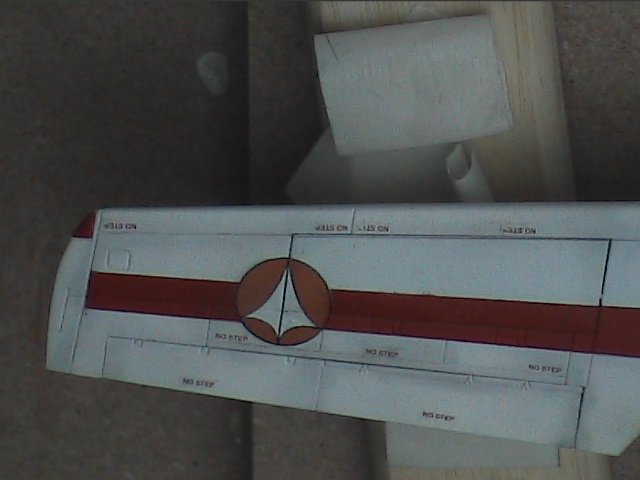
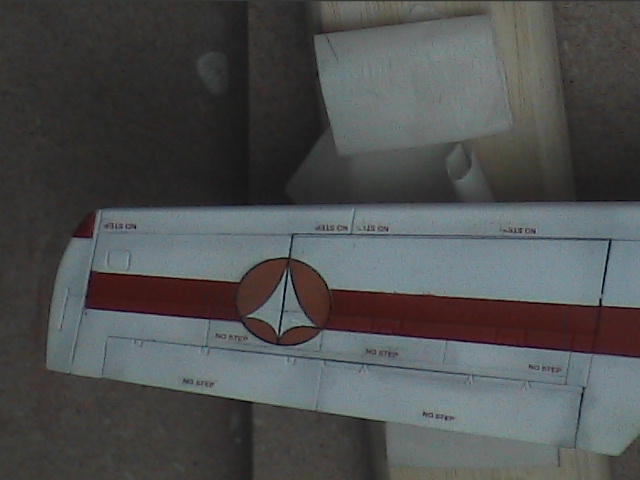
Left wing closeup:
I ruined quite a few 'no-step' markers. It may have been an idea to practice with the setting solutions. :-) But where would the fun be in that?
Tailplane closeup:
I'll have to repeat this shot once the panel linings done.

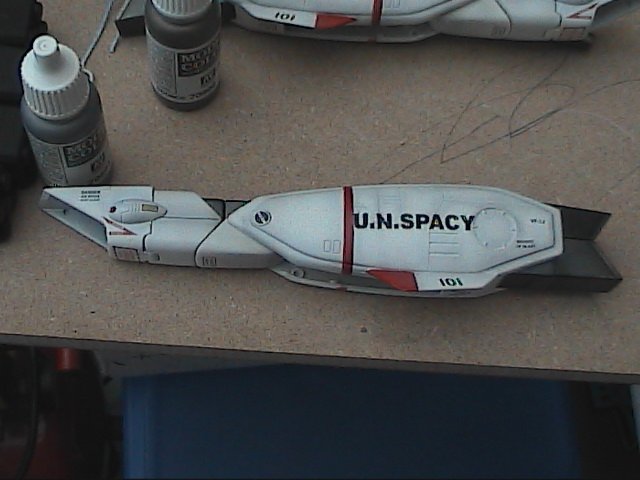
Left leg closeup:
The UN in UN SPACY is a little shaky. I've tried to tidy it up with a scalpel, but I think I may need to try and blend in some white (over the future, into the preshade) to neaten it some more. Perhaps the oil wash will even things out? Then again, this valk will eventually be GBP'd at least some of the time.
Comments, opinions, critique welcome (begged for in fact) as this is my first ever (!) airbrushed aircraft as well as custom valk. I'm thoroughly enjoying it tho, and can't wait to do another. I'm also planning on lighting the GBP legs for a laugh.
-
I also can't recommend these decals highly enough!
I've finished decalling my custom hikaru VF-1J. And it looks excellent.
If I don't completely wreck it in the panel lining phase, I'll post finished pics here. I'm going to be ordering some more transfers (including a spares sheet) when my next valk turns up.
Anyway, big kudos to Devin for providing this service again. I hope no more nasty impatient customers turn up. If so, they should probably try to get themselves an ALPS printer and see how long THAT takes. :-)
-
ARGGGGHHHHH! I snapped the hinge on the canopy! Guess I sprayed the future a little thick in there and it's overstressed the part. Anyhow, I ripped it off, repaired it, filed down the recess for the hinge and it's now floppier than well, I leave it to your imagination. Looks alright closed though, and can always be tightened by wrapping tape around it. EDIT: Nope, just snapped it again. Still looks ok closed, but I'm going to need to epoxy a new hinge onto it. Grr.
TOP TIP: If you're customising a 1/48 and are going to work the cockpit / canopy you really should remove the canopy before priming. It's held on by the part on the top/rear of the nose/cockpit assembly, which is glued in and held by a couple of pegs. The best way of removing it seems to be a big, flat nosed pair of pliers and just to wobble it off (snapping the pegs). It doesn't come of that easily. I didn't remove the canopy during painting and now wish I'd had the cojones to snap off that restraining piece and remove the canopy safely. Would have saved headaches in the long run. The cap piece could then have been lightly tacked back in place for preshading along with everything else then snapped off before reassembly.
I'm basically now in the position where I can use the canopy I have (already decaled) for now but would like to replace it with a fresh one (and redecal that when I do my next valk - yes, the addiction has set in!).
So, what I need to know is how the hell do I order (indeed CAN I order) a replacement part from Yamato? I neither read nor speak japanese, nor do I personally know anyone that does.
That said, as you may have gathered I've now futured the whole plane and am busily applying Devin's excellent transfers. He's not kidding when he says they work well with MicroSol / MicroSet. Very nice transfer sheets, if you're planning on customising a valk I'd say they're essential, although they could do with some spares - especially the tiny 'no step' markings which I managed to destroy a few of. Mind you I haven't applied a transfer for a good few years before this project. :-) I'll try to get some pics up over the weekend.
-
That's nice, I hope mine turns out as well!
-
Thanks. Next time I get a chance to do some painting I'll do them.
-
Thanks! I do have a question though, for anyone who's done this before:
You know those little semi-circles in the screw-caps etc (don't know what you'd actually call them)? Should I paint those in prior to wash or just let the wash darken them?
-
Ok, here's where I'm up to.
Not a great pic:

I primed the valk with citadel skull white primer (quite a good 'dusty finish') primer. Preshade with tamiya sky grey, and cover with many light coats of very thin flat white. Stripes are tamiya flat red and nato black.
You may notice the heatshield looks a little different. I've sculpted a raised upper section onto it, (actually by filing/sanding down the lower section). Should look nice with a wash.
Next step will be a thin coat of future, then decals, the seal those in with a thin coat of future, then oil wash, future, then matt. Then assemble. Hopefully everything should still move!
-
There are a couple of tricks that might work for the opening:
1) Build a deeper recess. This means you'll have a fairly large block on your wall and presents the problem of having sides that need detailing.
2) In the recess use a reduced apparent scale to fool the eye for depth - you need to build the back part of the recess larger than the front, and put detail on the back wall in a smaller scale. Looks very good for static camera shots but doesn't work so well when the viewing angle changes.
Both of these can be helped with good lighting (drawing the eye to the back wall rather than the 'warped' sides of the recess - internal LED's ftw) and paintwork (again use highlighting tricks to draw the eye back or to the launch boom).
At the end of the day though, if you look at it with 2 eyes your depth perception will make the warping apparent. This is probably why the shallow recess / closed bay door was used.
-
To my knowledge there are no 1/48 carrier trucks (as in the Yamato display) available currently. Best bet is to use italeri's set for the ammo loader and flatbed trailer, hasegawa for the generators and a few extra ground crew (though the sculpt is poor) and try to find verlinden's tractor set (which can be built up in several variants). If you're really set on quality verlinden's carrier crew are also very good, but expensive!
-
The tractor is a 1/48 Verlinden US Navy Carrier Tow Tractor (V0268). And it's OOP and VERY hard to get hold of. If anyone fancies doing recasts and can get hold of one, I'd reeeeally like one.
For positioning on a 'rough diorama' I tend to use either a very small dab of CA or blu-tak on surfaces that can't cope with a knife or be resanded easily. Final fit is always CA.
-
Thanks, because I've tried all my stuff; alcohol, Mr. Color thinner, Tamiya thinner, Metalizer thinner, ModelMaster Acyl thinner/solvent, Varsol, Acetone, & Nail polish remover - but still no go. Gawd! what is this stuff made of?!
Where do I get cellulose thinner? Is it a hardware thing? Paint solvent?
Car body / paint shops should have it. It's used with lacquers, and it's nasty stuff. Should be similar chemically to the metalizer thinner (as those are lacquer based), so if that didn't work, chances are the cellulose thinner won't work well either. Worth a shot though.
-
You could try very sparingly applying some cellulose thinner with a very fine brush (expect it to die), and then try to pick up the dissolving mask with the same brush. Should soften or cause the mask to start flaking off the mesh. Of course, this relies on the mesh being metal as plastic / fibre mesh would be ruined by the cellulose thinner. I've used this technique for part-stripping metal miniatures that I don't want to ruin most of the paintjob on.
-
i personally have never tried but seeing as the TV pilots are rubber, the paint might not stick as well as you would hope. also, removing the paint might be an issue because it might melt/change the rubber in the process.
i guess you could always sacrifice one of your TV pilots and take the plunge but i think you might be better off buying some recasts.
I repainted my TV hik pilot just over the top of the existing paint, no stripping. I did wash and degrease it carefully though. Using a flexible acrylic (citadel is king here) works very well on the soft plastic. Since you do want good adhesion, I'd recommend priming (citadel skull white) before undercoating (I used citadel fortress grey) and then highlighting up. You need a 'thick' painting style for these, or your paint will split visibly when the figure flexes. I'd probably advise against enamels or tamiya / humbrol ('dusty') finish acrylics, as these form a surface that's too brittle, and the paint will flake off easily. You may also want to omit a varnish / topcoat unless you can find one with similar flexible properties.
-
White is actually a pretty hard colour to match.
If you've got a toy that's yellowed (or a mostly white model that's scuffed / chipped), and you don't want that part to stand out, you really need to repaint ALL of the white surfaces (of the same 'type').
Markers are terrible for touching up paintwork. You have no control over the consistency of the paint so you can end up with it looking 'lumpy' and/or needing to sand down the touchup work. This almost always looks worse than slight yellowing. Generally markers come with fairly thick paint in them. A good, soft, flat hand brush (or decent airbrush) and good masking tape are the tools of choice here. And thin, high pigment paint and patience.
Mismatched colour (applied without sharp masking) also looks terrible. If you can't match the colour you need *exactly* your work WILL stand out. Masking off just a single panel neatly can allow you to justify the mismatch (that panel / part has been replaced), but this works better if you repaint other panels too.
Finally you'll need to match the finish. Again, this is easiest done by clearcoating the entire model (non-retouched areas and all, this also protects your repair work against handling a bit). Otherwise you're left with trying to match the finish that the manufacturer's paint or plastic is. Not easy!
If you post a photo of what's yellowed where I could probably come up with a suggestion for dealing with it. Markers are not a great idea, though, unless you're really not fussed by the quality of the result.
-
Sorry, but I'm a believer that toys should be played with.
'Course with toys like the 1/48's they're not the sort of thing you give an 8 year old, so it's generally 'grown up' play in that they're mostly displayed and transformed infrequently. And whooshed around the room when the kids are in bed and the girlfriend's not looking. Ahem.
-
I've noticed most people display 1/48 Armored Parts for Valkyrie with Hikaru VF-1J. I don't see any put a Roy VF-1S in it....Why is that?
That'll be because in the anime it was only used on a VF-1J. In Macross on Hikaru / Rick's, and in DYRL on a VF-1J with an alarming resemblance, but Hikaru is in a VF-1S at that point IIRC.
-
Regarding the vinyl figures, this http://www.starshipmodeler.com/basics/lj_vinyl.htm is a pretty good guide.
-
Vinyl kits are often attacked by oil based paints and solvents.
If you're planning a strip / repaint be very very careful what solvents you use.
Ideally use a water based acrylic on bare vinyl as a pre-primer. Actually I'd reccommend water based paint throughout (as some enamels are based on solvents that will dissolve the vinyl). Once you've got the vinyl pre-primed, you can then go for an enamel primer over the top which will help if the kit is going to be handled at all, but it'll never be as tough as a styrene kit. I strongly recommend using a soft cloth to handle dried paintwork in conjunction with a painting block. You don't want your nails or fingertips ripping the paint off before you seal it on.
If you're going for oil-wash weathering make damn certain the vinyl's not exposed. It's horrible to see paintwork peel off around a nick or scratch as the solvent works its way under.
It's probably a good idea to paint the model matt, and apply the satin finish to the unweathered article with a thin varnish, rather than attempt to use a satin paint - this will give you much more control over shading.
How big's the kit? Different techniques work better on different sizes. I've worked on 120 and 200mm figures professionally, in addition to lots of other scales in general hobby projects.
On large kits, a good trick for 'spatter weathering' I've used on uniformed WWII troops is this:
Very lightly drybrush the weathering colour (usually a dusty light brown / buff) onto the top surfaces of boots, and flatish surfaces (like the sides of boots). Once this is done, thin the weathing colour to nearly wash consistency and dip the tips of the bristles of an old toothbrush into it. Wipe the brush on a piece of tissue so you don't have big droplets on the brush. DO NOT HANDLE the area you're weathering from now on! Use a soft cloth hold the model, and fold it over so spatter doesn't go where you don't want it. Now use your thumb on the bristles of the brush to flick them so the spatter paint in the direction you'd expect a splash to come from. Very small droplets will flick off producing a nice spatter effect. If you're very brave, you can also do this by trimming an old household paint brush with a pair of scissors and stipple, but I find stippling produces very 'stand out' drops and needs a very gentle touch and thicker paint or the shape of the stipples comes out wrong.
Because you're going for a glossy surface under the matt weathering, you won't be able to seal the weathering in, and those spatter drops will rub off with very slight touches. It'll look ace though.
-
1/48 scale is the ONLY reason I bought a yamato valk.
1/60 just isn't a good scale to model with (and I like modelling with toys and bits thereof). 1/72 is a little dinky (and doesn't generally have perfect transformation without some major headaches). 1/48 is easy to work in (especially seeing as there's a wealth of 1/43 - 1/50 toys to cannibalise).
I've been planning on putting together a tomahawk and factory diorama in that scale as I had the old 1/100 'Robotech' factory double set (GBP VF-1J, Tomahawk) as a kid and have nostalgia pangs. I won't say what happened to it in my hands as a 9 year old, as I'd probably be (perhaps justifiably) lynched. I still shudder when I think about what I saw the exact same kit go for on ebay. It's not actually got much further than a few sketches and lightwave models so far. I've been following Mike's factory with some interest!
-
Wow... 1/48 destroids would be seriously cool. Weight is the primary issue here, especially if going for posable forms (without a feckin' great metal armature).
One trick I've seen done is to vac form approximate shapes from a rough sculpt, and use those as a base for sculpting actual detail (fiberglass/filler and epoxy putties over the vacform), then recast the detailed components. Dunno if you actually work that way already, but thought I'd throw the idea out (seen it used on ergonomic keyboard cases of all things).


Planning customising/weathering 1/48 VF-1J and GBP
in The Workshop!
Posted
Hey all. I think I'm around 90% done on the weathering / panel lining now.
A few lines need to be finished with thicker paint or scribed to finish (the front of the wing lights for example) and the canopy needs cleaning as the wet future got dusty. Grr. Oh well, some windowlene'll sort that right out.
Everything else seems to be going pretty well. Pics:
The whole bird:
Left leg:
Right leg:
Chestplate (airbrake closed):
Airbrake detail: This will get drybrushed up a bit to lighten it after the matt coat.
Head 3/4 view: The head's actually got a very slight brown tinge to it (as does most of the valk) from the wash. Doesn't seem to show up well in photos.
Head facing: Quite pleased with this. Need to darken the lining by the red stripe.
Gunpod: This has come out pretty well. No idea if the workings of a gun are supposed to be a bronze/brass. Looks pretty though.
Gunpod tip: This was also highlighted in bronze/brass to give a burnt metal effect. A heavy black wash brings out the detail and blends it in.
That's all for now. I want to get finished for christmas...