

mitch
-
Posts
201 -
Joined
-
Last visited
Content Type
Profiles
Forums
Events
Gallery
Posts posted by mitch
-
-
I've just about given up on some close approximation of reissued 1/55 Strike, armor elint seeker, etc., so failing that...
1/60 VF-4
1/60 Star Mirage
1/60 VF-17 and 171
I wouldn't care if Bandai or Yamato made them, as long as they're tough as guts with minimal QC issues.
Oh, and Revoltech Fraulein Minmay please.
Also, though not technically a toy, I had an idea the other week that I doubt anyone but me would want to see...
GUITAR HERO MACROSS! You could play along to Fire Bomber's tunes, unlock other classic tracks from M+, SDFM, MF, etc. and the background when you play would be a view from inside the cockpit that reacts to dodge missiles and stuff when you hit the notes right and gets hit when you cock it up... Anyone still with me on this one..? Anyone..?
-
I just signed up for MWcon'09 and I'm really looking forward to it already! I was disappointed that I couldn't make it to MWcon'08 but this year I'm determined to go!
-
If I remember correctly, Bandai would send out the replacements by late April.
Okay, cool, I was just getting a bit antsy since it's getting into late april now and I've not heard anything back from OD yet. I just need to 'chill me boots' as they say back home.
One more quick thing, did someone say that you could use hot water to pinch the thigh intakes a bit to give them more grip? I couldn't find anything when I checked back over the last thread, but I could've sworn someone said that using hot water to soften the plastic and cold water to set it worked with no negative side-effects. If not and i'm just going nuts from the heat here in LA recently I'll give it a go on the mis-painted set when the replacement intake covers come in and let everyone know. I just don't want to try it and the paint just disintegrates or something...
-
I just want to go on record and say that I hope that the VF-25S Full Armor has a sturdy back hinge. I have my 25S with the Super Pack on and the other day I was having trouble with it sagging when in Gerwalk mode. My concern is that the added weight of the armor boosters will mean that you won't be able to pose it without the stand.
By the way, has anyone heard anything about when Bandai will be sending out the replacement hip/intake covers for the 25S? Over drive hasn't gotten back to me yet, probably due to the server problems they've been having since they have generally been really good with replies.
-
that's a fantastic display idea. what stand did you use for the inverted valk? looks like v-shaped acrylic. a brochure standee?
my alto superparts arrived yesterday, so i finally took the VF-25F out of the box. was too excited to slap on the superparts, so i didn't bother learning how to transform the valk. now i'm not sure if i i've missed a step as a couple of things seem to be off:
1. couldn't squeeze-in the crotch armor in fighter mode. is this supposed to be possible?
2. can't get the wingroot to level with the fuselage. i think it's because of the calf armor which doesn't seem to completely go through the spaces in the rear part of the fuselage. are the left and right calf armors interchangeable?
my hip armors seem to attach ok. not solidly, mind you, but not as loose as others have described. thing is, i think the hip armors conceal the nice detail of the intakes so i'm contemplating keeping them off.
though i haven't really played with it yet, this valk seems very solid, and looks damn good, with or without super parts.
1) I don't think the nut-plate is supposed to be attached for Fighter and Gerwalk. It sucks, but like the hip-guns it's just another part-swap solution that Bandai opted for.
2) I don't know if the calf armor can be swapped over (never tried to personally), but it is a bit of a tight fit. Even without the armor attachments the wings never sit completely flush and level.
I've got to say that I am disappointed with the '25. I still really like it, it's just that Bandai have done the same thing as they always do with Valkyries - a lot of little details that could have easily been taken care of were overlooked, like the calf armor interfering with the knee movement.
Has anyone else had problems with a loose socket on the right trigger hand? My 25S won't hold it's gunpod straight. I don't want to put glue on the ball because the other hands fit fine, and I'm hesitant to put anything in the socket of the hand because I'm not 100% sure if the softer plastic would react to different substances.
-
Extremely cool!!! It always boggled my mind how Bandai could overlook something so simple as to allow the knees to bend in Battroid, they always seem to overlook one or two tiny details that would not take a lot of time, effort or expense to do that would greatly improve the final product.
The 'A' stance is awesome, I would really like to know how you did it.
Come to think of it, the VF-25 seems to me to be the first Bandai valk that doesn't lend itself to customization, since so many parts and screws are glued and sealed. Damn shame...
-
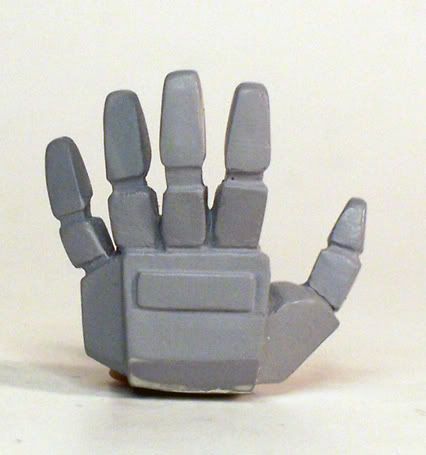
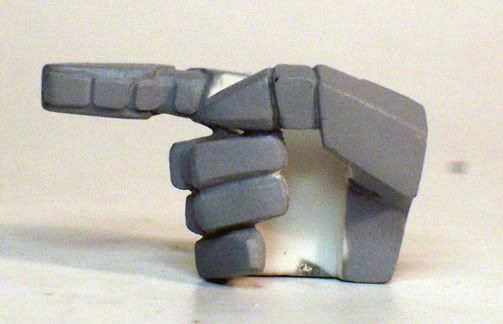
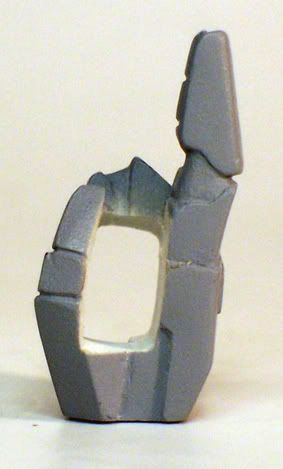
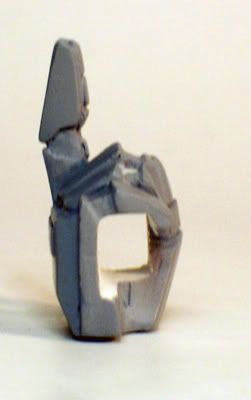
Sorry that it’s been so long since I updated last, I haven’t had a lot of time to work on this much, but I have finished the clean-up on the hands, which means that I’ve just got to work on the wrists and forearms and the build will be done.
Here are some shots of a finished foot. They were primed with Testors and painted with Krylon, and after the same sealing as other finished pieces I ran a small amount of superglue around the base of the foot with a Q-tip to help prevent chipping:

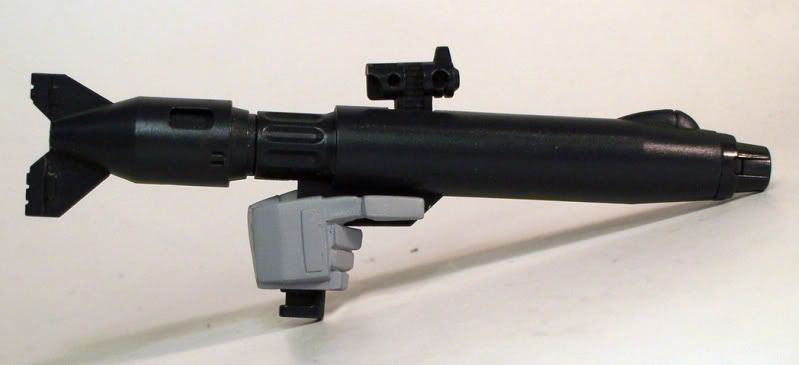
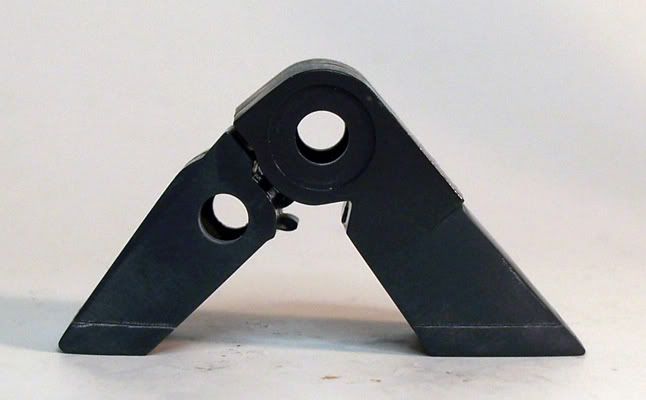
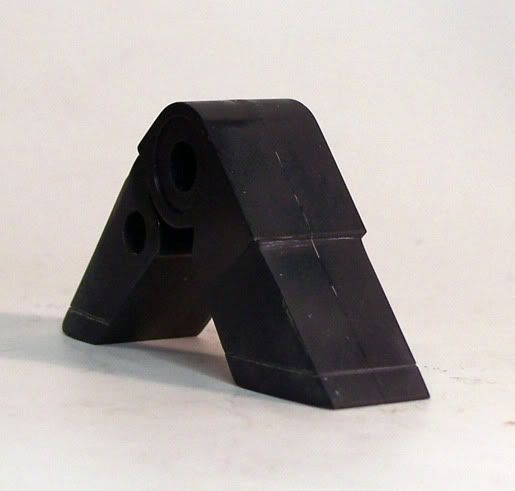
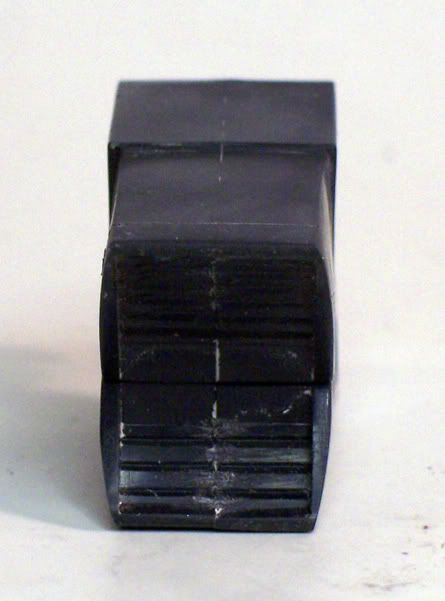
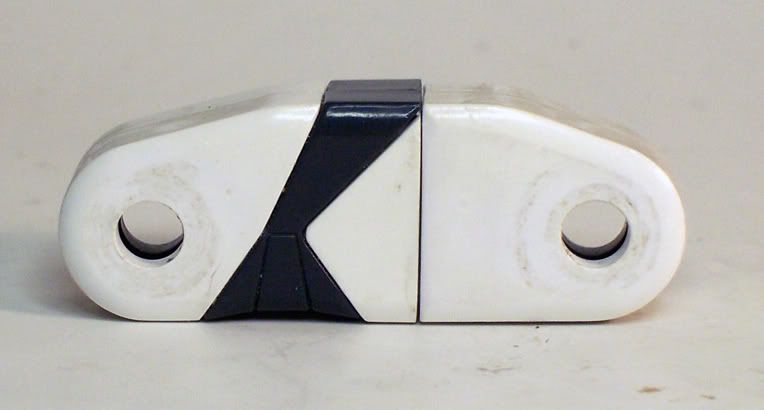
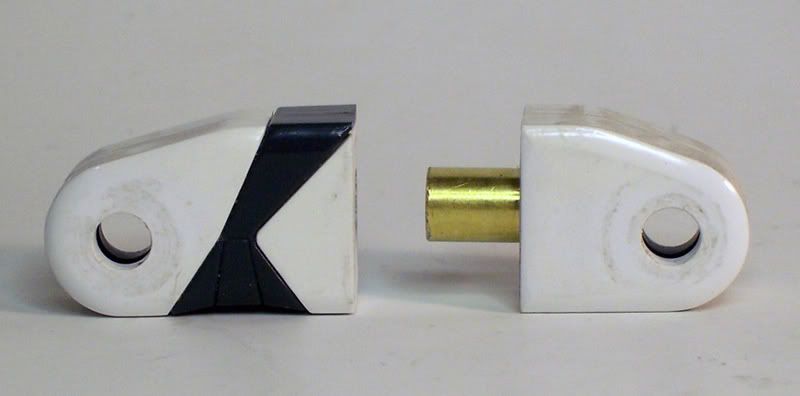
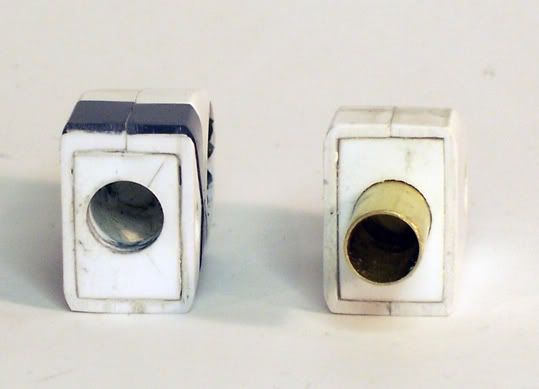
I’ve also been making a block that will be housed inside the forearm:
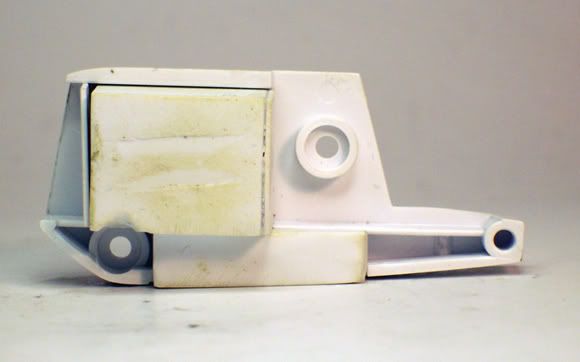
The vertical tab that runs down the block’s centre serves a dual purpose; it secures the block, and also fills the slit along the bottom of the forearm that usually accommodates the slide-tab. For some reason I seem to remember there being horizontal lines in the recesses in the wrist while the Battroid is in Fighter Mode, but I’ve been through a few of the art books and DYRL, but everything I can find (with the exception of about 6 frames of the Super Ostrich) has the recesses as black, which saves me a bit of time. If anyone can point to some reference that does show ‘shutters’ in the wrist cavity then I’ll go with that. If not, then I was mistaken and I’ll just paint the blank fascias.
I’m afraid that’s it for this time. I’m not sure when I’ll be able to post again since I got laid off the other day, and right now I’ve got to worry about finding another job. Whatever happens I will get this custom finished, and I’ll post pictures as soon as it is. Thank you to everyone who has taken an interest up to this point, I look forward to showing you all the finished article in the future.
-
A big thank you to takatoys for a first class transaction.
-
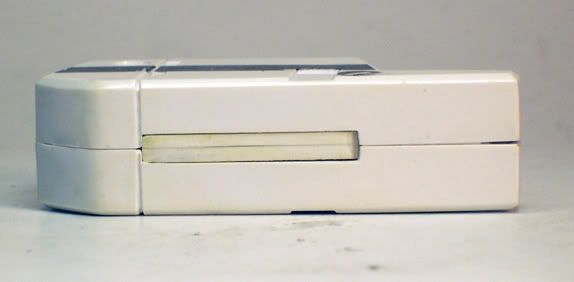
Aside from that, I’ve started getting the second thigh pivot joint together and managed to get the head and neck painted:
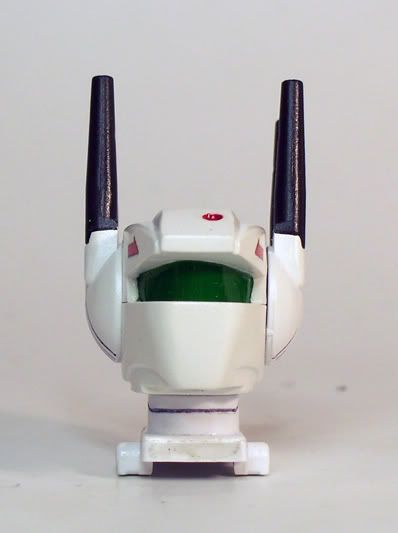
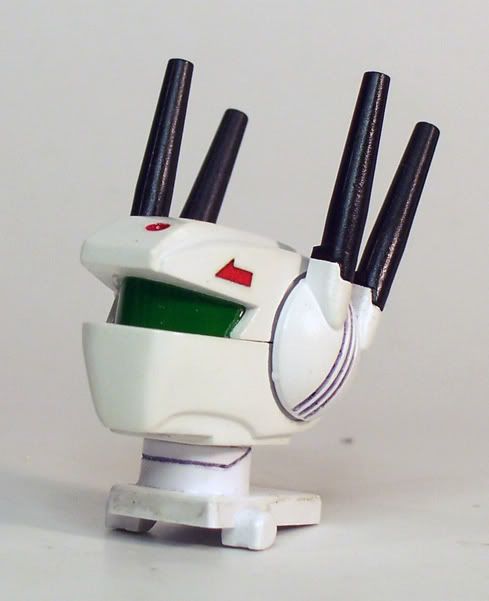
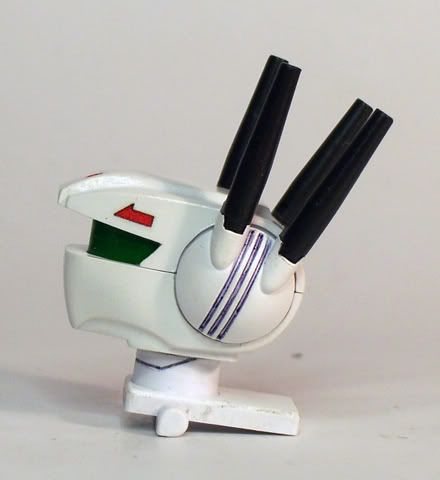
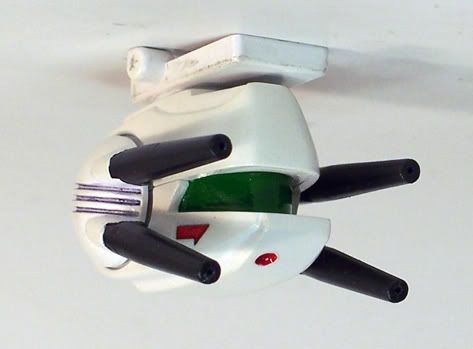
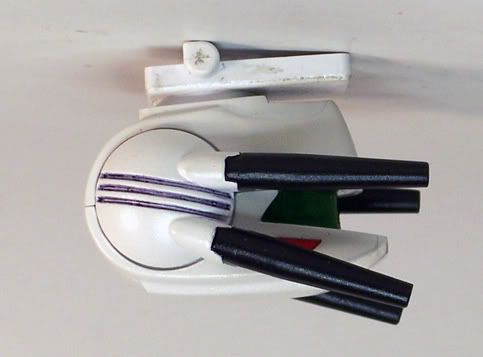
I used Krylon Fusion White, Green and Red Testors enamel, and decided to go with a Gundam brand pen for the panel lining. For sealing, I used a 50/50 mix of Testors Dull Cote and Gloss Cote to get a more satin finish when shot through an airbrush. The visor and forehead light were given a finishing coat of Tamiya Gloss. The ‘arrows’ on either side of the head were decals taken from the sheet supplied with the 1/55 reissues from a few years ago. I painted the base of the neck where it meets the shoulders, but not the neck itself, as paint would be scratched off as soon as I retracted it for the first time.
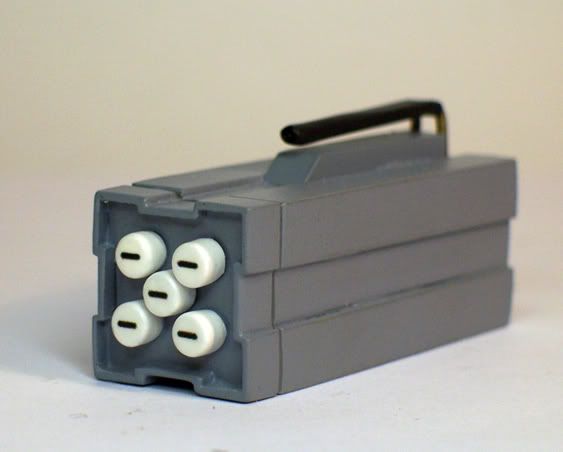
Just in case anyone’s curious, The Missile pods were painted with Testors Spray Enamel Flat Grey Primer and White enamel paint, The Cockpit was the same primer, red and chrome enamel, a black acrylic-based ink (the brand is called ‘Golden’ I think), and the seat was a mix of yellow and blue ink from Gundam Markers brushed on. The Pilot was based in Krylon Fusion, and various acrylics and enamels. The sealing on all of these were the same as the head.
Thanks for your interest, till next time…
-
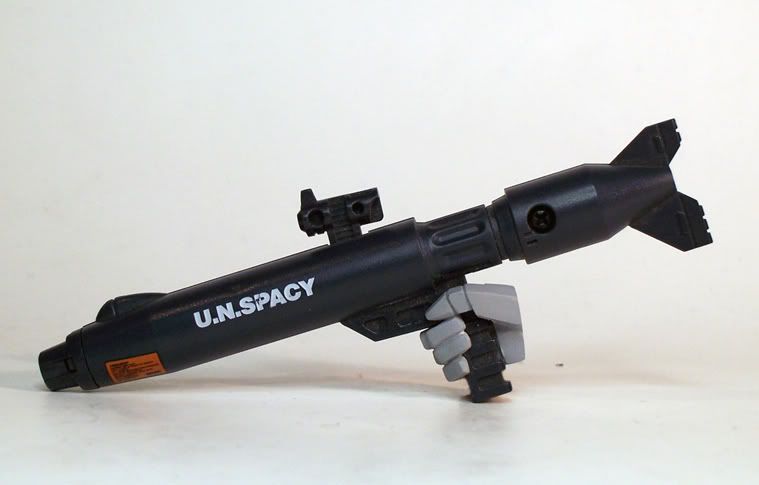
Hey everyone. I’ve had a lot of overtime at work recently so I’ve not been able to get too much done on this, but I’ve cleaned up a couple of the hands and prepared them for painting. The trigger hand had to be sanded out so that it’ll grip the standard 1/55 Gunpod snugly:

-
A big thank you to SAVE for going to all the trouble to get the SDF-1 Launch Posters. He's a credit to the Macross Fan community.
-
I wasn't too fussed about the 'Origin' re-releases. Apart from a few very minor things like the stickers on the dicast landing gear and (finally) getting a heat-shield for the 1J, I couldn't see any difference to the re-releases from a few years ago. If Toynami had followed through with the new retractible heads that they were showing off at SDCC last year then I'd have been all over them, but since they seem to have bottled out on that I just decided to make a custom that does that.
Of course, if they actually re-released the rarer valks (ie. Hikaru Strike 1S, GBP armor, Elint and Ostrich), then I'm sure they'd sell like gangbusters (I'd buy the hell out of them personally). Would it be a case of rights to the figure design or not being able to locate the original molds? I wouldn't want to think it was just down to ineptitude.
-
WOW! Gorgeous work mate, the Angel Bird came out really nice! I love the way you have it displayed, it really brings it to life. I think my personal fave is the Minmay Guard, the scheme is a classic, but they require so much work that when they come out looking that good it really testifies to the care and patience that goes into it.
-
Just pre-ordered the armored 25S, but I have to say my patience is starting to wear thin with Bandai. On one hand I'm happy that they are following through with the Fast Packs, Sound Boosters, Missiles, etc unlike their M7 line back in the day (I'm sure the random holes all over the 19's were supposed to be for supplemental accessories that never materialized - anyone able to confirm or deny that hypothesis?), but I was not expecting to have to re-buy the S and F re-releases (my cautious optimism has been dashed), it just seems to point to poor planning and development. I'm starting to wonder if we'll ever see a DX of the 171EX...
 I really hope that the 25S's neck issues are addressed with the re-release if they're going to be changing it up, at least that would be something posative for the valk itself rather than just extra holes. Given all the hoops one has to jump through to get all these things here in the US already, I'm not impressed with the added hassle and financial bite this entails. I mean, it's not like there is a global recession going on or anything...
Oh, and the 25 DX is totally the 'new chunky'. Or at least as close as we'll get with a newer, sleeker valk. Of course, I doubt we'll see it re-released every 10 years or so like the old 1/55 which to me still has appeal today. I suppose you could say that it is an homage to the 1/55 like how Frontier is an homage to the best aspects of the previous Macross stories.
-
Looks awesome! I'm going to have to get some Tamiya masking tape! Can't wait to see the finished article.
-
Here is one of the feet I mentioned last time:
Both have now been finished and are ready to paint. I’ll be doing that when all the modifications have been finished. Once I have the 1S together and finished I’ll then assemble and paint the Strike Pack and it’ll be done.
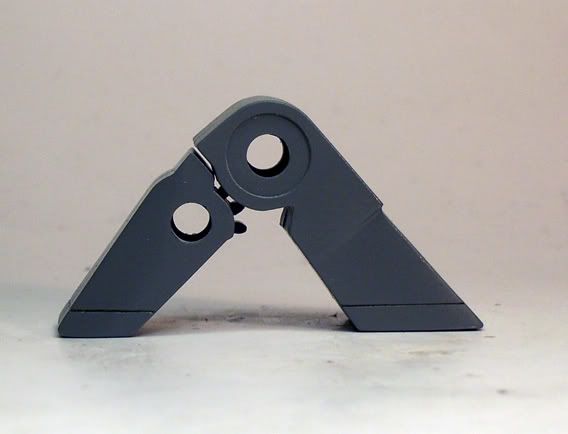
I’ve also finished one of the thighs since I was able to post last time:
I engineered the thigh pivot using 2 strips of 2mm thick styrene glued together to create 4mm plugs that sit inside the thigh that I hollowed out using a Dremel. I was originally thinking of using a short length of styrene tube to make the core peg of the pivot, but I realized that the heat generated by the friction of the pivot turning would weaken, distort or snap the tube. Luckily I found some copper tube that was the same diameter as the styrene so I used that. I drilled the plugs and got them to line up, then glued the peg into the top plug using some 5min epoxy, and glued that into the top of the thigh. Using that I was able to position the plug in the bottom section of the thigh so that they lined up, and then glued that in. I ran into a problem when I found out that what had initially been a snug fit of the plug had loosened, probably from the afore mentioned friction of the peg twisting in the plug that had occurred while I was testing and fitting it. To try to correct this I ran a very thin layer of zap-a-gap super glue around the inside of the lower plug using a Q-tip, and filled the open space inside the lower thigh section with some Milliput putty. Keeping the peg wet and pushing it into the plug made a closer fit that created a greater surface area for the peg to be in contact with and help make a more secure fitting.
After the second thigh is done I just need to do the hands. I chased up the tip that big F posted about some recast hands from Dyno, and these look great. The hand that holds the Gunpod needs to be filed out slightly for the grip to fit, but that shouldn’t be too much hassle. I was hoping that the hands would be the right size to allow for them to retract inside the fore arms, and they do (with the obvious exception of the open hand), except they would have to sit at an angle. Instead, what I’m planning on doing is creating a fixed ‘block’ in the forearm that looks from the outside like the ‘shutters’ that seal the hands in in Fighter mode, and make a socket for the hands to fit onto.
Finally, I have managed to get hold of some adhesive white vinyl sheet that I want to use to cover the landing gear tabs on the shins, which I believe is similar to what the latest 1/55 reissues have to hide the die cast areas. Here’s hoping that the adhesive is strong enough to stick.
-
I can't speak for the V2 1/60's as I don't have any (yet), but the last time I was at F&S I saw the new Hikaru 1A there.
As for your son, I'd recommend the Bandai 1/55's to anyone. What they may lack in line-accuracy they more than make up with in sturdiness and just sheer fun. I know you can find the reissues at F&S for a reasonable price. If you can find the VF-25's there now they are also a tough wearing toy generally, although my heart goes out to the few people on these boards who have experienced some broken shoulder screws and one poor chap also had a broken hip bar, but these seem to be rare cases (so far). The DX's are a bit steeper in price but they are still a load of fun.
Happy hunting!
-
Holy crap! This thing is huge!
 And it's the DYRL version! I think this may get my vote for the ultimate Macross collectible. If I moved house (and I'd have to, to find somewhere to put it!) I'd have to put a kid's booster seat in my car and drive it around with it sitting in the back just for sh*ts and giggles
  Of course, I'd need to buy a car in the first place and with the price-tag on that thing I don't think my budget could handle both. Maybe if I resign myself to eating ramen for the next year and started selling my organs...
Stunning piece of work, but with the economy and my wallet in the state they are in right now I have no idea how I could afford it. I'll get the Macross Quarter and be satisfied with that.
-
The Quarter looks stunning! I'll definately have to move some stuff around to accomodate it, but if it's as sturdy as most other Bandai issues then I'm definately in as long as the price is reasonable. Of course, when comparing it in price to Yamato's SDF-1 a lot of stuff does look a bit cheaper in comparison.
-
My 25S came through from BBTS, and after transforming it a few times I have to say that I’m really happy with it. The shoulder ball-joints and secondary pivots in the elbow and knees are a bit tight, but thankfully no problems with snapping screws. I would have liked the neck to have been a little longer, but I’m impressed at the build quality and engineering that went into it, regardless to the deviation to the line-art (as a fan of the old 1/55's that doesn't bother me).
Can’t wait for the 25F to be reissued and for the super-packs to come in!
-
Not a lot to show for it this week I’m afraid. Work has been really busy and I was procrastinating for a while about doing the thigh mod, but now I have a fairly good idea how I’m going to attack this and should just need a set of small clamps to hold it closed while the glue sets (For those of you who have never taken a 1/55 apart before, the ratchet joints housed in the thigh are set on springs).
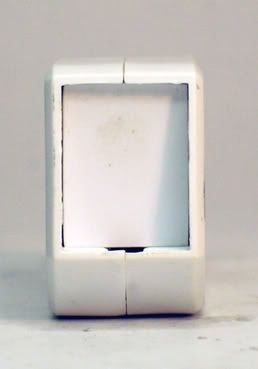
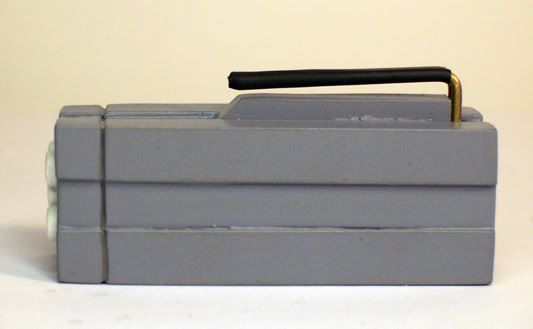
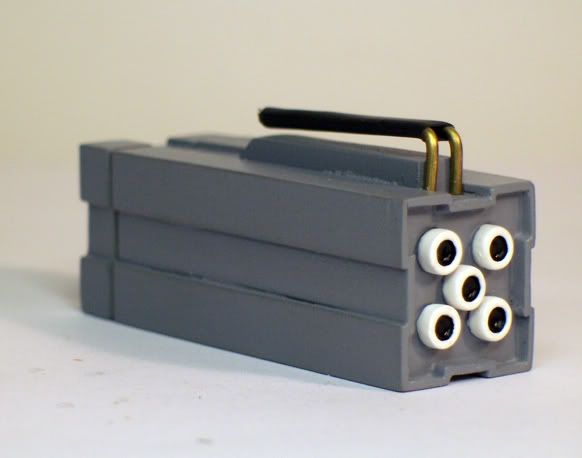
Here are some pictures of a completed missile pod. I’ve tested it out and it sits snugly under the wing.

At the weekend I was able to find some time to start the thigh mod. I started using Skull-1’s thread as a foundation, but instead of using pens for a friction joint I am custom making them to ensure I get a tight, solid join and to theoretically make it easier for me to position them inside the thighs.
I’ve also started on the feet. I used an epoxy putty called miliput to fill them and have been sanding them to taper slightly towards the outside face and create the raised plate above the ‘toe’. Once that’s done I’ll scribe the line around the base of the feet and they’ll be ready for painting. I’ll have photos next time.
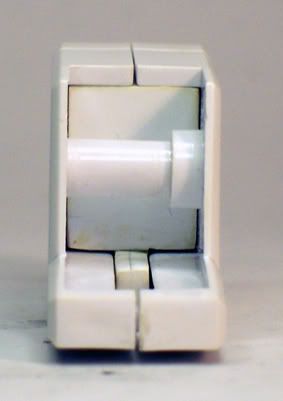
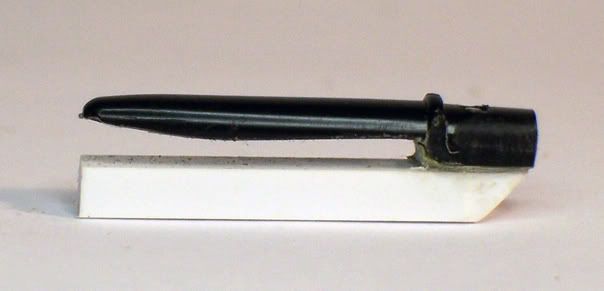
Just for documentation’s sake, here’s a shot of the missile clip that didn’t work out. Like I said before, a lot of trial and error...
-
Thanks veffidas, I'll run down to little Tokyo tomorrow and hope that they have it in stock. If I have no luck there I'll try to figure out amazon.co.jp (babelfish takes some lateral thinking to work with...).
Heck, if I get despirate I can always grab a copy off of this guy.
Or not.
-
Thanks Ganbare, they do have them at amazon.co.jp but I can't find anyone that will ship to the U.S.
Is there anyone here who lives in Japan that would be willing to act as an intermediary - ie. buy a copy and sell it to me please? I would of course pay for shipping and the service provided. If anyone could please help me then PM me and we can arrange what you would want for shipping and for your effort.
Thanks.
-
Hi,
Can anybody direct me to a site that is selling issue 1 of Macross Ace or have a copy for sale please?
Thanks.
Official Bandai 1/60 Scale DX Toy Thread Ver.5
in Hall Of The Super Topics
Posted
I finally decided the other week to take the plunge and applied some super-glue to the outsides of the 'hook' tabs on the male-connector on the crotch assembly and it seems to have helped a bit by giving the spring tabs something more to bite onto (time will tell if this is a long-term solution or if it needs to be re-applied over time), but if someone could post a pic or two of the mod using the styrene sheet that would be awesome.
The loose crotch issue is one of my main gripes about what I generally consider to be a good toy, although it lost a lot of marks with me for needing something like this to make it work the way it should out of the box, never mind the hip-armor that seems to be spring-loaded.
While I'm off on one, the sound booster kit will probably be a miss with me. 95 bucks for that?! The picture of the painted Ranka looked terrible, although I guess we should have seen that coming after looking at how the VF-25 pilots came out.
Get with the program, Bandai!