DrEmilLang
-
Posts
44 -
Joined
-
Last visited
Content Type
Profiles
Forums
Events
Gallery
Everything posted by DrEmilLang
-
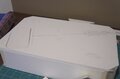
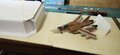
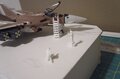
So I'm working on the mockup and the real thing as it goes along. Without bracing, the walls have a tendency to shift, or rotate a bit so the top isn't square. So I'm going to have to brace it more than I first thought. Also, cutting all the parts before using is a bad idea because invariably the measurements will be a bit off. So I'm going to only cut parts as I go, and I'm going to have to work from the corners inward, or else the corners come out asymmetrical. Here's the state of things so far (note: the "top" actually started as the base, but I drew my lines to cut in the wrong place and accidentally made it 2" too short. So now that piece is the top and before I cut, I check against the mockup.
-
From the album: Display Case
-
-
-
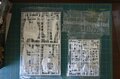
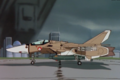
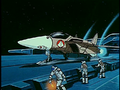
Here's the sources: (as an aside: the colorists kind of pick-and-chose what color things were, and I think that's a 1J and a 1A in "weird cannon fodder" colors.) There's no "clip", but changes must be made to make it removable. It was either that or fashion a peg-fit version and drill out the landing gear, which I don't trust to be that strong.
-
trading items
-
-
From the album: trades
-
From the album: trades
-
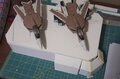
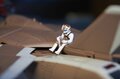
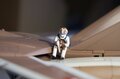
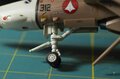
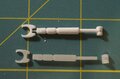
Oleo trailing links are in! The Frosted Ultra Detail is strong enough and sands well (for the parts you can reach; I need to chock it into the drill again and try sanding the narrow parts) I painted it with some leftover "this is kind of the color. ...or was this the cleaning jar...? Enh whatever" acrylics, so it's pretty half-assed (I'd tried sanding and painting the "strong and flexible" ones, but that didn't work, so I just rushed through it) I'll strip and re-paint later.
-
From the album: trades
-
From the album: trades
-
From the album: trades
-
You can save to your computer. Though, overall, the 123D interface is so simplified (or "enlarged") for Touch-centric devices that it's a bit cartoonish.
-
It seems that there's not much in Fusion that's not actually in 123D Designer; it's just that 123D has a "tablet friendly" interface.
-
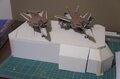
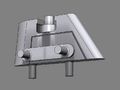
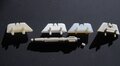
Results are in for the racks! Left to Right: "Elasto": poor resolution, crazy flexible, almost like silicone rubber. I just wanted to see how it was "White Strong and Flexible" Actually stronger than the original ABS, I think. Fair detail, but not great. Probably what I'll end up using. "Frosted Ultra Detail" Very very detailed. Strong, but as you can see, it shears easily between layers. If I used this, I'd have to print all the vertical pegs horizontally and have "drill holes" for them to fit into, then glue them in place. the original ABS As far as the model itself goes, the mount at the top has a peg that's just barely too thick, and the tines are just barely too close together, and thick. Not by much: probably the combined slop in my micrometer is the issue. The missile pegs themselves are probably 0.07mm too close together, so it's a snug fit; I'll have to move them all. Once I get that fixed, I'll probably make the file public on a six-rack sprue. I might also modify the model so all the pegs are twice as long as needed, so you can cut and drill and mount them, then offer it in WSF and FUD at cost.
-
From the album: trades
-
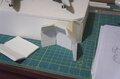
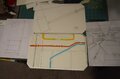
I'm working on measurements and the design of the top and floor plates. Left to Right: Cut options if I go with laser-cut plywood (trying to figure out how to make my strokes while leaving a solid piece, and how to order them) Deck layout (top): I've actually changed this up in Illustrator; I've made the cross-deck angle of the catapult 22.5º, which looks better I think, with the 45º angles Floor layout (bottom) It's going to be a small bay with a closed bay door on one side and three smaller doors (two personnel, on equipment). I wanted some color so I've added the guide-stripes (which'll have bar codes; yeah robots might not need OCR, but, maybe they're old?) The starting sketch I made while thinking about the interior layout.
-
From the album: Display Case
-
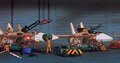
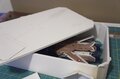
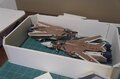
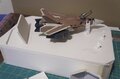
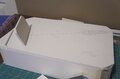
So after seeing a couple 1/48 dioramas, I decided I wanted to do a carrier-deck diorama with my valk. But then I thought "sometimes I move stuff around; it'd be nice to have a box to put them away in". Enter: The boxorama. A carrier top-deck hiding a carrier hangar deck storage area. I'm mocking it up as a rough sketch in foamcore first; then I'll do half or third-scale blueprints--maybe some light 3d modeling--then I'll most likely put it together from plywood and balsa and styrene. Once I build the box I can detail the flight deck (I'm tempted to buy an italeri 1/72 flight deck to trim to fit, then detail based on the artwork.). From there I can detail the hangar deck at my leisure. First up, some sources: Cannon fodder launching: Catapult detail: Then the rough design study: The interior will be straight-sided, but I want the outside to be beveled (I'm probably going to add doors to nowhere in the inner walls) The entire outside will have a beveled "frame", and probably be painted the blue and red of the Prometheus.
-
From the album: Display Case
-
From the album: Display Case
-
From the album: Display Case
-
From the album: Display Case
-
From the album: Display Case
-
From the album: Display Case
-
From the album: Display Case