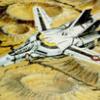
derex3592 Posted August 4, 2021 Share Posted August 4, 2021 (edited) Hello fellow modelers! I began this project last August when I heard that AMT/Round Two had reissued the Runabout kit, so I picked on up on Amazon for I believe $25. I've always thought it was a cool design and I have wanted a good size model of it for sometime. The Eaglemoss versions did absolutely nothing for me. So at the time I bought it, I was intending for it just to be a quick, fun build as a nice break in-between more complex builds. The model itself is all of about 15 parts. Easy!!!..(although fit IS a huge issue with this kit, more on that later)...LOL. As I looked at the giant interior DEAD space inside the ship, my wheels started turning and I started doing some research online. I noticed some guys had done interiors for their kits and it looked really cool. However by the time you purchased all the parts and pieces off Shapeways, it was going to become VERY expensive and dealing with 3D printed parts, just isn't easy IMHO. So, I went looking for cheaper options. I came across a small resin interior for a good price that gave you a front and rear cabin and some seated figures. I decided I could cut some sheet styrene for walls and ceiling parts, and maybe make some custom printed decals for the interior as well. I had just come off lighting my 1st ever kit, the Bandai Star Destroyer, which came out almost perfect... so I thought to myself, man, this thing would look REALLY cool lit up with an interior! So off to the races we went! This set of pics was just planning out phases of the build...We got a "new" cat last summer about a month before this, so he was ALLL about what Daddy was doing! Here are a couple of pics of the actual filming model of the ship, I didn't use this as an end all, be all example, but more as a general guide.. Edited August 4, 2021 by derex3592 Quote Link to comment Share on other sites More sharing options...
derex3592 Posted August 4, 2021 Author Share Posted August 4, 2021 Moving on into the build, I got to the point of priming and light blocking the kit. Went with Tamiya Fine Surface Primer on the outside, some SEM high build black surface primer for interior, then a nice coat of gloss black Rustoleum, followed up by a final coat of metallic silver Rustoleum for all lighted engine parts. They say this bounces the light around inside the part and makes it brighter. Also I modified the front cockpit and rear cockpits to be larger, as they felt to cramped the way they came. I got a set of aftermarket interior decals as well from the HDA Modelworx website that would be supplemented by my own LCARS DS-9/Star Trek TNG screengrabs that I would print and turn into waterslide decals for both the front and rear cabins. I wanted actual screens from the shows and especially ones of the wormhole and DS-9 along with images of the Runabout itself on screen. I had my video editor at work insert a Cisco and Dax image into one of the images as well. I begin figuring out the wiring of the warp engines and the method I would use for the impulse grills honeycomb look. In the end, it was a cheap roll of sticky window screen mesh and old scrap orange lighting gel from my work. I had never really scratch built anything from styrene before, but with a little practice, I built a pretty cool looking transporter for the middle of the front cabin. Quote Link to comment Share on other sites More sharing options...
derex3592 Posted August 4, 2021 Author Share Posted August 4, 2021 (edited) I went with Tamiya AS-16 for the interior color and through many trials, I ended up going with it for the outside base color as well! Extra greeblies from old Bandai Star Wars kits were added to the transporter area, and the silver handles on the transporter are paper clips cut and bent to length. Edited August 4, 2021 by derex3592 Quote Link to comment Share on other sites More sharing options...
derex3592 Posted August 4, 2021 Author Share Posted August 4, 2021 (edited) I started experimenting around with fiber optic lighting at this point, I got the method right and even had the micro holes drilled in the tops of the warp nacelles for the lights, which worked great!, as you can see. However, I couldn't make the LED bulb fit into the warp engine. As I had already sealed up the impulse engines at that point (there was plenty of room to hide the LED bulb inside those!) I had to abandon the fiber optic navigation lights idea. I puttied up the holes and moved on. Maybe next time! Putting the warp engines together was one of the hardest parts of the build. The blue plastic chiller grills literally just "lay" in place and you have to glue the two halves on the engines together. Super glue was used sparingly to achieve this and not mar the clear (tinted blue with Tamiya Sky Blue) plastic. Countless hours were spent puttying, sanding, and rescribing the deep lines on the engines to make them look seamless. The standing figures are architectural figs I got off Amazon, bag of 100 for like $10. Anybody need some??? I have plenty!!! I have always hated figure painting, so having to paint all these with mostly Tamiya Acrylics by hand was a laborious task to say the least!!! God I miss my Model Master Enamels for stuff like this... I decided not to use the included clear parts for the windows as they were super thick and you could NOT see through them. Everything was really distorted. So I ended up cutting clear transparency sheets and using those instead. I actually had to make all of them TWICE, as I got overspray on the first ones at some point on the inside. In case you're wondering, I used my photo etch bending tool to bend the front windows. The last GIANT hurdle was getting the interior parts in the bottom of the ship, sitting flat and where they needed to be, AND to get the top and bottom halves of the ship together. The top half of my ship was bowed inward in the middle and slightly in the front end. In order to fix this, I finally wedged and hot glued a brass rod and a brass beam in place to spread the top half apart enough to get it to semi close up with the bottom half. Then MORE puttying, sanding, and rescribing, I must have worked on this part for weeks to get it looking close to right.... Edited August 4, 2021 by derex3592 Quote Link to comment Share on other sites More sharing options...
derex3592 Posted August 4, 2021 Author Share Posted August 4, 2021 From this point forward, it was just a lot of masking and painting up to 8 different shades of gray all over. All Tamiya acrylics. Most were airbrushed, some of the smallest ones are done by hand. Weathering was done with Tamiya Weathering Master pallets and finely ground up artist chalk. Final flat coats were Tamiya spray can TS-80. The base was a basic wooden base purchased off Amazon, painted with a gloss black Rustoleum with silver specs in it. The glass was purchased from a glass shop near my brother in law's print shop. The glass shop also drilled the hole in the center ($25 for that hole!), but hey, I wasn't ABOUT to try that! My brother in law then used one of his super fancy $$$$$ printers to print on the backside of the glass the picture I had found that I wanted under the ship followed by 4 layers of white ink. I used clear Gorilla Glue sparingly to glue the glass down to the wood. That's pretty much it in a nutshell....If anyone has any questions about anything, I'll be happy to try and answer them! Thanks for reading! Quote Link to comment Share on other sites More sharing options...
Bolt Posted August 4, 2021 Share Posted August 4, 2021 Mad skills @derex3592 Awesome work 🤠 Quote Link to comment Share on other sites More sharing options...
pengbuzz Posted August 4, 2021 Share Posted August 4, 2021 1 hour ago, derex3592 said: From this point forward, it was just a lot of masking and painting up to 8 different shades of gray all over. All Tamiya acrylics. Most were airbrushed, some of the smallest ones are done by hand. Weathering was done with Tamiya Weathering Master pallets and finely ground up artist chalk. Final flat coats were Tamiya spray can TS-80. The base was a basic wooden base purchased off Amazon, painted with a gloss black Rustoleum with silver specs in it. The glass was purchased from a glass shop near my brother in law's print shop. The glass shop also drilled the hole in the center ($25 for that hole!), but hey, I wasn't ABOUT to try that! My brother in law then used one of his super fancy $$$$$ printers to print on the backside of the glass the picture I had found that I wanted under the ship followed by 4 layers of white ink. I used clear Gorilla Glue sparingly to glue the glass down to the wood. That's pretty much it in a nutshell....If anyone has any questions about anything, I'll be happy to try and answer them! Thanks for reading! My friend, you have here a filming quality model worthy of being both an effects model and a museum-quality replica. Congratulations!!!!! Quote Link to comment Share on other sites More sharing options...
peter Posted August 5, 2021 Share Posted August 5, 2021 Awesome, thanks for uploading the build log! Might need to reference this if I get the Runabout Quote Link to comment Share on other sites More sharing options...
electric indigo Posted August 5, 2021 Share Posted August 5, 2021 Your work really did pay off. A true museum piece. Quote Link to comment Share on other sites More sharing options...
Mintox Posted August 5, 2021 Share Posted August 5, 2021 Looks bloody brilliant. Well done. Quote Link to comment Share on other sites More sharing options...
derex3592 Posted August 5, 2021 Author Share Posted August 5, 2021 Thank you for all the nice compliments guys! Quote Link to comment Share on other sites More sharing options...
Recommended Posts
Join the conversation
You can post now and register later. If you have an account, sign in now to post with your account.