Ignacio Ocamica Posted July 12, 2015 Share Posted July 12, 2015 A work of art!!! Quote Link to comment Share on other sites More sharing options...
Mintox Posted July 13, 2015 Author Share Posted July 13, 2015 Highlights to the buttons done. Dark washes and some light dry brushing on all of the detail surfaces. Next I start the chipping and general weathering of the interior walls. Quote Link to comment Share on other sites More sharing options...
Mintox Posted July 13, 2015 Author Share Posted July 13, 2015 Going to move onto the front hatch now but will in the meantime chip the interior while waiting for the front hatch to dry. Here I am trying to guess what I am going to see from the rear hatch opening to get a better understanding of where to concentrate the weathering. Quote Link to comment Share on other sites More sharing options...
derex3592 Posted July 13, 2015 Share Posted July 13, 2015 that looks awesome!!! great job! love the letters on the screen! Quote Link to comment Share on other sites More sharing options...
Mintox Posted July 14, 2015 Author Share Posted July 14, 2015 Chipping done I think. I also applied a very light wash of citadel sepia over the green to give it a bit of a worn/dirty look. Next step is to join the two halves and then some how sand the joins and repaint them internally. Thankfully there is really only the seam at the top front of the pod that will need to be really hidden well. Quote Link to comment Share on other sites More sharing options...
DarrinG Posted July 14, 2015 Share Posted July 14, 2015 Spectacular! Quote Link to comment Share on other sites More sharing options...
EXO Posted July 14, 2015 Share Posted July 14, 2015 Ridiculously meticulous! Sounds like a Harry Potter spell... Quote Link to comment Share on other sites More sharing options...
chaff.g Posted July 15, 2015 Share Posted July 15, 2015 The weathering looks really nice. What techniques were used to produce the chipping effect? Quote Link to comment Share on other sites More sharing options...
Mintox Posted July 15, 2015 Author Share Posted July 15, 2015 The weathering looks really nice. What techniques were used to produce the chipping effect? Fine tipped paint brush. I toyed with using salt/hairspray/solvents etc but in the end I wanted some control over it in such a confined space I decided on using a brush and citadel paints. I haven't totally finished with it as I need to chip the grey panels and add a little more to the green interior but I'll post photos later after I seal the two body halves together. Some areas are still untouched, such as where the seat will go, so those don't need to be weathered as they'll be hidden by some part. Quote Link to comment Share on other sites More sharing options...
milhouse Posted July 15, 2015 Share Posted July 15, 2015 That interior looks really awesome Mintox, and I love that green! Quote Link to comment Share on other sites More sharing options...
MechTech Posted July 15, 2015 Share Posted July 15, 2015 Awesome interior finish! I think you captured the well worn, "I'm not pickin' up chicks with this" look. I have to second the lettering on the screen too. - MT Quote Link to comment Share on other sites More sharing options...
Mintox Posted July 16, 2015 Author Share Posted July 16, 2015 (edited) I sealed the two hull halves together last night using Rapidfix. Man that stuff is good : http://www.rapid-fix.com/ Now some sanding etc. I have managed to fit the front hatch without the need to glue it so that'll help in displaying the insides a little better as I think the interior details make this kit more interesting. Edited July 16, 2015 by Mintox Quote Link to comment Share on other sites More sharing options...
mickyg Posted July 16, 2015 Share Posted July 16, 2015 Isn't that just cyanoacrylate (super glue) and baking soda in two containers? Quote Link to comment Share on other sites More sharing options...
Mintox Posted July 16, 2015 Author Share Posted July 16, 2015 (edited) Isn't that just cyanoacrylate (super glue) and baking soda in two containers? The glue is basically super glue but the powder isnt baking soda, its a combination of Glass Oxide 99% and Amorphous Silicone dioxide 1%. Edited July 16, 2015 by Mintox Quote Link to comment Share on other sites More sharing options...
mickyg Posted July 16, 2015 Share Posted July 16, 2015 Very good to know! Now, just need to find some of that... Glass oxide I can do but amorphous Silicone dioxide could be tricky. Quote Link to comment Share on other sites More sharing options...
Mintox Posted July 18, 2015 Author Share Posted July 18, 2015 I've started to rectify the gaps on the front hatch. The photos show what the issue is and how I have gone about it. i have basically cut some 1mm card and used the Rapidfix stuff to glue it and then sand and shape. So far it is beginning to fit really nice. More photos later. Quote Link to comment Share on other sites More sharing options...
captain america Posted July 20, 2015 Share Posted July 20, 2015 I'm both pleased and impressed with your work so far, Mintox. Just got back into town a couple days ago and I'm itching to see more! Quote Link to comment Share on other sites More sharing options...
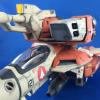
Mintox Posted July 26, 2015 Author Share Posted July 26, 2015 Work on the front hatch is slowly coming to an end. Started the interior face - detailing the instruments etc. I've decided I am going to try and replicate the display in the line-art for it. I've chosen a purple display colour for the forward screens. Quote Link to comment Share on other sites More sharing options...
derex3592 Posted July 26, 2015 Share Posted July 26, 2015 So very cool.... Quote Link to comment Share on other sites More sharing options...
Mintox Posted July 26, 2015 Author Share Posted July 26, 2015 Just finished the front hatch and seat. I'll fit these and start sealing up the pod in readiness for painting. Quote Link to comment Share on other sites More sharing options...
Mintox Posted July 28, 2015 Author Share Posted July 28, 2015 I'm calling the cockpit done. Now to mask the rear opening and get to work on painting the exterior. Quote Link to comment Share on other sites More sharing options...
mickyg Posted July 29, 2015 Share Posted July 29, 2015 Mintox, the way you did that display screen is fantastic! How many colours are there? If I had to guess, I'd say the symbology is two colours. Care to share your technique with us? Quote Link to comment Share on other sites More sharing options...
Mintox Posted July 29, 2015 Author Share Posted July 29, 2015 (edited) Mintox, the way you did that display screen is fantastic! How many colours are there? If I had to guess, I'd say the symbology is two colours. Care to share your technique with us? Actually about four colours to be precise. The base colour was laid down first (Citadel purple something), followed by a Citadel purple wash then the display markings were done with a mauve sort of colour then edged with white, then washed again with the previous purple wash but thinned a little with water. It certainly lifts the interior and draws the eye to the front as the interior without lighting is dark. I wish I could have added even a single light but resin kits like this aren't really designed with that in mind. Still it looks good I think. I'm itching to wait for better weather this weekend to start with the exterior colours. Edited July 29, 2015 by Mintox Quote Link to comment Share on other sites More sharing options...
Mintox Posted July 30, 2015 Author Share Posted July 30, 2015 (edited) The one thing that had bothered me with this kit was the little open space on the ''chin'' of the pod. Getting inside to sand it was going to be a challenge. So I decided to dremel it out a little by making it a little deeper and then mixed up some Aves putty and filled it in and smoothed it out saving me the hassle of sanding the join in this little trough. Edited July 30, 2015 by Mintox Quote Link to comment Share on other sites More sharing options...
MechTech Posted July 31, 2015 Share Posted July 31, 2015 The painting in there looks awesome! It looks like it all belongs too. You gotta leave that open at shows or at least in your house!-MT Quote Link to comment Share on other sites More sharing options...
Mintox Posted August 1, 2015 Author Share Posted August 1, 2015 The painting in there looks awesome! It looks like it all belongs too. You gotta leave that open at shows or at least in your house!-MT Thanks MT. Yeah I intend to leave it opened. Only issue with that is I'm going to have to secure it to its base because once the hatch is on it will tip the centre of balance to the rear and the thing tends to want to topple backwards. So now I have to find a nice base for it. Quote Link to comment Share on other sites More sharing options...
Cesar Enrique Posted August 1, 2015 Share Posted August 1, 2015 I'm eager to see the final photos, you created a lot of expectation with this awesome progress. I started a regult too, it's a Bandai, sadly, I didn't bought any of the Moscato regults. Quote Link to comment Share on other sites More sharing options...
Mintox Posted August 1, 2015 Author Share Posted August 1, 2015 (edited) I'm eager to see the final photos, you created a lot of expectation with this awesome progress. I started a regult too, it's a Bandai, sadly, I didn't bought any of the Moscato regults. I always wanted to build my Bandai Regult but it seemed so small and the proportions are a little off for me. This kit to me is the ducks nuts. It has its issues but boy does it look sexy when built. Anyway a few more photos of the first major undercoat. Edited August 1, 2015 by Mintox Quote Link to comment Share on other sites More sharing options...
Mintox Posted August 9, 2015 Author Share Posted August 9, 2015 (edited) Slow progress this week. I've started shading the undercoat then applying the white top coat over. This is the first stage where I go over it with the white fairly liberally and wait for it to dry. I can then access where to reapply a deeper coat of the white while leaving the shading in the corners etc to give it some depth. The white looks a little grey in these shots that's because it isn't particularly thick. Edited August 9, 2015 by Mintox Quote Link to comment Share on other sites More sharing options...
TheElf Posted August 9, 2015 Share Posted August 9, 2015 (edited) This is amazing. I love seeing how you've detailed the interior. I took the easy way out and colored everything "interior lighting green" when I drew my Meltran Pod pilot... Edited August 9, 2015 by TheElf Quote Link to comment Share on other sites More sharing options...
Mintox Posted August 9, 2015 Author Share Posted August 9, 2015 This is amazing. I love seeing how you've detailed the interior. I took the easy way out and colored everything "interior lighting green" when I drew my Meltran Pod pilot... Thanks Elf. I'm a little behind in finishing it because the weather in Perth has been pretty horrible - low temperatures and high humidity plus I have a shitty cold/flu thingy going making me feel like crap. The interior on this kit is a highlight. I wish I had a 1/72 Zentran pilot to pose with it but that's what my next model will be for - a 1/72 Valkyrie in Battroid mode (Hasegawa) with super pack of course. Quote Link to comment Share on other sites More sharing options...
Mintox Posted August 16, 2015 Author Share Posted August 16, 2015 Ive decided to change the colours to something more in line with the movie version and the old toy I used to have of the Regult. Here are the legs with their base colour of a blueish/green blue. This is something I mixed up myself from Mr Hobby Color White (80%) with 5% Alaitoc blue plus a few drops of green and blue from Mr Hobby. Quote Link to comment Share on other sites More sharing options...
Mintox Posted September 9, 2015 Author Share Posted September 9, 2015 (edited) Ok I'm back. House renovations made a big interruption to my painting things so not much progress plus the weather has been pretty ordinary. Anyway started on the body with the light bluish colour. I still need to mask off the ''eye'' in the centre of the hatch and paint that the bluish colour. I also brought a nice big plastic base for it from HLJ. Edited September 9, 2015 by Mintox Quote Link to comment Share on other sites More sharing options...
NZEOD Posted September 10, 2015 Share Posted September 10, 2015 (edited) You can mount a Neopixel http://www.gadgetcat.com/product/neopixel-mini-pcb-pack-of-5-a-1612/ inside the cockpit even hidden behind something like the seat and you'd get a backgound colour wash. The Neopixel can display any brightness from nothing to blinding, and any 4k colour. They are crazy tiny and blindingly bright with a chip controller built in. Then use single strand laquered copper wire to run the three wires out of the cockpit (you could just them as additional piping and paint them) and down the legs to the the feet where you could hollow a foot pad out and add the battery cell (watch/hearingaid size) or use pins to fit into slots in a diaorama base and have the power supply underneath that. Mine are powered by a USB power supply and on the fighters the copper cables are run down each landing leg as "brake lines" in into the Carrier deck though a contact pin. To get the copper lines to lay down the legs you dremel a slot the length of the legs on the outside, lay in the copper wire and putty over it and sand. This is for anything not hollow. I'm trying this technique on 1/72 tail fins and wingtips to get flashing navigation lights to the ends. Either copper strand and heavily sanded to shape 1.8mm LEDs or a single fibre optic strand. The Gundam guys and girls have been doing this awhile I think as I found the techniques on their sites. Edited September 10, 2015 by NZEOD Quote Link to comment Share on other sites More sharing options...
Mintox Posted September 10, 2015 Author Share Posted September 10, 2015 More progress. body now complete, I just need to tidy up some paint creep around the top rear laser bulge thingy and the main body is done. Legs are up next. I'm getting psyched over finishing this as I want to get onto my 1/72 Battroid to pose with it. Quote Link to comment Share on other sites More sharing options...
Recommended Posts
Join the conversation
You can post now and register later. If you have an account, sign in now to post with your account.