Mintox Posted June 8, 2015 Share Posted June 8, 2015 (edited) Ok I am building this in parallel to my 1/48 VF19. And boy is there a noticeable difference in ease of construction. I don't know what possesses anyone to like anything smaller than 1/48 scale unless the subject matter is a very large vehicle, such as a heavy bomber or something like the enterprise from Star Trek. 1/72 is just a pain to build. Having said that the kit is very detailed for the most part and is pretty much a scaled down version of the 1/48 kit. Did I mention its also SMALL? Arrrgh! The cockpit. Like most aircraft modelers I paint and detail the cockpit tub first and then insert and close the hull halves together. In the case of this kit, there were some issues with the fit around the cockpit dashboard(?) and the rear above the backseat position. I decided to close the halves together and put the tub in now. It'll make it trickier to paint but that''ll be the challenge. The gaps are marked in red. The rear I'll have to put a bit of plastic card in the seam gap as it wont pull all the way over. The seats haven't been permanently fixed yet. Flipping it over, I have decided to display this bird in flight so that necessitated modifying the forward gear doors so they can be closed. Now the first of the two issues I have with the Hasegawa 1/72 Valkyries, scale aside. The forward fuselage has a very pronounced bend like a banana in side profile this is evident when you try and fit the doors closed as they do not following the bend in the fuselage profile correctly.The rear doors are very straight where there should be curve in the plane when closed. Easy fixed by gently bending them. I believe the profile of the 1/48 kits to be superior in this area. Edited June 8, 2015 by Mintox Quote Link to comment Share on other sites More sharing options...
electric indigo Posted June 8, 2015 Share Posted June 8, 2015 I also mostly display my aircraft kits in flight configuration, and when no explicit parts for closed doors are provided, I usually fit the door parts as good as I can and then apply a layer of polyester putty. After this is sanded flush with the fuselage, I re-scribe the panel lines around and across the doors. Quote Link to comment Share on other sites More sharing options...
Mintox Posted June 8, 2015 Author Share Posted June 8, 2015 I also mostly display my aircraft kits in flight configuration, and when no explicit parts for closed doors are provided, I usually fit the door parts as good as I can and then apply a layer of polyester putty. After this is sanded flush with the fuselage, I re-scribe the panel lines around and across the doors. Precisely what I plan on doing here. I would have scratched built them if not for the fact of that bulge on the doors for the wheels. It's no biggy really and pretty much expected. The curve on the other hand wasn't something I was aware of. I don't think the line-art even has this or at least not to my eyes. As I said the 1/48 side profile is closer, if not exactly correct, in this area. Quote Link to comment Share on other sites More sharing options...
Mintox Posted June 14, 2015 Author Share Posted June 14, 2015 More progress on the forward undercarriage doors. Sanded flat, puttied up and sanded then rescribed the doors. Quote Link to comment Share on other sites More sharing options...
chaff.g Posted June 14, 2015 Share Posted June 14, 2015 Very nice. Your rescribed doors look much better than mine turned out in the VF-1 strike thread. What kind of putty did you use? Quote Link to comment Share on other sites More sharing options...
Mintox Posted June 14, 2015 Author Share Posted June 14, 2015 Very nice. Your rescribed doors look much better than mine turned out in the VF-1 strike thread. What kind of putty did you use? Just plain old Tamiya but I used their scribing tool which I find so far to be the best tool I have used. Very sharp and gives a great panel line. I used the tape from those printers that print labels as it is hard and gives a good, straight edge to scribe against and is flexible enough to go over things like the door bump. Quote Link to comment Share on other sites More sharing options...
Mintox Posted February 28, 2016 Author Share Posted February 28, 2016 (edited) Weather has been mild so I'm diving into the models as much as I can. I've started to add the metal etch parts to the Elint. Intakes were a bit tricky but ok if you take your time. The booster packs have some of the etch set applied. Once the top is sanded smooth the missing detail is then replaced with metal etch parts. Edited February 28, 2016 by Mintox Quote Link to comment Share on other sites More sharing options...
slide Posted March 2, 2016 Share Posted March 2, 2016 Flipping it over, I have decided to display this bird in flight so that necessitated modifying the forward gear doors so they can be closed. Now the first of the two issues I have with the Hasegawa 1/72 Valkyries, scale aside. The forward fuselage has a very pronounced bend like a banana in side profile this is evident when you try and fit the doors closed as they do not following the bend in the fuselage profile correctly.The rear doors are very straight where there should be curve in the plane when closed. Easy fixed by gently bending them. I believe the profile of the 1/48 kits to be superior in this area. I Will have to do the same thing for almost all of my Valks, since i display very few of my models on the ground. at least Hasegawa included Gear-up doors for the VF-25 series, did they do it with any other kits? your nose-gear doors turned out very nice btw. Quote Link to comment Share on other sites More sharing options...
Mintox Posted March 3, 2016 Author Share Posted March 3, 2016 I Will have to do the same thing for almost all of my Valks, since i display very few of my models on the ground. at least Hasegawa included Gear-up doors for the VF-25 series, did they do it with any other kits? your nose-gear doors turned out very nice btw. As far as I can see they only did them for the VF-25. The doors for the VF-1 arent so bad as to be only a little painful to fit otherwise its just a matter of using some plastic card to make some edges around the wheel wells so that the doors sit flush and then a little putty and sanding and they look very decent. Quote Link to comment Share on other sites More sharing options...
joscasle Posted March 4, 2016 Share Posted March 4, 2016 As far as I can see they only did them for the VF-25. The doors for the VF-1 arent so bad as to be only a little painful to fit otherwise its just a matter of using some plastic card to make some edges around the wheel wells so that the doors sit flush and then a little putty and sanding and they look very decent. wait for the main gear Quote Link to comment Share on other sites More sharing options...
Mintox Posted April 18, 2016 Author Share Posted April 18, 2016 Now that I have finished the YF19 its onto the Elint. These are some random shots of work in progress. Engine bells and thruster bells have been sprayed Mr Hobby Steel. I had to assemble the legs and thrusters at this stage as I couldn't make the thrusters fit after the legs have been glued. Its just too tight a fit. Forward fuselage and centre section are also joined at this stage. The cockpit tub needs painting and detailing but thats next including the chairs and pilots. Quote Link to comment Share on other sites More sharing options...
Mintox Posted April 20, 2016 Author Share Posted April 20, 2016 Main gear doors sealed. I think they turned out not too bad considering the angst they caused me. Quote Link to comment Share on other sites More sharing options...
kajnrig Posted April 21, 2016 Share Posted April 21, 2016 I have a question about photo-etch parts. Are they meant to be applied then painted the same way you would other scratch-built detail? Or are you expected to put them on after all other assembly/painting is complete, and leave the metal bare? I guess I'm not quite sure how much more they add to kits nowadays, considering the detail you can get out of the bare plastic has risen considerably. But anyway, I'm really looking forward to this. I've always wanted to build an Elint but never got the chance before they stopped production. Keep it up. Quote Link to comment Share on other sites More sharing options...
NZEOD Posted April 21, 2016 Share Posted April 21, 2016 Add them in the build up and paint along with the rest of the model. They add finer detail for panel lining and relief on areas that may have been left devoid of detail otherwise (tailpipes and super pack exhaust areas on VF-1s) or they add parts that were never there but should have been (cockpit controls, radio aerial fin blades, rear fuselage to wing filler panel on VF-1s). Quote Link to comment Share on other sites More sharing options...
Mintox Posted April 21, 2016 Author Share Posted April 21, 2016 I have a question about photo-etch parts. Are they meant to be applied then painted the same way you would other scratch-built detail? Or are you expected to put them on after all other assembly/painting is complete, and leave the metal bare? I guess I'm not quite sure how much more they add to kits nowadays, considering the detail you can get out of the bare plastic has risen considerably. But anyway, I'm really looking forward to this. I've always wanted to build an Elint but never got the chance before they stopped production. Keep it up. As NZEOD mentions, they simply add an extra level of detail to things that were either missed or are maybe present but not correct or they simply add extra features - common on military kits for adding things like tool boxes, latches, tie downs etc. You add them during the build process and paint over as normal. For the 1/72 Valks the main detail they add is the intake vents on the tail/backpack when it is flipped up and the missing lights? on the lower part of the legs that is completely missing from the Hasegawa 1/72 kits and inside the thruster walls but that detail is missing on both the 1/72 and 1/48 kits. Other than that the rest of the detail is probably not worth getting (some control sticks for the cockpits, space filler for the rear of the area where the wings fold etc). Add them in the build up and paint along with the rest of the model. They add finer detail for panel lining and relief on areas that may have been left devoid of detail otherwise (tailpipes and super pack exhaust areas on VF-1s) or they add parts that were never there but should have been (cockpit controls, radio aerial fin blades, rear fuselage to wing filler panel on VF-1s). As above. Quote Link to comment Share on other sites More sharing options...
NZEOD Posted April 21, 2016 Share Posted April 21, 2016 The best bits are the jet nozzle ribbing details, the fuselage wing space filler, the backpack vent blades, the blade aerial blades and the twin leg lights. Quote Link to comment Share on other sites More sharing options...
Mintox Posted April 24, 2016 Author Share Posted April 24, 2016 Test fitting the pilots to the cockpit. I had to chop off their feet to make them fit. I think Hasegawa didnt think anyone would have pilots for this kit or else they didnt care. Either way they were annoying to get right. I've also finished the back pack. Most of these have now all been given an undercoat of Tamiya fine grey undercoat. Quote Link to comment Share on other sites More sharing options...
Mintox Posted April 30, 2016 Author Share Posted April 30, 2016 Let the painting begin! Quote Link to comment Share on other sites More sharing options...
MechTech Posted May 3, 2016 Share Posted May 3, 2016 Looking good! - MT Quote Link to comment Share on other sites More sharing options...
Mintox Posted May 10, 2016 Author Share Posted May 10, 2016 All parts have finally received their colours and now need to be glossed so I can apply the decals and then onto weathering. Quote Link to comment Share on other sites More sharing options...
NZEOD Posted May 10, 2016 Share Posted May 10, 2016 Main gear doors sealed. I think they turned out not too bad considering the angst they caused me. Working on a bunch of mine at the moment for the Hall displays and that front door on the rear legs, the one with the light in it.... I hate it with a passion now. So much of the back side of it has to be shaved off to have it sit flush! Quote Link to comment Share on other sites More sharing options...
Mintox Posted May 10, 2016 Author Share Posted May 10, 2016 Working on a bunch of mine at the moment for the Hall displays and that front door on the rear legs, the one with the light in it.... I hate it with a passion now. So much of the back side of it has to be shaved off to have it sit flush! Oh yeah THAT part. Its a right royal pain in the arse. Yep I had to do the same. I wish they had supplied closed door like they do in the VF25 kits. Quote Link to comment Share on other sites More sharing options...
mickyg Posted May 11, 2016 Share Posted May 11, 2016 It looks great! I'm still on the lookout for one of these and can't believe the premium they're commanding on the second-hand market. There's nowhere I can get one for less than 60 or so and I just can't stomach that price. Quote Link to comment Share on other sites More sharing options...
NZEOD Posted May 11, 2016 Share Posted May 11, 2016 It looks great! I'm still on the lookout for one of these and can't believe the premium they're commanding on the second-hand market. There's nowhere I can get one for less than 60 or so and I just can't stomach that price. Ahhh ??? Try here... 153 of them available for $44 http://www.amazon.com/72-VE-1-Elintseeker-Plastic-model/dp/B0006NGPT6/ref=sr_1_2?ie=UTF8&qid=1462927885&sr=8-2&keywords=Elintseeker Quote Link to comment Share on other sites More sharing options...
mickyg Posted May 11, 2016 Share Posted May 11, 2016 Thanks! Hadn't seen any offering free shipping before. Unfortunately, it's still too much as in aud, it works out to be $65 to my door. Since the 3 of us are all here on this side of the world, I didn't think to specify. Mintox, sorry to derail! Love seeing the build progress from a "local" fan. and also wanted to highlight the fact this is a somewhat expensive kit that you're doing a fantastic job building. Quote Link to comment Share on other sites More sharing options...
NZEOD Posted May 11, 2016 Share Posted May 11, 2016 I buy all mine from there and have them sent to NZ... still cheaper than whats here Quote Link to comment Share on other sites More sharing options...
Mintox Posted May 11, 2016 Author Share Posted May 11, 2016 Thanks! Hadn't seen any offering free shipping before. Unfortunately, it's still too much as in aud, it works out to be $65 to my door. Since the 3 of us are all here on this side of the world, I didn't think to specify. Mintox, sorry to derail! Love seeing the build progress from a "local" fan. and also wanted to highlight the fact this is a somewhat expensive kit that you're doing a fantastic job building. Yeah prices seem pretty stupid for this and the Ostrich. If I had a spare I would sell it to you. Anyway I am getting close to finishing this kit. The pilots will crap me when I go to paint them. 1/72 figures are just why. Why would anyone build 1/72 figures! Why WHY!!! Quote Link to comment Share on other sites More sharing options...
VF-1A Grunt Posted May 13, 2016 Share Posted May 13, 2016 Yeah prices seem pretty stupid for this and the Ostrich.I check Amazon every few days because the prices fluctuate so much. The Ostrich actually dropped down to about $35 + free shipping a few weeks ago, but I was getting ready to move and wouldn't have been at the same address after the three weeks it would take to reach the U.S. From Japan. I should have had it shipped to a friend and picked it up later, because it's back up to $60+.Back on topic, excellent work with the landing gear doors! I'll have to tackle that soon. I've only worked with 1/72 but am considering buying a 1/48 VF-1. Maybe I shouldn't or I might not want to go back! Quote Link to comment Share on other sites More sharing options...
Mintox Posted May 13, 2016 Author Share Posted May 13, 2016 I check Amazon every few days because the prices fluctuate so much. The Ostrich actually dropped down to about $35 + free shipping a few weeks ago, but I was getting ready to move and wouldn't have been at the same address after the three weeks it would take to reach the U.S. From Japan. I should have had it shipped to a friend and picked it up later, because it's back up to $60+. Back on topic, excellent work with the landing gear doors! I'll have to tackle that soon. I've only worked with 1/72 but am considering buying a 1/48 VF-1. Maybe I shouldn't or I might not want to go back! Trust me the 1/48 kits crap on the 1/72. Only thing as I say they dont do the D or Elint or Ostrich. Three of the most wanted versions.WTF Hasegawa? Anyway I've started on my Ostrich but I dont think I'll do a in progress of this. I'll just build it and post it once its finished. Quote Link to comment Share on other sites More sharing options...
kajnrig Posted May 13, 2016 Share Posted May 13, 2016 I've asked this before, but does Hasegawa ever re-issue their limited-run kits? Anyway, thanks for the PE advice from earlier, and still enjoying the entire WIP. Keep it up. Quote Link to comment Share on other sites More sharing options...
Mintox Posted May 13, 2016 Author Share Posted May 13, 2016 I've asked this before, but does Hasegawa ever re-issue their limited-run kits? Anyway, thanks for the PE advice from earlier, and still enjoying the entire WIP. Keep it up. Sometimes they do. Its rare but they have done so in the past with the aircraft kits, cars etc. They usually offer better decals and etch parts or even resin detail sets. So yeah hopefully they'll reissue the Elint and Ostrich one day. Maybe even as a double kit would be awesome. Quote Link to comment Share on other sites More sharing options...
VF-1A Grunt Posted May 13, 2016 Share Posted May 13, 2016 Trust me the 1/48 kits crap on the 1/72. Only thing as I say they dont do the D or Elint or Ostrich. If they release the D, I'd be totally sold on buying a bunch of 1/48 kits. I want to build a couple D variations, including an Angel Birds #6. The fact that they include the TV cockpit and pilot alone would convince me, since I'm trying to figure out how to get enough TV pilots to meet my needs. However, I would still want to build 1/72 kits to go along with the Destroids that aren't available in 1/48. Quote Link to comment Share on other sites More sharing options...
Mintox Posted May 15, 2016 Author Share Posted May 15, 2016 (edited) A slight setback this weekend. While I have started to put the decals on I was carrying the main body and drop it. It crashed to the floor right on the end of the nose and cracked a good portion of it along the top and bottom of the joins leaving a nasty crack. While its repairable I decided to shelf it and start again. I strangely had three spare cockpits for the VE and VT. I have no idea where they came from but I was stoked. I also had a bunch of other parts too so I've started over again with the cockpit which is the reason its missing in this photo. Edited May 15, 2016 by Mintox Quote Link to comment Share on other sites More sharing options...
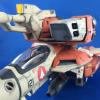
Mintox Posted May 22, 2016 Author Share Posted May 22, 2016 (edited) Almost done. Here I have basically finished the wash into all the panel lines etc. I'm pretty happy with the results considering the level of detail Hasegawa has put into this kit it does buildup into something very nice. Next will be some chalks and oils and then I'll seal it with a dull coating and then add all the clear parts, add the cockpit seats, canopy and it'll be done. Edited May 22, 2016 by Mintox Quote Link to comment Share on other sites More sharing options...
batcode Posted May 22, 2016 Share Posted May 22, 2016 very nice work, coming along nicely... the paint ,looks great Quote Link to comment Share on other sites More sharing options...
Recommended Posts
Join the conversation
You can post now and register later. If you have an account, sign in now to post with your account.