Mintox Posted June 6, 2015 Share Posted June 6, 2015 Just started on detailing the cockpit. This is of course the Hasegawa 1/48 YF-19. A beautiful kit. Very detailed and big. I have the etched detail kit for this by Hasegawa too. It adds some nice little touches like the open vents behind the canopy, little detail bits on the main thruster thingys etc. I'll show these as I progress through the build. For now I am just test fitting the pilot here. It needs cleaning up on the mold seams on the shoulders. Cockpit needs to be given a coat of flat Vallejo clear and then dry brushed to bring out some of the detail. Cockpit displays needs to be added via a kit supplied decal. Quote Link to comment Share on other sites More sharing options...
chyll2 Posted June 6, 2015 Share Posted June 6, 2015 Thanks for sharing. Quote Link to comment Share on other sites More sharing options...
Mintox Posted June 7, 2015 Author Share Posted June 7, 2015 (edited) I've managed in between pulling tree stumps out this today. Cockpit still needs some highlights with a lighter grey drybrushed on. This is the cockpit after the brass etch and decals have been applied: More brass goodness. Vent thingys behind cockpit. Hasegawa brass cockpit detail fret: Edited June 7, 2015 by Mintox Quote Link to comment Share on other sites More sharing options...
coronadlux Posted June 7, 2015 Share Posted June 7, 2015 Looking good. Can't wait to see the rest Quote Link to comment Share on other sites More sharing options...
chaff.g Posted June 7, 2015 Share Posted June 7, 2015 Cockpit is already looking fantastic! Quote Link to comment Share on other sites More sharing options...
Mintox Posted June 10, 2015 Author Share Posted June 10, 2015 I've added some more touches to the cockpit. Dry brushed with Citadel Astronomican Grey. Test fitting here before I close the two hull halves together. Quote Link to comment Share on other sites More sharing options...
mickyg Posted June 10, 2015 Share Posted June 10, 2015 Mintox - that looks superb! Mind if I ask you how you get such a nice finish with acrylics? I haven't used Citadel before but I understand it's very similar to Valejo in consistency. Which doesn't help me because I've never used Valejo either! I have plenty of experience with Tamiya, Gunze, and Lifecolor paints though and in every case, they dry so quickly that dry brushing becomes very difficult. Do you use a retarding agent with the paint? Quote Link to comment Share on other sites More sharing options...
Mintox Posted June 10, 2015 Author Share Posted June 10, 2015 (edited) Mintox - that looks superb! Mind if I ask you how you get such a nice finish with acrylics? I haven't used Citadel before but I understand it's very similar to Valejo in consistency. Which doesn't help me because I've never used Valejo either! I have plenty of experience with Tamiya, Gunze, and Lifecolor paints though and in every case, they dry so quickly that dry brushing becomes very difficult. Do you use a retarding agent with the paint? Nope ask away - Ok if you are airbrushing I mix about 50/50 thinners/paint regardless of brand of acrylic except Vallejo where their airbrushable range is spot on for me in terms of thinness. They do have a thinner if you feel it is still too thick. As for Citadel paints, they come in various consistencies from their glazes and filters to their brushable range. They also have some thicker stuff for undercoats too and for effects like mud etc. I have successfully airbrushed their range. I did try water first for thinning but they seemed to want to form droplets (i'm guessing the waters surface tension is playing a part here). I tried Tamiya thinner and that seemed to be ok. So you can airbrush the stuff. As for paint brush and using it to dry brush, Citadel paints tend to dry quickly but I find it inst any worst than using acrylics such as Tamiya for the same effect. I would probably add a few drops of water to the mix (not necessary to use acrylic thinner in this instance) for Citadel paints and give that a go. As for dry-brushing with Tamiya or Gunze or Mr Hobby (my preferred paints at the moment), I would add a drop or two of their thinners. I also as a rule make sure that the surface is dead flat so it "grabs" the paint off the brush. For this I use the Vallejo clear acrylics. Their flat is the best I have come across but by all means try other brands. Edited June 10, 2015 by Mintox Quote Link to comment Share on other sites More sharing options...
mickyg Posted June 10, 2015 Share Posted June 10, 2015 Thanks for the advice! Great stuff and I'll not hesitate to experiment a bit. I'd always heard you couldn't dry brush acrylics but I'm glad to know that's not the case. Quote Link to comment Share on other sites More sharing options...
Mintox Posted June 10, 2015 Author Share Posted June 10, 2015 Thanks for the advice! Great stuff and I'll not hesitate to experiment a bit. I'd always heard you couldn't dry brush acrylics but I'm glad to know that's not the case. I would say that the Citadel paints are probably a little easier to dry brush given they are purely designed for brushes and nothing else. They have a great range of colours and are non-toxic. I love them and use them with other acrylic paints so no issue of this paint eating into the other paints. Quote Link to comment Share on other sites More sharing options...
Mintox Posted June 10, 2015 Author Share Posted June 10, 2015 Closed the two hull halves together. Here are some shots of the etched metal parts for this kit. The extra detail looks good. Quote Link to comment Share on other sites More sharing options...
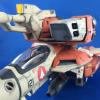
Mintox Posted June 11, 2015 Author Share Posted June 11, 2015 (edited) Messing around with test fitting parts. I never realised how bloody big this thing is! Edited June 11, 2015 by Mintox Quote Link to comment Share on other sites More sharing options...
chyll2 Posted June 11, 2015 Share Posted June 11, 2015 (edited) or you can say how small VF-1 is (along with other small valkyrie like VF-11). Nice progress and thanks for sharing the progress. Edited June 11, 2015 by chyll2 Quote Link to comment Share on other sites More sharing options...
coronadlux Posted June 12, 2015 Share Posted June 12, 2015 It'll take up a lot of counter space. Looking good so far.keep the updates coming. Quote Link to comment Share on other sites More sharing options...
Mintox Posted July 5, 2015 Author Share Posted July 5, 2015 Slowly working on my VF-19. Drilled out the holes on the torque link on the forward undercarriage leg and added the intake and after burner? details. Quote Link to comment Share on other sites More sharing options...
MechTech Posted July 15, 2015 Share Posted July 15, 2015 Th PE parts really make the engine parts realistic. The whole thing is looking great!-MT Quote Link to comment Share on other sites More sharing options...
Mintox Posted July 16, 2015 Author Share Posted July 16, 2015 Th PE parts really make the engine parts realistic. The whole thing is looking great!-MT Yeah I have shelved this while I work on the Regult. Probably do more to the VF19 on the weekend. Hoping to undercoat it and make a start on finishing the first layer or paint. Quote Link to comment Share on other sites More sharing options...
Mintox Posted January 18, 2016 Author Share Posted January 18, 2016 Ok Im back. Weather here in sunny Perth has not been conducive to painting acrylics. Temperatures are in the high 30's-40's and the paint dries before it hits the plastic. Its been a bit cooler now so back to work on the YF19. Started undercoating everything in preparation for the top coats. I took some shots of the metal detail set that I think adds a little more detail to the kit. Quote Link to comment Share on other sites More sharing options...
505thAirborne Posted January 19, 2016 Share Posted January 19, 2016 Good to see you're back on track with this project!! Quote Link to comment Share on other sites More sharing options...
Mintox Posted February 1, 2016 Author Share Posted February 1, 2016 Finally all parts have been primed and parts that needed panel highlights have been sprayed with Mr Hobby H77 Tire Black. I prefer this over using a black as its not quite a black so is easier to spray over with the primary colour later. Quote Link to comment Share on other sites More sharing options...
Mintox Posted February 2, 2016 Author Share Posted February 2, 2016 (edited) I've started on the shading of the primary colour. In this case I have decided to follow the standard colour scheme and not go with a skull squadron marked bird but will save that for later (I'm actually doing a Red Skull VF1 with strike pack so didnt want to do two versions of it). Anyway, the first pict is of the main colour mixed in a big Hobby bottle (I combined a full bottle of H1 and H318 50/50 mix). Next pict shows how I progressively fill the panels in. The last photo is a comparison of pre-shaded and post shaded leg. Edited February 2, 2016 by Mintox Quote Link to comment Share on other sites More sharing options...
Mintox Posted February 2, 2016 Author Share Posted February 2, 2016 More shots of various parts being shaded. You know a model is big when you sit for two hours airbrushing parts. Even more so when you are wearing a particulate mask. Quote Link to comment Share on other sites More sharing options...
spanner Posted February 2, 2016 Share Posted February 2, 2016 great looking build so far Mintox! can't wait to see more! Quote Link to comment Share on other sites More sharing options...
batcode Posted February 4, 2016 Share Posted February 4, 2016 paints comeing on well, nice work so far Quote Link to comment Share on other sites More sharing options...
MechTech Posted February 4, 2016 Share Posted February 4, 2016 Welcome back and it looks like with a vengeance! Looking good! - MT Quote Link to comment Share on other sites More sharing options...
Ignacio Ocamica Posted February 4, 2016 Share Posted February 4, 2016 Wow, love your work in progress threads!!! I'll patiently wait for more pics!!! Quote Link to comment Share on other sites More sharing options...
Mintox Posted February 5, 2016 Author Share Posted February 5, 2016 (edited) Yeah I love this kit. I've just ordered another couple. I really want to do it in skull colours but I'll leave it as the standard Edwards Base YF-19 for now and do the others in a Skull Squadron and the blue and white colour scheme (not sure where it is from but the 1/72 kit sports it). Unfortunately its been close to 40 degrees C here and 45 plus in my workshop, being tin clad it doesnt do much for installation from the searing sun so I've been working on my SDF1 TV and Movie version ships. I know the TV version has coped a lot of flack but I love it. It doesnt have that silly scalloped bit under the reflex guns which has always annoyed me. Edited February 5, 2016 by Mintox Quote Link to comment Share on other sites More sharing options...
Mintox Posted February 18, 2016 Author Share Posted February 18, 2016 Progressing sloooowly. Temperatures still very hot and humid. Working on the upper body blending in the panel lines. Some areas are stil a bit dark but the extreme rear is what I am aiming for. Other parts like gear doors etc are finished. Quote Link to comment Share on other sites More sharing options...
mooman Posted March 13, 2016 Share Posted March 13, 2016 Beautiful. Can't wait till she's done. Quote Link to comment Share on other sites More sharing options...
Mintox Posted March 20, 2016 Author Share Posted March 20, 2016 Ok so I am almost done with painting. All major parts are completed. I'm test fitting here one of the vertical stabilisers. The other is the awesome GU gun, which has always been my favourite version of Macross VF weapons. things to still paint are the landing gear and bays (white) and the thrusters and insides of the rear engines and the black anitglare panels around the cockpit and some of the small thruster thingies then its onto the decaling and washes. Quote Link to comment Share on other sites More sharing options...
MechTech Posted March 21, 2016 Share Posted March 21, 2016 It's looking great! - MT Quote Link to comment Share on other sites More sharing options...
Mintox Posted March 24, 2016 Author Share Posted March 24, 2016 Started to paint the black markings around the cockpit. You can see some of the cockpit displays on the lower sides of the cockpit. Pity they'll be covered when the canopy goes on. Quote Link to comment Share on other sites More sharing options...
derex3592 Posted March 24, 2016 Share Posted March 24, 2016 Lovely detail work there! And hey--at least you'll know they're there! Quote Link to comment Share on other sites More sharing options...
Mintox Posted March 25, 2016 Author Share Posted March 25, 2016 (edited) I've just realised I have used the wrong red on the stabiliser and vertical stabilisers. It should be Mr Hobby Shine Red not Red. Oh well back out to the spray bench. In the meantime here are some more update photos. I'm slowly adding those parts that can stay on when I give it a coat of clear gloss for the decaling and weathering process.\ Edited March 25, 2016 by Mintox Quote Link to comment Share on other sites More sharing options...
Mintox Posted March 26, 2016 Author Share Posted March 26, 2016 I have finally started on the detailing washes. Here I have done the landing gear and GU gun. In the undercarriage there is a before and after shot of the rear landing gear showing the difference a wash does to bring out the detail. Quote Link to comment Share on other sites More sharing options...
Recommended Posts
Join the conversation
You can post now and register later. If you have an account, sign in now to post with your account.