ErikElvis Posted May 2, 2016 Share Posted May 2, 2016 Totally psyched. Always wanted a good x-9 and this looks excellent! Quote Link to comment Share on other sites More sharing options...
Xigfrid Posted May 4, 2016 Author Share Posted May 4, 2016 Just updated first post: "The production is complete. Shipping has started for Unpainted version. Painted Ghosts scheduled to be available in late May. If you want to secure a kit of the 2nd batch, you can order for Unpainted or Painted version now, I will have a few plastic parts in stock the 14th of May." Also User Manual can be read online here. This is a colored version. Note that a black & white paper version is included in each kit. Quote Link to comment Share on other sites More sharing options...
Loop Posted May 4, 2016 Share Posted May 4, 2016 (edited) I'm ok if there is any delay because of the added figures. Edited May 4, 2016 by Loop Quote Link to comment Share on other sites More sharing options...
Garfinkel Posted May 4, 2016 Share Posted May 4, 2016 Mine shipped today and i am super excited. Just need to work out what colour to go for, a low vis grey or the high vis orange we see in the anime. Quote Link to comment Share on other sites More sharing options...
Xigfrid Posted May 5, 2016 Author Share Posted May 5, 2016 Mine shipped today and i am super excited. Just need to work out what colour to go for, a low vis grey or the high vis orange we see in the anime. This one is more like red Ferrari! Don't make it orange! Quote Link to comment Share on other sites More sharing options...
Garfinkel Posted May 9, 2016 Share Posted May 9, 2016 I stand corrected, i need to have a look at how reds weather without going pink or rusted. Quote Link to comment Share on other sites More sharing options...
wmkjr Posted May 12, 2016 Share Posted May 12, 2016 (edited) Thanks Xigfrid! The package arrived! Will work on this one a little at a time while working on another project. Initial impressions: Very nicely packed inside. Love that resin smell. It feels like its got some heft. Depending on your skill level, you can either build it straight outta the box or refine it some more as it looks good as is to me (noob level builder here). This is the unpainted one without gears (checked box has gears) Parts breakdown (some are partial assembled) Edited May 12, 2016 by wmkjr Quote Link to comment Share on other sites More sharing options...
Xigfrid Posted May 12, 2016 Author Share Posted May 12, 2016 (edited) Thank you for the feedback, I am looking forward for the built progress now! Just a piece of warning concerning the UN spacy kite logo: the glue is super strong, so be careful when applying it.You can put a gloss coat before applying the sticker/mask. I did use the kite on top of the white primer, and still have some primer chip out. Edited May 12, 2016 by Xigfrid Quote Link to comment Share on other sites More sharing options...
Garfinkel Posted May 12, 2016 Share Posted May 12, 2016 Mine arrived at the local sorting office yesterday but I won't be able to pick it up until Saturday Quote Link to comment Share on other sites More sharing options...
Golden Arms Posted May 14, 2016 Share Posted May 14, 2016 (edited) Thanks Xigfrid, What WMKR said!!! Postman just dropped mine off and I unboxed it. I can't wait to start building this. Those on the fence, dont be, it looks awesome. I may have to double dip on your second batch and get a painted version as I have way too many kits in the pipeline to build!! For painting, Will enamels be safe? Do you have a suggested paintcolor guide? Going to need to watch Mac+ sometime soon and burn the colors into my mind! Thanks again! Edited May 14, 2016 by Golden Arms Quote Link to comment Share on other sites More sharing options...
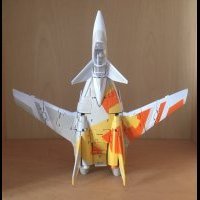
Garfinkel Posted May 14, 2016 Share Posted May 14, 2016 I finally got to pick mine up, and its a beauty! Here are a few quick phone snaps along my Yamato YF-19 AND YF-21. The ghost is held together by gravity only. Quote Link to comment Share on other sites More sharing options...
derex3592 Posted May 14, 2016 Share Posted May 14, 2016 Got mine today! What a great kit! Very impressive! Thank you Xigfrid!! Can't wait to build it! Quote Link to comment Share on other sites More sharing options...
wmkjr Posted May 14, 2016 Share Posted May 14, 2016 Build update: Let it sit in simple green for a few hours, scrubbed with a toothbrush, rinsed, then soaked overnight in soapy water. This morning scrubbed with toothbrush and rinsed again to let air dry. In the afternoon, started parts fitting then I noticed the clear eye lens. How many sections on it are supposed to be clear? I see the main lens and the upper lens. Are the 2 smaller ones that go on the sides supposed to be clear too? The 2 smaller windows and inner part of the eye are cloudy/unfinished. Did I do something wrong or is there a way to make it clear via sanding finer and finer grits of sandpaper followed by polishing? Quote Link to comment Share on other sites More sharing options...
Chronocidal Posted May 14, 2016 Share Posted May 14, 2016 I might have to take the plunge on this one, though I don't know if I want a pre-painted kit or not yet. It's tempting to not have to worry about decorating it myself, and just display it. Quote Link to comment Share on other sites More sharing options...
Xigfrid Posted May 14, 2016 Author Share Posted May 14, 2016 (edited) For painting, Will enamels be safe? Do you have a suggested paintcolor guide? Going to need to watch Mac+ sometime soon and burn the colors into my mind! Thanks again! That's a pleasure! For enamel paint, sound pretty safe. The painted ghosts are using Tamyia TS spray which is supposedly "hotter" than enamel. The color chart is quiete simple, the main body use Mica red (TS-85 sprayed in a can then airbrushed), 5 canons in Gun metal + some black brushing, all the inside such as landing gears, missile bay is white. At the rear, the reactors have been tricky. I will have a few pictures soon to show the result! I finally got to pick mine up, and its a beauty! Here are a few quick phone snaps along my Yamato YF-19 AND YF-21. The ghost is held together by gravity only. 20160514_200454.jpg 20160514_200506.jpg 20160514_200542.jpg Looking really nice with its deadly friends Got mine today! What a great kit! Very impressive! Thank you Xigfrid!! Can't wait to build it! Can't wait to see the built too! How many sections on it are supposed to be clear? I see the main lens and the upper lens. Are the 2 smaller ones that go on the sides supposed to be clear too? The 2 smaller windows and inner part of the eye are cloudy/unfinished. Did I do something wrong or is there a way to make it clear via sanding finer and finer grits of sandpaper followed by polishing? Everything is perfectly right, don't worry. The clear parts are exactly as you described them, clear on the visible outside areas: easy to refined with sanding/tooth paste brushing etc. Apply a gloss coat when satisfied with the finish. The interior is cloudy, and a simple gloss coat should make it less cloudy. But you don't really need to worry as this side is supposed to be painted so it represents the details of the eye. See ? I might have to take the plunge on this one, though I don't know if I want a pre-painted kit or not yet. It's tempting to not have to worry about decorating it myself, and just display it. Let me know Edited May 14, 2016 by Xigfrid Quote Link to comment Share on other sites More sharing options...
Jasonc Posted May 15, 2016 Share Posted May 15, 2016 Got mine yesterday, and everything looks great. I haven't done a parts check, but so far so good. Quote Link to comment Share on other sites More sharing options...
wmkjr Posted May 18, 2016 Share Posted May 18, 2016 (edited) Thanks for the info! I sanded down the canopy then gave it a coating of Future and it came out looking great! The only problem was that I broke the 2 smaller lens but I think I have a solution for that later: I wanted the lens to have a bluish tint so today I gave it another coating of Future with blue food coloring: I used Tamiya TS-8 Italian red over Tamiya fine white primer for the body color so here it is with a test fit to see how it looks though I still need to spray on another coat as I missed some spots: Edited May 19, 2016 by wmkjr Quote Link to comment Share on other sites More sharing options...
Xigfrid Posted May 19, 2016 Author Share Posted May 19, 2016 I like this color too! I had a hard time to decide which one between TS-8 and TS-85. Also, i am sorry for the breakage of your clear part, but fortunately for you, the FUD material can be glued back together with 'Power Glue', it will be just like as new. I highly recommend this method. As an alternative, I have also put the part available on Shapeways, but you will have to sand it all the way again... I order them by 12x to reduce price, but it will be too much if you need only 1, so I put also a single canopy, but expensive though. Anyway it doesn't bother me to put both options. (You got 15% off on FUD orders this weekend) single: http://www.shapeways.com/product/7JD5XR4E6/clear-canopy-fud-v5?optionId=59292022 12x pack: http://www.shapeways.com/product/N5AFAHF5H/clear-canopies-v5-12x?optionId=59292112 Quote Link to comment Share on other sites More sharing options...
wmkjr Posted May 19, 2016 Share Posted May 19, 2016 Thanks for the tip and links! Unfortunately I lost those 2 pieces that broke off. I'm gonna try and see if I can use some clear resin I got laying around to fill the smaller windows.. Quote Link to comment Share on other sites More sharing options...
Xigfrid Posted May 19, 2016 Author Share Posted May 19, 2016 Thanks for the tip and links! Unfortunately I lost those 2 pieces that broke off. I'm gonna try and see if I can use some clear resin I got laying around to fill the smaller windows.. I hope it will work! Anyway I also put a 4x version if it can help being a compromise. 4x set: https://www.shapeways.com/product/F9ZNA2QNL/clear-canopy-4x Quote Link to comment Share on other sites More sharing options...
derex3592 Posted May 19, 2016 Share Posted May 19, 2016 Nice looking build so far wmkjr! I was planning the exact same method of Future/Blue Food Coloring with my clear parts! Quote Link to comment Share on other sites More sharing options...
Jasonc Posted May 19, 2016 Share Posted May 19, 2016 Is that lense blue in the anime? Quote Link to comment Share on other sites More sharing options...
wmkjr Posted May 19, 2016 Share Posted May 19, 2016 (edited) I forgot if it was blue. It's probably clear but just colored blue to give it shape. Most of the online pics of builds or colored pics I used as reference has it blue so I went with it. I like it that color anyway. I forgot to add that one thing you can do is use clear future on the inner part first to clear it up some, paint the inner parts of the eye, then dye it (or just clear Future the whole thing if you want it clear). Edited May 19, 2016 by wmkjr Quote Link to comment Share on other sites More sharing options...
Jasonc Posted May 20, 2016 Share Posted May 20, 2016 I forgot if it was blue. It's probably clear but just colored blue to give it shape. Most of the online pics of builds or colored pics I used as reference has it blue so I went with it. I like it that color anyway. I forgot to add that one thing you can do is use clear future on the inner part first to clear it up some, paint the inner parts of the eye, then dye it (or just clear Future the whole thing if you want it clear). Thanks. I'm hoping to get started on it sometime soon. I've been looking at place to add LED function to it, as well as a small switch. I may end up going with a darker red for the body, and doing a yellow clear for the front, but I'm not sure yet. I like the blue as well. Green would also be good, too. Man, decisions decisions. Quote Link to comment Share on other sites More sharing options...
aaajin Posted May 21, 2016 Share Posted May 21, 2016 looking good wmkjr!. Please keep us updated with your build! Quote Link to comment Share on other sites More sharing options...
wmkjr Posted May 21, 2016 Share Posted May 21, 2016 A little update for today. Sorry to hijack this thread but I didn't want to start another one. I stripped the lens back to clear so everyone can see how it looks( I'll dye it blue again later) and painted the inner part Tamiya XF-66 light grey. For now I painted the eye Fluorescent glow in the dark pink just to test. I might go the led route later on. I also painted the laser pods and intake(?) gunmetal though I'll redo the intakes as I used white primer versus the grey for the pods. I'm still debating how I should paint the rear area. Here are a couple of pics showing the lens in clear and the ghost mocked up without screws as I need to do a lot more painting and finishing. Quote Link to comment Share on other sites More sharing options...
Xigfrid Posted May 22, 2016 Author Share Posted May 22, 2016 You are welcome to post here! I love your progress so far Quote Link to comment Share on other sites More sharing options...
derex3592 Posted May 22, 2016 Share Posted May 22, 2016 Lookin good! Quote Link to comment Share on other sites More sharing options...
wmkjr Posted May 24, 2016 Share Posted May 24, 2016 (edited) Slowly getting there. Still needs more work done till I call it a day. Will paint the upper intake fin and bottom reactors gunmetal today. Getting the tail section to hold together while adding it to the main body is tricky for me as the bottom exhaust doesn't hold firmly to the upper housing. I might have to glue it or add some future for more friction. Here are some pics with the boosters free standing: Edited May 24, 2016 by wmkjr Quote Link to comment Share on other sites More sharing options...
Xigfrid Posted May 24, 2016 Author Share Posted May 24, 2016 Hey Wmkjr, your ghost is getting some character with these black accents! Looking really great! I have received the painted Ghosts today, and assembled one to take a few pictures of it. 1) The plastic parts that hold the landing gear need some sanding and cutting to fit. Be careful with them when working them: Work slowly, step by step when adjusting! In particular the front plastic part that is a lot off the perfect dims. I don't know why, probably because the resin recesses more than 3D printing when curing. 2) the paint is not super high quality, and have some defaults: it cannot be compared to a Bandai DX or Yamato painting jobs. But I am really happy with them and I think they really worth it. I will let you judge them by yourself: Last picts to show that the rear reactors have been emphasized with a slight darker red than the rest of the body. Quote Link to comment Share on other sites More sharing options...
Jasonc Posted May 24, 2016 Share Posted May 24, 2016 They look pretty good. As far as the shrinkage of the resin goes, that's usually a sign of the quality of resin, or the type. Some shrink a lot more than others. In any case, the recasting was done very good, so even with shrinkage, it came out really well, with not too much work required. As for the painting, it's a good job. I know I'd be happy with it if I got it. A job well done. Quote Link to comment Share on other sites More sharing options...
Xigfrid Posted May 24, 2016 Author Share Posted May 24, 2016 I will try to take new pictures of the painting in the sun light, these one don't really do justice Quote Link to comment Share on other sites More sharing options...
wmkjr Posted May 25, 2016 Share Posted May 25, 2016 Looks great! Now I got something to reference for the exhaust. Is that the TS-85? That red looks nice. Too bad my LHS don't carry it in stock and they take forever to order. Quote Link to comment Share on other sites More sharing options...
valhary Posted May 25, 2016 Share Posted May 25, 2016 impressive work you are amazing Quote Link to comment Share on other sites More sharing options...
Xigfrid Posted May 25, 2016 Author Share Posted May 25, 2016 (edited) Looks great! Now I got something to reference for the exhaust. Is that the TS-85? That red looks nice. Too bad my LHS don't carry it in stock and they take forever to order. Yes it is. The color looks good, and I also love the feel of TS paints once dry! impressive work you are amazing Thank you! Small update about the painted orders: in the next coming days I will assemble the landing gears and add some coat to harden the paint. That would take a few additional days, sorry for the wait. Edited May 25, 2016 by Xigfrid Quote Link to comment Share on other sites More sharing options...
Recommended Posts
Join the conversation
You can post now and register later. If you have an account, sign in now to post with your account.