Xigfrid Posted October 28, 2015 Author Share Posted October 28, 2015 Sometime we think that we got plenty of space... the truth is often the opposite! Quote Link to comment Share on other sites More sharing options...
Jasonc Posted October 28, 2015 Share Posted October 28, 2015 This looks like a massive undertaking. How many other materials are you going to need for this? Quote Link to comment Share on other sites More sharing options...
Xigfrid Posted October 28, 2015 Author Share Posted October 28, 2015 The optional gears are a very complex part of the design, this is why I study it last. So far, everything is clear for the moment: the main body comes with cavities, the cavity is closed by the gear traps, everything is so far recast in resin. The traps however would need some nail vernish to stay in place or just power glue them in place to close the cavities. Then for those how want the optional landing gears, things go pretty wilde, for the front landing gear you will need: -a 3D printed part would be glued to the resin trap -this is going to be articulated with another plastic 3D printed part to make the trap movable. There goes the rod between the two parts. -the landing gear main body is 3D printed in stainless steel -cover it with the rubber tire -assemble the landing gear into a third plastic part that perfectly grip to the cavity sides, this part is in yellow. and voila you got a complicated mechanism, but keeping things pretty cheap. Quote Link to comment Share on other sites More sharing options...
Jasonc Posted October 28, 2015 Share Posted October 28, 2015 That's gonna be some tight work, indeed. I like what I'm seeing though. Quote Link to comment Share on other sites More sharing options...
Ignacio Ocamica Posted October 28, 2015 Share Posted October 28, 2015 Great progress so far!! I'm impressed!! Quote Link to comment Share on other sites More sharing options...
Kelsain Posted October 29, 2015 Share Posted October 29, 2015 How about a cheap, hollow one in 1:72? 😉 Quote Link to comment Share on other sites More sharing options...
Bolt Posted October 29, 2015 Share Posted October 29, 2015 Landing gear is brilliant. Love the option, haha. But the more I think about it, it's probably going straight to the yeti stand😏 Quote Link to comment Share on other sites More sharing options...
Xigfrid Posted October 29, 2015 Author Share Posted October 29, 2015 How about a cheap, hollow one in 1:72? I have no definitive plans for the 1:72 scale, but at 90% it won't have the landing gears, then bottom wing can be fixed, that means a larger bottom part. No way it would be cheap, but cheaper than the 1:60 yes Quote Link to comment Share on other sites More sharing options...
valhary Posted October 29, 2015 Share Posted October 29, 2015 will look amazing side by side with the yf 19 and 21 Quote Link to comment Share on other sites More sharing options...
Xigfrid Posted October 29, 2015 Author Share Posted October 29, 2015 almost finished the gears, what a relief! Quote Link to comment Share on other sites More sharing options...
Xigfrid Posted November 6, 2015 Author Share Posted November 6, 2015 (edited) exciting update, the model is finished and in its way to 3D printing! Edited November 6, 2015 by Xigfrid Quote Link to comment Share on other sites More sharing options...
Jasonc Posted November 6, 2015 Share Posted November 6, 2015 Holy....!!! That looks awesome. Great work Xigfrid. Looks like a very in depth kit to work on. Quote Link to comment Share on other sites More sharing options...
MILKAUTICO Posted November 6, 2015 Share Posted November 6, 2015 exciting update, the model is finished and in its way to 3D printing! Holly X-9!!!!!! Quote Link to comment Share on other sites More sharing options...
Spitfire_BR Posted November 6, 2015 Share Posted November 6, 2015 Oh my God... dude, make it in 1/72, please ! Quote Link to comment Share on other sites More sharing options...
Loop Posted November 6, 2015 Share Posted November 6, 2015 Dammmmn this thing looks awesome! Quote Link to comment Share on other sites More sharing options...
mickyg Posted November 6, 2015 Share Posted November 6, 2015 That is gorgeous Xigfrid! Every new model you make is a big jump from the last one before it. Very nice work! Quote Link to comment Share on other sites More sharing options...
Kurisama Posted November 7, 2015 Share Posted November 7, 2015 Dude, you did an amazing job! Really. Well done Quote Link to comment Share on other sites More sharing options...
Bolt Posted November 7, 2015 Share Posted November 7, 2015 That's the shizzle!😉 Quote Link to comment Share on other sites More sharing options...
Xigfrid Posted November 7, 2015 Author Share Posted November 7, 2015 Thank you guys! Quote Link to comment Share on other sites More sharing options...
derex3592 Posted November 7, 2015 Share Posted November 7, 2015 This looks absolutely fantastic!!! Now....any idea on pricing??? Quote Link to comment Share on other sites More sharing options...
MechTech Posted November 7, 2015 Share Posted November 7, 2015 That work looks awesome!!! It will be great to see it printed and in kit form. Nice execution of the concept! - MT Quote Link to comment Share on other sites More sharing options...
Xigfrid Posted November 9, 2015 Author Share Posted November 9, 2015 (edited) I have been working on this project non stop for 2 weeks to get the prototype 3D printed, I am now resting a bit from this project. To let you know, It is about 2 and 2.5 more expensive to print than the fighter drone. That means that making a more complex or bigger thing than this X-9 would be very difficult using this process (shapeways for validating prototype, printing in higher resolution resin, recasting, then painting) ! Anyway, the prototype is coming in the next weeks, so if everything is right from this step I will look into the next ones. Edited November 9, 2015 by Xigfrid Quote Link to comment Share on other sites More sharing options...
Mommar Posted November 9, 2015 Share Posted November 9, 2015 Given it's 2 to 2.5 times more expensive that would push this to the $200 to $250 range. Quote Link to comment Share on other sites More sharing options...
Xigfrid Posted November 9, 2015 Author Share Posted November 9, 2015 Given it's 2 to 2.5 times more expensive that would push this to the $200 to $250 range.I was speaking only about the prototype, i don't know yet how that would scale as a finished product/kit. I hope not that high though. Quote Link to comment Share on other sites More sharing options...
Mommar Posted November 9, 2015 Share Posted November 9, 2015 I was speaking only about the prototype, i don't know yet how that would scale as a finished product/kit. I hope not that high though. I see, I miss-understood. Quote Link to comment Share on other sites More sharing options...
Mommar Posted November 12, 2015 Share Posted November 12, 2015 I keep looking back at this and you're fricking nuts, bro! How did you come up with a solution for the super parts attaching? Quote Link to comment Share on other sites More sharing options...
Xigfrid Posted November 12, 2015 Author Share Posted November 12, 2015 I used a basic system. Each super parts is made of 3 parts: the red and brown ones will be recasted in resin and the third (yellow one) needed to be highly flexible then it would be 3D printed directly from shapeways. I made this part partly hidden so it can even be printed in white. But it can also be printed in red.To assemble the super, you just got to screw the small yellow part into the brown (top part), with the red in between the two. The super should not be able to be snapped in two once they are assembled and if they do, that won't bother me either that much.But the top part would be slightly able to move and rotate to make the hooking lever enter into a hole, then you close the front of the super part, with the yellow tab moving inside the air intakes.To remove the the super, that would be as simple as 1) pull up the front of the brown part, 2) then let it rotate to free the backside hook 3) then pull out the super. Quote Link to comment Share on other sites More sharing options...
Jasonc Posted November 12, 2015 Share Posted November 12, 2015 Given it's 2 to 2.5 times more expensive that would push this to the $200 to $250 range. Based on the design work and details needed, that's actually a fair price. If it's priced lower, it's really a sweet deal. Quote Link to comment Share on other sites More sharing options...
aaajin Posted November 13, 2015 Share Posted November 13, 2015 thats really good, using sketchup at that. was wondering if $200-$250 price range is for a 3d-print or a molded/recast parts? Quote Link to comment Share on other sites More sharing options...
claude grant Posted November 13, 2015 Share Posted November 13, 2015 Xigfrid, you are a talented, inspired, and INSANE cat to tackle this the way you have, and I thank you for your efforts. Will probably order this one as well just coz I loves me some M+ so much. Your designs with Jasonc's 3Ding are hitting the mark for me! Quote Link to comment Share on other sites More sharing options...
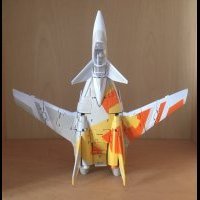
Xigfrid Posted November 30, 2015 Author Share Posted November 30, 2015 Most parts came through and perfectly fit. I got rejected the metallic parts, I fixed their models and am waiting for the new ones, hopefully they come out nicely this time. Additionally I am not very happy with the stand adapter, I will try to figure something out and fixing a few other thing if possible Pretty happy with the overall result though! I hope you will enjoy the first assembly as much as I did Quote Link to comment Share on other sites More sharing options...
Ignacio Ocamica Posted November 30, 2015 Share Posted November 30, 2015 Wow!!!! Arcadia should hire you!!! It's a piece of art!!! Fantastic job, you've done great justice to this design. Quote Link to comment Share on other sites More sharing options...
derex3592 Posted November 30, 2015 Share Posted November 30, 2015 I MUST HAVE THIS!!! Quote Link to comment Share on other sites More sharing options...
mickyg Posted November 30, 2015 Share Posted November 30, 2015 That looks awesome! Excellent work there! Quote Link to comment Share on other sites More sharing options...
MILKAUTICO Posted November 30, 2015 Share Posted November 30, 2015 Most parts came through and perfectly fit. I got rejected the metallic parts, I fixed their models and am waiting for the new ones, hopefully they come out nicely this time. Additionally I am not very happy with the stand adapter, I will try to figure something out and fixing a few other thing if possible Pretty happy with the overall result though! I hope you will enjoy the first assembly as much as I did :hail: Quote Link to comment Share on other sites More sharing options...
Recommended Posts
Join the conversation
You can post now and register later. If you have an account, sign in now to post with your account.