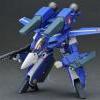
GU-11 Posted December 9, 2012 Share Posted December 9, 2012 I was cleaning my airbrush for the first time, and some time during disassembly, a plastic seal called a "packing" went missing. It's supposed to be located between the "central block" and air hose and it very small--I didn't even notice it the first time I took it apart. Below is a pic of the central block and air hose. That figure-eight depression on the red plastic cover is where the "packing" is supposed to go: I know it's a stupid question, but is this part essential to the airbrush? I could have sworn it wasn't even there when I first took the airbrush apart. I searched the entire room, but that plastic part is nowhere to be seen. The airbrush worked fine the first few times, so I was wondering it that packing thing was even needed. Any advice? Quote Link to comment Share on other sites More sharing options...
VF-19 Posted December 9, 2012 Share Posted December 9, 2012 Well, aside from the obvious, reassemble and give it a try (with water), if you can't find it, there's a chance it never was there in the first place. What model of airbrush do you have? Quote Link to comment Share on other sites More sharing options...
GU-11 Posted December 10, 2012 Author Share Posted December 10, 2012 (edited) Thanks for replying! I'm using a Tamiya basic airbrush, the one that comes with the Spraywork basic compressor set. TBH, the more I read the manual and cross-reference it to the actual airbrush, it seems as if there have been some revisions that weren't documented. In the manual, there was supposed to be an O-ring that was supposed to be placed between the screw top of the central block and the paint cup, but in the actual AB, the ring seems to be built into the paint cup itself. FYI, it looks like the upper hole supplies air into the part where the paint mixes with the air in the central block and exits the nozzle, while the lower hole simply blasts air through the nozzle continuously. I'll try to find some time and test out the airbrush with some water and see if it still works. Edited December 10, 2012 by GU-11 Quote Link to comment Share on other sites More sharing options...
VF-19 Posted December 10, 2012 Share Posted December 10, 2012 Reminds me of when I was barely getting any paint through my Badger Patriot. Turns out I had paint buildup inside the nozzle. An overnight soak in windex, and a good scrubbing (carefully!) fixed that up. It was just really weird that I had the trigger all the way back, and I was still getting pencil thin lines, instead of broad coverage. Quote Link to comment Share on other sites More sharing options...
Noyhauser Posted December 10, 2012 Share Posted December 10, 2012 I might be mistaken but I think that the tamiya brush is actually made by iwata. You might be able to get a replacement part from them (you can buy all Iwata parts online). Quote Link to comment Share on other sites More sharing options...
GU-11 Posted December 13, 2012 Author Share Posted December 13, 2012 (edited) Seems I might be needing that "packing" thing after all. I reassembled the AB and filled the paint cup with water, and gave it a try. The water in the paint cup kept bubbling, and when I pressed the trigger, no water came out. This, however, might have something to do with my accidentally bending the needle when picking it up from a box I placed it in during disassembly. I straightened it the best I could, but it seems like the damage is already done. I had no idea a metal needle can be so fragile. But if it was the needle, shouldn't it at least spray when I pull back on the trigger? I might be mistaken but I think that the tamiya brush is actually made by iwata. You might be able to get a replacement part from them (you can buy all Iwata parts online). Thanks for the advice, Noyhauser! I think I'll try getting them from the Tamiya store I bought this from, first. Should be quicker this way. First, the packing goes missing, and now I have to replace the needle too. Damn, this airbrushing sh!t's getting expensive. Edited December 13, 2012 by GU-11 Quote Link to comment Share on other sites More sharing options...
Greyryder Posted December 14, 2012 Share Posted December 14, 2012 (edited) This, however, might have something to do with my accidentally bending the needle when picking it up from a box I placed it in during disassembly. I straightened it the best I could, but it seems like the damage is already done. I had no idea a metal needle can be so fragile. I have an Iwata Revolution. I hadn't had it long, when I sheared the nozzle off, when I was putting the thing back together. It's a tiny little brass piece, that threads in. I'm not what anyone would consider a big dude, but I have been known to damage bicycle parts, when putting things together. That poor little nozzle never stood a chance. Edited December 14, 2012 by Greyryder Quote Link to comment Share on other sites More sharing options...
GU-11 Posted December 15, 2012 Author Share Posted December 15, 2012 I have an Iwata Revolution. I hadn't had it long, when I sheared the nozzle off, when I was putting the thing back together. It's a tiny little brass piece, that threads in. I'm not what anyone would consider a big dude, but I have been known to damage bicycle parts, when putting things together. That poor little nozzle never stood a chance. Ouch! How much did that cost you? I heard that high end airbrushes can cost up to 500 USD. Murphy's Law at work, I guess. Prior to cleaning the AB for the first time, I've been re-reading that damn manual for two months, trying to memorize every step of disassembling the AB, taking extra care to place all components inside a box to make sure they don't go missing. And still I failed to notice the rubber seal aka packing, and managed to bend the needle. I guess everything's a learning curve. Next time I disassemble an AB, the needle will be placed in a cup (pointy end up, of course) and the center block will be disassembled in a box with a transparent plastic cover over it; even if the packing launches into the air from the forceful prying of the center block and air hose, it'll just ricochet off the plastic cover and back into the box. Quote Link to comment Share on other sites More sharing options...
Greyryder Posted December 15, 2012 Share Posted December 15, 2012 The Revolution's on the low end of the Iwata range. I think the new nozzle only cost 10 or 15 dollars. I was much more careful, when I installed it. I've since gotten one of their Eclipse airbrushes, and I've become quite adept at stabbing my fingers with the needle, when reassembling it. Quote Link to comment Share on other sites More sharing options...
GU-11 Posted December 15, 2012 Author Share Posted December 15, 2012 (edited) Personally, I plan to stick with this cheap one until I'm at least more familiar with the workings of an AB. Don't trust myself around the more expensive ones yet. I'll probably go with single-action AB's, since I tend to use pastels, weathering kits and other non-AB techniques for exhaust stains, post shading and "racing stripes." Double action ones seem like a bitch to maintain and use, and I'm already getting flustered with the simplest AB Tamiya (or any airbrush company for that matter) has to offer. Edited December 15, 2012 by GU-11 Quote Link to comment Share on other sites More sharing options...
VF-19 Posted December 15, 2012 Share Posted December 15, 2012 I can vouch for my Badger 105 Patriot. Nice and simple to maintain. Needs no tools to take apart or to assemble. At worse, you'll need a wrench, but that happens rarely. Quote Link to comment Share on other sites More sharing options...
Kylwell Posted December 15, 2012 Share Posted December 15, 2012 Stabbing oneself with a/b needles is a time honored tradition dating back to the neolithic eras. Quote Link to comment Share on other sites More sharing options...
Kylwell Posted December 15, 2012 Share Posted December 15, 2012 So I contacted the guy I go to when I have an a/b problem. He said to email him about the problem tom@tagteamhobbies.com He knows more about airbrushes and the industry than anybody else I know. Quote Link to comment Share on other sites More sharing options...
GU-11 Posted December 16, 2012 Author Share Posted December 16, 2012 @ VF-19: That Badger Patriot you mentioned; is it single or double action? I might get this one later when I get the hang of airbrushing, and keep the basic Tamiya one for large areas and/or single-color paint jobs. @ Kylwell: Many thanks, Kylwell! One thing, though. Will he ignore my email, since he doesn't even know who I am? I've heard that emails sent from gmail accounts have a habit of ending up in spam folders. Quote Link to comment Share on other sites More sharing options...
VF-19 Posted December 16, 2012 Share Posted December 16, 2012 It's a gravity fed double action. It's also compatable with parts from the 200 and 155 (more so with the 155 as it's a gravity fed version of this airbrush). I find it really easy to use, clean and maintain. I do, however find that the trigger is really stiff out of the box (for me), but there's an easy way to loosen it up. The spring that governs trigger tension is held in with a screw. One or two turns to loosen the spring is enough for me. I've also tried putting a tiny bit of lube (WD-40) on the trigger and rocker, but it was too inconsistent. The MiG-3 in the workbench thread was painted up with the Badger 105 (aka Patriot). Honestly, I love that airbrush. Quote Link to comment Share on other sites More sharing options...
Kylwell Posted December 16, 2012 Share Posted December 16, 2012 @ VF-19: That Badger Patriot you mentioned; is it single or double action? I might get this one later when I get the hang of airbrushing, and keep the basic Tamiya one for large areas and/or single-color paint jobs. @ Kylwell: Many thanks, Kylwell! One thing, though. Will he ignore my email, since he doesn't even know who I am? I've heard that emails sent from gmail accounts have a habit of ending up in spam folders. It's always a possibility, even if he did know you. Give it a try & if that doesn't work try contacting @ Starship Modeler, he has an account there. Quote Link to comment Share on other sites More sharing options...
GU-11 Posted December 17, 2012 Author Share Posted December 17, 2012 It's always a possibility, even if he did know you. Give it a try & if that doesn't work try contacting @ Starship Modeler, he has an account there. Thanks, I'll give it a try. My current plan, though, is to bring the whole damn AB to the Tamiya store and get the guy there to replace/fix whatever parts are necessary, which probably entails replacing the needle and rubber seal aka packing anyway. I don't want to end up damaging the AB any further trying to fix the thing on my own. But if all else fails, I'll contact the guy at Starship Modeler and hopefully get some help to salvage the mess. BTW, I'm a big fan of the site; learned a lot of techniques and tips from there. It's a gravity fed double action. It's also compatable with parts from the 200 and 155 (more so with the 155 as it's a gravity fed version of this airbrush). I find it really easy to use, clean and maintain. I do, however find that the trigger is really stiff out of the box (for me), but there's an easy way to loosen it up. The spring that governs trigger tension is held in with a screw. One or two turns to loosen the spring is enough for me. I've also tried putting a tiny bit of lube (WD-40) on the trigger and rocker, but it was too inconsistent. The MiG-3 in the workbench thread was painted up with the Badger 105 (aka Patriot). Honestly, I love that airbrush. Sounds like a good AB for me to upgrade to. I'm admittedly a bot of a slob, and cleaning airbrushes has turned out to be one of my least favorite things to do. Felt like a fricking bomb disposal expert when I took my AB apart for the first time, I was so nervous. BTW, nice job on that MiG-3! If using that AB brings me just one step closer to getting a realistic coat of paint like that, it'll be worth every cent. Of course, I'll need to do a lot of practicing on scrap plastic with water colors first--the tools are only as good as the user. Quote Link to comment Share on other sites More sharing options...
VF-19 Posted December 17, 2012 Share Posted December 17, 2012 Well, the base coats (the summer camo, and then the winter camo on top of it) were done with the airbrush. The rest was future floor polish, a q-tip, thinned enamels, and generous drybrushing. I use Tamiya paints, so it's easy on the cleanup. Cheap too, as I just stock up on Windex to clean the airbrush with. Quote Link to comment Share on other sites More sharing options...
GU-11 Posted December 17, 2012 Author Share Posted December 17, 2012 We don't have Windex here, but I've noticed that most any window/glass cleaner seems to work in removing or thinning Tamiya paints. I used Kao Magiclean to thin my Tamiya paints once for hand-brushing, and it actually works better than Tamiya's own brand of thinner (doesn't cause the first coat to lift when you apply the second one, and within minutes of the first coat!) Should have thought of using it instead of Tamiya's expensive airbrush cleaner--smells horrible and very strong. Speaking of paints, can I use Tamiya's acrylics for panel-line washing? I've only heard of people using enamel and even washes, but not acrylics. Is it just unpopular or is there a reason people avoid it? Quote Link to comment Share on other sites More sharing options...
VF-19 Posted December 17, 2012 Share Posted December 17, 2012 Actually, its because, once you put a coat of future on the model, the heavily thinned enamels won't strip the underlying acrylics. I did miss a few tiny spots on my MiG 3 with my future coverage, and the enamels took the acrylics right off. I was using Testors Model Master enamels to put the panel lines on the MiG and the grime too. If I had painted the model using enamels, I would have used Tamiya to put the panel lines on, for the same reason. Quote Link to comment Share on other sites More sharing options...
GU-11 Posted December 18, 2012 Author Share Posted December 18, 2012 So if I panel washed bare plastic using acrylics, there wouldn't be a problem, right? Quote Link to comment Share on other sites More sharing options...
VF-19 Posted December 18, 2012 Share Posted December 18, 2012 There shouldn't. but, the MiG-3's radiator scoop was a separate part, so I experimented wash techniques and combining paint types (and blasting future on it), as it would be much less painful if something went wrong. However, panel washing works better when applied to a glossy surface, so if you're painting with flat colours, you'll need to put a clear gloss layer on first, then panel wash. Otherwise, the paint won't flow as neatly into the panels. Using the MiG-3 as an example here's the steps I took: 1) Painted the summer camo colours with acyrilics 2) Painted the winter camo colours with acrylics 3) Sprayed Future 4) Panel wash and weathering using enamel paints 5) Applied decals 6) Did exhaust, gun, and rocket stains using acrylics 7) Sprayed a flat clear using acrylics I should note that Future is an acrylic based product, and readily dissolves in windex (which is a soap, ammonia and alcohol blend), and I don't know how future will react using another acrylic on top of it to do panel washes. Quote Link to comment Share on other sites More sharing options...
MacrossJunkie Posted December 18, 2012 Share Posted December 18, 2012 Using another acrylic to do panel washes on a model/toy coated in future is just asking for trouble. Future seems to react pretty easily when it comes in contact with another acrylic. When you need to wipe off the excess, it would either mix and bond with the Future and thus leave a stain or the Future coating will wipe up along with the wash if you try to wipe immediately. Panel lining bare plastic shouldn't be a problem assuming you can get it to work right. Personally, I've never been successful in getting an acrylic wash to work. I can never get it thin enough with a low enough surface tension to make it have that capillary effect so it just runs along the panel lines and such and it seems harder to clean up mistakes. Enamel + thinner seems to work best for me thus far, but I'm going to try an oil wash next. I recently bought some Turpenoid and burnt umber artist oil paint for my next wash so I'll see how that works out for me. Quote Link to comment Share on other sites More sharing options...
GU-11 Posted December 18, 2012 Author Share Posted December 18, 2012 @ VF-19: Thanks for the tips! Copied and pasted on a txt file along with all the other modeling tips. The step-by-step will prove very useful if I do a full-on paint job. For my current project (minor FOC Jazz weathering and touch-up) though, I just plan on panel-lining, a coat flat spray over bare plastic, and then some pastel weathering and paint chip effects. Speaking of which, which one is the right order of things? Flat coat before pastel weathering, or vice versa? Also, should I be doing paint chip effects (either silver paint or graphite shavings) before or after the flat coat? Sorry for the flood of questions. Most other modeling forums offer complex and elaborate weathering and painting tutorials that TBH is a little overwhelming for me to handle as a relative beginner. @ MacrossJunkie: Thanks for the heads-up on the acrylics! Actually, I'm just planning on panel washing over bare plastic, and flat coat it with Tamiya matte spray. The main thing that concerns me is that Tamiya's clear sprays are lacquer-based. Spraying that over acrylics is what worries me. Sometimes I do wonder about how Tamiya does things. If you only made lacquer-based clear sprays which are only safe on lacquer paints, then what the hell am I supposed to use over your acrylics and enamel paints? Would pastels mixed with thinner (Tamiya or industrial) and window cleaner work instead? The local Tamiya store doesn't carry a lot of enamel paints if any, and my current spray booth setup doesn't allow me to use anything with toxic fumes. Quote Link to comment Share on other sites More sharing options...
MacrossJunkie Posted December 18, 2012 Share Posted December 18, 2012 The main thing that concerns me is that Tamiya's clear sprays are lacquer-based. Spraying that over acrylics is what worries me. Sometimes I do wonder about how Tamiya does things. If you only made lacquer-based clear sprays which are only safe on lacquer paints, then what the hell am I supposed to use over your acrylics and enamel paints? Would pastels mixed with thinner (Tamiya or industrial) and window cleaner work instead? The local Tamiya store doesn't carry a lot of enamel paints if any, and my current spray booth setup doesn't allow me to use anything with toxic fumes. I've used the Tamiya lacquer based clear coat sprays on plastic and acrylic paint before and haven't had any problems with them melting or eating through the paint. Now I'm not saying you won't, just that I've never had a problem with it before I switched to using Future for my clear coats. I heard you can use the pastels with plain water mixed with dishwashing detergent if you want to try to avoid fumes from thinner and window cleaner. Never tried it so YMMV. You could try the oil wash thing as well. What I got was Martin/ F. Weber Odorless Turpenoid and Burnt Umber oil paint (Amazon links for illustrative purposes). After doing some research, this brand of turpenoid seems to be safe for model use where some other brands might mess up a Future clear coat or paint finish. From what I've seen in youtube videos and from articles talking about how to use oil washes, it seems to be very forgiving and easy to clean up. Quote Link to comment Share on other sites More sharing options...
VF-19 Posted December 18, 2012 Share Posted December 18, 2012 The flat coat should be the last layer of paint you apply to your model. It's purpose is twofold: 1)To give the desired look to your model (a flat, non-glossy look), and 2) To protect the layers of effects and paint underneath. Also, your decals will also blend in and you won't be able to tell those decals are decals, which just adds to the realism. Quote Link to comment Share on other sites More sharing options...
EXO Posted December 18, 2012 Share Posted December 18, 2012 I use gloss clear coat in between each layer before the last also. I tried Future once to lessen the silvering effect but the water from the decal ruined it. But this thread made me research it more. You have to wait up to 48 hours for Future to completely dry to be able to apply decals on it. Other interesting tips too. Now I can't wait for the next build... stupid non stop rain here in L.A. Can't paint anything. Quote Link to comment Share on other sites More sharing options...
VF-19 Posted December 18, 2012 Share Posted December 18, 2012 I use gloss clear coat in between each layer before the last also. I tried Future once to lessen the silvering effect but the water from the decal ruined it. But this thread made me research it more. You have to wait up to 48 hours for Future to completely dry to be able to apply decals on it. Other interesting tips too. Now I can't wait for the next build... stupid non stop rain here in L.A. Can't paint anything. My future was ready to work the day after. Again, I tested out techniques on the scoop first, before I applied them to the main body. Admittedly, I didn't do decals until after I dirtied up the MiG-3, so I may have dodged that particular bullet. Quote Link to comment Share on other sites More sharing options...
GU-11 Posted December 19, 2012 Author Share Posted December 19, 2012 (edited) I've used the Tamiya lacquer based clear coat sprays on plastic and acrylic paint before and haven't had any problems with them melting or eating through the paint. Now I'm not saying you won't, just that I've never had a problem with it before I switched to using Future for my clear coats. I heard you can use the pastels with plain water mixed with dishwashing detergent if you want to try to avoid fumes from thinner and window cleaner. Never tried it so YMMV. You could try the oil wash thing as well. What I got was Martin/ F. Weber Odorless Turpenoid and Burnt Umber oil paint (Amazon links for illustrative purposes). After doing some research, this brand of turpenoid seems to be safe for model use where some other brands might mess up a Future clear coat or paint finish. From what I've seen in youtube videos and from articles talking about how to use oil washes, it seems to be very forgiving and easy to clean up. I'll try painting a piece of scrap plastic with Tamiya acrylics and then spray some clear coat over it to see how it goes. Hopefully it'll turn out okay like in your case. As for the turpenoid and oil paint, I just hope they'll be available for overseas shipping, what with the restrictions on liquids and aerosol cans on planes these days. The flat coat should be the last layer of paint you apply to your model. It's purpose is twofold: 1)To give the desired look to your model (a flat, non-glossy look), and 2) To protect the layers of effects and paint underneath. Also, your decals will also blend in and you won't be able to tell those decals are decals, which just adds to the realism. Would the surface end up too thick if I sprayed a layer of matte coat before and after weathering? The reason I need a matte coat under the weathering, is because the pastels supposedly stick better on a matte surface and won't be blown off when you apply your top coat to seal it in. Or is it okay to do weathering on just bare plastic? I use gloss clear coat in between each layer before the last also. I tried Future once to lessen the silvering effect but the water from the decal ruined it. But this thread made me research it more. You have to wait up to 48 hours for Future to completely dry to be able to apply decals on it. Other interesting tips too. Now I can't wait for the next build... stupid non stop rain here in L.A. Can't paint anything. Thanks for the heads-up on the Future. Same weather here, BTW. Way too humid to use spray cans outside, and my spray booth isn't powerful enough to handle aerosol cans indoors. And with my AB busted up, I won't be doing any spraying until I get it fixed with weekend. Edited December 19, 2012 by GU-11 Quote Link to comment Share on other sites More sharing options...
Recommended Posts
Join the conversation
You can post now and register later. If you have an account, sign in now to post with your account.