Mommar Posted October 15, 2014 Share Posted October 15, 2014 I can see a lot of the sides. I used to hate having to put on the decals but I made the mistake of putting some on my early releases without trimming the borders. I wasn't very good at trimming them for a long while either so I avoided it. But I decided to get better because I wanted my Valks to look a particular way. I had so many VF-1's I could easily test out trimming decals without worry of trashing something unique. It's still not possible for me to cut some of those stickers though, like the Diamond Force logo for the 17. I've tried, I haven't been able to do it. So I've left them off. That being said, I was very happy to try out the waterslide decals that came with the Anniversary 1J but I found I like them less than decals. They're pretty thin and the color really bleeds through a lot, plus you still get an irritating border around everything just like untrimmed decals. It's kind of an impossible situation to balance what everybody wants though. Quote Link to comment Share on other sites More sharing options...
chyll2 Posted October 15, 2014 Share Posted October 15, 2014 imo, water slide are easier to apply and looks better but needs a proper procedure to make it work. I kind of understand why arcadia or yamato really like to use stickers since these are toys that are meant to be handled. waterslide thickness = it is really thin and fragile for normal or even careful toy handling. this means it needs to be sealed before playing with the toy water slide border = this will be removed after applying decal soltuion color bleeding = this is a problem with the older decal printing solution but It surprises me that the Anniversary 1J has a decals that bleeds. the new decals hasegawa provides is very opaque and no longer bleeds. But I have to agree, VF-1 has the right amount of Balance in terms of tampo printing. Quote Link to comment Share on other sites More sharing options...
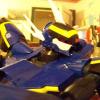
MacrossJunkie Posted October 15, 2014 Share Posted October 15, 2014 I just finished weathering one of my 19's. I still have to work on the gunpod and the FAST pack and the other 19 and its accessories as well. But with this discussion on the included stickers and such and lack of people using them, I figured I'd take some pics now and put them up as an example of carefully cut stickers applied to the toy. Other modes to come after I finish the other stuff. Quote Link to comment Share on other sites More sharing options...
Xigfrid Posted October 15, 2014 Share Posted October 15, 2014 Really amazing weathering/tampos. Did you matt finish it ? Quote Link to comment Share on other sites More sharing options...
Brand-X Posted October 15, 2014 Share Posted October 15, 2014 I just finished weathering one of my 19's. I still have to work on the gunpod and the FAST pack and the other 19 and its accessories as well. But with this discussion on the included stickers and such and lack of people using them, I figured I'd take some pics now and put them up as an example of carefully cut stickers applied to the toy. Other modes to come after I finish the other stuff. Wow! I want my YF-19 to look like that... what did you do? Was it a simple ink wash or something more? #totalnoob. Quote Link to comment Share on other sites More sharing options...
MacrossJunkie Posted October 15, 2014 Share Posted October 15, 2014 Wow! I want my YF-19 to look like that... what did you do? Was it a simple ink wash or something more? #totalnoob. Stickered it based on the markings in the VF-19 master file and Hasegawa, oil wash and mechanical pencil for panel lines, mix of airbrush and Tamiya weathering kit powders and some use of a Mr. Clean magic eraser for some weathering effects, and a clear coat. Really amazing weathering/tampos. Did you matt finish it ? Thanks. I tried to make the clear coat around the same level of matte-ness as the base toy. Quote Link to comment Share on other sites More sharing options...
Ignacio Ocamica Posted October 15, 2014 Share Posted October 15, 2014 Beautiful work as usual MJ!!! Quote Link to comment Share on other sites More sharing options...
Mommar Posted October 15, 2014 Share Posted October 15, 2014 Stickered it based on the markings in the VF-19 master file and Hasegawa, oil wash and mechanical pencil for panel lines, mix of airbrush and Tamiya weathering kit powders and some use of a Mr. Clean magic eraser for some weathering effects, and a clear coat. Me too, ours are largely very similar. I didn't use any of those hooks because I have a hard time trimming them so they don't look awful. I did put the Caution Hot Air stickers on the ends of the wings even though the actual vents weren't molded in those locations. I felt it looked better with a UN Spacy Kite on one of the underwings as well and I actually bothered to put the stickers labeling the underwing pylons too. Looks like for the emitters on the nose instead of labeling them in a row top, emitter, bottom, emitter (if that's in any way clear) I decided to put the labels centered between the two emitters but off left and right of center. I may have to take pictures to be clear, but it's not fancy weathered/coated like yours. Quote Link to comment Share on other sites More sharing options...
wm cheng Posted October 15, 2014 Share Posted October 15, 2014 Congrats MJ! That's the best looking YF-19 I've seen to date. Having all those markings really elevate it from a ridiculously expensive kids toy to a real adult collector's item. It looks simply fantastic, you should be proud. I can't wait to start in on mine... someday... I've re-traced all the Arcadia stickers in Illustrator to vector files, and I'm hoping to try out a guy that does "rub-on" transfers to see if he can do a opaque white now that Alps printers are no more but its taking forever for him to get back to me. I wish Anasazi was still around... (I'm so NOT looking forward to the VF-0D having to source out decals for that puppy especially since its a dark valk). It's been so disheartening to see mine naked especially after how much I had to paid for it. Quote Link to comment Share on other sites More sharing options...
MacrossJunkie Posted October 15, 2014 Share Posted October 15, 2014 Me too, ours are largely very similar. I didn't use any of those hooks because I have a hard time trimming them so they don't look awful. I did put the Caution Hot Air stickers on the ends of the wings even though the actual vents weren't molded in those locations. I felt it looked better with a UN Spacy Kite on one of the underwings as well and I actually bothered to put the stickers labeling the underwing pylons too. Looks like for the emitters on the nose instead of labeling them in a row top, emitter, bottom, emitter (if that's in any way clear) I decided to put the labels centered between the two emitters but off left and right of center. I may have to take pictures to be clear, but it's not fancy weathered/coated like yours. Yeah, I have the pylon attach labels next to my hardpoints as well. I know exactly what you are talking about for the VFC labels. You went with how the master file has it while I took the Hasegawa route for those. Congrats MJ! That's the best looking YF-19 I've seen to date. Having all those markings really elevate it from a ridiculously expensive kids toy to a real adult collector's item. It looks simply fantastic, you should be proud. I can't wait to start in on mine... someday... I've re-traced all the Arcadia stickers in Illustrator to vector files, and I'm hoping to try out a guy that does "rub-on" transfers to see if he can do a opaque white now that Alps printers are no more but its taking forever for him to get back to me. I wish Anasazi was still around... (I'm so NOT looking forward to the VF-0D having to source out decals for that puppy especially since its a dark valk). It's been so disheartening to see mine naked especially after how much I had to paid for it. Thank you. For the rub on transfers, is it something like this? http://www.pulsarprofx.com/decalpro/Vertical/1_MENU/1b_Overview/Overview.html I had been debating trying out this particular product, but I wasn't entirely clear on how it worked. I wish I had any skill/knowledge in designing and making decals or I would go that route as well. If there were some company that made printers like the ALPS dye sublimation printers at an affordable price, that would give me enough incentive to learn to make my own decals. I can't believe there's no market for something like that here. Now I need to find time to do the other one, the FAST packs, and gunpods. This is why I tend not to buy multiples of the same thing, aside from cost. It becomes tiresome doing the same thing more than once... Quote Link to comment Share on other sites More sharing options...
Kanedas Bike Posted October 15, 2014 Share Posted October 15, 2014 Nice job as usual MJ, really like the High Speed Mode shots - makes the YF-19 look more aggressive. -b. Quote Link to comment Share on other sites More sharing options...
Saburo Posted October 15, 2014 Share Posted October 15, 2014 Great job on the YF-19 MJ! Quote Link to comment Share on other sites More sharing options...
Mommar Posted October 15, 2014 Share Posted October 15, 2014 Yeah, I have the pylon attach labels next to my hardpoints as well. I know exactly what you are talking about for the VFC labels. You went with how the master file has it while I took the Hasegawa route for those. Somehow I missed seeing the pylon attach labels. And VFC was the term I was looking for. I thought the master file take was a bit more interesting so I went with that interpretation. I do like the way it looks. What are you planning to do to the Fast Packs? Quote Link to comment Share on other sites More sharing options...
wm cheng Posted October 15, 2014 Share Posted October 15, 2014 ....For the rub on transfers, is it something like this? http://www.pulsarprofx.com/decalpro/Vertical/1_MENU/1b_Overview/Overview.html Yeah, I saw that a while ago, but I thought it was just too fussy and involved too many steps. I'm trying to send it out to a dry transfer manufacturer - we just used them on the last show I was on to do a control panel button lettering and it turned out pretty good - but of course that lettering was 100X bigger than what I want to do. And because its a small personal project, its on their backburner - argh. Quote Link to comment Share on other sites More sharing options...
no3Ljm Posted October 15, 2014 Share Posted October 15, 2014 Wow! Truly, a masterpiece MacrossJunkie. How's the coat so far? Does it get scratches everytime you move the wing to fast mode? And have you transformed this one after applying those decals, effects, and topcoat? But still, superb piece. Quote Link to comment Share on other sites More sharing options...
no3Ljm Posted October 15, 2014 Share Posted October 15, 2014 Ex-Gear Alto Saotome. Panel lined using Tamiya Panel Line Accent Grey. Quote Link to comment Share on other sites More sharing options...
MacrossJunkie Posted October 15, 2014 Share Posted October 15, 2014 (edited) Somehow I missed seeing the pylon attach labels. And VFC was the term I was looking for. I thought the master file take was a bit more interesting so I went with that interpretation. I do like the way it looks. What are you planning to do to the Fast Packs? Right now the FAST packs are stock condition. I need to sticker them, panel line them (should be almost nothing to do here), and apply weathering effects and clear coat. I need to double check the master file to see if there were marking indicators for the FAST packs, but I don't recall seeing any. I don't think Hasegawa made FAST packs for the 19 either, so worst case scenario, I'll just have to use some common sense and already established conventions to determine basic placement. (Edit: There's no diagram, but the VF-19 Master File pages 60 and 62 essentially show the markings and it's not hard to figure out what they are.) For the gunpod, I was thinking of making decals to mimic the vent slots that are missing in the YF-19's because they forgot to modify it from the VF-19 gunpod. That shouldn't be too difficult and it's all black so that's even easier. Wow! Truly, a masterpiece MacrossJunkie. How's the coat so far? Does it get scratches everytime you move the wing to fast mode? And have you transformed this one after applying those decals, effects, and topcoat? But still, superb piece. Thank you. I can flip the wings in and out and all around and there are no scratches as there is pretty much no contact with the edges of the wing glove. I haven't transformed it yet as I only finished it last night and was waiting for the clear coat to dry. The main area where there will be a lot of scraping is the chest lock mechanism over the red sensor array on the sides of the nose cone so I left that uncoated, not that it needed any. The other place I identified to watch for is the area that die-cast shoulder pivot passes over when transforming to GERWALK or battroid, especially the flaps that lift up to make room for the head unit. Gotta make sure those are down flat before swinging the arms around or it WILL scrape. Everything else should be more or less okay, given careful handling. Edited October 15, 2014 by MacrossJunkie Quote Link to comment Share on other sites More sharing options...
Saburo Posted October 15, 2014 Share Posted October 15, 2014 Ex-Gear Alto Saotome. Panel lined using Tamiya Panel Line Accent Grey. Very nice no3ljm! That first photo has the Professor X vibe to it. Quote Link to comment Share on other sites More sharing options...
Ignacio Ocamica Posted October 16, 2014 Share Posted October 16, 2014 I've just recieved one of the custom cabinets I ordered. Now I have to clean it and start displaying part of my collection Quote Link to comment Share on other sites More sharing options...
wmkjr Posted October 17, 2014 Share Posted October 17, 2014 Nice Custom display case. Alto and Brera playing chicken. Quote Link to comment Share on other sites More sharing options...
Mommar Posted October 17, 2014 Share Posted October 17, 2014 I've just recieved one of the custom cabinets I ordered. Now I have to clean it and start displaying part of my collection How wide is that case? Quote Link to comment Share on other sites More sharing options...
Kanedas Bike Posted October 17, 2014 Share Posted October 17, 2014 @ Ignacia Ocamica - very nice case, can't wait to see pictures once you have everything situated @ wmkjr - really nice shots and awesome use of the Yeti Stands -b. Quote Link to comment Share on other sites More sharing options...
wmkjr Posted October 17, 2014 Share Posted October 17, 2014 Thanks KB. Wish I had a display case to put them in instead of leaving them out in the open or in boxes. Shipping sucks to here. Need a couple of more Yetistands. Quote Link to comment Share on other sites More sharing options...
Ignacio Ocamica Posted October 17, 2014 Share Posted October 17, 2014 (edited) How wide is that case? The case dimensions are: Width: 4' Depth: 16" Height 7' Edited October 17, 2014 by Ignacio Ocamica Quote Link to comment Share on other sites More sharing options...
VF-18S Hornet Posted October 17, 2014 Author Share Posted October 17, 2014 I only applied stickers to my VF-17S because to me the Valkyrie is incomplete without the kites and the Diamond Force insignia (and the arrows on the Super Parts). I don't like the stickers because they suck. I hate the excess transparent film around the stickers and that they are not opaque (I can still see the black though the decals on the Nightmare) and I hate to trim them because I can't get it done perfectly and every imperfection bugs the hell out of me because It doesn't meet the standard I have for myself. I stickered up my RG Destiny Gundam (with all the stickers on the sheet) and flat coated it.... it looks passable from the distant but up close it looks horrendous. So it is ok for a 2000 Yen kit but not for a 25000 Yen collectible. tl:dr Stickers are horrible on collector oriented toys imho. That's why I trim them, took me years of practice from collecting to get it right. Quote Link to comment Share on other sites More sharing options...
Ignacio Ocamica Posted October 17, 2014 Share Posted October 17, 2014 (edited) Worth the effort to trim them!!! Makes a great difference. Edited October 17, 2014 by Ignacio Ocamica Quote Link to comment Share on other sites More sharing options...
Saburo Posted October 17, 2014 Share Posted October 17, 2014 I've just recieved one of the custom cabinets I ordered. Now I have to clean it and start displaying part of my collection That is a really nice display case! Looking forward to see it filled with Valks. Quote Link to comment Share on other sites More sharing options...
EXO Posted October 17, 2014 Share Posted October 17, 2014 I've just recieved one of the custom cabinets I ordered. Now I have to clean it and start displaying part of my collection That looks awesome... awkward placement though... Quote Link to comment Share on other sites More sharing options...
Ignacio Ocamica Posted October 17, 2014 Share Posted October 17, 2014 That looks awesome... awkward placement though... Yes I'll leave it there and wait until my son and daughter manage to topple it over No seriously, I was cleaning it and checking the separation from the glass levels (can be adjusted). It has hidden wheels so it's easy to move it around. Quote Link to comment Share on other sites More sharing options...
EXO Posted October 17, 2014 Share Posted October 17, 2014 That's exactly the kind of shelf i want... I could use 2 of those. I just need more toys to fill it up with. lol. Quote Link to comment Share on other sites More sharing options...
DarrinG Posted October 17, 2014 Share Posted October 17, 2014 The case dimensions are: Width: 4' Depth: 16" Height 7' NICE case - looks great . . . Quote Link to comment Share on other sites More sharing options...
wmkjr Posted October 17, 2014 Share Posted October 17, 2014 @ Ignacio- Did you go through a local cabinet maker and told them your specs? Would like to try and get a custom built one if it costs the same as shipping one here. Space patrol: Quote Link to comment Share on other sites More sharing options...
Mommar Posted October 17, 2014 Share Posted October 17, 2014 @ Ignacio- Did you go through a local cabinet maker and told them your specs? Would like to try and get a custom built one if it costs the same as shipping one here. Space patrol: _DSC0258 (2).jpg_DSC0290 (2).jpg_DSC0349 (2).jpg I'm with wmkjr, I'm wondering where you got the cases too? Nice pics man. Quote Link to comment Share on other sites More sharing options...
Ignacio Ocamica Posted October 18, 2014 Share Posted October 18, 2014 I came up with the specs and my wife drew it on Corel Draw. Then I went to a local cabinet maker with the blueprints and ordered two display cases. The front has a fixed glass and the back has two sliding lockable glass doors. Here's a .jpg file (in Spanish): Quote Link to comment Share on other sites More sharing options...
EXO Posted October 18, 2014 Share Posted October 18, 2014 awesome! And conveniently already in L.A.'s native language! Quote Link to comment Share on other sites More sharing options...
Recommended Posts
Join the conversation
You can post now and register later. If you have an account, sign in now to post with your account.