Ignacio Ocamica Posted July 18, 2012 Share Posted July 18, 2012 (edited) Well I'd try to buy your VF-1S/A in 1/32. One could buy each month the different components, I mean buying it in different insatllments, like we're doing with John's 1/32 Legioss. I must add that your VF-1 is becoming the DEFINITE VF-1. Kawamory would be proud, the student is surpassing the teacher!! Edited July 18, 2012 by Ignacio Ocamica Quote Link to comment Share on other sites More sharing options...
EXO Posted July 18, 2012 Share Posted July 18, 2012 I think we pretty much covered it before when we talked but, yeah, doing a detailed modeled like this could be impossible at a small scale. You'd have to have 3D as your primary goal when designing, but the beauty of this project lies in the fact that this is how the components would fit together in the real world. Printing at a large scale like 1:10 would cost you closer into the hundred thousands. There's a point where some parts will be too big for a 3D printer and you'd have to get into CNC routers using renshape or really dense foam that would need molds made out of. Where I work we always compare the price of one prop to a luxury or sports car and something like the parts you've already rendered would probably be a C Class Mercedes with a few options. Quote Link to comment Share on other sites More sharing options...
danbickell Posted July 18, 2012 Author Share Posted July 18, 2012 Yeah, at the very least, this 1/24 S head will be a fun experiment, and not overly expensive. My expectations are low, but maybe we'll be surprised. Maybe it will turn out great, and steer me towards attempting more. Maybe it will serve to get the idea out of my system and save it for the future when the technology advances enough to meet my high standards while being fairly affordable. Browsing through the stuff people have available on Shapeways, there is very little that comes anywhere close to this level of detail and complexity. I certainly don't think that has anything to do with a lack of 3D modelling talent out there. It all seems to just come down to the practicality of the medium. Kurisama's work is easily some of the best I see there, and designed specifically for this purpose. Still, practicality sets the limits. In order to make it available at a reasonably affordable level, it has to comply with the limitations of the cheaper materials. I'd be curious to see how some of his parts would come out in the FUD material, but then we're looking at more than doubling the prices, which would make for a rather expensive upgrade kit. I would love to see this VF-1 model in 1/32 scale. It would be a nice manageable size, and would cut down considerably on the theoretical costs. However, I just don't think it is in the cards with the current 3D printing technology. It would require a completely different model, designed for the scale, and the end result would have to be less detailed than we already see in a good injection-molded kit like the Hasegawa 1/48. Yet, the price would still be several times over what the smaller and more detailed injection-molded kit costs, so why bother? I've been busy converting the older parts of my model to sub-d (mostly just a lot of re-topologizing), to match what I did with the S head. If I continue moving forward with the 3D printing, this will facilitate that. If not, it is allowing me to go back and fix a few things that have bugged me, and allows me to easily crank up the resolution as much as I like. I started out too low with the poly counts, having a hard time breaking my habits from decades of game modelling, and found myself making things increasingly higher resolution as I moved on. The nose is getting an upgrade to make it comparable with the newer parts New page in the thread deserves some new pics. Here's the last few progress renders I made, parting shots for the old nose: Quote Link to comment Share on other sites More sharing options...
MichaelS Posted July 19, 2012 Share Posted July 19, 2012 what wonderful work!! Quote Link to comment Share on other sites More sharing options...
GMK Posted July 19, 2012 Share Posted July 19, 2012 Looking good! Quote Link to comment Share on other sites More sharing options...
Chronocidal Posted July 19, 2012 Share Posted July 19, 2012 Oh, I wanted to point this out earlier, but forgot. Those hand-holds on the nose would definitely be there, but they'd be flush when not in use. Slots like that have spring loaded covers that push or fold inwards for use, but push out flush with the surface afterwards to keep from disturbing the airflow. I'll be really interested to see what kind of new details you're going to add by redoing parts of the nose. It's already so pretty. Quote Link to comment Share on other sites More sharing options...
Zinjo Posted July 20, 2012 Share Posted July 20, 2012 (edited) Yeah, at the very least, this 1/24 S head will be a fun experiment, and not overly expensive. My expectations are low, but maybe we'll be surprised. Maybe it will turn out great, and steer me towards attempting more. Maybe it will serve to get the idea out of my system and save it for the future when the technology advances enough to meet my high standards while being fairly affordable. Browsing through the stuff people have available on Shapeways, there is very little that comes anywhere close to this level of detail and complexity. I certainly don't think that has anything to do with a lack of 3D modelling talent out there. It all seems to just come down to the practicality of the medium. Kurisama's work is easily some of the best I see there, and designed specifically for this purpose. Still, practicality sets the limits. In order to make it available at a reasonably affordable level, it has to comply with the limitations of the cheaper materials. I'd be curious to see how some of his parts would come out in the FUD material, but then we're looking at more than doubling the prices, which would make for a rather expensive upgrade kit. I would love to see this VF-1 model in 1/32 scale. It would be a nice manageable size, and would cut down considerably on the theoretical costs. However, I just don't think it is in the cards with the current 3D printing technology. It would require a completely different model, designed for the scale, and the end result would have to be less detailed than we already see in a good injection-molded kit like the Hasegawa 1/48. Yet, the price would still be several times over what the smaller and more detailed injection-molded kit costs, so why bother? I've been busy converting the older parts of my model to sub-d (mostly just a lot of re-topologizing), to match what I did with the S head. If I continue moving forward with the 3D printing, this will facilitate that. If not, it is allowing me to go back and fix a few things that have bugged me, and allows me to easily crank up the resolution as much as I like. I started out too low with the poly counts, having a hard time breaking my habits from decades of game modelling, and found myself making things increasingly higher resolution as I moved on. The nose is getting an upgrade to make it comparable with the newer parts New page in the thread deserves some new pics. Here's the last few progress renders I made, parting shots for the old nose: Valkyrie Rhinoplasty huh? Should be cool!! Edited July 20, 2012 by Zinjo Quote Link to comment Share on other sites More sharing options...
danbickell Posted July 20, 2012 Author Share Posted July 20, 2012 (edited) Oh, I wanted to point this out earlier, but forgot. Those hand-holds on the nose would definitely be there, but they'd be flush when not in use. Slots like that have spring loaded covers that push or fold inwards for use, but push out flush with the surface afterwards to keep from disturbing the airflow. I'll be really interested to see what kind of new details you're going to add by redoing parts of the nose. It's already so pretty. I considered that about the hand-holds. Hasegawa clearly made it a hinged panel on their 1/48 model, but that isn't how Kawamori drew it on my favorite of the DYRL detail drawings: I kinda like that it breaks up the surface. Of course, I know it isn't good aerodynamic design, but the VF-1 is full of such things already. The vernier thrusters on the nose are a much bigger offender in that respect. You guys probably won't notice anything different about the nose. The shapes and details are the same, the geometry just has different topology. Sub-d just allows me to crank up the poly count, so the round curves can be as round as I want/need them to be. Most of that is already done. I was just showing a buddy who stopped by to visit, and he didn't notice anything different at all. Where it would be noticeable is how not faceted the surface would be should I do a 3D print. The only thing that might change would be the areas under the canopy frame. I put some shapes in there, like a seal, but I've never been happy with the lack of detail, so I might address that while I'm revisiting the area. Edited July 23, 2012 by danbickell Quote Link to comment Share on other sites More sharing options...
EXO Posted July 23, 2012 Share Posted July 23, 2012 Wow, you really scoured the lineart for accuracy... now you're going to be even more dangerous with the downloads I linked you to... Quote Link to comment Share on other sites More sharing options...
danbickell Posted July 23, 2012 Author Share Posted July 23, 2012 Wow, you really scoured the lineart for accuracy... now you're going to be even more dangerous with the downloads I linked you to... Hehehe. Yeah, I do spend a LOT of time scouring the lineart. Up until now, that's meant always surrounding myself with books, many stacked open to specific pages, and spending time scanning the stuff that I keep going back to. The resources you sent my way are an ENORMOUS help! I've been in the process of getting a bunch of it on my iPad today. I think it might just be the ultimate use for a 64 gig iPad 3. My workspace just got a whole lot less cluttered. Thanks again! All the research involved with this is half the fun. I love pouring over the material, taking note of all the little differences here and there. I love it most when I'm paying specific attention to a certain detail I'm working on, and seeing details I never noticed before, despite the decades spent with the same old old reference. I just noticed for the first time the other day that one of the DYRL drawings showing the revised main landing gear (kinda F-18 style) has the light removed from the forward nose gear door panel and relocated on the nose gear strut. Other DYRL drawings still show the original round light on the door panel. That hand hold is something that always stuck out to me in that particular drawing, though. It makes me ponder why that decision was made, and sparks my imagination. I think it is easy for us to get stuck in a certain mindset about the design, based on our knowledge of real-world modern aircraft design. Of course, this isn't "real-world", and even the "modern" part only loosely applies, not only because it was actually designed in the early 80s, but even in-universe it is a parallel reality where we encountered alien technology in 1999 and have only had a decade to reverse-engineer it. Even the "aircraft" part only partially applies, as this is mecha that happens to have a transformation mode that mimics aircraft, and even then that only really applies for atmospheric flight. If we were to imagine at some in the Macross universe, after the VF-1 was no longer in regular service, I wonder what data might exist showing the percentage of time the VF-1 service hours were in space vs atmospheric use. In the long run, I would guess that space hours vastly outnumber atmospheric use. How much of our real-world aircraft design sensibilities truly apply to something like the VF-1? How much gets compromised by the needs of space flight, or the mecha concerns of transformation? How much does aerodynamics continue to matter when you have a relative abundance of thrust? Back to those hand holds... I can imagine the scenario where the earliest variants might have had a spring-loaded panel to cover those, like one would expect on a modern real-world aircraft. Maybe that is something that later got deleted, because it just didn't matter in space, and it wasn't having any significant aerodynamic effect in atmosphere because they are downstream of the turbulance from the nose verniers? Maybe they decided to delete them because gloves had a tendency to snag on the edge of the open panel when pulling out in a hurry, which became a serious issue for space flight suits. The smallest details can be totally interesting like that. I wonder if Kawamori thought about stuff like this, or if he just decided to do something different for the hell of it. I don't suppose it ultimately matters. What matters is that 30 years later, we the fans are talking about this stuff! Quote Link to comment Share on other sites More sharing options...
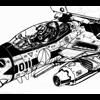
MMORefugee Posted July 23, 2012 Share Posted July 23, 2012 I was thrilled to see the panel lines in the LERX in this shot. I just know there's a brilliant leg transformation mechanism hidden in there and I'm dying to see it. Quote Link to comment Share on other sites More sharing options...
danbickell Posted July 23, 2012 Author Share Posted July 23, 2012 I was thrilled to see the panel lines in the LERX in this shot. I just know there's a brilliant leg transformation mechanism hidden in there and I'm dying to see it. I wondered, while that was rendering, if anybody would notice that. The mechanism is worked out, but not detailed yet, so you aren't missing much. I'm trying to keep it as close to the transformation drawings that were originally done, but the key difference is that the hinge panel is 2 pieces so that it can extend in length to line up the hip joints. Instead of having the actuator pistons on a sliding mechanism (which really doesn't make much sense), the sliding mechanism is for the extension of the hinge panel, and the actuators are anchored at a fixed point up above the LERX body, occupying some space under the chest (which allows for a space for the collapsed pistons above the LERX when closed up). Quote Link to comment Share on other sites More sharing options...
Kurisama Posted July 23, 2012 Share Posted July 23, 2012 You know, ever since I got my 1/60 V.2 VF-1's - I always thought a more refined (clearly hard to do at 1/60 scale) version of the die-cast swing bar is perfect for the legs to attach to the hips/nose. I imagine the legs would swing forward on the hip bars (far better structurally than the 2 little struts as seen in the anime - M.Zero for example) and that once the hip/nose clamp secures on the swing bar, it either A) detaches and the rest of the swing bar retracts or B) is segemented like a mechanical spine that has a certain degree of flexibility that act as further spinal/core support. CALL ME CRAZY! See my crappy phone camera + dodgy potatoshop sketch; But just my 2 cents - I don't wanna steer you away from your adherence to the source material! Quote Link to comment Share on other sites More sharing options...
danbickell Posted July 24, 2012 Author Share Posted July 24, 2012 I completely agree that a swing bar like that makes a lot more sense, from a structural standpoint. From the bigger picture, the problem a setup like that on the VF-1 causes is proportional. Just like the toys, it requires space between the back/underside of the nose and the back/wings, and that space should not be there. This is the biggest factor in why the Yamato toys are proportionally too thick front-back in battroid. It seems to be a decent tradeoff in the toys, because it allows some extra room for the hips to pitch back and forth, giving extra posability. But, therein lies another problem, at least in the way I see things. I don't think the intakes/hips should pitch back in forth much at all. They should mainly yaw (spread apart or close the legs), but the pitch should primarily be the job of the joint between the thigh and the hips. Everything about the transformation mechanisms I've worked out in my model is all about getting a slim and tight battroid torso, as close as I can get it to the line art without anime magic/cheating. Besides not wanting to do anything non-canon, a setup like that would undo everything that has been done to keep the chest and back as close together as possible in battroid. Having the gap between those parts as narrow as possible is also key to any hopes of having functional battroid side covers. Quote Link to comment Share on other sites More sharing options...
JET7 Posted July 25, 2012 Share Posted July 25, 2012 amazing!! cant wait for the full valk. question, what do you will be the reaction of Kawamori when he see's this? Quote Link to comment Share on other sites More sharing options...
danbickell Posted July 25, 2012 Author Share Posted July 25, 2012 amazing!! cant wait for the full valk. question, what do you will be the reaction of Kawamori when he see's this? Thanks! If Kawamori-san manages to see it, I would simply hope that he recognizes it for the labor of love that it is. No doubt, my path through life, and the successful career I've had as a digital artist, would not have been the same if not for the influence of his work. So, in more ways than one, this would certainly not be possible without him. Or, maybe he would just think that I'm a giant nerd, who has put way too much thought, effort, and time in to such an endeavour. And, he would be right, but it wouldn't stop me from doing it all over again through the years to come, hopefully getting better each time! Latest news: I got my shipping notice from Shapeways yesterday. The design did not get rejected! I'm still somewhat surprised that I managed to get it right on my first try, but perhaps it was beginner's luck. The 1/24 scale VF-1S head model, in frosted ultra detail, is on schedule to arrive by 3pm today. I doubt I will get much sleep, but I will be sure to post an update with pictures. We'll see what went right, and what went wrong, in the next 12 hours... Quote Link to comment Share on other sites More sharing options...
Knight26 Posted July 25, 2012 Share Posted July 25, 2012 that is cool and all, now show us some progress on the fuselage/chest area Quote Link to comment Share on other sites More sharing options...
Mommar Posted July 25, 2012 Share Posted July 25, 2012 I think what Knight26 is trying to say is that we think your model is really awesome and we can't wait to see the rest of it. Quote Link to comment Share on other sites More sharing options...
MichaelS Posted July 25, 2012 Share Posted July 25, 2012 How far are you planning on going with this? Any chace of a VF-4 next? Quote Link to comment Share on other sites More sharing options...
danbickell Posted July 26, 2012 Author Share Posted July 26, 2012 I think what Knight26 is trying to say is that we think your model is really awesome and we can't wait to see the rest of it. Nah. He meant "dance, monkey!", and I wouldn't hold it against him either. How far are you planning on going with this? Any chace of a VF-4 next? I will be happy to get the DYRL version of the VF-1 done. I should hopefully be able to work a J head and FAST packs in there too. I would *like* to get around to GPB armor, and a TV versiion VF-1 as well. I'd also want to do the 2 seaters as well. We'll see, I'm not getting any younger... I would love to do a VF-4. Unfortunately, there just isn't nearly as much reference material available, so it could never get the same treatment. Having the Yamato toy would certainly help with that though. I've got a lot of VF-1 stuff to work out before I would ever get there. Shapeways update: 1st delivery attempt failed. I hate living in a gated complex... I left a big sign out for him with my phone #, and have been impatiently waiting all day. Even had my buddy and his boy over, (more patiently) waiting with me. Despite going outside every time I imagined I heard what could possibly be the UPS truck, I managed to miss them. I nagged customer support, and arranged to go make a pick up at will call later tonight. Quote Link to comment Share on other sites More sharing options...
danbickell Posted July 26, 2012 Author Share Posted July 26, 2012 While I continue to impatiently wait for my Shapeways order, here's a little bit of what I messed around with earlier today when I had company over: A little more serious lighting and a backdrop (WIP Prometheus model) does wonders, and I haven't shown it with the gear down recently. Ok, back to the waiting... Quote Link to comment Share on other sites More sharing options...
mechaninac Posted July 26, 2012 Share Posted July 26, 2012 It's the suspense that kills me. Can't wait to see pictures of the 1/24 head model... Quote Link to comment Share on other sites More sharing options...
MichaelS Posted July 26, 2012 Share Posted July 26, 2012 evry time I come back here I am always blown away, please keep it up. Quote Link to comment Share on other sites More sharing options...
Hikaru2 Posted July 26, 2012 Share Posted July 26, 2012 It's the suspense that kills me. Can't wait to see pictures of the 1/24 head model... Just watched It come out pf the UPS box... Speechless. Just...speechless. Quote Link to comment Share on other sites More sharing options...
danbickell Posted July 26, 2012 Author Share Posted July 26, 2012 Well, it certainly came out better than I expected! Nothing broke, all the parts are there, and all the details survived. Here's a few pics, straight out of the bag, with zero cleanup: Quote Link to comment Share on other sites More sharing options...
danbickell Posted July 26, 2012 Author Share Posted July 26, 2012 Bonus pic! Quote Link to comment Share on other sites More sharing options...
Kurisama Posted July 26, 2012 Share Posted July 26, 2012 Duuuuuuuuuuuuuuuuuuuuuuuuuuuuude.... Duuuuuuuude... Schwing! How's the surface? No sanding at all before a coat of primer u reckon? What material did you select, UD or FUD? Quote Link to comment Share on other sites More sharing options...
EXO Posted July 26, 2012 Share Posted July 26, 2012 *drops dead* Quote Link to comment Share on other sites More sharing options...
danbickell Posted July 26, 2012 Author Share Posted July 26, 2012 Duuuuuuuuuuuuuuuuuuuuuuuuuuuuude.... Duuuuuuuude... Schwing! How's the surface? No sanding at all before a coat of primer u reckon? What material did you select, UD or FUD? Yeah, I'm pretty surprised myself! This is FUD. The surface feels pretty smooth, but you can see the print lines. Not sure how much the lines are visable because of the transparent medium, or what. Of course, it is all greasy, and there is wax residue in places. Currently debating how to go about cleaning it. I'm just really excited about how well the parts all fit together. There seems to be no detectable warpage or shrinkage or sagging from the cleaning process at Shapeways (which involves heat, to melt away the wax). Thinking we'll shoot some Tamiya ultra fine primer on it after cleanup. Quote Link to comment Share on other sites More sharing options...
Kurisama Posted July 26, 2012 Share Posted July 26, 2012 Wow, that's a lot more transparent than I thought it'd be! So beautiful. Try warm water with a bit of dish washing detergent to cut thru the grease. I had planned at some point to make replacement fast packs for the V2 VF-1 as they're so rare now, but seeing ur level of skill, attention to detail - well I ain't going to even going try! Haha! Cannot wait to see this with a coat of primer, to really show off the detail. Colour me super impressed man, seriously. * I meant warm water, detergent and an old toothbrush. Quote Link to comment Share on other sites More sharing options...
EXO Posted July 26, 2012 Share Posted July 26, 2012 these days are perfect for leaving it our car for a day. That's actually the most recommended technique on the shapeways forums. I actually have some grease and wax remover spray. Quote Link to comment Share on other sites More sharing options...
danbickell Posted July 26, 2012 Author Share Posted July 26, 2012 Yeah, I was reading on the Shapeways forums about FUD cleanup. The recommendations are all over the place. People are putting their parts in sub-boiling hot water for a few minutes, using acetone, and even ear wax remover. Warm water and some dish soap sounds like a safe place to start. I'm sure that will help with the greasy stuff, but the wax residue will be the tricky part. I guess that's why people are resorting to heat and harsh chemicals, but that scares me a bit. I'm wishing I would have put some more pieces on sprue (other than the little 1mm thick sprue the small eye clam shell pieces are on), so I'd have some material to experiment on. The gun barrels are going to be the hardest part to actually get clean. Those are hollow almost all the way back, with the tiny "rifling" detail, and those are pretty much filled with wax. If I ever do something like that again, I'll make sure to make the cavity go all the way through. Quote Link to comment Share on other sites More sharing options...
danbickell Posted July 26, 2012 Author Share Posted July 26, 2012 I had planned at some point to make replacement fast packs for the V2 VF-1 as they're so rare now, but seeing ur level of skill, attention to detail - well I ain't going to even going try! Haha! Please do try that! I would certainly buy them. I'm sure I will eventually get around to making some detailed FAST packs that fit my model, but it isn't like they would be any good for the Yamato V2. You seem to have the mechanical know-how and skill to pull off toy parts far better than I could, and with an eye for doing the right level and scale of detail to match the toys. Mine would surely end up an over-complicated mess! I'd say the weakest area of this 1/24 head is that it isn't a proper model kit at all. The parts fit together great, but there isn't any provision to hold it all together. Nothing is hinged or jointed, slotted or pegged. The neck rings just sit on the neck (technically, they would need thin plastic spacers to hold them off the neck at the proper position for any given pose), and the neck just fits up inside the head (but not attached to anything). You can actually put it together and hold it (hanging upside down) by the neck, but that puts the head sitting a mm or 2 too far up on the neck. You could glue it that way, and it looks perfectly fine, but it wouldn't be sitting as properly tucked-in in fighter mode as it should be. Quote Link to comment Share on other sites More sharing options...
PetarB Posted July 26, 2012 Share Posted July 26, 2012 Very awesome! Quote Link to comment Share on other sites More sharing options...
EXO Posted July 26, 2012 Share Posted July 26, 2012 The sword and gun that I showed you was FUD and recasted with no primer at all. Quote Link to comment Share on other sites More sharing options...
Recommended Posts
Join the conversation
You can post now and register later. If you have an account, sign in now to post with your account.