chillyche Posted February 28, 2008 Share Posted February 28, 2008 Hey folks. Everybody in the world has modeled a valkyrie or tried their hand at the SDF, and everybody besides me has done a great job at these. I'm about to embark on modeling something I haven't seen very frequently. A Valkyrie pilot. It'll be my first character modeling attempt. I know a lot of y'all have awesome art books and stuff, so I was hoping somebody might have some pilot outfit reference images. I'm kinda partial to either doing Isamu Dyson or a DYRL Hikaru. As always, I appreciate any and all help. This board is great. Thanks. Quote Link to comment Share on other sites More sharing options...
chillyche Posted March 12, 2008 Author Share Posted March 12, 2008 Here is the first picture. It's obviously a WIP. I'm attempting Isamu Dyson's Macross Plus jumpsuit. I already modeled a non-Isamu head, but haven't attached it to the body as of yet. There's no texture on this thing (obviously), and I haven't done much of the detail, but it's a start. Quote Link to comment Share on other sites More sharing options...
chillyche Posted March 12, 2008 Author Share Posted March 12, 2008 Another update. This one is not terribly drastic, but I'm still working on figuring out how best to control creases with meshsmooth. I'm using 3DS Max, so if any of the max geniuses out there want to help me out... wait... did I just say Max Jenius? That's awesome. Unintended, but totally awesome. Anyway... Quote Link to comment Share on other sites More sharing options...
Chronocidal Posted March 13, 2008 Share Posted March 13, 2008 Looks like a good start. Wish I could help you with Max expertise, but I've never really worked with deformable bodies before... I just stick to solid objects (mostly aircraft). Quote Link to comment Share on other sites More sharing options...
Mr March Posted March 14, 2008 Share Posted March 14, 2008 This looks great for a start! Wow. I love the anime-style cel shading. I bet you're going to get a ton of requests once this is done. All the Valkyrie modelers will want to use your figure for their cockpit Quote Link to comment Share on other sites More sharing options...
chillyche Posted March 14, 2008 Author Share Posted March 14, 2008 Finished with the glove. There's really nice wrinkles around the wrist that you can't see on account of that wrist guard thingy. I've included both a cel shaded version, and the shiny version (which I use just to spot any inconsistencies in the mesh -- it does look nice, though). You might notice that that is NOT Isamu Dyson's head in the reference picture. That's okay. It's my head. Who DOESN'T want to get behind the controls of a Valkyrie? Never fear, though, when I'm finished with the model, I WILL do an actual Isamu head, because I figured y'all would want the authentic realness. It's my way of giving back to a really great and talented community. Does anybody have any Macross Plus art books with any kind of image of homeboy's boots? I've got a like two boot references, and I know how they look, sort of, but I'm having a hard time figuring out exactly how they're constructed. You'll have to forgive me if the boots wind up being rough, and not 100% accurate. They'll be in the spirit, at least. Thanks for your feedback, y'all. Quote Link to comment Share on other sites More sharing options...
Mr March Posted March 14, 2008 Share Posted March 14, 2008 I'd be delighted to assist in a project like this. I'm at work right now, but later today I can do some quick scans of the character designs from the Macross Plus books to help this most worthy cause. Quote Link to comment Share on other sites More sharing options...
Mr March Posted March 14, 2008 Share Posted March 14, 2008 Here's a scan of Isamu's flight suit from Macross Plus: http://www.new-un-spacy.com/miscellaneous/isamu-suit.gif Also, my website has a book section with color reference if you should need it: http://www.new-un-spacy.com/books/Books-Th...ovieEdition.jpg http://www.new-un-spacy.com/books/Books-Th...MacrossPlus.jpg I hope this helps you out. Quote Link to comment Share on other sites More sharing options...
chillyche Posted March 25, 2008 Author Share Posted March 25, 2008 I hope this helps you out. WORD. 'EM. UP. Thanks so much! This is exactly the kind of thing I was hoping to find. I've been out of town for a week, so progress has been non-existent, but, I'm back and raring to go! I think I'll add a few adjustments to reflect the ref material you posted, before I move on to new stuff. Thanks again! -Che Quote Link to comment Share on other sites More sharing options...
Mr March Posted March 25, 2008 Share Posted March 25, 2008 I was wondering where the heck you went Here I go out of my way to make a scan for ya and you even come back...hahahaha Just kidding. I'm looking forward to seeing new work on your model. Best of luck! Quote Link to comment Share on other sites More sharing options...
chillyche Posted March 25, 2008 Author Share Posted March 25, 2008 Foots. Quote Link to comment Share on other sites More sharing options...
Mr March Posted March 25, 2008 Share Posted March 25, 2008 They call them "Feet" Looking good, but the boot toe seems to be a little too big. I think the top of the boot toe is flush with the top of the boot, as seen in the line art. Still, this is coming along great. I love the look. Quote Link to comment Share on other sites More sharing options...
chillyche Posted March 26, 2008 Author Share Posted March 26, 2008 In the words of the internet: "I kan haz grammr?" Is Adidas the official sponsor of Valkyrie pilots everywhere, or what? Anyway, I've made the boot toe box flush with the rest of the boot, it looks a bit better. The toe box still looks a little wide, but that won't be too hard to change. I'm running into weird problems trying to mess with creases in my meshsmooth modifier. The secret is, I'm trying to do as little texture mapping as possible, and do all the color with materials, because the cell shading works more smoothly that way, but sometimes I need to do weird things to the model to get a line to either appear or disappear where I want it. Either way, it's coming along nicely, and I still have confidence that other people will be able to plop this guy down into their models if they want. These boots look pretty hard, and I'm curious where the joints would be located which would allow the pilot to flex? I'm thinking underneath the striped part, and probably underneath the ankle guard thing. I'm not sure that I'm going to segment the boot, for simplicity's sake -- I don't plan on doing much animation of dude's feet. Anyway, tomorrow I've got a gig at MTV so I'll have to work on their junk instead of my own, and then I'm out of town again this weekend. So, progress is taking a hit. Once I'm satisfied with the boots, I'll move on to the harness and belts (I need to move the waist belt up a bit, as Isamu seems to like to hike his trousers quite a bit). Quote Link to comment Share on other sites More sharing options...
Mr March Posted March 26, 2008 Share Posted March 26, 2008 Hehehe These latest boots look great. Actually, you're in luck if you need some reference for the feet, because there are several shots in Macross Plus showing Isamu's boots in action piloting the YF-19. I believe it's early in the OVA series (might even be in the movie version as well). I'm not sure if it shows the arch and forward foot bends, but it definitely shows the ankle bends. If you ever get stuck and need some help, you should try deviantART. I've found many a good tutorial on that site from time to time and there are lots of friendly members. Quote Link to comment Share on other sites More sharing options...
chillyche Posted March 26, 2008 Author Share Posted March 26, 2008 Actually, you're in luck if you need some reference for the feet, because there are several shots in Macross Plus showing Isamu's boots in action piloting the YF-19. Aha. I thought there might be. I remember Guld flexing his feet and cupping his hands to get the 21 to do its thing, and I remember Shin in Macross Zero definitely working the pedals, but I was not sure if there were pedal shots of Isamu. Nice. All I have to do is try not to get sucked into watching the whole thing (which is what always happens when I go looking for reference shots). Heh. Quote Link to comment Share on other sites More sharing options...
Chronocidal Posted March 26, 2008 Share Posted March 26, 2008 Those boot shots are definitely in the movie version as well, they're shown during his skywriting sequence when he first gets in the YF-19. Quote Link to comment Share on other sites More sharing options...
chillyche Posted March 27, 2008 Author Share Posted March 27, 2008 Boots are looking nice. I'm running into a few challenges, wherein, certain elements never seem to remain consistent in size or proportions between frame grabs, line art, and other reference sources (that Isamu statuette is basically the "other" category, but I'm just working from an over-exposed picture of that thing, not the actual model). When this is the case, I try to find a compromise that looks good, functions well (will it allow for animation?), and/or is the dominant design. That chest unit thing is about as variable as VF-1, with just as many editions. This one isn't finished (need the indents across the side). I'm also having a hell of a time with the creases in the meshsmooth. Every time I fix one thing, I accidentally grab some other edge and crease that, so you'll notice that the white shell above the feet has lots of odd ink marks -- that's from edges that are creased that aren't meant to be. Finally, the boot interior is white. This matches up with the shots of Isamu's feet controlling the YF-19, although I've seen other pics where the interior is black (or perhaps deeply shadowed). It just seemed uncool to put black socks with white sneaks, if you know what I mean. Quote Link to comment Share on other sites More sharing options...
chillyche Posted March 28, 2008 Author Share Posted March 28, 2008 minimal update. First attempt at the shoulder harness straps. Fitting them in with the shoulder pads was challenging, and I'm almost certain that during animation there will be some clipping issues, but they should be minor. Adjusted the shoulders further. In some shots, the things look huge, in others they're small, and in the concept art they're tiny. I'm just trying to get them to WORK with the other stuff. Changed the color of the gloves to off-white. Not happy with the color match, though I had it pretty close to the actual palette used in the OAV. No more updates until sunday. I hope to finish the harness and the neck then. And then, maybe, I'll do the elbow pads (which are surprisingly far harder than you would think. harder to make, not just more shatter-proof). Quote Link to comment Share on other sites More sharing options...
Mr March Posted March 28, 2008 Share Posted March 28, 2008 Looking sharp. Nice work. Quote Link to comment Share on other sites More sharing options...
chillyche Posted April 3, 2008 Author Share Posted April 3, 2008 Freelance is kicking my butt right now. As are gigs and trips. But I should have a decent update tonight. Quote Link to comment Share on other sites More sharing options...
chillyche Posted April 3, 2008 Author Share Posted April 3, 2008 Chest box thing and straps/harnesses complete. These were some other pieces that seem to change shape and size depending on the illustration. the grooves in the bigger side of the chest box don't even stay consistent in number. And the biggerness of it seems widely variable. The piece is still in flux, but I'm somewhat satisfied with the results. I will finally finish homeboy's belt and pouches before moving on to my dreaded elbow pads. Last step for the suit will be tweaking the ankles -- I modeled the whole boot area as sort of one unit, but I think to be more accurate, I'll have to separate the ankle pieces. That may help with animation as well, giving the boots a little bit of flexibility. But... before that... perhaps I'll switch to the helmet, which I'm eager to work on. Quote Link to comment Share on other sites More sharing options...
chillyche Posted April 3, 2008 Author Share Posted April 3, 2008 I need to redo the pouches Quote Link to comment Share on other sites More sharing options...
Mr March Posted April 3, 2008 Share Posted April 3, 2008 Keeps getting better. Looking positively Isamu Quote Link to comment Share on other sites More sharing options...
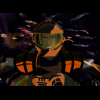
chillyche Posted April 4, 2008 Author Share Posted April 4, 2008 This helmet is harder than I thought. The Space War One era helmets would have been way easier. If I ever get around to making DYRL pilots, I'll be very happy to take care of their helmets -- less transparency = more places to hide tricky modeling. I don't have very many good shots of the BACK of the helmet. I understand that there is a tube or hose extending from the back of the helmet into... the backpack? I guess. Does anybody know any good shots with detail of this particular uh... detail. Quote Link to comment Share on other sites More sharing options...
chillyche Posted April 4, 2008 Author Share Posted April 4, 2008 Keeps getting better. Looking positively Isamu Thanks, I'm nearing the home stretch with the suit. I really hope it will be a matter of tweaking the head model I already have to get it to look like Isamu -- I basically used his chin and general facial structure anyway, I'll just have to anime up his nose a bit, and get the eyes right (big challenge for me), because man, I wanna get this thing to the next phase. Quote Link to comment Share on other sites More sharing options...
chillyche Posted April 4, 2008 Author Share Posted April 4, 2008 couldn't go to sleep without adding those vents (?) on the helmet's respirator-thingy (?) Quote Link to comment Share on other sites More sharing options...
Mr March Posted April 4, 2008 Share Posted April 4, 2008 I'll see what I can find in my books. However, I'm working now so I won't be able to get to it until much later today. I might not have a good shot of the helmet rear, but I do know for a fact there are several in the anime itself. Unfortunately, it would take some searching. Quote Link to comment Share on other sites More sharing options...
chillyche Posted April 4, 2008 Author Share Posted April 4, 2008 couldn't go to sleep without adding those vents (?) on the helmet's respirator-thingy (?) Quote Link to comment Share on other sites More sharing options...
chillyche Posted April 4, 2008 Author Share Posted April 4, 2008 I'll see what I can find in my books. However, I'm working now so I won't be able to get to it until much later today. I might not have a good shot of the helmet rear, but I do know for a fact there are several in the anime itself. Unfortunately, it would take some searching. Cool, that's good enough. If you haven't got a shot, I'll resign myself to watching the whole show. And remember to actually get some screengrabs, instead of just chilling watching the hotness. Quote Link to comment Share on other sites More sharing options...
Mr March Posted April 4, 2008 Share Posted April 4, 2008 Unfortunately, there's nothing else in my Macross Plus books. This was the only other image I could find: I don't have any software to do screen captures so I can't help you there. Quote Link to comment Share on other sites More sharing options...
Darrtallion Posted April 5, 2008 Share Posted April 5, 2008 I think the project looks great. You are doing a fantastic job. "I don't have any software to do screen captures so I can't help you there." To answer that question you can go to www.videolan.org and be able to download Videolan which has a lot of great options for screen shots and frame by frame progression. Plays all sorts of video files to DVD's. It is what I use to pull screen shots out of movies for 3d modeling. Quote Link to comment Share on other sites More sharing options...
chillyche Posted April 6, 2008 Author Share Posted April 6, 2008 I think the project looks great. You are doing a fantastic job. "I don't have any software to do screen captures so I can't help you there." To answer that question you can go to www.videolan.org and be able to download Videolan which has a lot of great options for screen shots and frame by frame progression. Plays all sorts of video files to DVD's. It is what I use to pull screen shots out of movies for 3d modeling. Cool! Thanks for the tip. I've just been using my mediocre DVD player software which does have a screen capture, but the frame by frame leaves quite a bit to be desired and often just crashes the thing. I usually just click the snapshot button and HOPE it works. Also, for some reason, moving the mouse switches the audio track, and so if I move the mouse at all, the playback jumps a little. Annoying. Oh, wait, Videolan? Is that VLC Player? I HAVE that. Why didn't I think to use that?! HA ha ha. Oh man. Sometimes. Mr. March: That's a great shot. The line art is really helpful, because sometimes the shadows or colors are confusing in the screenshots. That gives me a good idea of where things go and what they do. Thanks! This community is really great, thanks for all the material and moral support. (I'm out of town, so the next update won't be until monday or tuesday) Quote Link to comment Share on other sites More sharing options...
chillyche Posted April 6, 2008 Author Share Posted April 6, 2008 Oh yeah, any detail shots of his backpack out there? I've got a few that will do for the basic piece, but the more detail I can find, the better, right? Quote Link to comment Share on other sites More sharing options...
Mr March Posted April 6, 2008 Share Posted April 6, 2008 Mr. March: That's a great shot. The line art is really helpful, because sometimes the shadows or colors are confusing in the screenshots. That gives me a good idea of where things go and what they do. Thanks! This community is really great, thanks for all the material and moral support. Why thank ya. We aim to please Alas, you've got the totality of everything I have on the suit, backpack and all. The best shot is the cover of "This Is Animation The Select", for which I provided a link on page one of this topic. Quote Link to comment Share on other sites More sharing options...
chillyche Posted April 7, 2008 Author Share Posted April 7, 2008 Why thank ya. We aim to please Alas, you've got the totality of everything I have on the suit, backpack and all. The best shot is the cover of "This Is Animation The Select", for which I provided a link on page one of this topic. Yep, that's the one I have. I'll scan through the animation before I start with that, and look for any other reference shots, but I may be forced to use "artistic license" in places. Purists, beware! Quote Link to comment Share on other sites More sharing options...
Recommended Posts
Join the conversation
You can post now and register later. If you have an account, sign in now to post with your account.