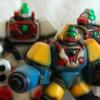
promethuem5 Posted April 6, 2006 Share Posted April 6, 2006 Hi all, This is my GBP-1S custom, done using acrylic paints, artist dry pigments, inks, and Anasazi decals. I was going for a weathered mid action look, and I think I achieved that. Please let me know what you think! I know it's not Kurt level, but I like to think that it's still really good. Quote Link to comment Share on other sites More sharing options...
nightmareB4macross Posted April 6, 2006 Share Posted April 6, 2006 WOW!!! Quote Link to comment Share on other sites More sharing options...
Veritas Posted April 6, 2006 Share Posted April 6, 2006 Wow that's a subtle enough paint job, but it adds a ton of character to that figure. Nice job! Quote Link to comment Share on other sites More sharing options...
Guppy Posted April 6, 2006 Share Posted April 6, 2006 that's great! IT's amazing how much better you can make an already good looking stock toy. Man, I have to get me that Anazi minmay decal. As soon as I can afford a GBP.. Quote Link to comment Share on other sites More sharing options...
rnurmin Posted April 7, 2006 Share Posted April 7, 2006 Looks great to me Quote Link to comment Share on other sites More sharing options...
wolfx Posted April 7, 2006 Share Posted April 7, 2006 NICE! The weathering really brings it out! Quote Link to comment Share on other sites More sharing options...
Mog Posted April 7, 2006 Share Posted April 7, 2006 Very nice weathering and scorching on the missile launchers and boosters, too. I can't really tell from the pictures, but did you also add any scorching on the inside parts of the leg missile hatches or on the back-leg launchers? Quote Link to comment Share on other sites More sharing options...
ychanus Posted April 7, 2006 Share Posted April 7, 2006 Where did you buy that Minmay decal?? Awesome work by the way. Quote Link to comment Share on other sites More sharing options...
valkyrie312 Posted April 7, 2006 Share Posted April 7, 2006 Nice stuff! Quote Link to comment Share on other sites More sharing options...
promethuem5 Posted April 7, 2006 Author Share Posted April 7, 2006 Mog, I didn't add scorching to the inside of the leg launchers... didn't occur to me really... I didn't add alot of scorching from missile fire...that would have gotten pretty messy looking. ychanus, it's a decal from Anasazi. Quote Link to comment Share on other sites More sharing options...
Toonz Posted April 7, 2006 Share Posted April 7, 2006 nice! a little touch here and there really have enhanced the entire armor to a new look i like this pic Quote Link to comment Share on other sites More sharing options...
promethuem5 Posted April 7, 2006 Author Share Posted April 7, 2006 Yeah, it does look seriously pissed and ready to punce in that shot. Thanks for all the replies guys, keep them comming! Someone's gotta have some constructive criticism for next time... Quote Link to comment Share on other sites More sharing options...
specr0101 Posted April 7, 2006 Share Posted April 7, 2006 Amazing work on the weathering! Did you repaint the entire model and use waterslide decals? Quote Link to comment Share on other sites More sharing options...
promethuem5 Posted April 7, 2006 Author Share Posted April 7, 2006 I didn't actualy repaint the whole blue. That woulda have added too mcuh unecessary paint and thickness to it and obsucured the details and ruined the parts fit. I drybrushed a lighter blue-grey over the whole thing, gloss coated, added the decals, panel lined, matte finished, and weathered, followed by one last matte varnish coat (whcih you technically aren't supposed to do wtih dry pigments, but I like the subtlety it adds.) Quote Link to comment Share on other sites More sharing options...
Graham Posted April 7, 2006 Share Posted April 7, 2006 Â Someone's gotta have some constructive criticism for next time... 388589[/snapback] Buy a better camera! (Will add this to the MW Custom Toy Gallery) Graham Quote Link to comment Share on other sites More sharing options...
hirohawa Posted April 7, 2006 Share Posted April 7, 2006 LOOKS fantastic Quote Link to comment Share on other sites More sharing options...
fearyaks Posted April 7, 2006 Share Posted April 7, 2006 Great job and great poses! Looks groovy man. Quote Link to comment Share on other sites More sharing options...
promethuem5 Posted April 7, 2006 Author Share Posted April 7, 2006 Buy a better camera! Don't worry, that's the one I've known about for years.... I try all the time to convince my parents to get me a digital SLR, but no dice. My stupid dad doesn't undersand why our Sony Mavica (uses floppy disks, doesn't even have a measurable megapixel because that wasn't the unit of measurement at its time) isn't goog enough, and my mom doesn't want to spend that kind of money. Quote Link to comment Share on other sites More sharing options...
eugimon Posted April 7, 2006 Share Posted April 7, 2006 nice job! I also love the subtle weathering... for next time though... try to have the scorch marks correspond to the directions of the vents. For example, the vent on the chest has scorching all around it, but the vents are angled down and to the side a bit... Quote Link to comment Share on other sites More sharing options...
promethuem5 Posted April 7, 2006 Author Share Posted April 7, 2006 Hey, that's a good point. I didn't really think about that, but now that you mention it, it makes alot of sense. I'll have to keep that in mind... Quote Link to comment Share on other sites More sharing options...
strtkwr Posted April 7, 2006 Share Posted April 7, 2006 It looks great. You do very good work! Quote Link to comment Share on other sites More sharing options...
Dante74 Posted April 7, 2006 Share Posted April 7, 2006 Amazing job! Quote Link to comment Share on other sites More sharing options...
Fortress_Maximus Posted April 7, 2006 Share Posted April 7, 2006 Great job! Yamato should take notes! Quote Link to comment Share on other sites More sharing options...
1 VF-1 2NV Posted April 7, 2006 Share Posted April 7, 2006 Nice Quote Link to comment Share on other sites More sharing options...
Ignacio Ocamica Posted April 7, 2006 Share Posted April 7, 2006 What can I say that hasn't been said before? Very good job!!! Quote Link to comment Share on other sites More sharing options...
Graham Posted April 8, 2006 Share Posted April 8, 2006 Buy a better camera! Don't worry, that's the one I've known about for years.... I try all the time to convince my parents to get me a digital SLR, but no dice. My stupid dad doesn't undersand why our Sony Mavica (uses floppy disks, doesn't even have a measurable megapixel because that wasn't the unit of measurement at its time) isn't goog enough, and my mom doesn't want to spend that kind of money. 388669[/snapback] Wow, Sony Mavica! I remember those. First handled one back in 1997 IIRC. Graham Quote Link to comment Share on other sites More sharing options...
promethuem5 Posted April 8, 2006 Author Share Posted April 8, 2006 Hehe, I've got 4. Quote Link to comment Share on other sites More sharing options...
specr0101 Posted April 10, 2006 Share Posted April 10, 2006 How durable is the finish seeing that you didn't prep the surface or using any primer? Does it scratch easily? Quote Link to comment Share on other sites More sharing options...
Black Valkyrie Posted April 10, 2006 Share Posted April 10, 2006 Beautiful. Quote Link to comment Share on other sites More sharing options...
promethuem5 Posted April 11, 2006 Author Share Posted April 11, 2006 How durable is the finish seeing that you didn't prep the surface or using any primer? Does it scratch easily? Not really... it's got a gloss coat after the drybrushing (to fade the drybrushing and prep for decals) and then two matte coats (one after decals and one after weathering.) The only place that gets marked up (after playing with it quite a bit... I love this toy) is the tip of the hip covers where they hit the grey torso filler pieces, and it's ni big deal seein as all it's doing is scratching through the clear coats to the udnerlying plastic color, which is still the same color as the rest of the finished piece. That's true of the whole thing... aside from the decals, there's really nothing to scratch off anyways... it's not like the dry pigments are going to chip. Quote Link to comment Share on other sites More sharing options...
port Posted April 11, 2006 Share Posted April 11, 2006 Dude! You have got to stop putting out stuff that looks better than mine. I'm feeling like yesterdays trash. I love it man...super great weathering. Your skills are now complete Quote Link to comment Share on other sites More sharing options...
promethuem5 Posted April 11, 2006 Author Share Posted April 11, 2006 Yesterday's trash? Dave man, I still can't do primer chips the way you do....surely your weather-fu is still greater than mine. Quote Link to comment Share on other sites More sharing options...
specr0101 Posted April 11, 2006 Share Posted April 11, 2006 Very Nice...it makes me want to pick up a 1/48 GBP to just customize...after I get my first toy(VF-0S) though! Quote Link to comment Share on other sites More sharing options...
phatslappy Posted April 11, 2006 Share Posted April 11, 2006 Kurt who? Quote Link to comment Share on other sites More sharing options...
Dante74 Posted April 11, 2006 Share Posted April 11, 2006 Dude! You have got to stop putting out stuff that looks better than mine. I'm feeling like yesterdays trash. I love it man...super great weathering. Your skills are now complete 389845[/snapback] So you have a custom GBP too? Post pics! pleasepleaseplease Quote Link to comment Share on other sites More sharing options...
Recommended Posts
Join the conversation
You can post now and register later. If you have an account, sign in now to post with your account.