

Chronocidal
-
Posts
10757 -
Joined
-
Last visited
Content Type
Profiles
Forums
Events
Gallery
Everything posted by Chronocidal
-
I'd personally disagree with the "not being fun to handle" part, though I've probably gotten used to the occasional stab wound from my VF-17s. Both designs have their good and bad points, depending on how you like to display/play with them, so it's really up to personal preference. I personally just enjoy fighter mode mostly, and I love being able to easily transform things back and forth. While I do prefer the actual design of the 171 to a point, and it does have some points over the VF-17 for how well it locks into fighter mode, it's also the absolute least fun to transform of any valk I own. It's fiddly, the wings go flying, the legs jam up and won't rotate correctly due to the shoddy rotation mechanism, and every time I look at it, I'm expecting the shoulder pieces to explode. I love the design, but it's just not any fun. On the other hand, the VF-17 is pretty much a plastic tank. It uses significantly less die-cast, and isn't as pretty, but it's solid as a rock. It can still be a beast to transform correctly, but it's actually enjoyable, because I don't feel like I'm fighting against mechanisms that don't want to fit right, and I'm not worrying about scraping paint off all the time, or the wings flying off. I'll admit, I'm biased toward the Yamato designs, because I just prefer the simplicity and functionality of their designs over Bandai's mess of overcomplicated mechanisms. It's the same thing for all the Bandai valks really, I just don't enjoy transforming them.
-
So, a word of warning... don't let things get too hot around the printer... found out the hard way on this one. To keep the area warm around the printer, I got a small space heater, and set it near the printer. Apparently, it was just too close, because it actually caused one of the belt drive bearing mounts to warp out of shape. Why they made this piece out of plastic, I don't know, but it bent enough that it lets the table driver belt slip off, killing the forward to back motion. The piece is just a simple plastic bracket that holds onto the belt bearing, but it's tilted sideways in a way that won't hold the belt on anymore, so I'm going to need a new one. Probably will be quick and painless to replace, since I already disassembled the printer to get the part out, and it was easy to get to. I might even just see if I can make a metal piece to replace the part entirely. I work near a metal shop, and someone might be able to machine me a metal bracket to do the same job without the risk of bending or warping if it gets too hot. So, lesson learned, don't let the mechanisms themselves get too hot. I might just wait until it's warmer before trying any serious prints.
-
I really don't care about a stand for this mold, since they clearly haven't learned to mount them further back yet. Suppose I can't be too disappointed, since it's the same stand mount as the other VF-19s had, but it's still just as useless in fighter mode. The VF-19 series just has to have the single worst stand mount out of the entire line of 1/60 valks (either Yamato, or Arcadia). Every single other one at least pegs into something solidly, but the one time I tried using a VF-19 mount, the plane toppled backwards out of that clip the instant I let go of it.
-

MickyG's Yamato VF-1S Unpainted, Unassembled Kit Build
Chronocidal replied to mickyg's topic in The Workshop!
Yeah, you see that term used a lot if you start discussing star trek ship designs. "Warp nacelles" is just the "proper" term for what most people will just call warp engines. A lot of times on aircraft, you won't see it used because the engines are integrated, and they just become part of the fuselage. F-14s, Su-27s, MiG-29s, etc all have distinct tubes where the engines are housed, while planes like the F-15 and F-22 have them buried in a big box. Anyway, looking forward to seeing how this comes out. I admit, I'm probably going to chicken out and do mostly white schemes on all the unassembled VF-1 kits I bought, just because I love to fiddle with things, and the idea of scratching paint makes me paranoid. Too bad they couldn't cast these in a plastic that would look like bare metal, so when the paint scratched off, it would look like weathering. -
Arcadia 1/60 Perfect Transformation VF-0D for 2015
Chronocidal replied to Dark_Ghost's topic in Toys
Also, the main thing I noticed on there? You can see the blurred out panel lines of the back edge of the wing. -
Arcadia 1/60 Perfect Transformation VF-0D for 2015
Chronocidal replied to Dark_Ghost's topic in Toys
Actually, unless I'm remembering completely wrong, I think Shin spent more time in the VF-0D than Hikaru ever spent in the VF-1D. He got the VF-0D in episode 2, and didn't get the VF-0A until the last battle, right? -
Actually, I wouldn't really call them "weak" so much as they were just misdesigned somehow. The joint never worked right. Hopefully that's been sorted out now.
-
Arcadia 1/60 Perfect Transformation VF-0D for 2015
Chronocidal replied to Dark_Ghost's topic in Toys
That's your decision, and if you feel it's so stupidly overpriced, I'm sure the people producing it could explain where the costs come from. Otherwise, if you're not interested, it'd be easier if you just ignored the entire subject. Anyway, I'm looking forward to seeing how they change the overall mold from the original. It's one of those weird cases where the original was already plenty accurate, just needed a little polish on the molding, and materials. I wonder if they are actually able to use any of the old molds, or have to start from scratch? -
Please.. just say "NO" to the jet-ski packs. Those things are abominations. As far as the VF-25 packs go, sure, it would be funny to see them fit on this YF-19, but honestly... I don't understand why everyone is so enamored with that particular kitbash. They look ok in fighter, but they would pretty much fail in every other mode.
-
Arcadia Wonder Festival 2014 (Winter) special item
Chronocidal replied to Dark_Ghost's topic in Toys
At that size.. you could probably embed a fairly hefty nerf-style blaster in it. -
I haven't looked at my stand closely to check, but if it's anything like the SV-51/YF-21 stand, it should be possible to rotate the tip of the stand, and mount it sideways so you can roll the jet. I'm not sure about roll and pitch though. The old stand had a different mount than the standard Yamato stand adapters, and had a big peg that would accept the adapters at several angles, so you could mount the valk sideways, tilted, backwards, etc, to get the maximum variability out of the stand. You would have to angle the base in some weird ways to display the valk that way though. Edit: Yeah, just looked at my stand, the tip that accepts the stand adapters can be attached at a lot of angles, looks like either 12 or 16. All you have to do is mount the tip rotated, and you can get pretty much any angle of bank and pitch you want, as long as you don't mind the base being angled on your shelf.
-
Arcadia 1/60 Perfect Transformation VF-0D for 2015
Chronocidal replied to Dark_Ghost's topic in Toys
Well, really, think about this a moment.. If the designs aren't even different to accommodate the bigger canopy like I assumed, there would probably be literally nothing stopping you from swapping a VF-0D nose onto another VF-0. -
Arcadia 1/60 Perfect Transformation VF-0D for 2015
Chronocidal replied to Dark_Ghost's topic in Toys
That's.. actually much worse looking than the normal one would be. They basically turned it into a robot that looks kinda like it uses some airplane parts. I think if they actually recessed the speakers instead of making them into boobs, the design would be fine. Just cover them with sliding doors. -
Arcadia 1/60 Perfect Transformation VF-0D for 2015
Chronocidal replied to Dark_Ghost's topic in Toys
Hey, I'm still going with the thought that they've been watching your upgrade sales, and figured out it was worthwhile. You showed them it it was plenty possible. -
Actually, I noticed the color inconsistency too, and I wonder if it's because the parts may have been produced in different factories. Say, if they had had a lot of parts left over when Yamato closed, and mixed the leftovers with the new run?
-
Arcadia 1/60 Perfect Transformation VF-0D for 2015
Chronocidal replied to Dark_Ghost's topic in Toys
The tricky difference about the D is the different nose, since the rest of the changes are mostly aesthetic, and don't really have any effect on the transformation. Comparing the various model instructions, I don't think the nose on the D is actually longer, it's just a different profile because of the double cockpit. It'll take some redesigning of the chest area in battroid to work, similar to how the VT-1 and VE-1 are different from the standard VF-1. The backpack mechanism might be a little redesigned as well, to remove the original tail mounts, and it'll need some kind of attachment to the back of the lower legs to connect the wings in fighter mode, but those should be pretty simple changes to make. You're still looking at replacing or changing at least 1/3 to 1/2 the parts of the valk though. -
Arcadia 1/60 Perfect Transformation VF-0D for 2015
Chronocidal replied to Dark_Ghost's topic in Toys
If the image is any indicator, looks like they might be continuing the standard they're starting with the YF-19, and including a bunch of optional weapons. The 0D had single pylons right under the wingtips, and those long pointy missiles look like they might be AMRAAMs. I'll be incredibly surprised if it's anything but the 0D, but I wouldn't mind getting a VF-14 (the SR-71-ish one, not the M3 version). -
Arcadia 1/60 Perfect Transformation VF-0D for 2015
Chronocidal replied to Dark_Ghost's topic in Toys
HAH VF-0D all the way! Will buy at least one, just hope it's not more than the YF-19. -
Maybe I should clarify which piece I'm actually referring to. The piece I'm working with is that huge wing in the lower left. It's the centerpiece of the model, and everything glues to it. I'm thinking I might need to custom build a support for it though, since there's nothing to really hold it to the plate if it stands on the back edge. I've been letting the platform get up to 1000 C before I print anything, which usually takes about 10-15 min, but I can try seeing if it goes higher than that. I'm not sure if the platform stays heated while printing though. As far as calibration goes, I've been using the auto-level sensor the printer came with, but I can try manually doing it as well. What seems to happen is that the entire structure cools and shrinks as it gets farther from the platter, and it winds up warping things, pulling the edges up from the support. Ambient room temp is about 700 F, would it help to keep the room itself warmer? I probably do need to go read the official forums for the printer though.
-
I'm not even concerned about a cockpit at the moment, the scale on WC ships is insane, and even at this size, it's close to 1/200 scale. I don't think the clear filiment would ever make a usable canopy anyway, due to the layering process. I can probably print the main body components all the same way as the upper fuselage, so those I'm not concerned with too much, but this wing is a puzzle. It covers nearly the entire printing area at the size I'm aiming for, and I was able to print a test copy flat, but at some point in the print, part of the wing came loose and warped upwards. Besides that, the underside was so covered with layers of support structure it was impossible to clean up. I'm experimenting with either cutting the wing in half and molding it from the center outward, or building my own support structure to hold the thing in place, because to two times I've tried printing it vertically, it came loose within the first few layers.
-
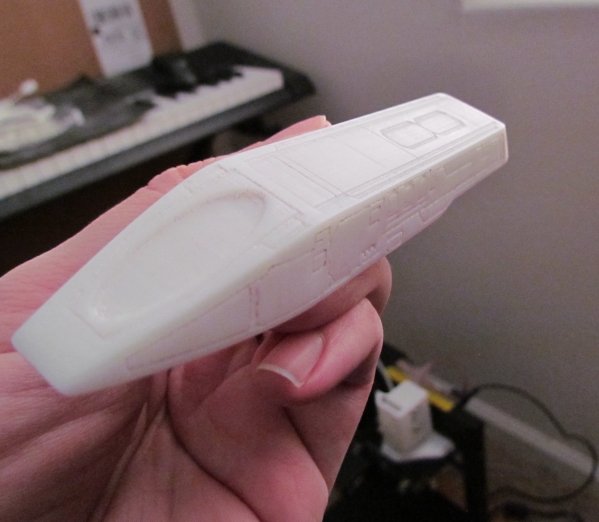
Well, Wing Commander type, if you're wondering. I think I posted a pic here earlier, but here's the most recent model I'm trying to print from. It's the same model I sent to Shapeways a while back, but I just finished cutting the panel lines into it. I cut the panel lines oversized to make sure they print deep enough to allow a little sanding and smoothing, and I had one print that came out pretty close to perfect last night, but a few of the panel lines were too close together, and caused some misaligned layers in between. I'm reprinting the upper fuselage with some adjustments right now, along with the main wing, so we'll see how that comes out. Was also really happy to find out Amazon sells the refill spools. Wish I could find some gray, but I got another spool of white and one of black for about $35 each. Edit: So, here's the top half of the fuselage I printed, panel lines included. Took about 3 hours to do on the "fine" setting, and a bit of sanding to clean up, but it really smoothed out nicely. Sadly, this one's got a few of the messed up details from panel lines being too close together, so I'll probably print another one later. I tried a print on fast, and the panel lines turned out correctly, but the overal quality wasn't great. So far, I'm having the best success printing things vertically. This was printed with the nose pointing straight up, and I was happy to see it not tip over. Most of the other pieces should print fine that way, but I'm having a dickens of a time setting up the wing. It's too wide standing on its back edge to print reliably (printing anything long and skinny doesn't stick), so right now I'm waiting on a test to see if it'll even print laying flat.
-
Not yet, I'm still learning my way around the active forums about 3d printing, so that'll probably come in handy. Though, I think I do know what's going on.. I'm just trying to print things that're too big and flexible for the printer to not mess up the shape. Printing smaller parts at a time seems to work much better. I've been reworking that excalibur model with panel lines, and printing a small test piece tonight, so we'll see how that goes.
-
I've always assumed this would be an option anyway. Not letting people use other USB devices would be shooting themselves in the foot repeatedly.
-
Don't think so sadly, but I grabbed two to be safe. By the way.. I remember someone asking why the Roy was labeled "Special Movie Version" and the Hikaru was just "Movie Version"... just occurred to me last night... Roy's VF-1S sometimes gets referred to as the "Roy Focker Special."
-
Very fancy stuff there! So, starting to have a problem, and I'm not sure what's behind it. After a few successful prints with no trouble, suddenly, my printer can't seem to make the layers of the support structure stick together. I've got absolutely no trouble sticking to the base, but the layers of the support structure are just peeling apart before I even start the model. It's like only the first 3-4 layers are sticking before everything just starts peeling up from there. One thing I am noticing though, the strips the printer is putting down to build up the support structure used to be straight lines, but now the material is turning into little squiggles, which I can't tell is on purpose or not. Is the structure just cooling too fast, and not sticking to itself? That would explain this happening I guess, but then I have no idea what changed between yesterday and today. I had a near perfect print of an entire model last night, but I haven't been able to get anything decent all day today.

