

erewhon1872
-
Posts
25 -
Joined
-
Last visited
Content Type
Profiles
Forums
Events
Gallery
Posts posted by erewhon1872
-
-
2 minutes ago, no3Ljm said:
No worries. Cheers!

First time I've ever posted anything so it was odds on I'd make a hash of it! Thanks again 👍
-
I hope these few suggestions are helpful to you, I’m no expert but bitter experience has taught me what is likely to work and what doesn’t work so well!
-
When cleaning up the seams on joints it may be useful to find a putty that you can clean up with water as this can save both time and the need to sand a seam which risks removing surface details. Again this depends on where you are in the world and what’s available near you but I use one called ‘Deluxe Materials Perfect Plastic Putty’ which sets after ten minutes and any excess can be removed with a cotton bud dipped in water. This is particularly useful to fill gaps where wings meet fuselages as those areas are both difficult to sand and very difficult to re-scribe if you wipe out nearby panel lines.
-
thinking about it both of those are 'after' pictures 😊
-
6 minutes ago, erewhon1872 said:
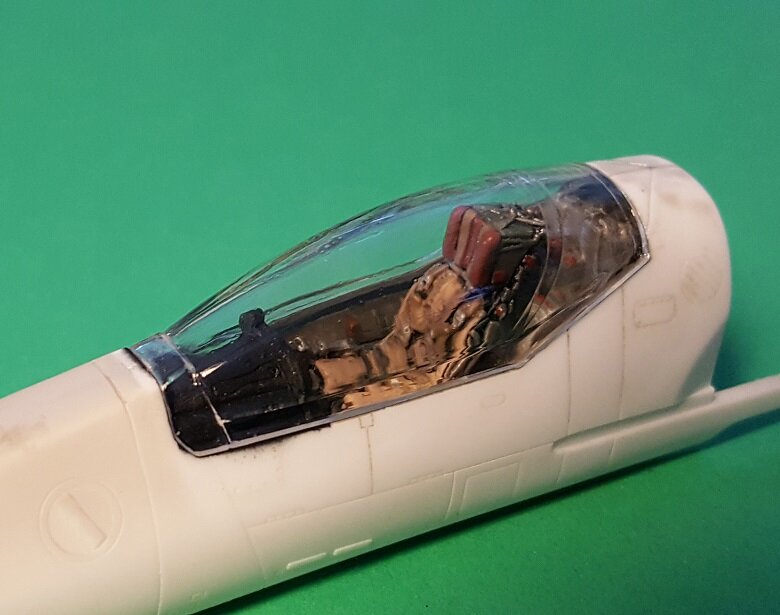
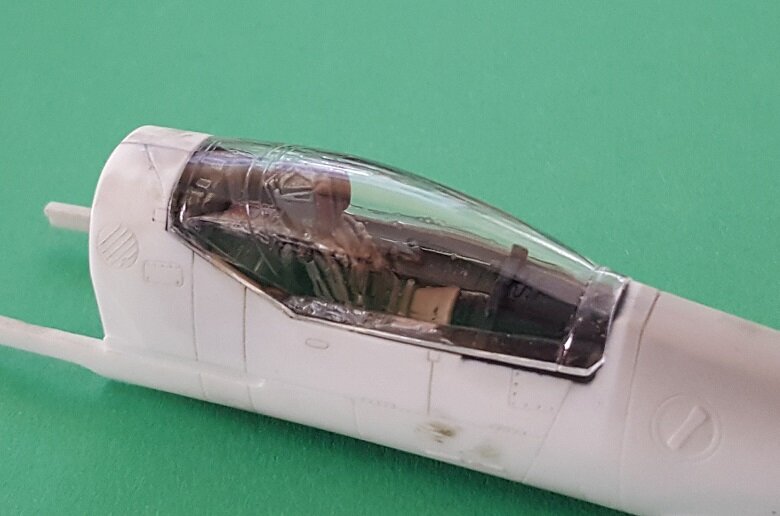
Attached are some before and after pictures on a VF-1 canopy that I removed the seam on, it was my first attempt so while not perfect it is still a lot better than leaving the seam in place
I also replaced the kit seat with a resin alternative, it’s an FA-18 seat by ‘Quickboost’. As it is of course not designed for the VF-1 kit it’s a great fit in the cockpit, you just need to take a little material from its base to avoid a clash with the inside of the canopy
-
When painting the canopy remember if you use primer first then the colour of the primer will be the interior colour of the framing, so prime it with the colour of the cockpit interior and then once dry spray over that with the airframe colour or whatever shade is immediately around the canopy as sometimes that is different to the main airframe colour.
On the subject of the canopy transparency the one in the YF-19 Hasegawa kit does not have a mould seam down the middle but earlier kits like the VF-1 do have a seam. It can be removed with a new scalpel blade, just scratch away the seam (add masking tape either side of the seam to protect the rest of the canopy) and then sand with successively finer grades of sanding sticks, once reasonably clear again polish with Tamiya Polishing compound or the Mr. Hobby liquid equivalent. This will leave the transparency clear again but to give it a shine I dip the canopy in ‘AK Interactive's Gauzy Glass Coat’, wick off the access on tissue paper and leave to dry in an airtight container to avoid dust settling on the surface as it dries. Other people use ‘Finish’ floor polish for this and no doubt there are other alternatives too.
-
As for priming models if they are available in your part of the world but why not try Mr Hobby’s ‘Mr Primer Surfacer 1000’ thinned 50/50 with either their normal thinner or the levelling thinner but avoid the ‘Aqueous’ thinner as that is for water based paints.
I also found this advice online about the distance to keep the tip of the needle away from the surface when spraying the primer………….. ‘The key with these lacquers is to not get too far away. I work from about 0.25 to 1.5 inches away. Spray from too far and it dries before it hits the surface, landing as (near) powder. If the spray isn't shiny when it hits the surface, you're too far away’.
-
5 minutes ago, no3Ljm said:
Hey @erewhon1872. If you kindly change the default color of your text. It's not showing anything for those whose using forum's IPS Default (Light) theme.
")


ok thanks I'll post the messages again
-
I also replaced the kit seat with a resin alternative, it’s an FA-18 seat by ‘Quickboost’. As it is of course not designed for the VF-1 kit it’s a great fit in the cockpit, you just need to take a little material from its base to avoid a clash with the inside of the canopy
-
Attached are some before and after pictures on a VF-1 canopy that I removed the seam on, it was my first attempt so while not perfect it is still a lot better than leaving the seam in place


-
On the subject of the canopy transparency the one in the YF-19 Hasegawa kit does not have a mould seam down the middle but earlier kits like the VF-1 do have a seam. It can be removed with a new scalpel blade, just scratch away the seam (add masking tape either side of the seam to protect the rest of the canopy) and then sand with successively finer grades of sanding sticks, once reasonably clear again polish with Tamiya Polishing compound or the Mr. Hobby liquid equivalent. This will leave the transparency clear again but to give it a shine I dip the canopy in ‘AK Interactive's Gauzy Glass Coat’, wick off the access on tissue paper and leave to dry in an airtight container to avoid dust settling on the surface as it dries. Other people use ‘Finish’ floor polish for this and no doubt there are other alternatives too.
-
When painting the canopy remember if you use primer first then the colour of the primer will be the interior colour of the framing, so prime it with the colour of the cockpit interior and then once dry spray over that with the airframe colour or whatever shade is immediately around the canopy as sometimes that is different to the main airframe colour.
-
I also found this advice online about the distance to keep the tip of the needle away from the surface when spraying the primer………….. ‘The key with these lacquers is to not get too far away. I work from about 0.25 to 1.5 inches away. Spray from too far and it dries before it hits the surface, landing as (near) powder. If the spray isn't shiny when it hits the surface, you're too far away’.
-
As for priming models if they are available in your part of the world but why not try Mr Hobby’s ‘Mr Primer Surfacer 1000’ thinned 50/50 with either their normal thinner or the levelling thinner but avoid the ‘Aqueous’ thinner as that is for water based paints
-
Hi, about the overall size of the VF-19 in 1/72nd scale, the information on the side of the kit box says that the overall length is 260mm and the wingspan is 206.5 mm, hope that helps?
-
the original idea of the wanted post was to try to find someone who was selling and ideally in the U.K. to cut down on the postage costs, but looks like these kits are impossible to find here?
-
Out of curiosity. If the kit you're looking for is still available from HLJ, why not get it directly from there? Looking at that link you provided, and the shipping estimate they have, you're probably going to spend like 5740 yen using EMS method. That's 35.5 pound.
actually I'd not checked the shipping costs on HJL as I assumed they'd just be too expensive, but looking at the SAL (registered) postage option then that's 4.830 yen, which is under £30. Might take a month to get here but I'm in no hurry. Thanks for pointing it out, I'd have not looked otherwise.
-
I have a VF-1J/A 1/48 Hasegawa (fighter mode), unassembled.
I live in Chile, though.
Hi and thanks for replying to my 'wanted' post.
Can I check the kit you have is this one?
http://hlj.com/product/HSGMC02/Sci
I am not sure how much you are selling the kit for but I think the postage to the U.K. may be a problem? Could tell me what the cost would be including postage and I'll let you know if I am interested?
Again thanks for the reply, I had almost given up on hearing anything.
Kind regards,
Peter
-
I am still looking so will give this a quick bump again

-
still looking so will give this a quick bump
-
Hi all,
I can't figure out how to change the title of previous post (I tried 'full editor' button and it would not let me edit the title) or delete it so forgive me for posting again and I apologize in advance to the moderators.
I found one of the kits (the Super Valkyrie) I was after courtesy of Jefuemon but wonder if anyone has the Hasegawa 1/48 VF-1J/A Valkyrie, the 1/48 YF-19 Macross Plus kit or the Valkyrie weapons set in the same scale that they would be willing to sell/trade in the U.K. or Europe. Will consider outside Europe if the postage rates are reasonable.
If anyone has one of these kits please let me know what you'd like for it/them?
If you are looking for anything in the 1/48 aircraft line let me know and perhaps we can trade if I have what you are after.
Again sorry for posting request again but it was only way I could think to add a different title!
Cheers,
Pete
-
have sourced the VF-1S/A Strike/Super Valkyrie thanks to Jefuemon but still looking for the VF-1J/A Valkyrie and the weapons set if anyone has one to sell or even trade,
Pete
-
maybe I am limiting myself too much by stressing U.K. so how about if anyone in Europe has one of these they want to sell/trade could they let me know what sort of price they are looking for and what the postage to the U.K would be?
Thanks,
Pete
-
Hi all,
this might be a shot in the dark but wonder if anyone has the Hasegawa 1/48 VF-1J/A Valkyrie or VF-1S/A Strike/Super Valkyrie kit or the weapons set that they would be willing to sell/trade in the U.K.?
They only seem to be available from Japan and the postal cost from there virtually doubles the price of the kit. If anyone knows of a U.K. supplier that might be good to know too?
Anyway if anyone has one in 1/48 (I know they do them in 1/72 but my poor old eyes won't work at that scale) please let me know what you'd like for it/them?
If you are looking for anything in the 1/48 aircraft line let me know and perhaps we can trade if I have what you are after.
Cheers,
Pete
Starting on Plane Model Kits
in Model kits
Posted
I have never tried it but Tamiya do something called 'Smoke' which is a tint, you could try that on a spare piece of transparency and see if you like the look of it? I never use pilot figures and to me, heresy I know, but the seat on a Valkyrie looks more like something you'd recline in rather than be ejected from 😊I used thinned down oil paint for my panel lines and on a light grey finish use dark grey rather than black so they don't stand out so much