

Rock
-
Posts
353 -
Joined
-
Last visited
Content Type
Profiles
Forums
Events
Gallery
Posts posted by Rock
-
-
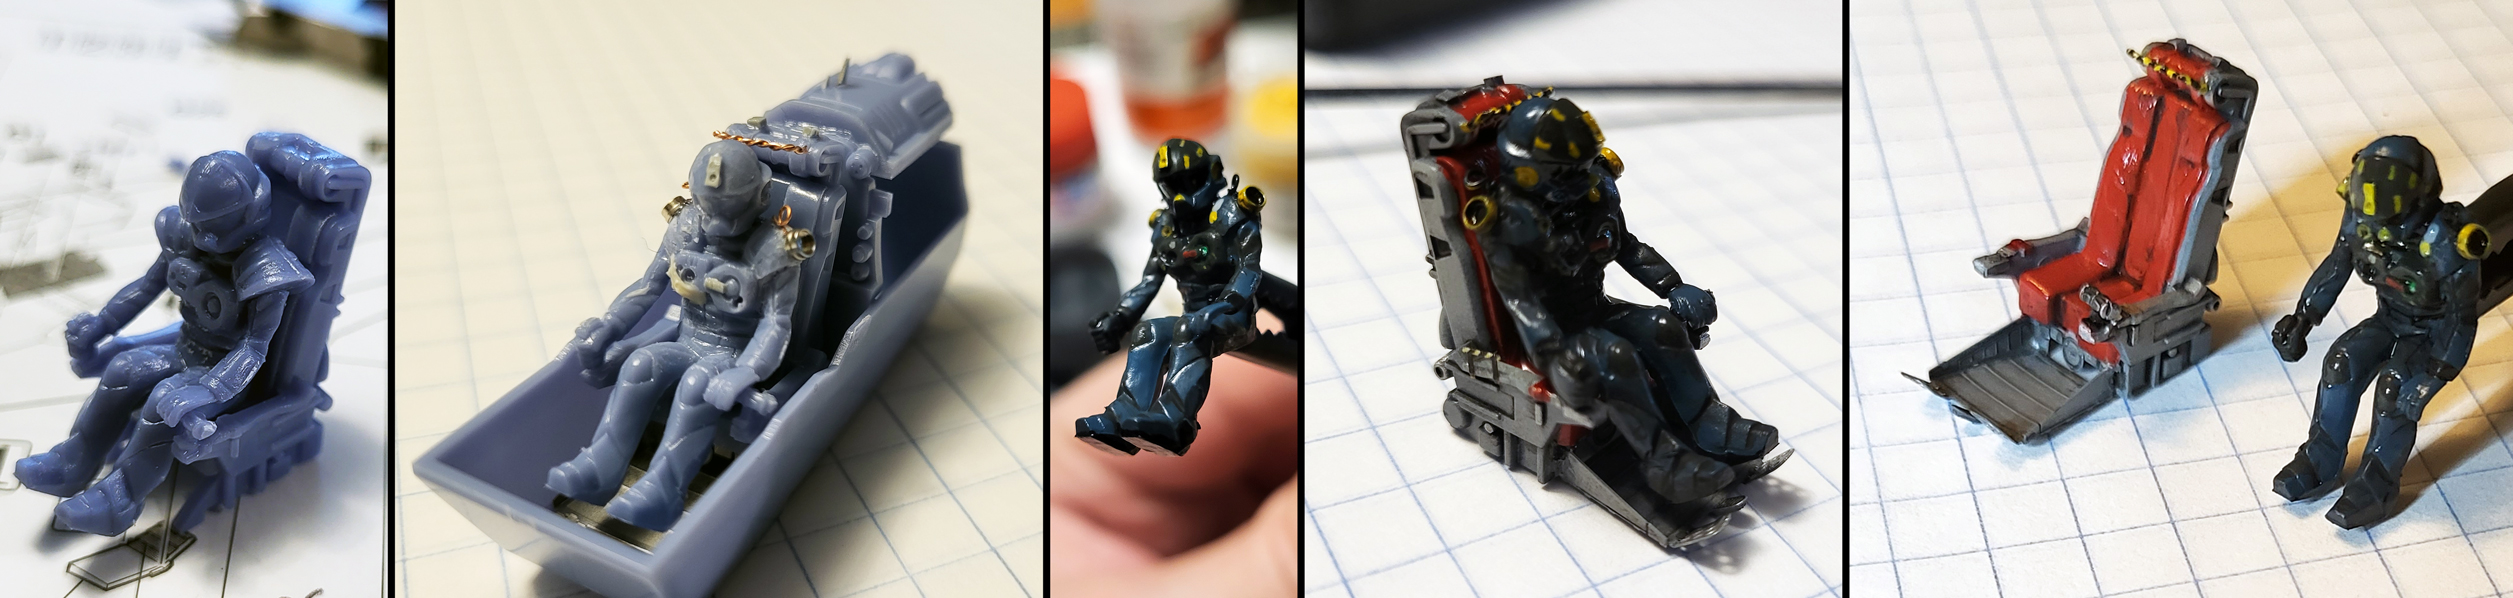
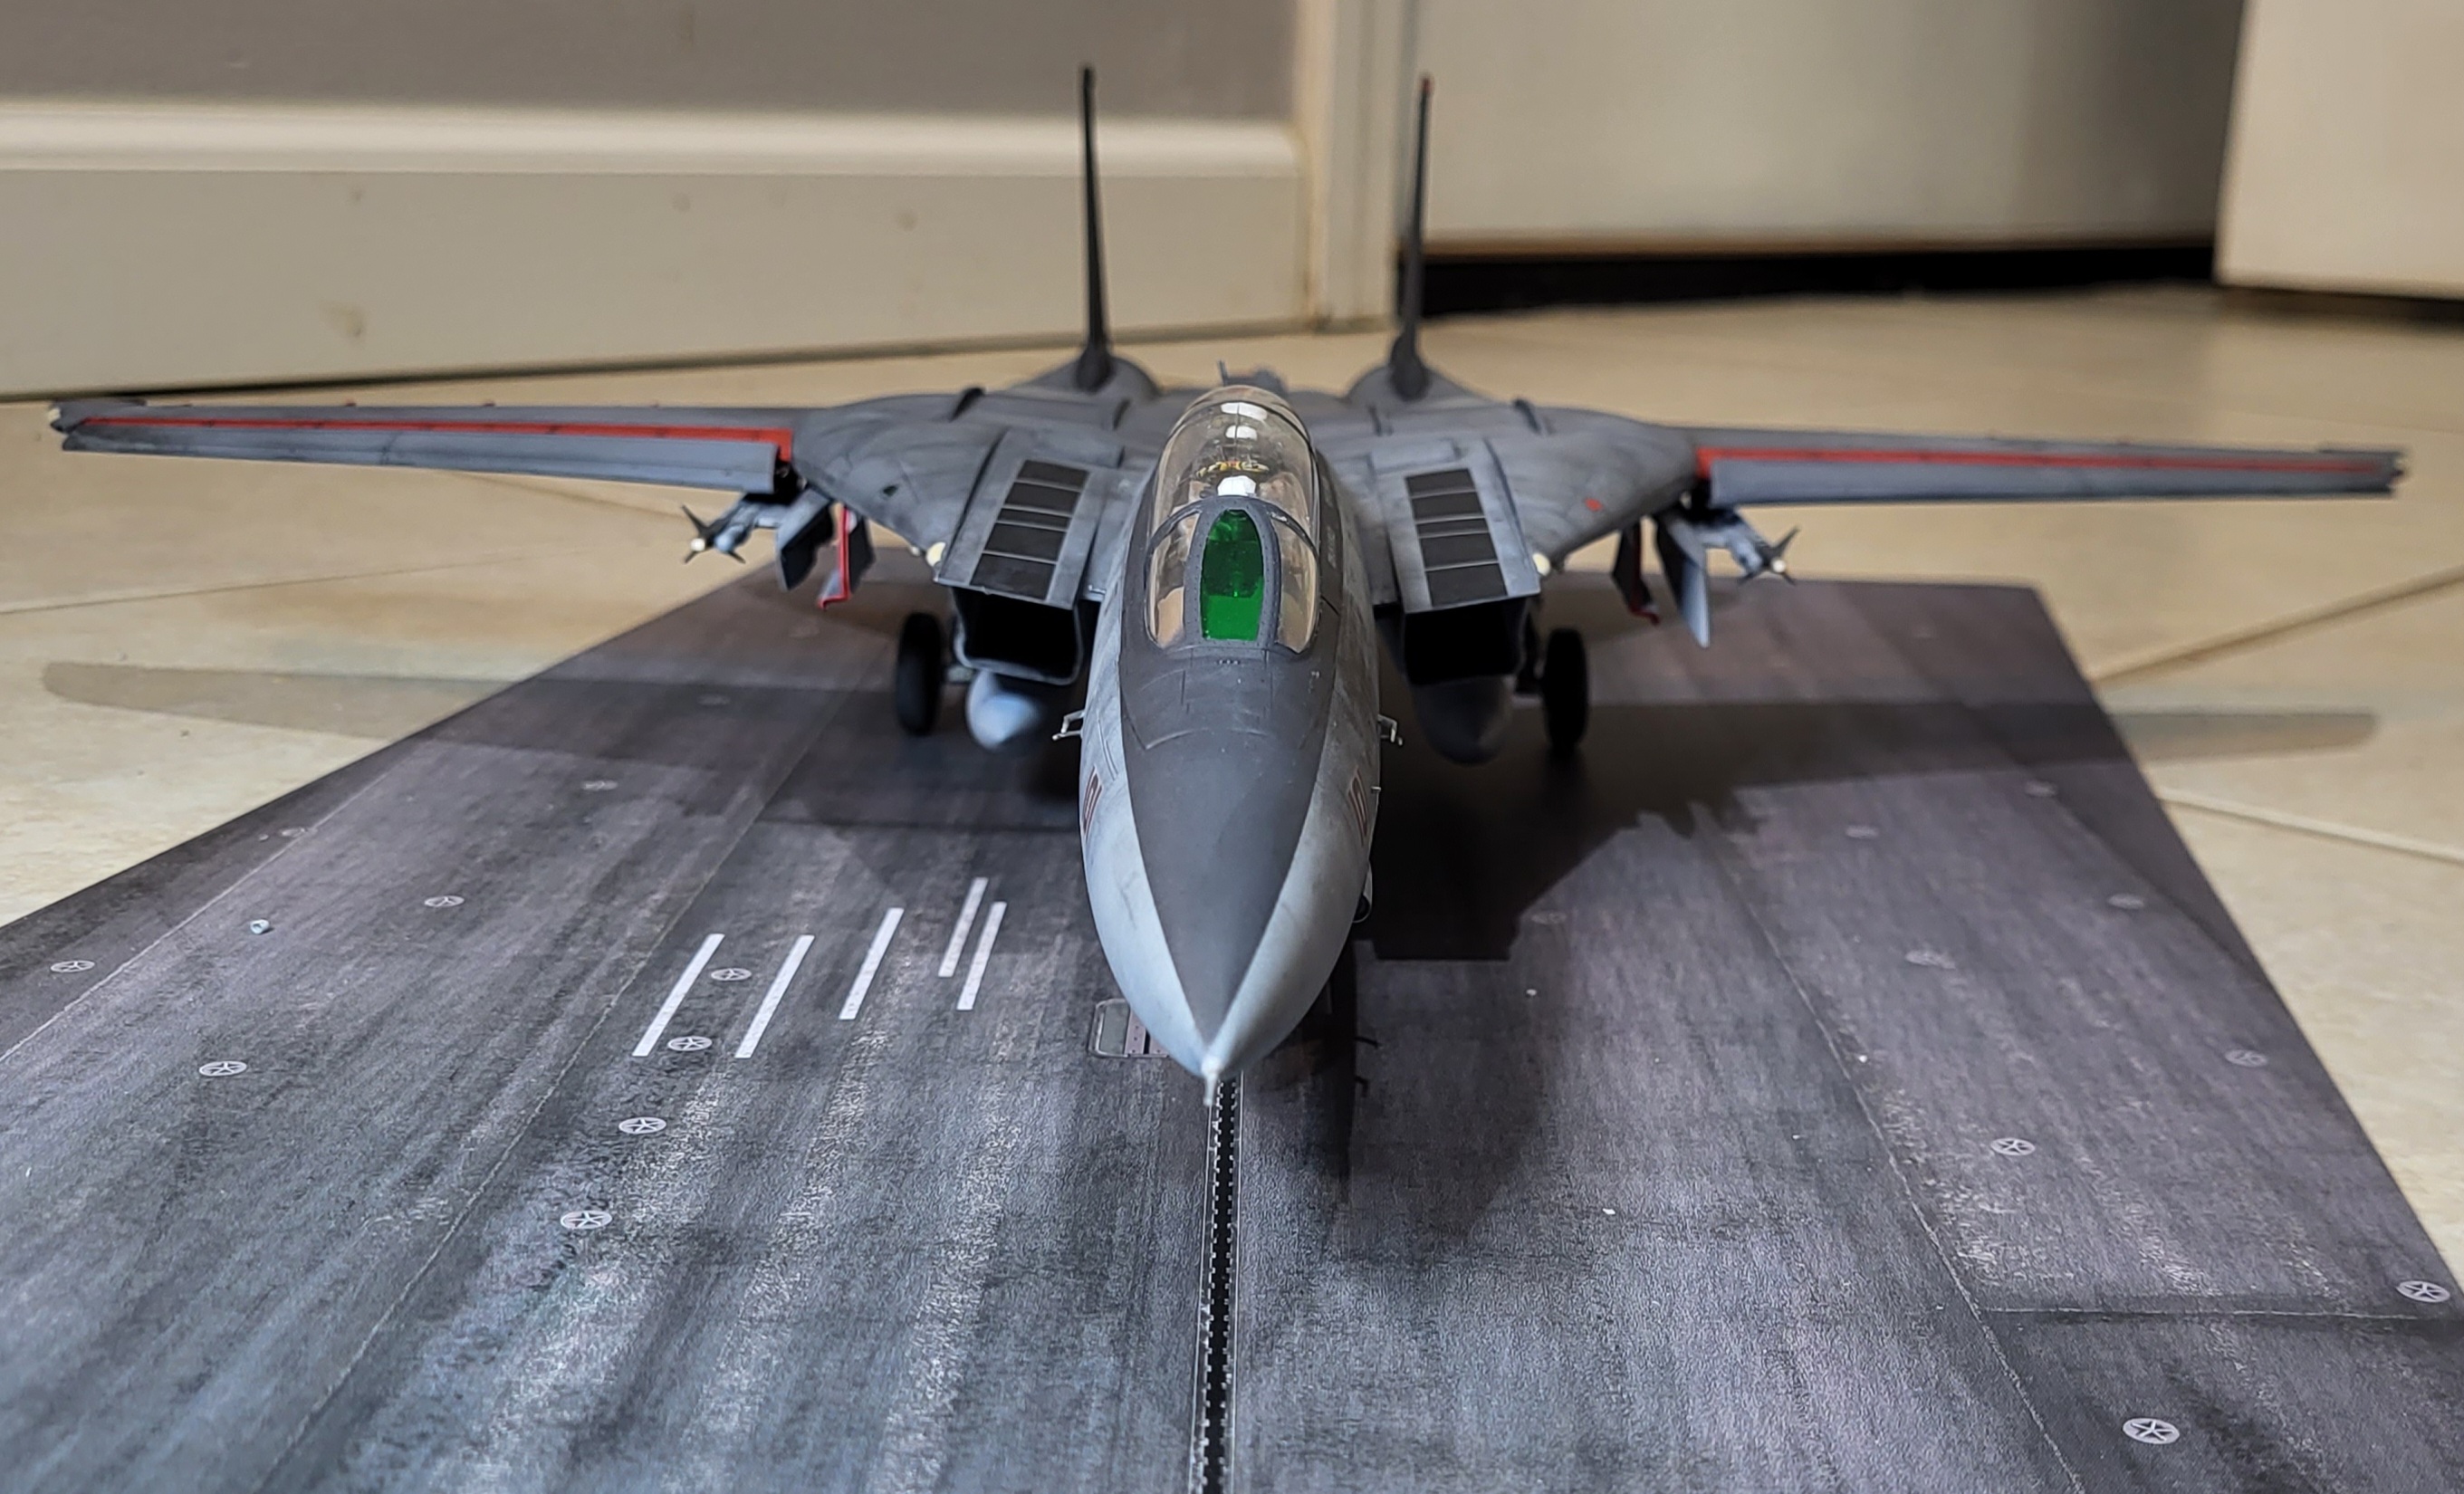
Pilot makeover. I learned on my YF-29 not to spent too much time chasing perfection and to use suggestion to make the pilots look the part. Keep moving. Added some basic detailing to the ejection seat to break up the large spaces, a PE emergency handle and some color. After reviewing the photo's it appears I got some touchup work to still do.
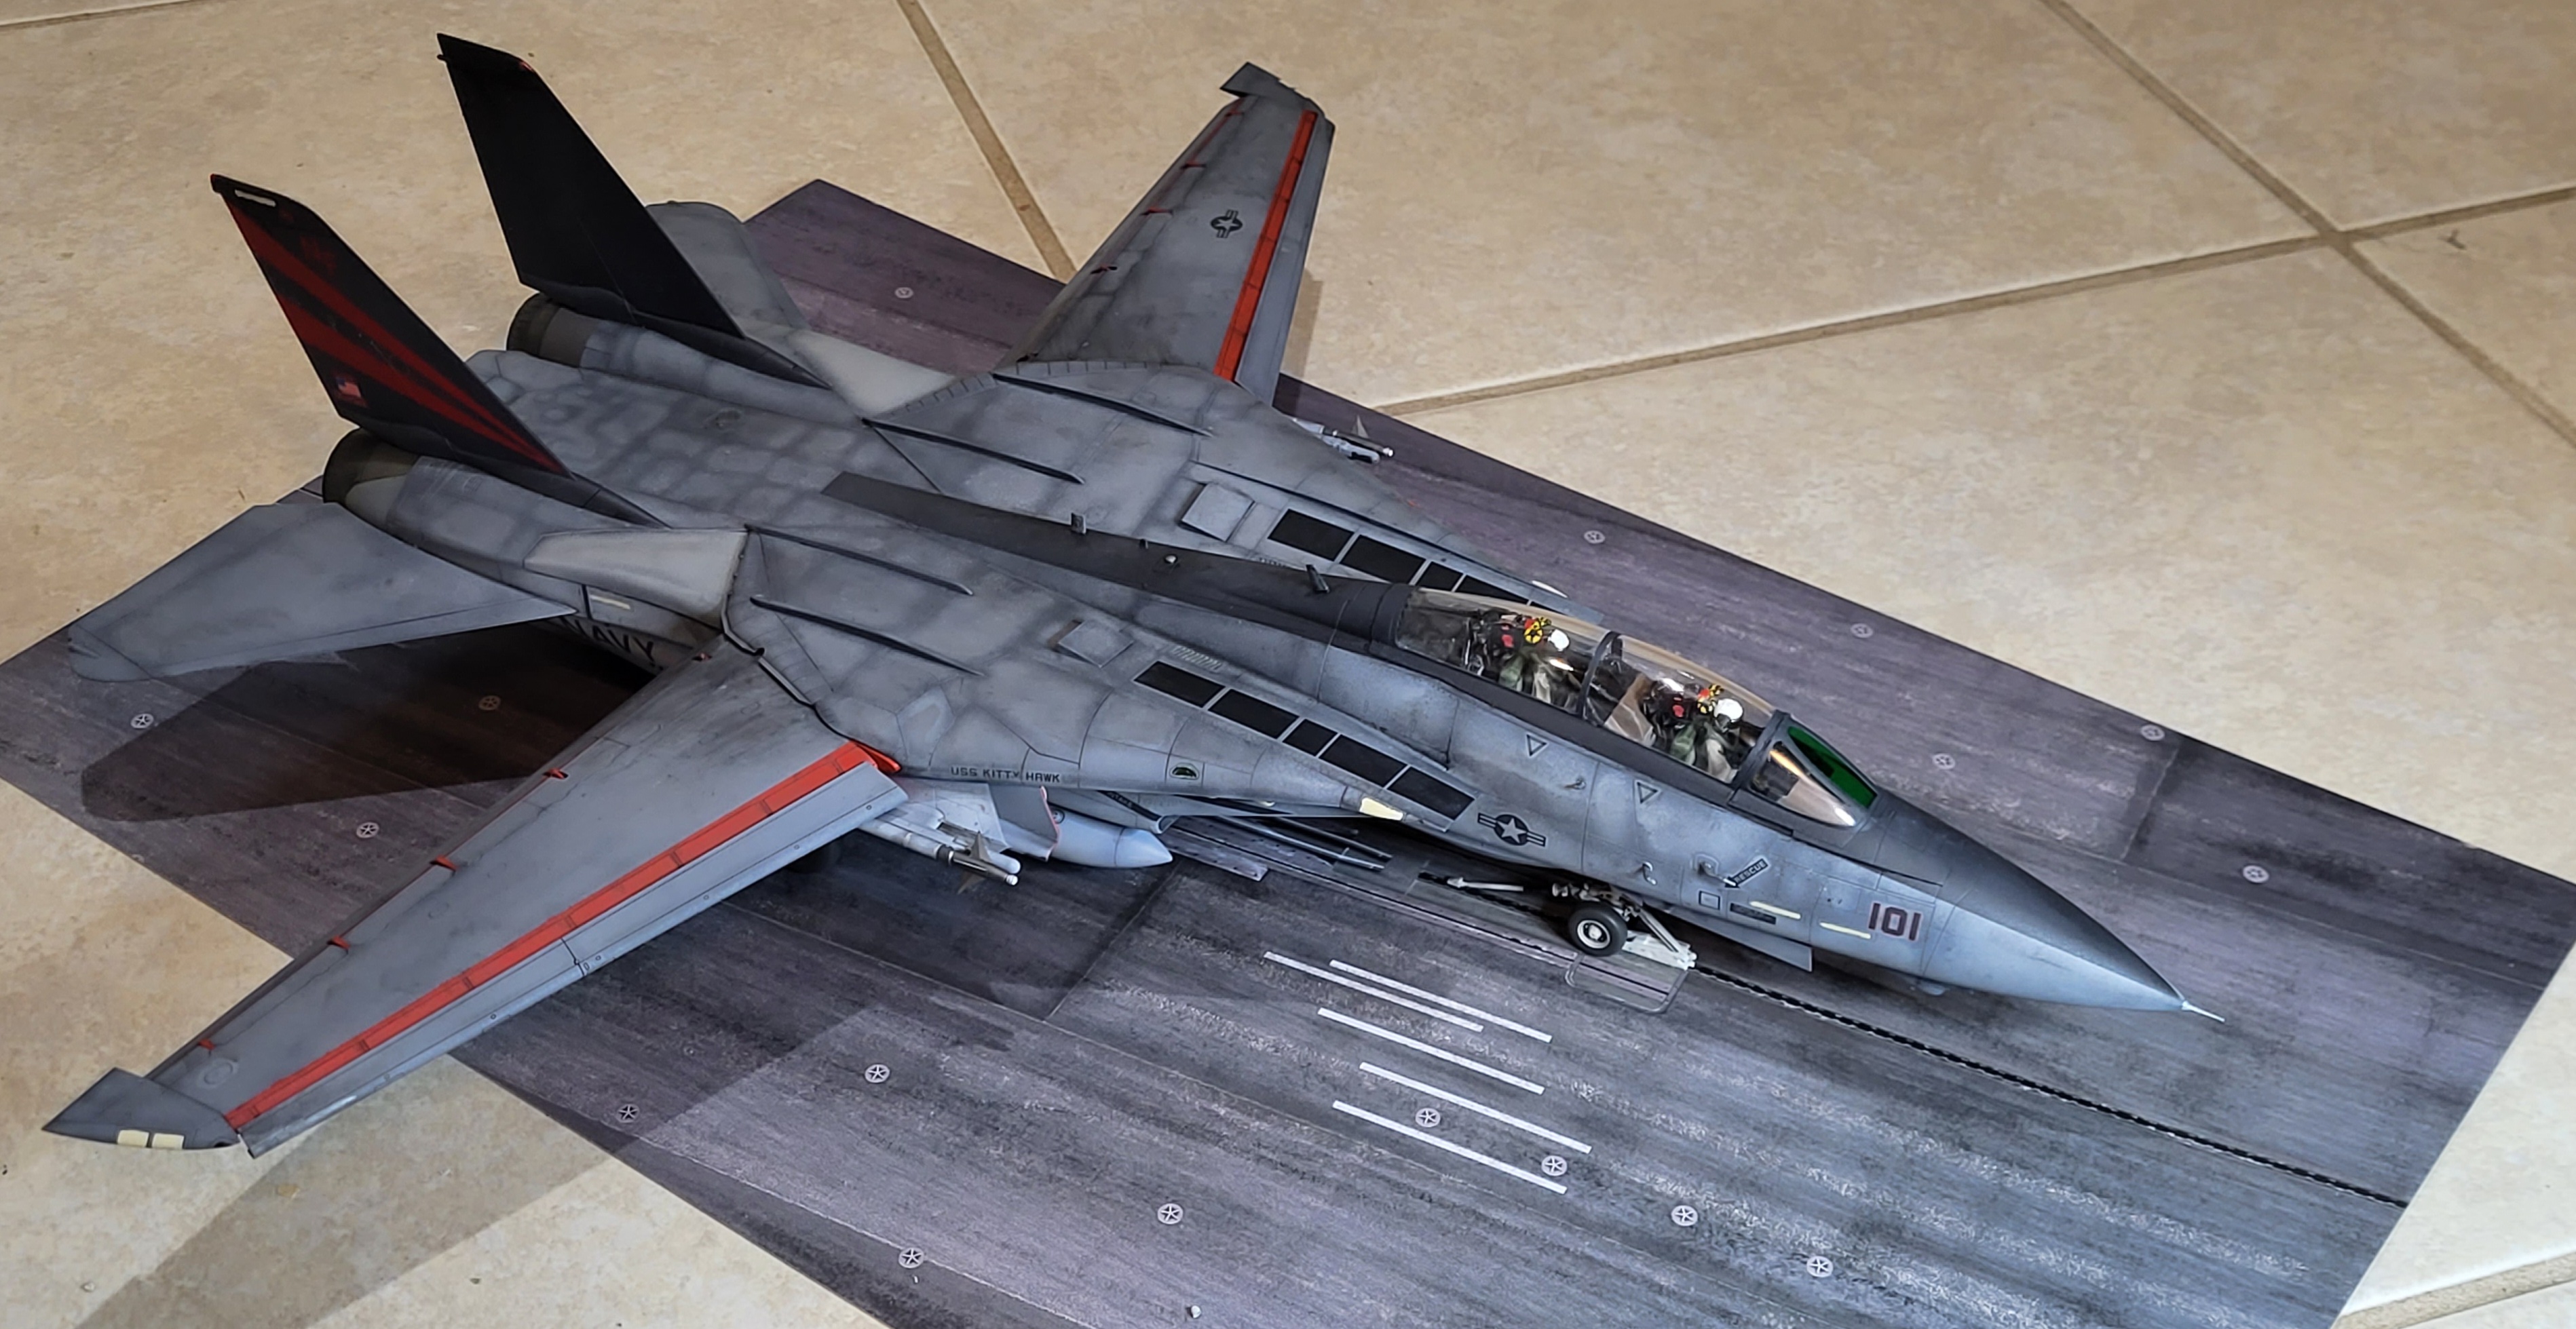
To get Isamu Dyson looking more like Aegis Focker I started with some knife work. Followed with drills and wire.-Shave down the shoulder pads and round off. I then drilled into the, letting me install a pair of leftover 3mm Hi-Q Parts metal detail bits. A single strand of copper wire was tied around a drill-bit to create the loop on the shoulders and glued down.
-Make the breast plate armor conform to the chest more and look closer to the game's design. Putty, and pla-plate were used to get the shape closer.
-Trim the helmet 'beak' rounding it off and revealing more of the shield/visor. I drilled the sides of the helmet for the circle details and used pla-plate for the main forehead body-cam.
-Remove some of the bagginess in the clothing, mostly around the wrists and ankles.I simply painted a lot of the fine details such as the yellow stripes on the helmet and the rings around the biceps and thighs. This is what I meant by using suggestion to make the conversion convincing. Most colors were just quick mixes with AK Color paints. For the green, blue and black lenses I used Testors Aluminum enamel followed with a drop of Tamiya's clear acrylic colors (green, blue and smoke.) The lenses came out a bit darker than I hoped. A gloss varnish was then applied over everything followed with a simple black wash.
Looking through the art books and video game cut scenes, colors on the uniforms varied greatly. The official character sketches even featured red details/lining which was completely absent in the game. I choose to follow the game's less toon-ish look, however I ended up not liking the black on slightly darker black look and sprung for some purple highlights. Sadly, the purple/blue/grey mix kind of wiped out the shading work I had going. Once the rest of the cockpit is further along and things are flat topcoated I'll try to reintroduce them using some weathering pencils, dry brushing and pastels. I gave up trying to make Aegis' blue glasses show up through the visor and just blacked it all out. After topcoat I may try to do a black/blue chrome to make it pop more.
-
1 hour ago, wm cheng said:
Well, I finally got around to taking some better photos of my models that I built during the Pandemic and learned about Focus Stacking. I've always been trying to fight the depth of field thing where only the nose of the plane is in focus and the tail is blurry - even with tonnes of light, and stepping down the aperture the physical lens limitations and the sensor size will only allow a few inches to be in focus even with Macro lenses. Anyways, here are proper photos of the planes I've built in the last 3 years... thanks.
Those pictures look great! Everything on focus almost gives it a 3d render look!
-
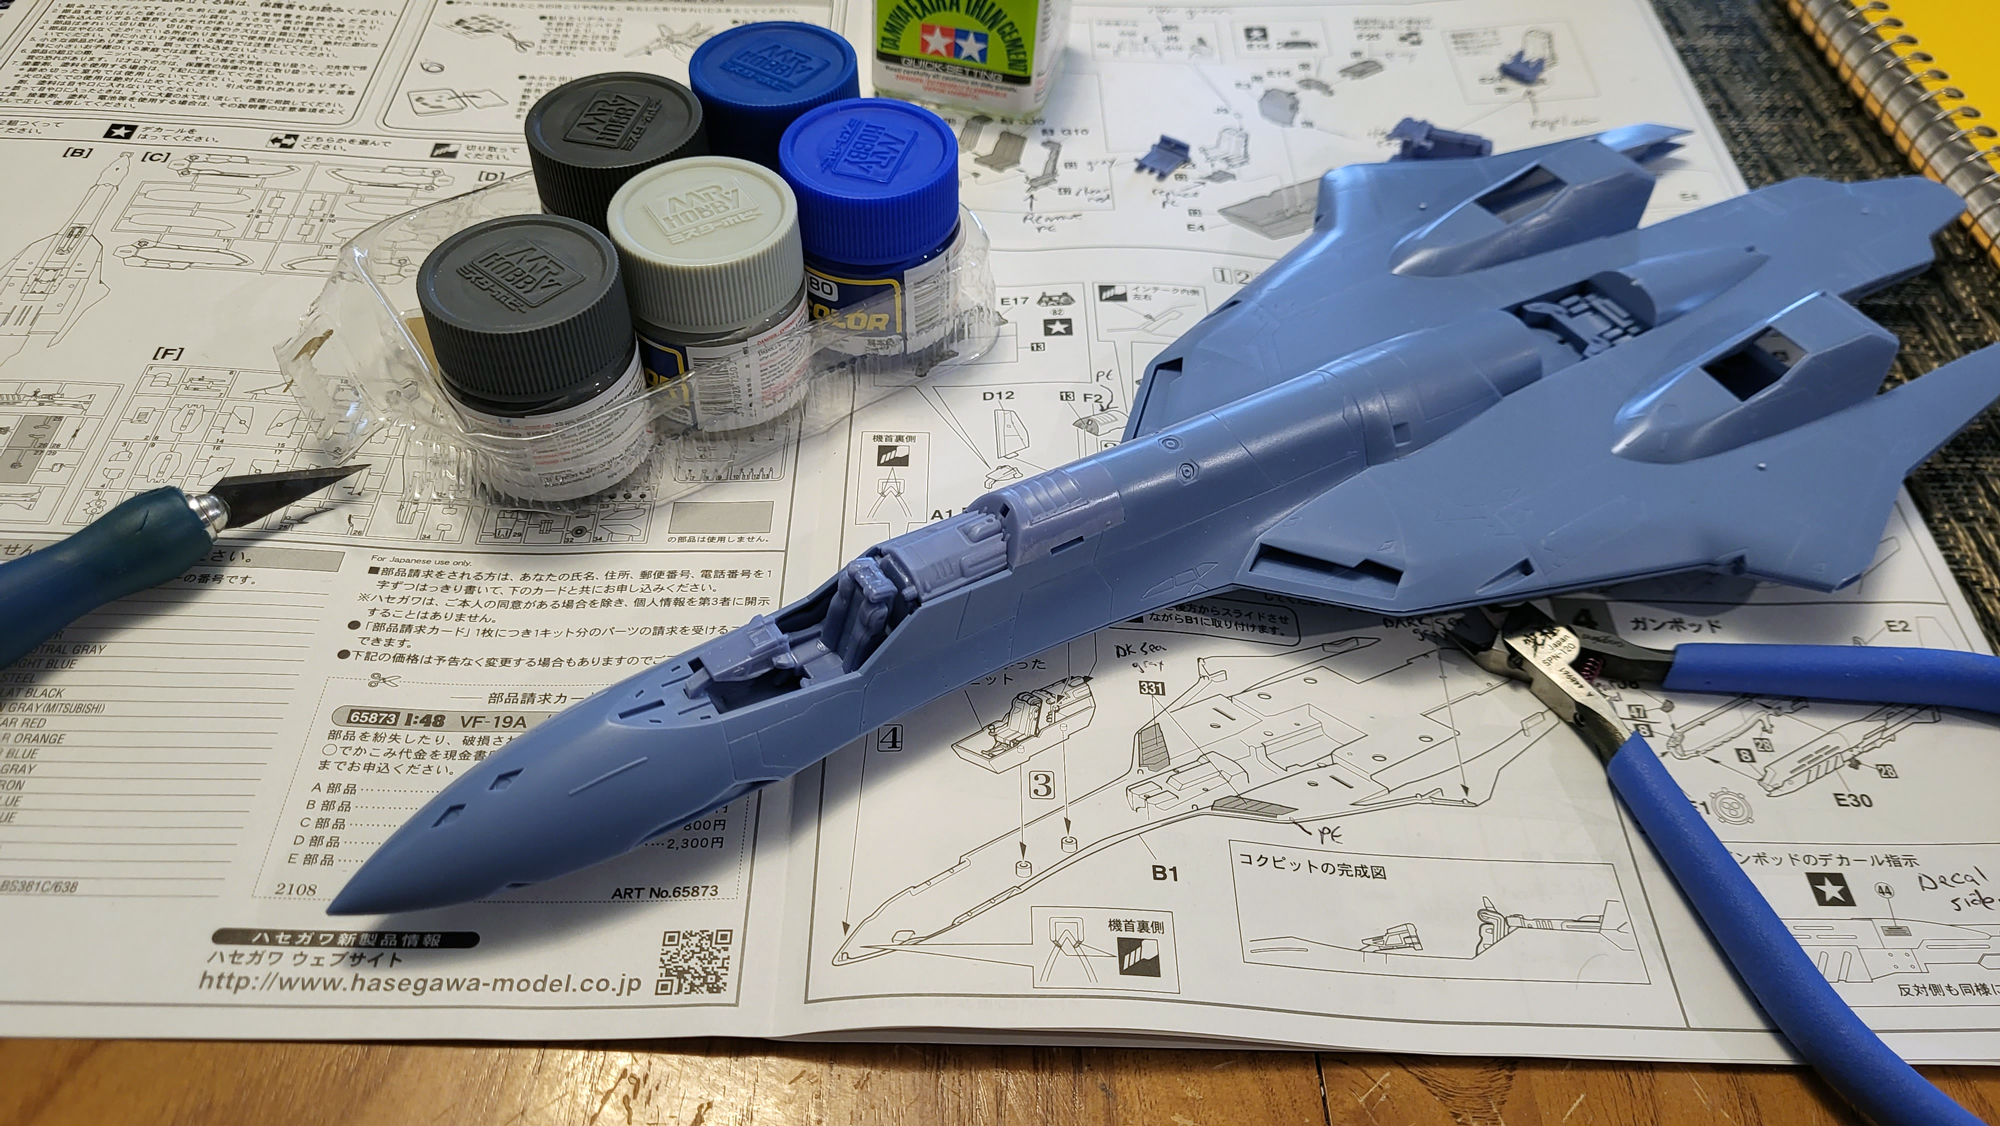
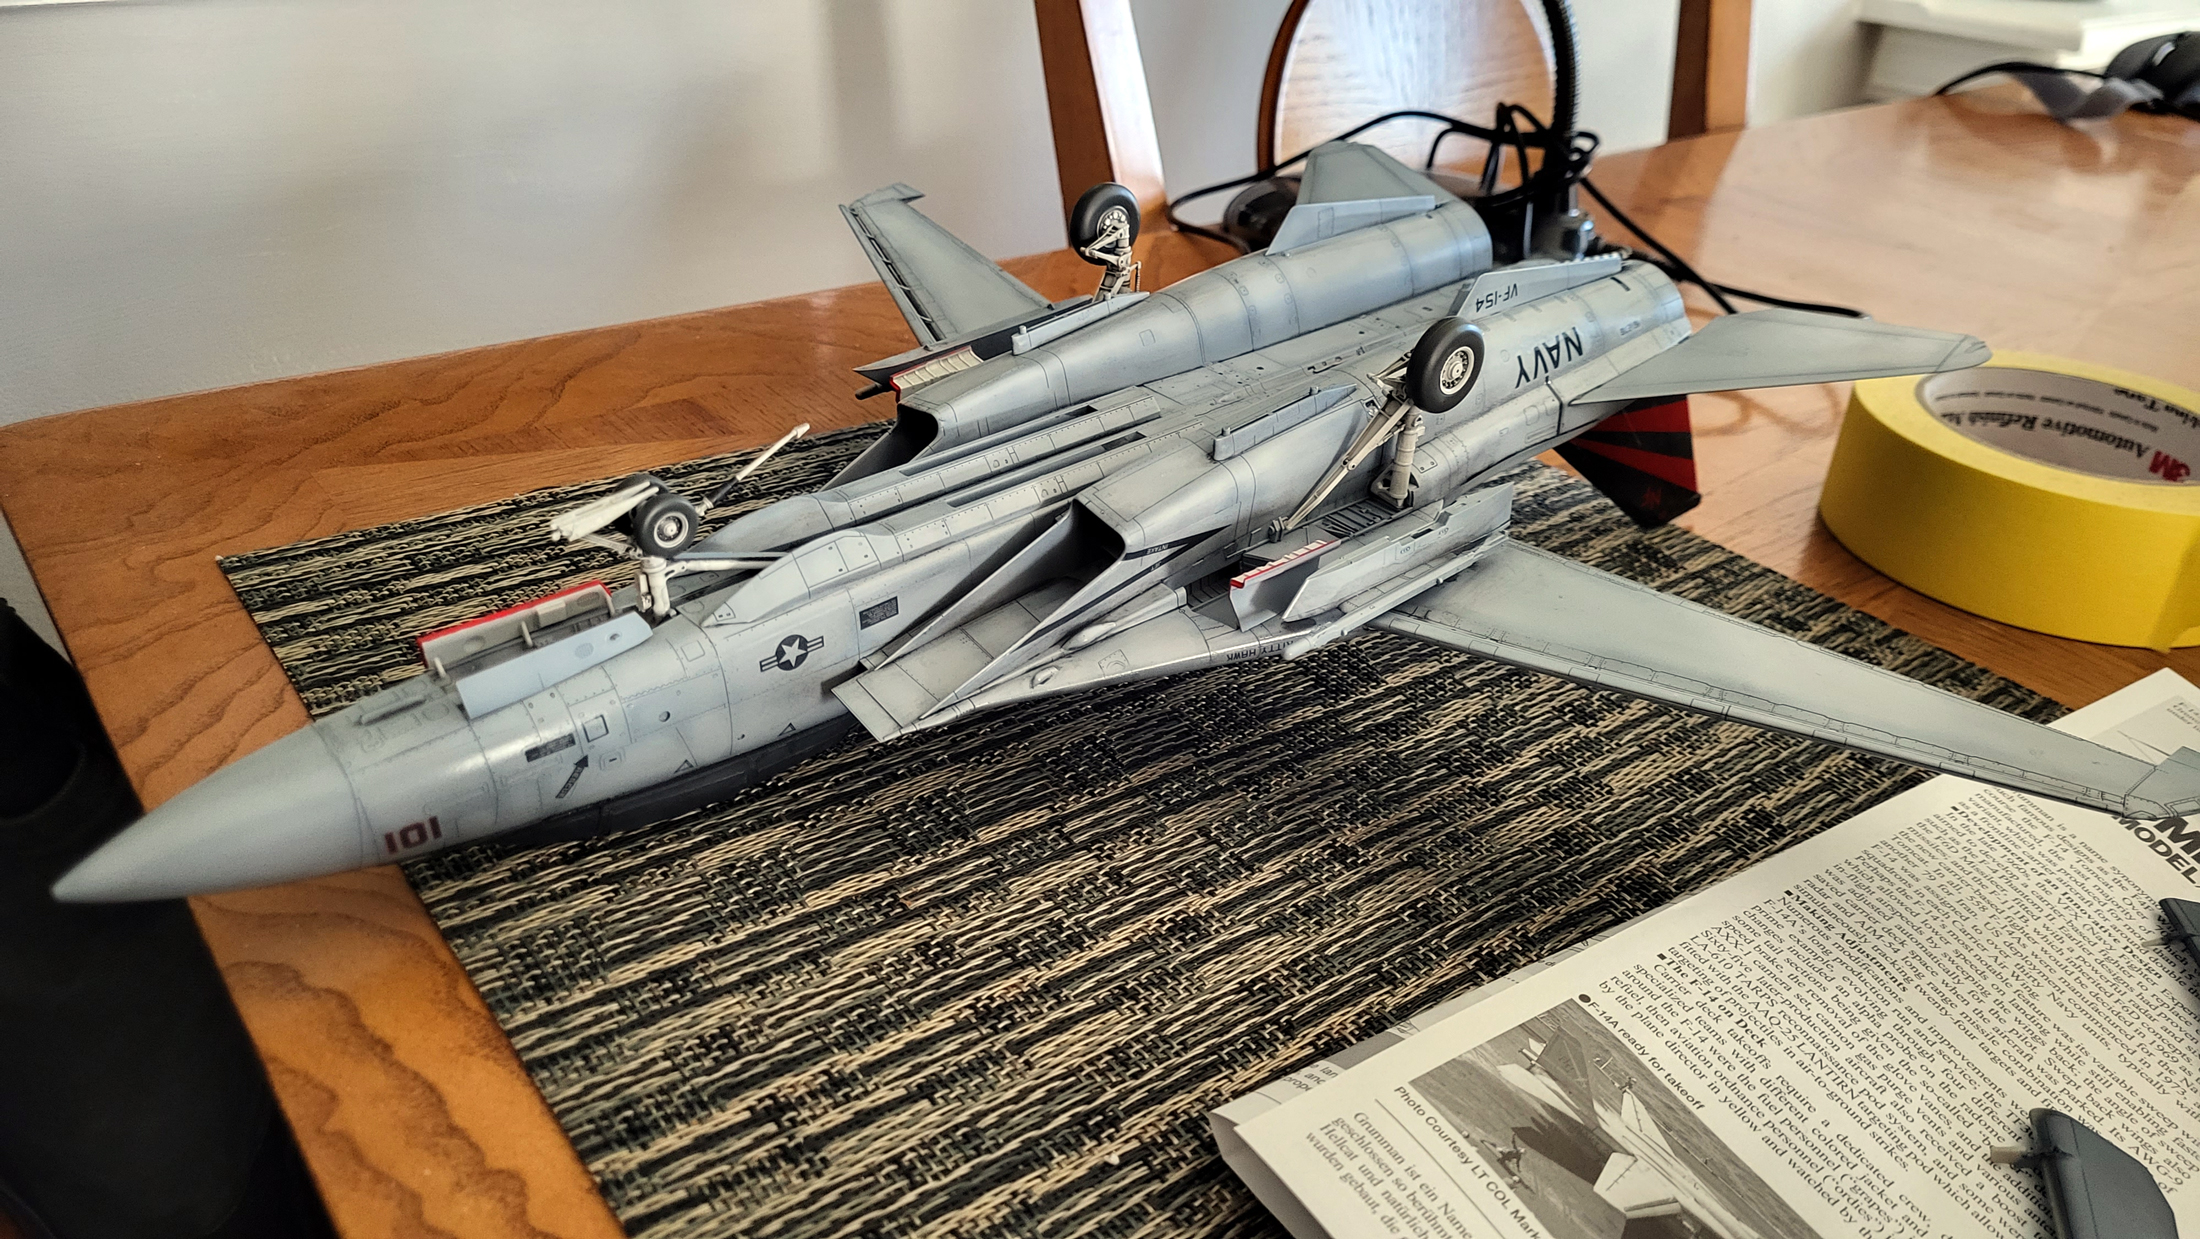
In typical fighter fashion the cockpit is first. I ended up having to test fit the 2 halves of the main body together just to glue the rear seat delete panels into the correct position. Hasegawa really sucks for not including a rear passenger/RIO. A full cockpit would have been way more interesting to detail!
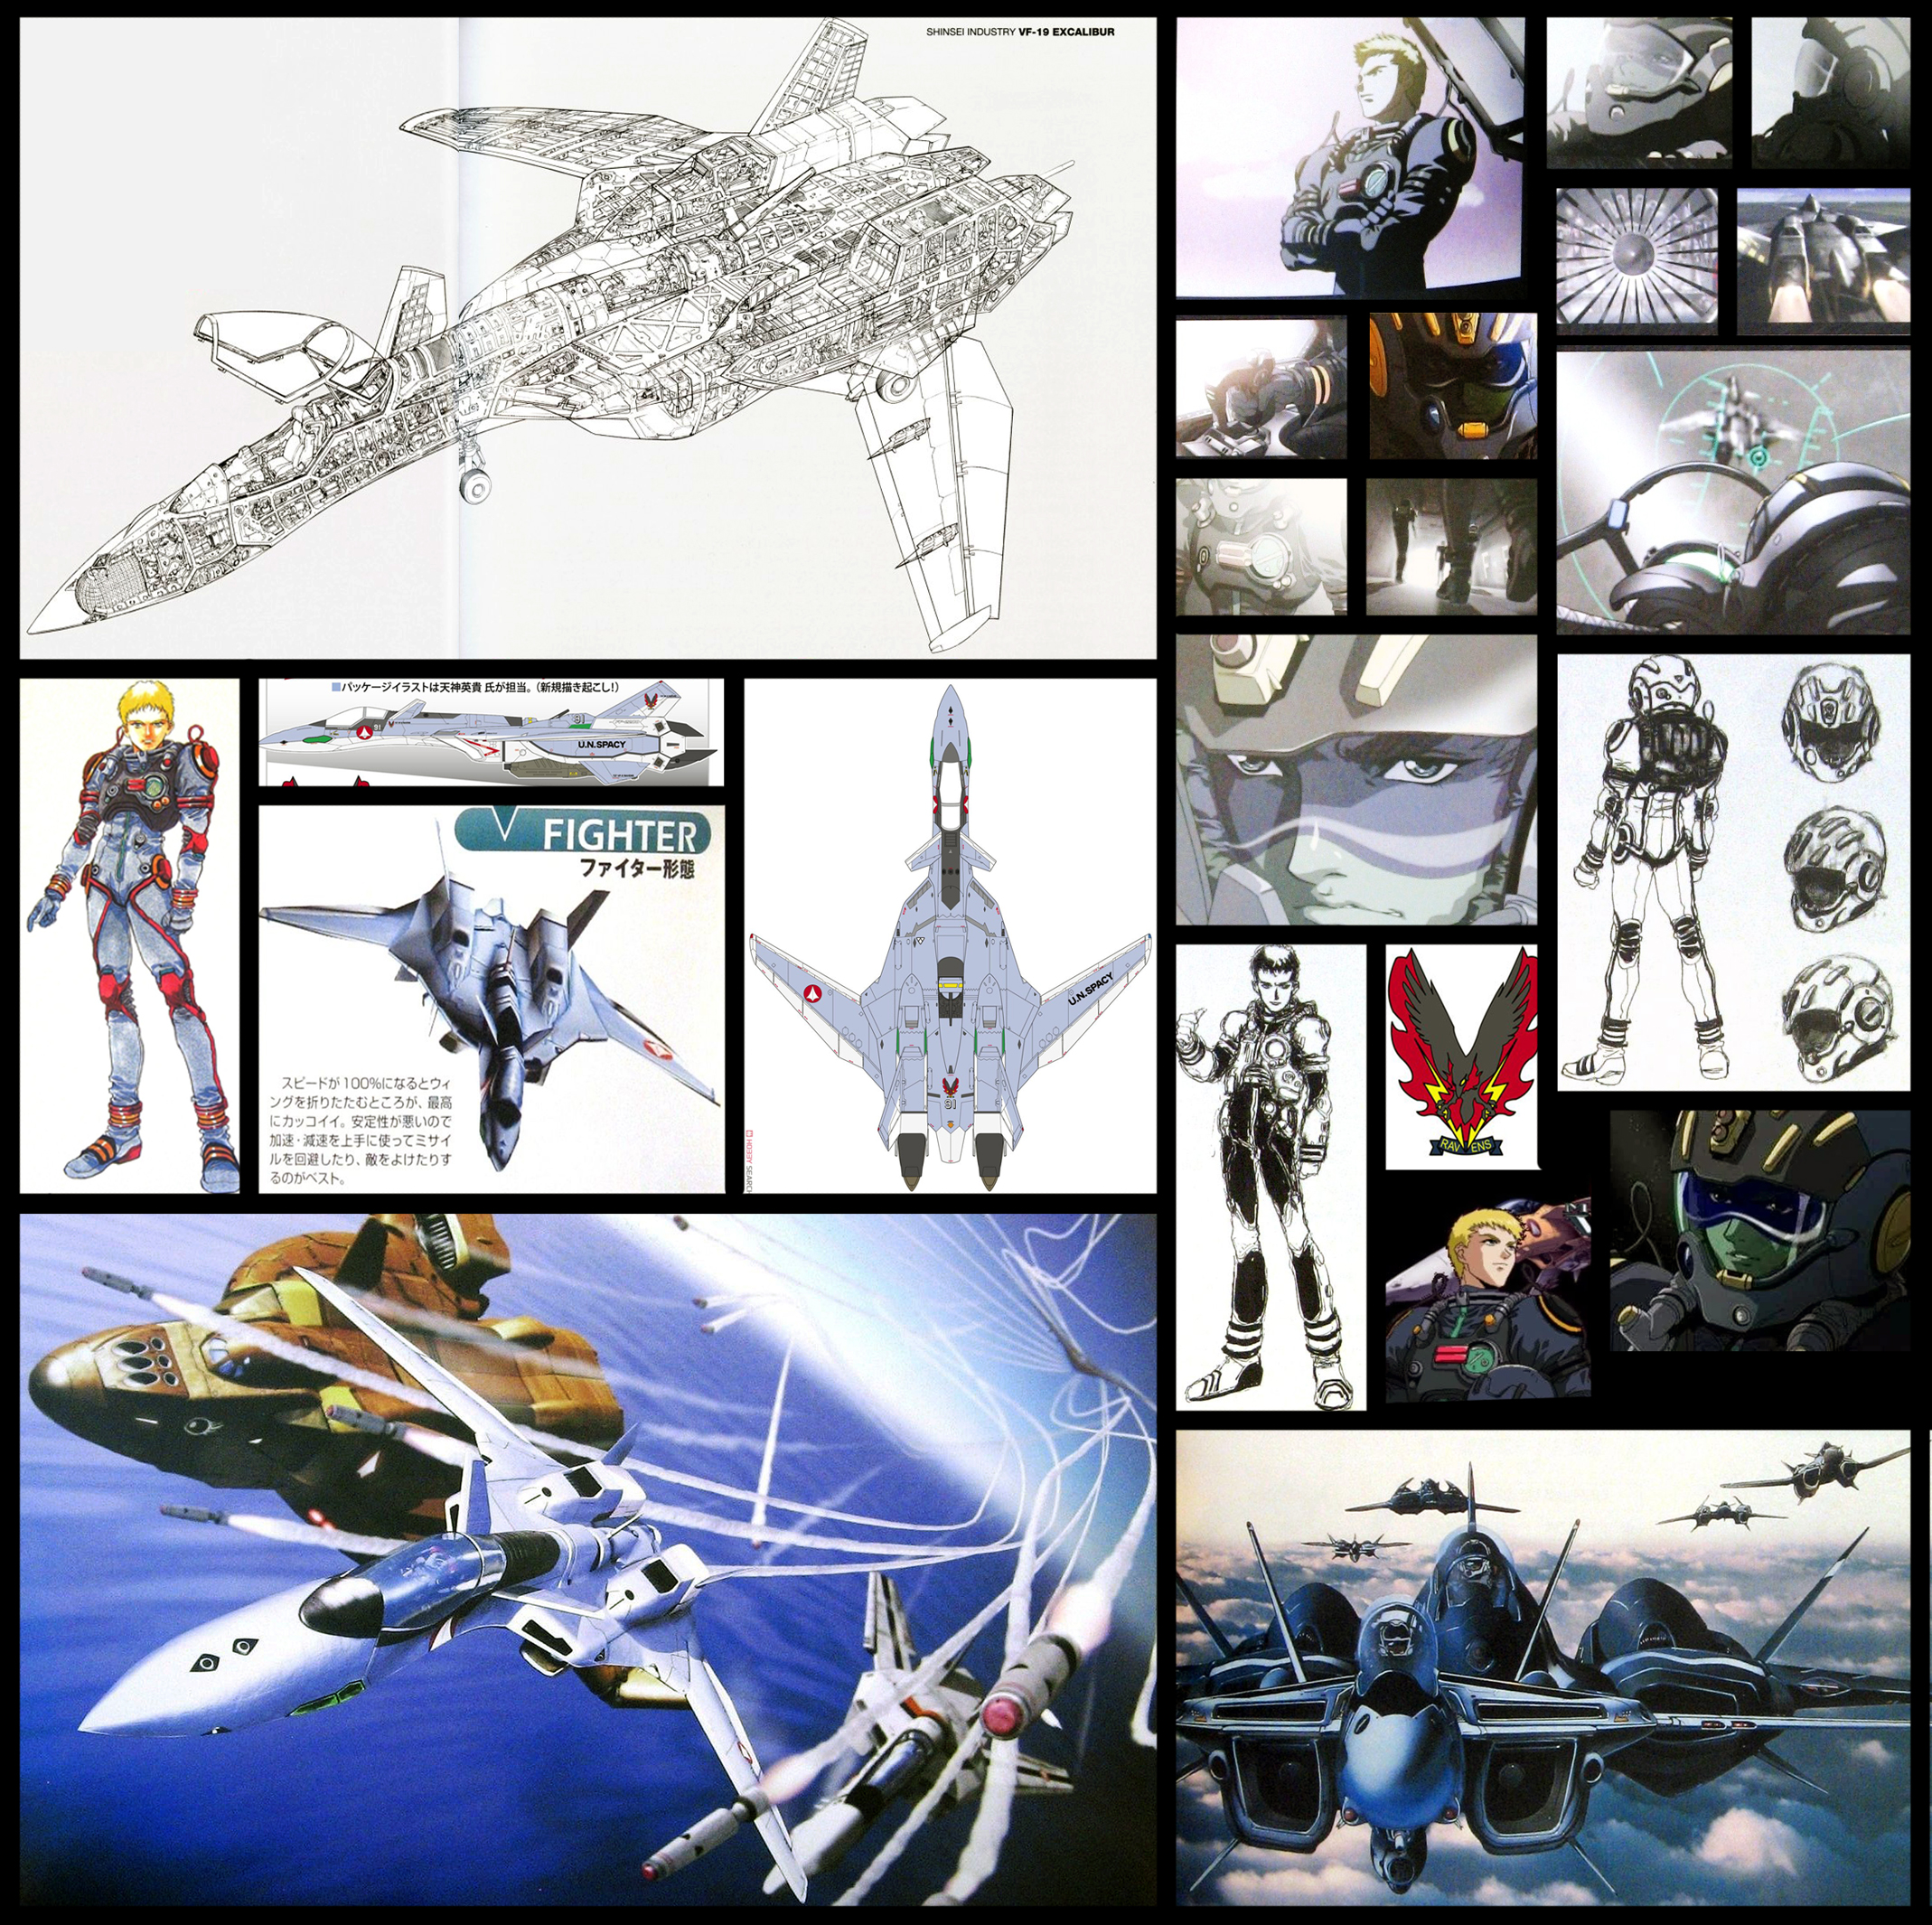
The pilot took a bit of work. I have to keep reminding myself this is just a repop of the older YF-19... which is why the 1 included pilot is Isamu Dyson instead of Aegis Focker. With the first challenge found, we can begin modifying the Macross Plus pilot suit into something that resembles the the very complex VF-X design! Stay tuned. [Also the paint has arrived!]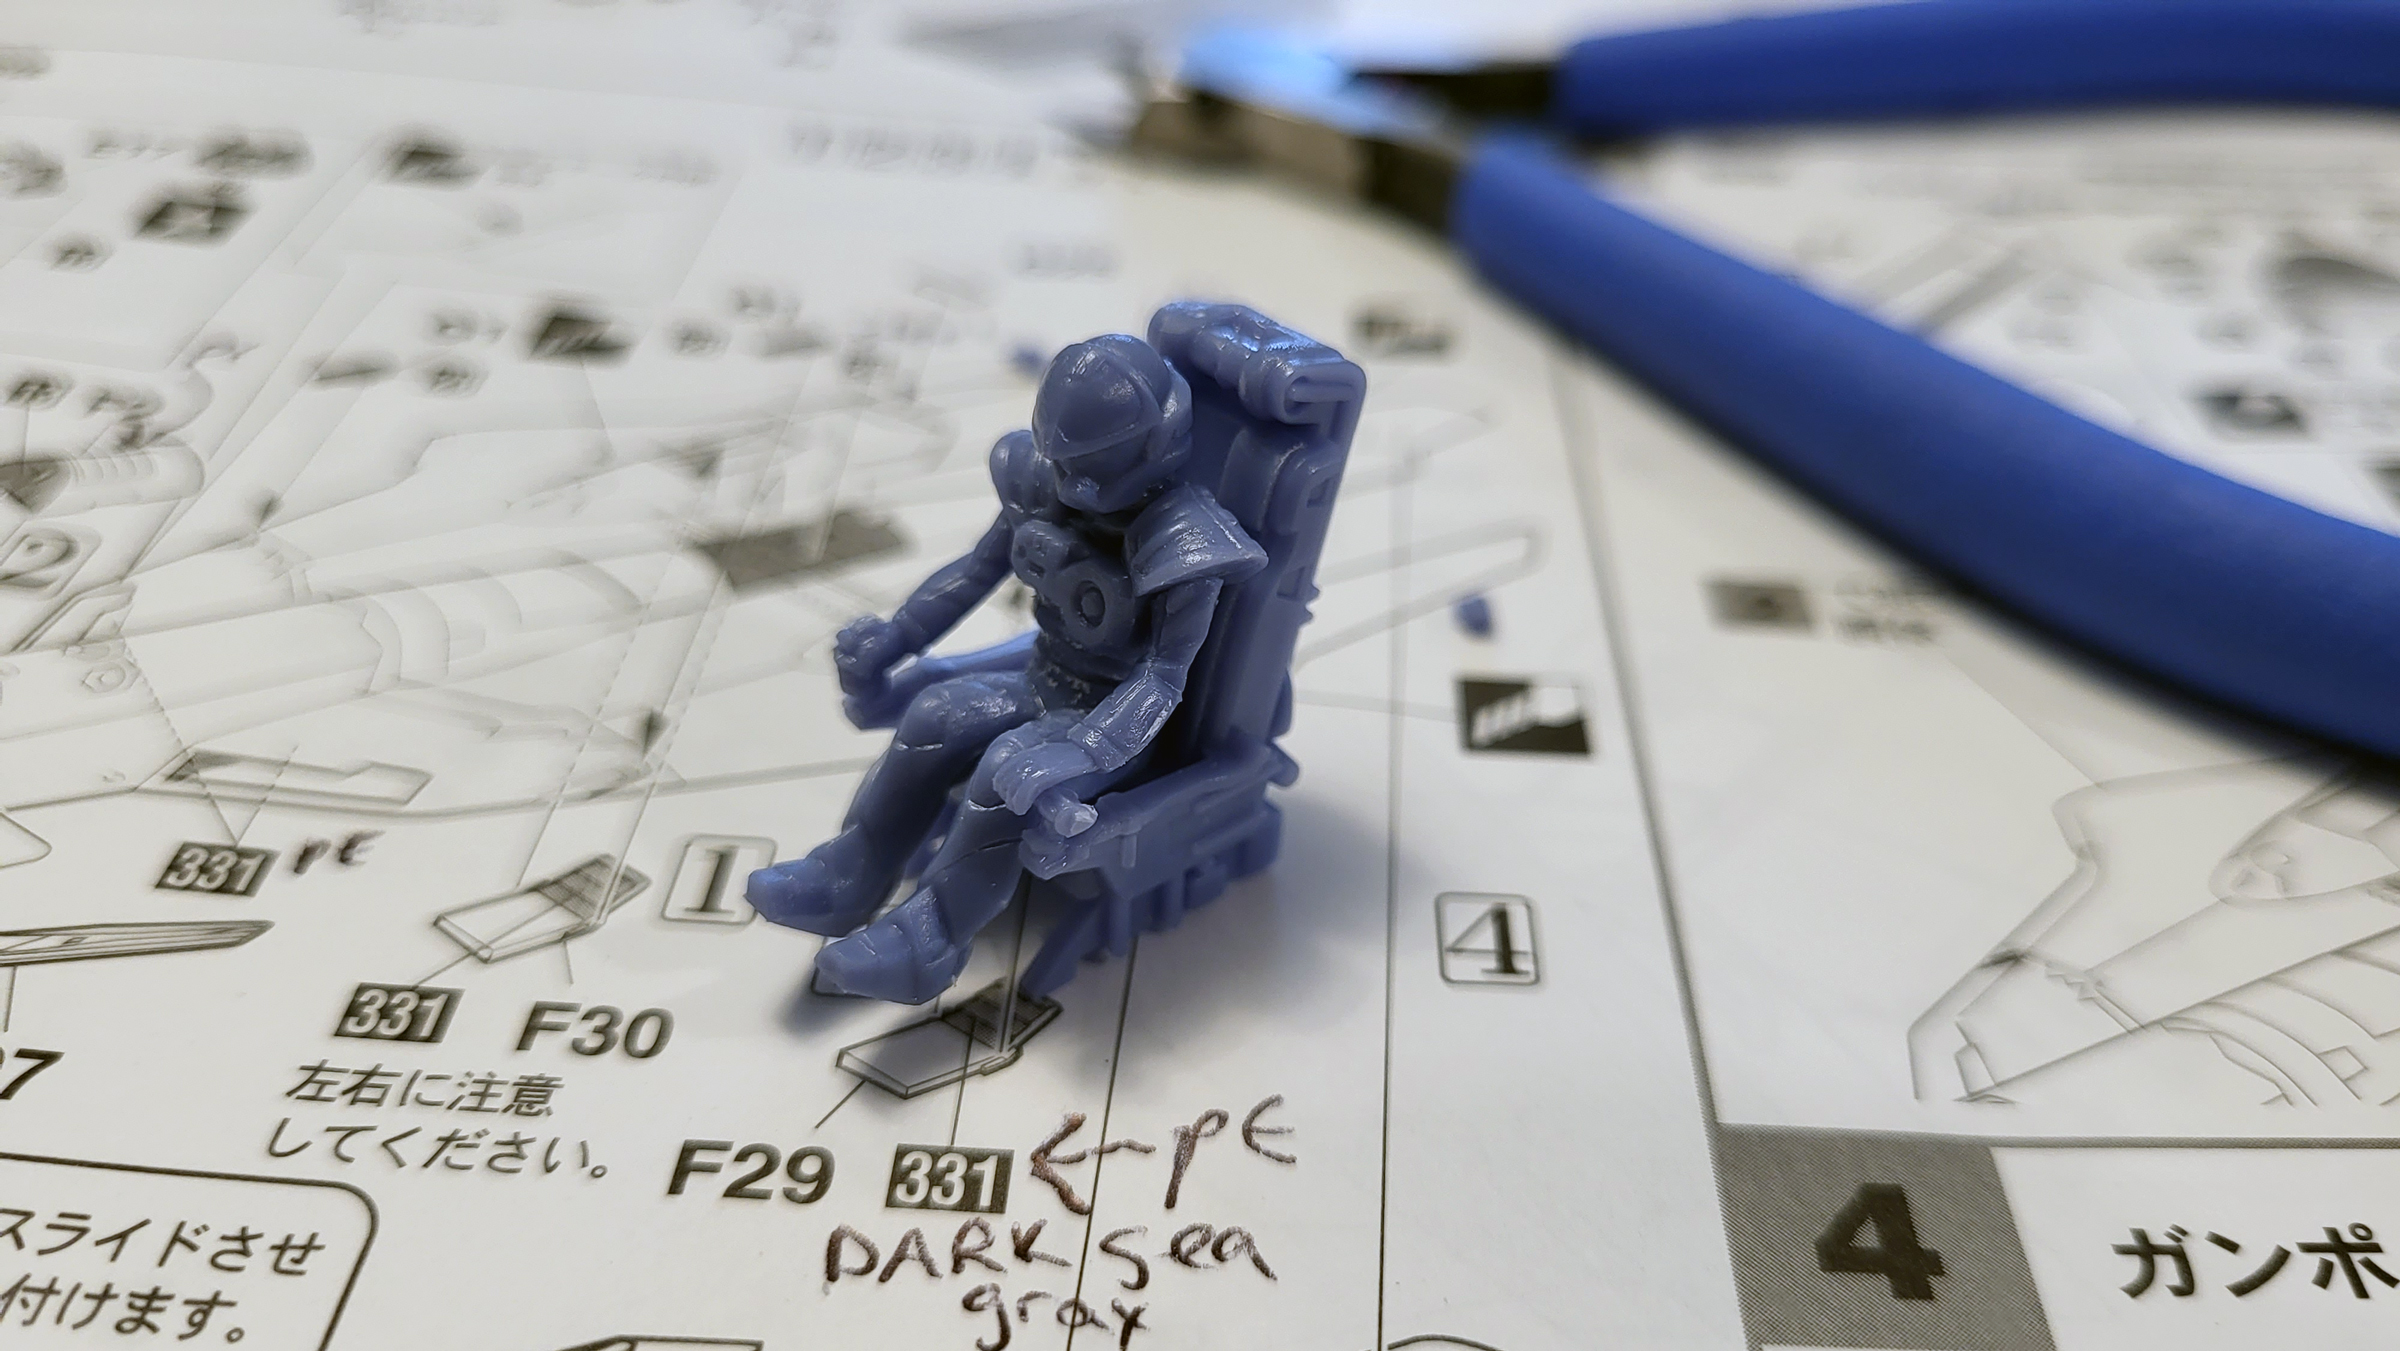
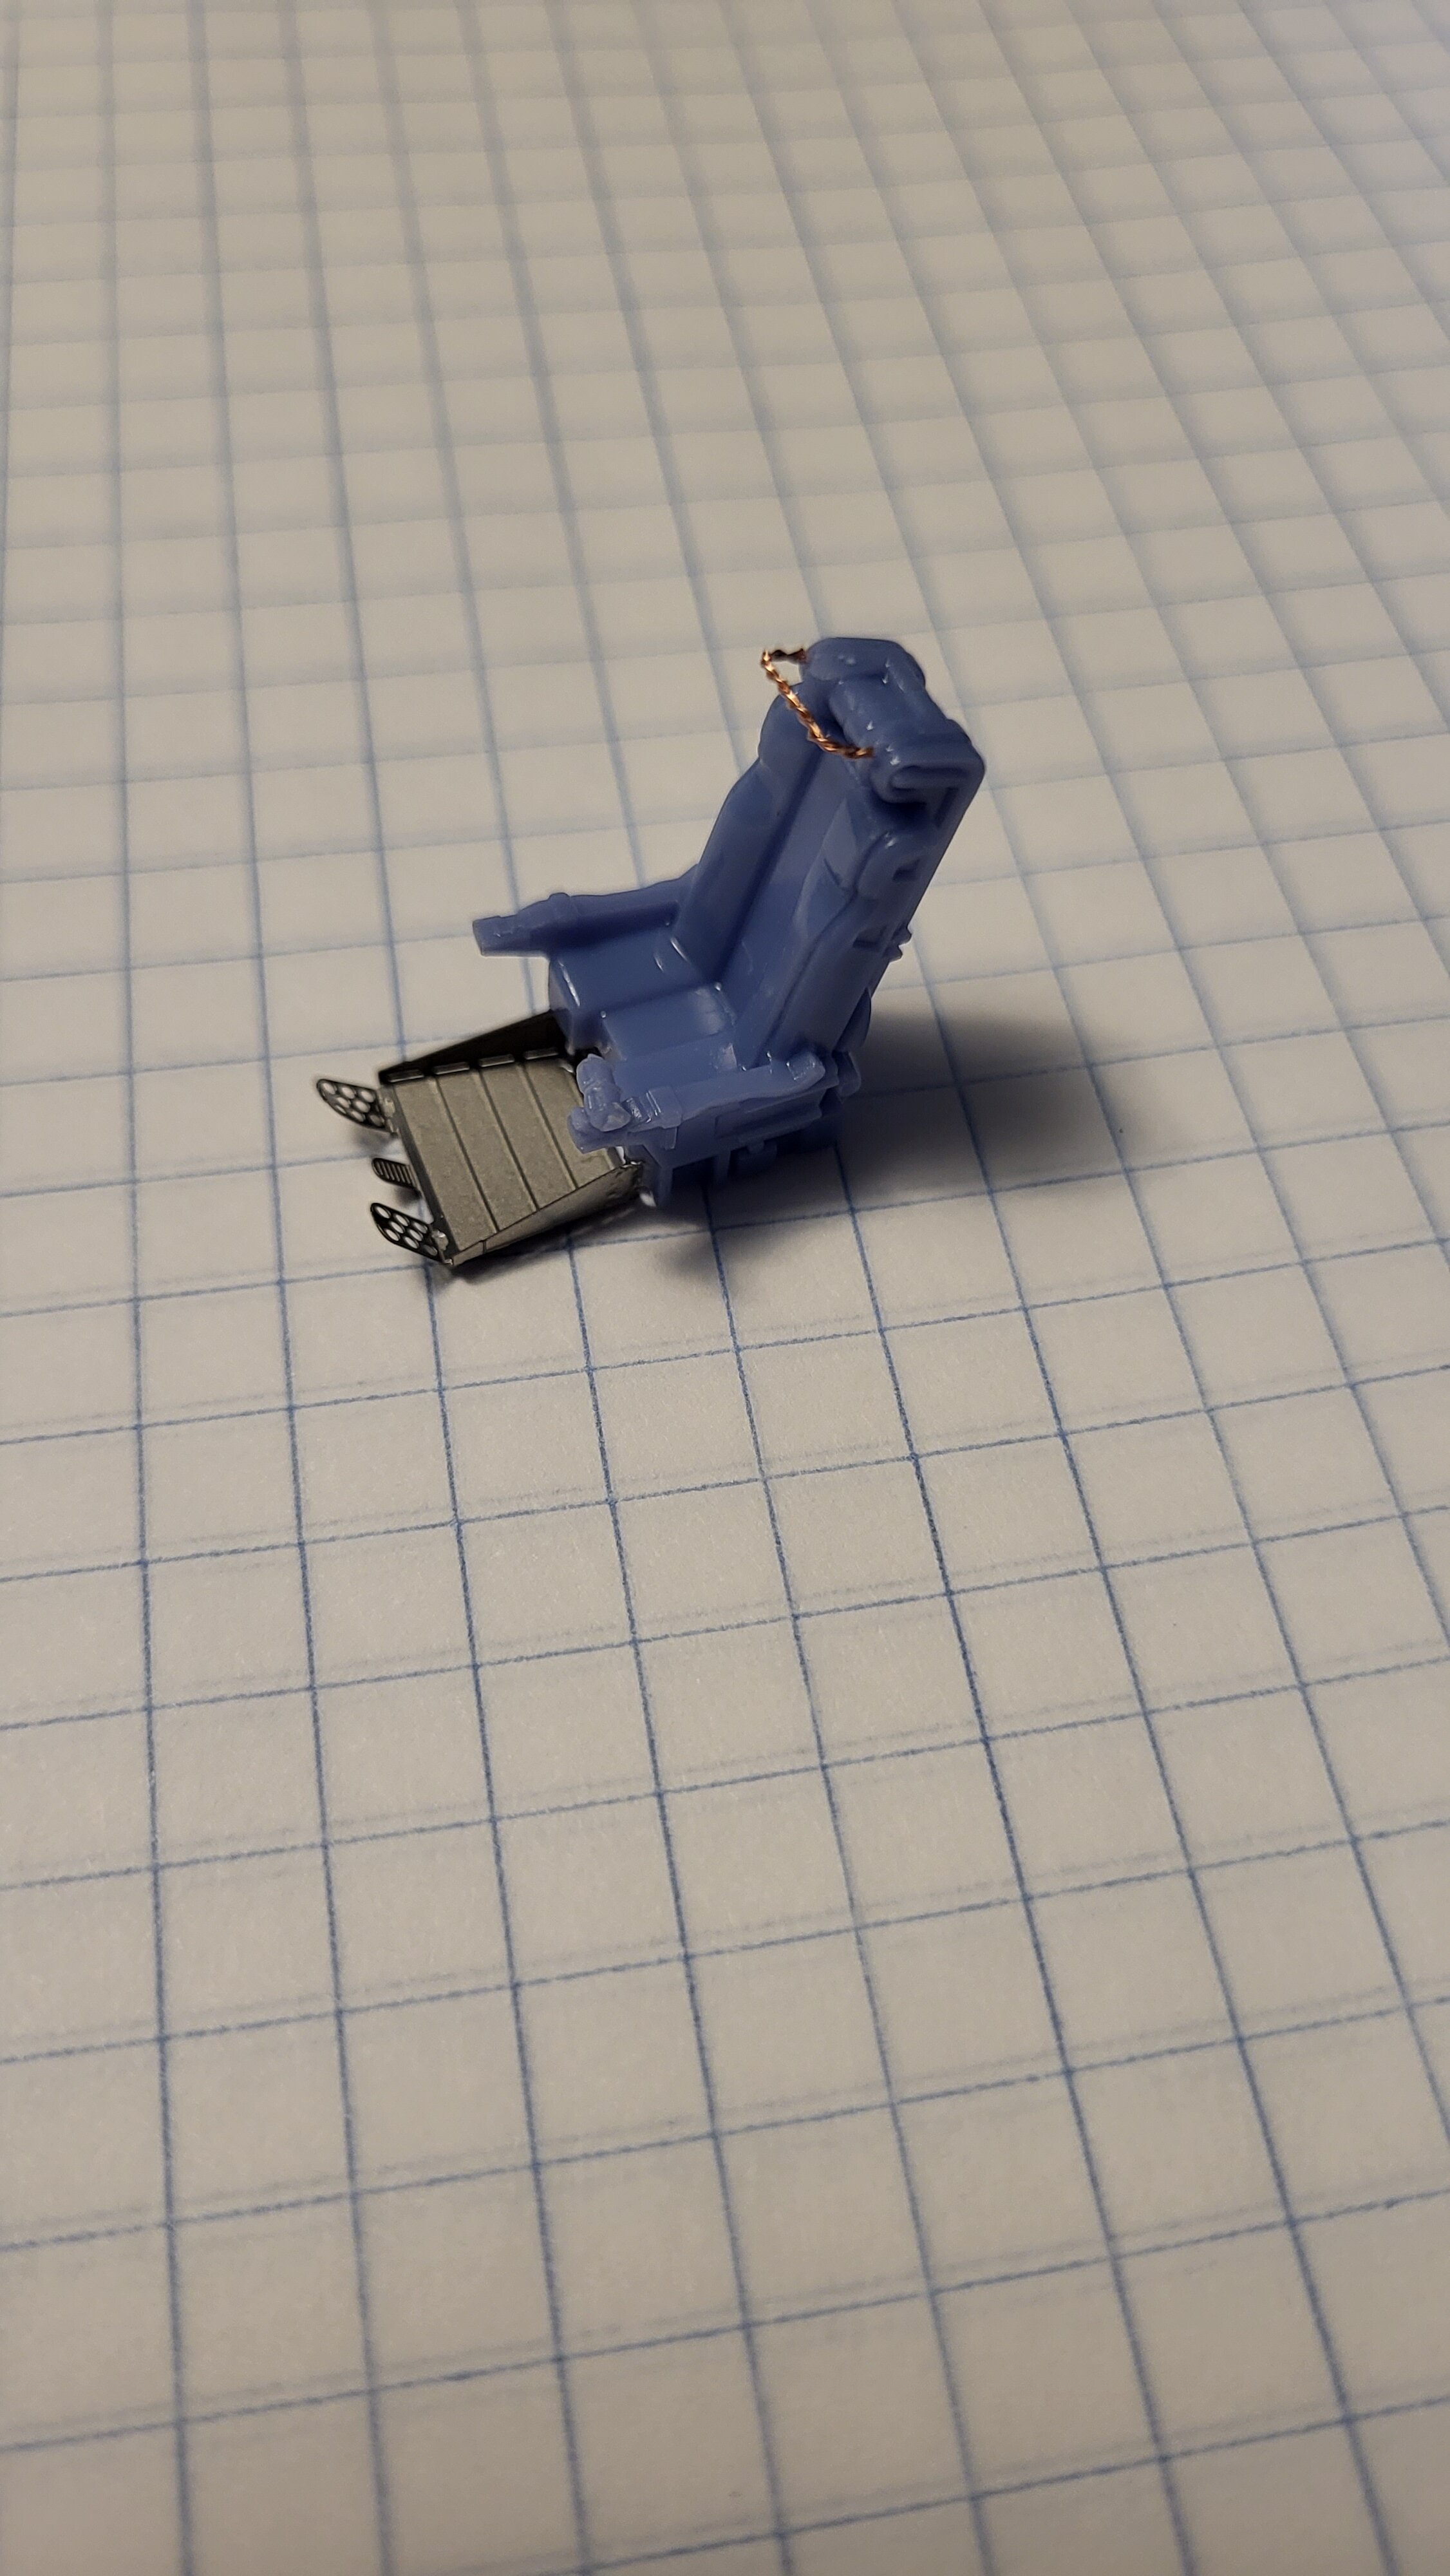
Using some of Hase's own YF-19 photo etch parts for the pedals. They look great but, unfortunately they fit like most aftermarket sets I've worked with a good 3mm away from the pilot's feet. Copper wire was twisted and bent to make the overhead ejection handles. They were shown in some of the scenes/art such as the cover for Macross Plus Movie Edition.
-
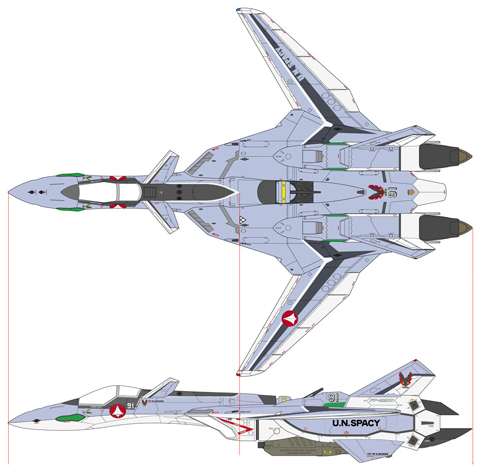
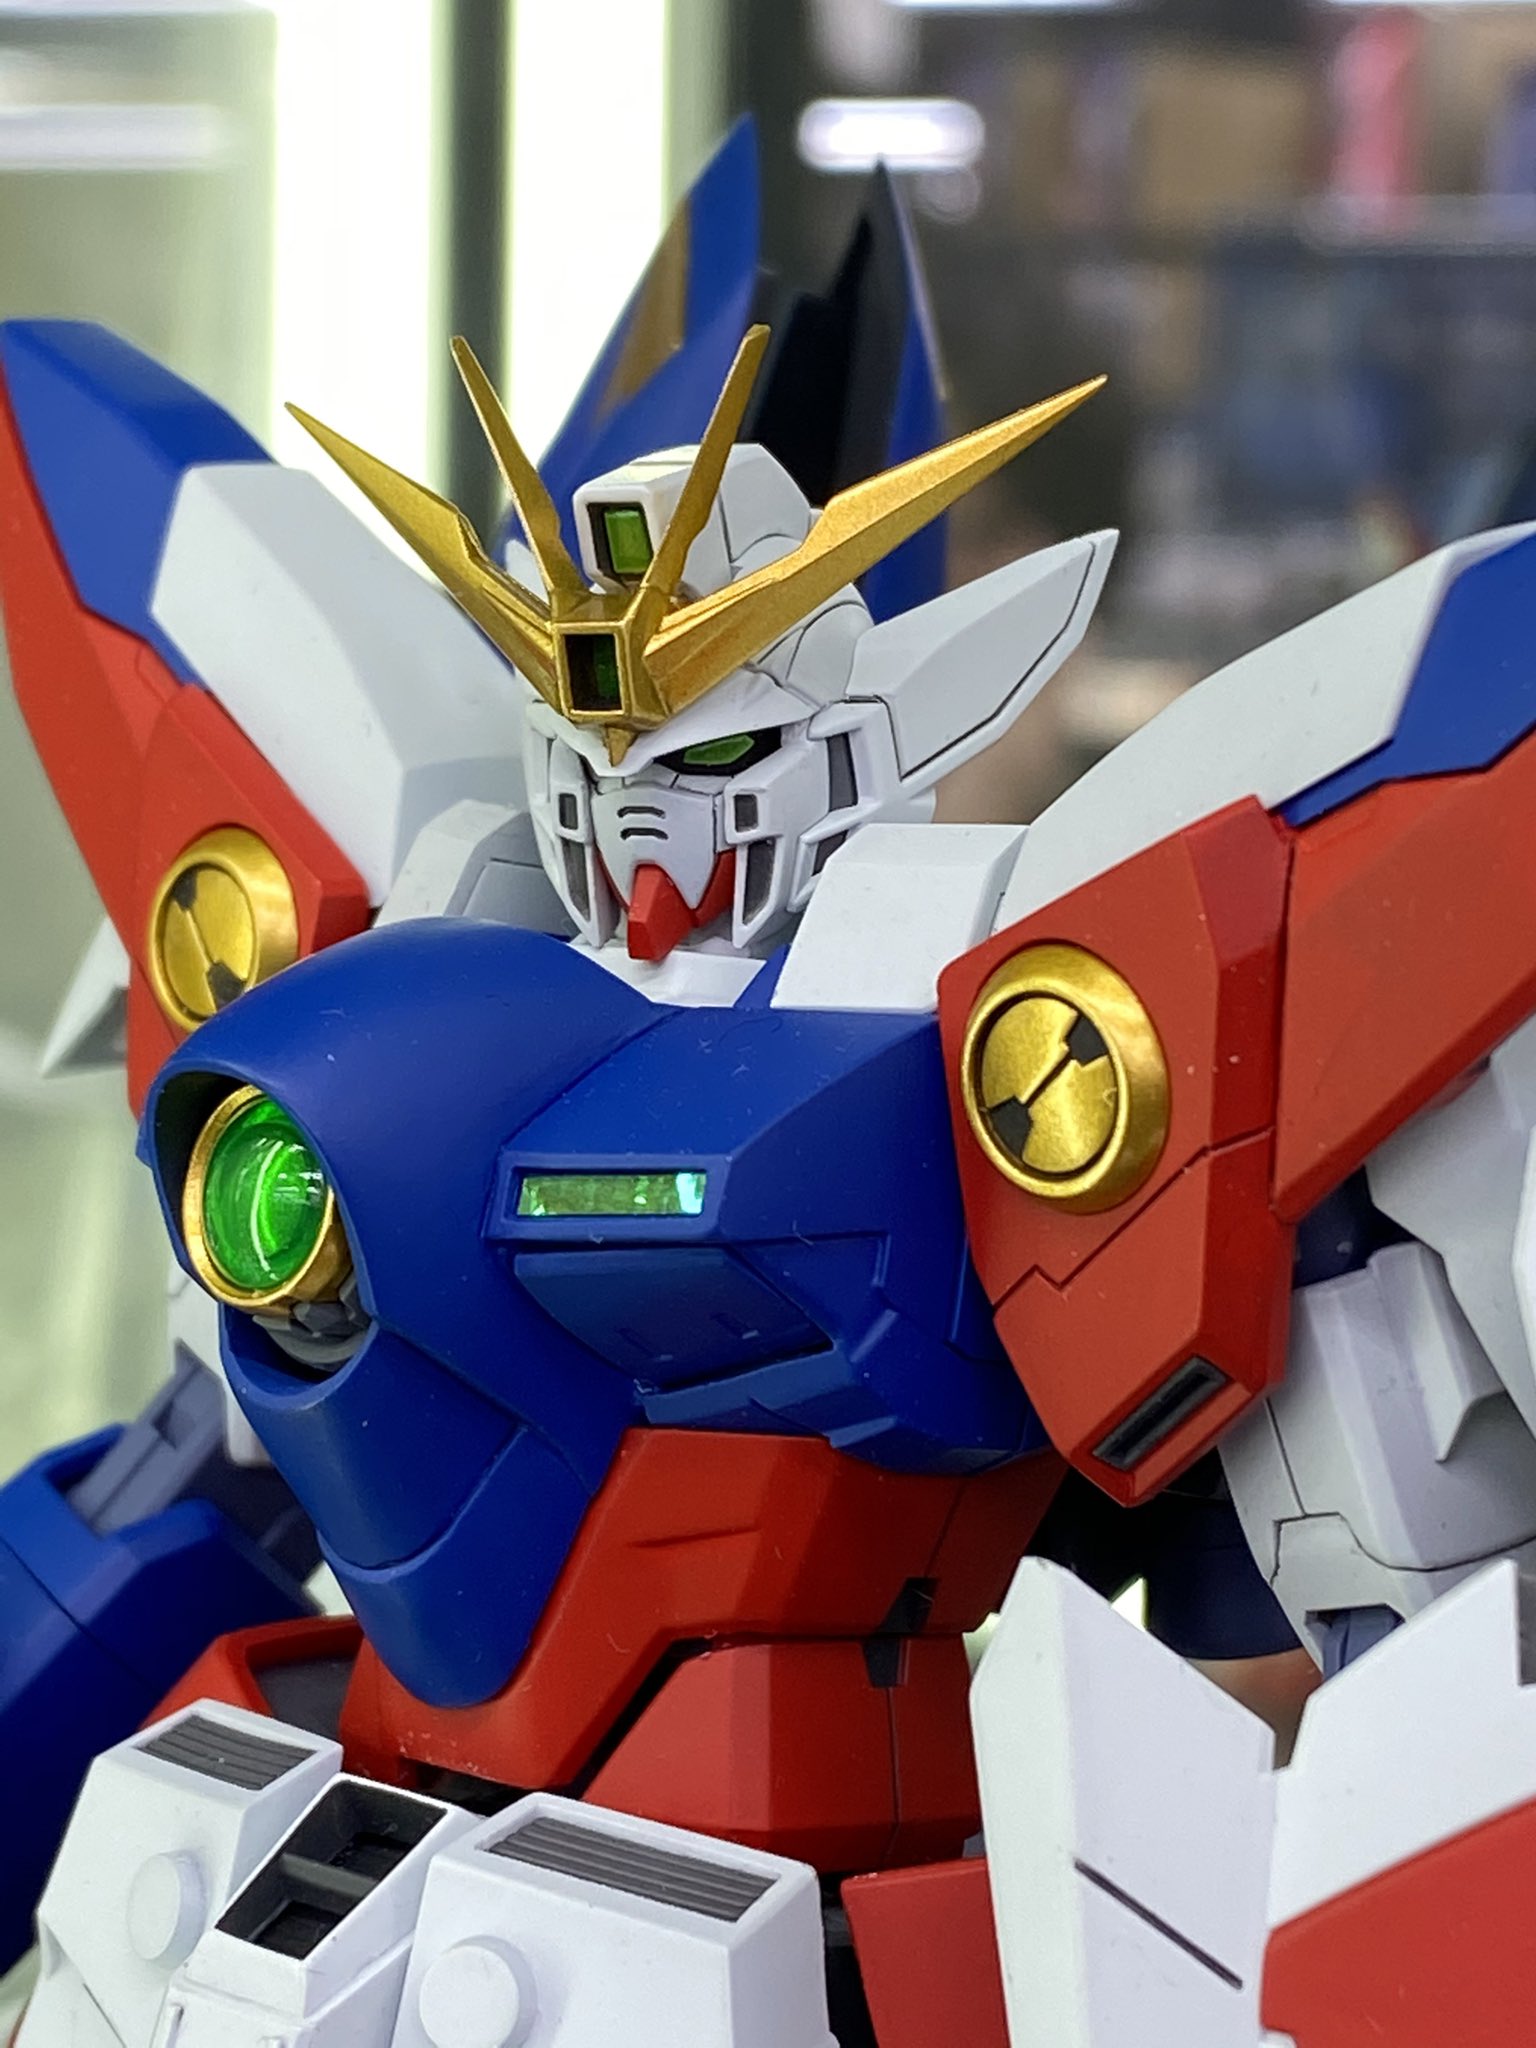
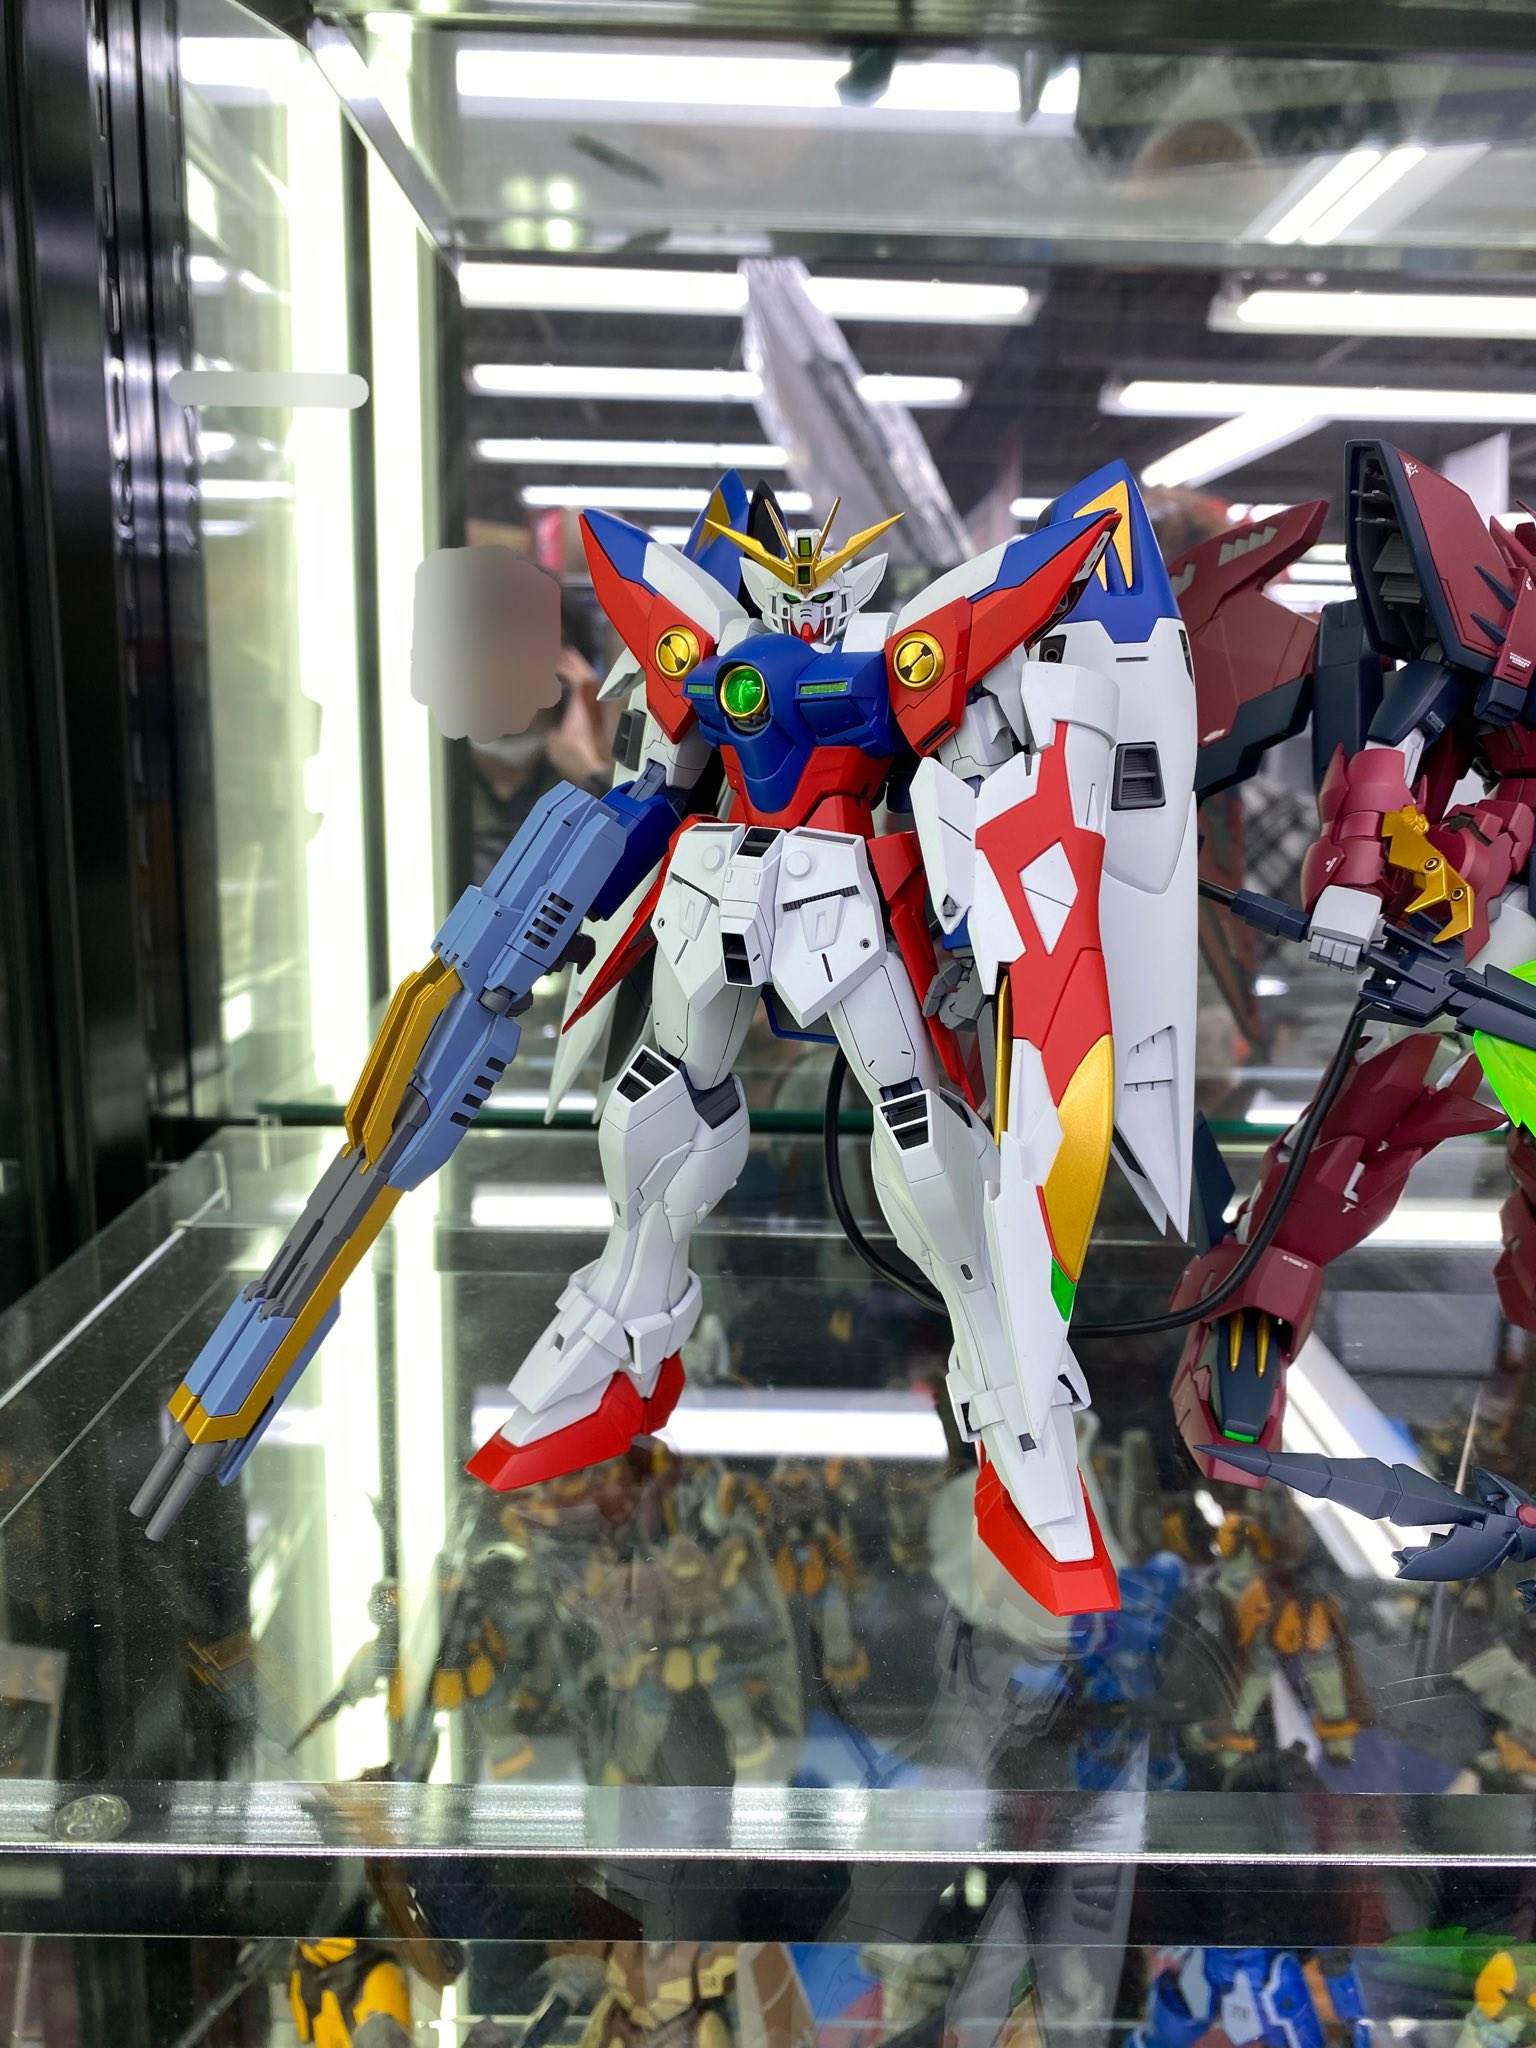
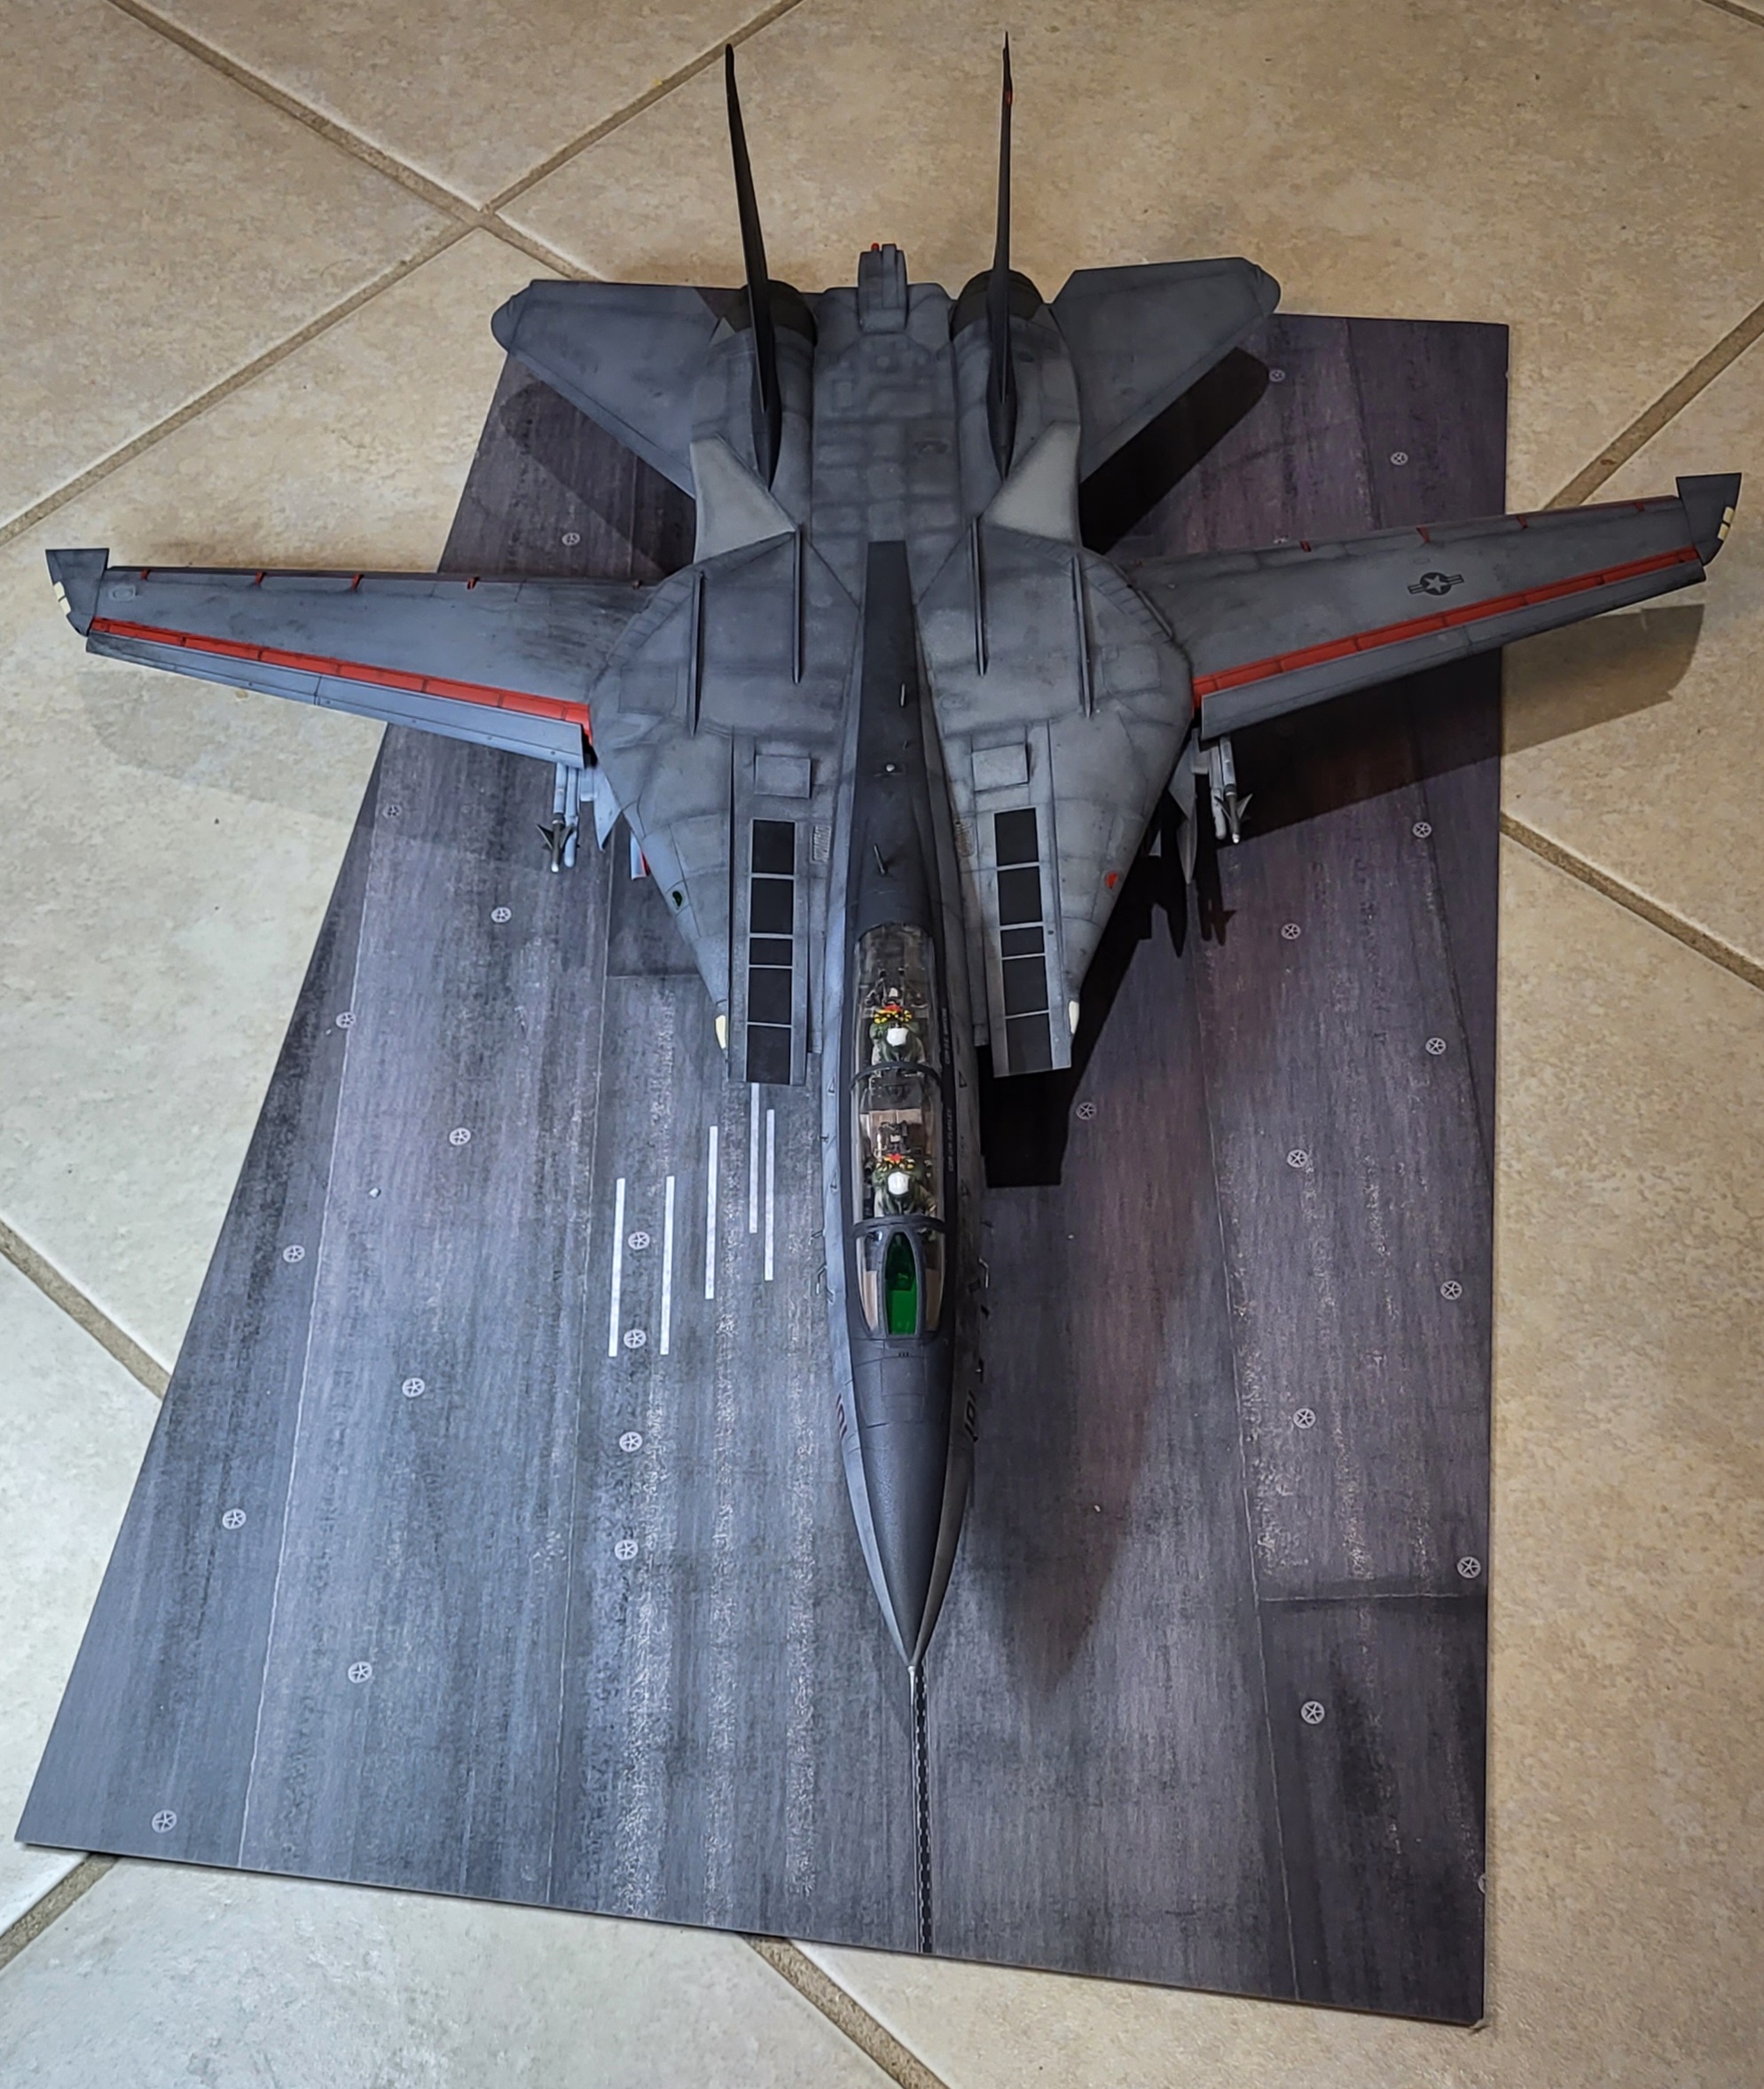
First up Macross build for 2023. The VF-19A Excalibur! This kit is the 2020 re-re-release by Hasegawa. The kit itself is identical to the other VF-19/YF-19 releases with a unique decal set. I originally planned to build this as SV-440 from the VF-19 Master Files but over the few years I've now had the kit, the Macross VF-X2 scheme grew on me. The build itself will be fairly straight forward with only some minor changes and detailing to make it less of a lazy recolor and more fitting to my tastes.
For those not initiated... This VF-19A debuted in the Playstation game Macross VF-X2 Digital Missions. The new story follows the 727th Independent Squadron, the VF-X Ravens' missions a year after Macross 7. This unit was piloted by the Alpha Squadron's newly appointed leader, Aegis Focker.VF-X mission standby... VF-X mission standby... Good luck! Reference images:
-
6 hours ago, Urashiman said:
How are the Jasmine model 1/48 PE parts? I only got the Hasegawa ones.
That is the Hase set. Lol
Honestly not really worth the money IMO, there are a ton of large blank areas where they had opportunity to detail up the kit and didn't.
-
-
28 minutes ago, Urashiman said:
VF-19A and the X-29. Having so much kits in queue at once always feels fun due to the mix and variety. Going to finish priming on the VF-19A and the X-29 soon, and then it will be color coat time.
I too am loving having multiple things on the bench. Quick kits really break up the long projects, speaking of-
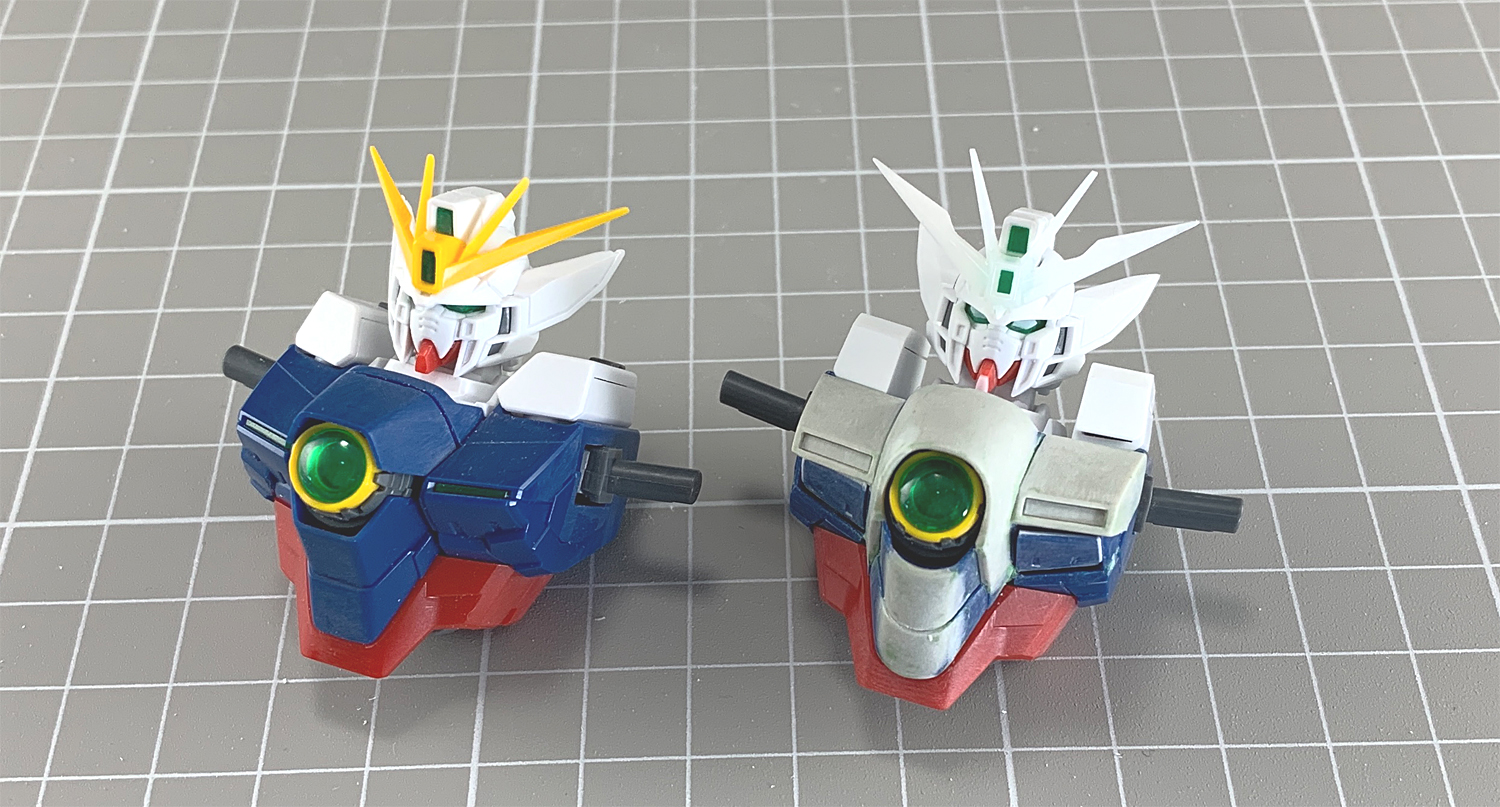
I'm going to join you soon too! Sunday, I got the VF-X2 out of the back log and have been staring at the box all day and playing looking at it. It has been forever since I built the 1/72 YF(VF)-19(a) but, my initial impression of the parts is that the 1/48 literally feels like a scaled up version of the same kit. Originally when I bought it, I was thinking about doing the SV-440 livery from the VF-19 Master File. Sometime between 2021and now the Raven's scheme has grown on me. Very rare for me to paint light blues. Just needed a bit of tweaking to make it a bit more interesting. Here is what I've come up with.
-
39 minutes ago, Bolt said:
Cool. I will eventually be multi kit bashing 1/144 hg's with my son. He has a bunch he's built and i think reimagining them , kit bashed together, would be fun.
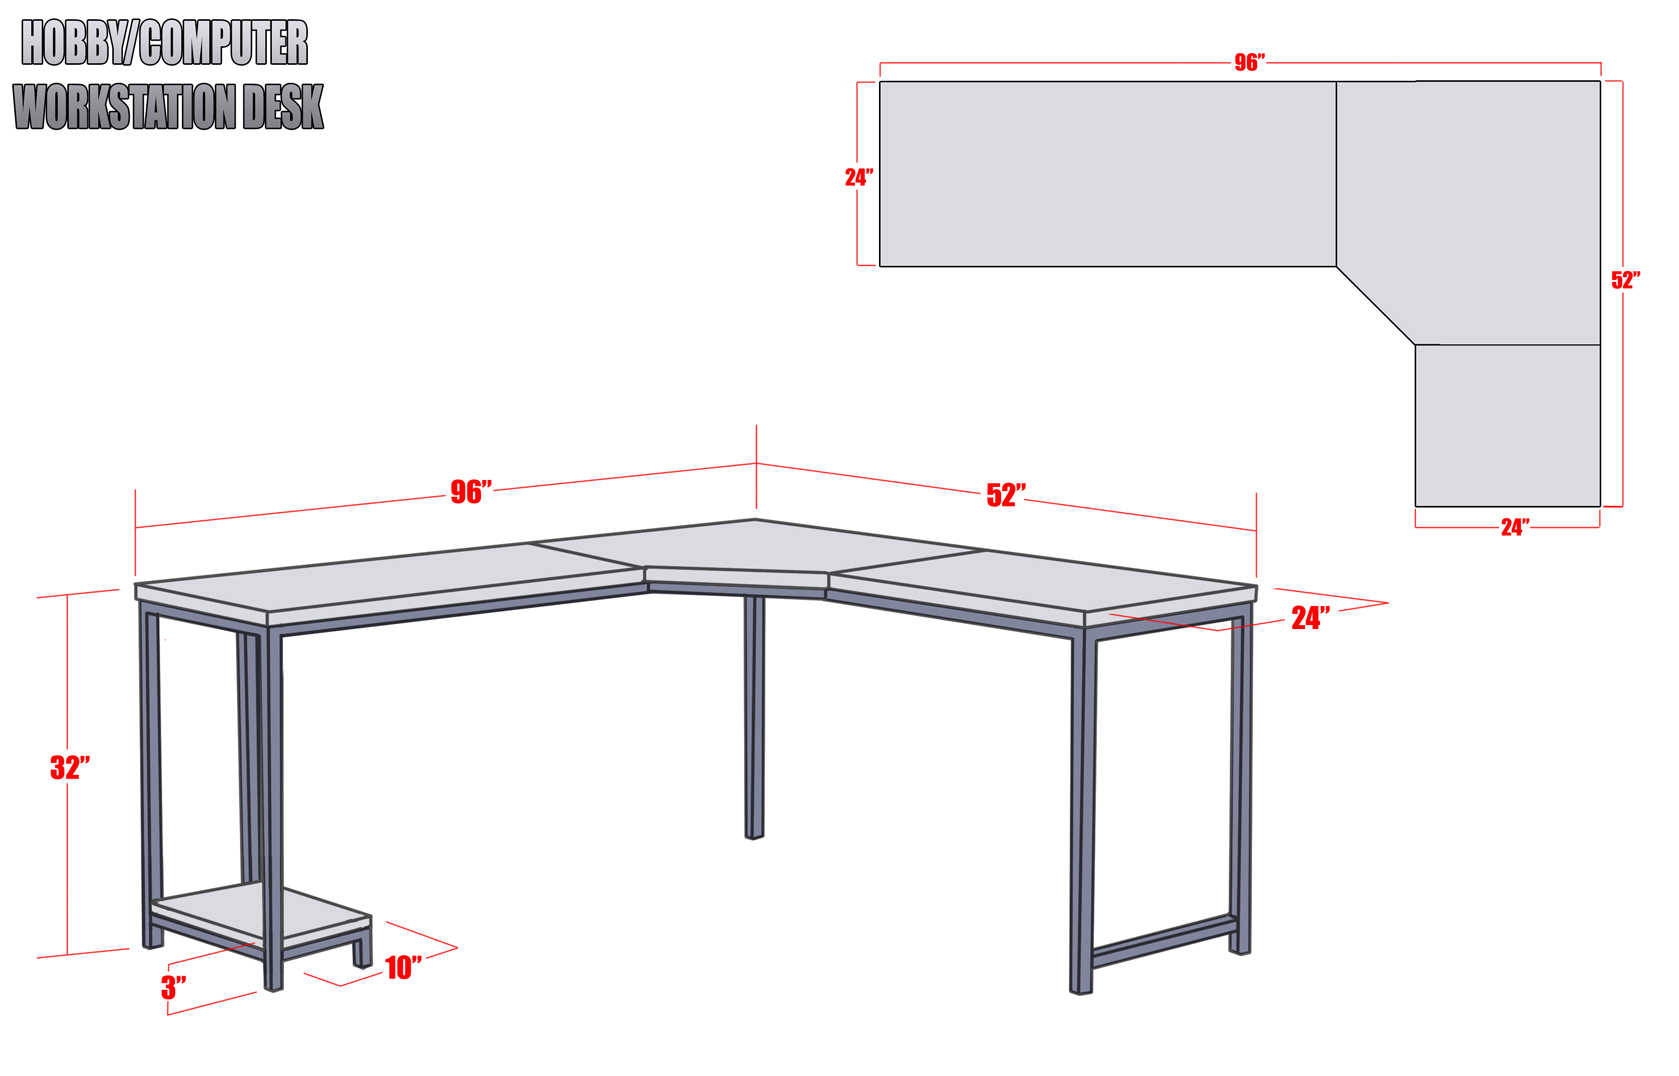
It's ridiculous, the cost of ready built stuff ! As a builder, I always just figure the cost of materials alone. A work bench, as you've shown , should only cost a few hundred in materials. At most.
If this was going in the garage/basement I'd be happy with going to homedepot. But, as-is this will be setup in my office (one of the spare bedrooms) so it does have to look decent.
-
57 minutes ago, MechTech said:
@Rock What country are you in? You may still be able to get your workbench with other options. - MT
America. Here is the last 2 quotes I got based off the dimensions and image I posted in here last.
"For your 2 table options I've broken them down into different finishes for you and different species.-Option 1 would be finished with a 2k polyurethane and would need no maintenance and have a more durable wood. The price for that would be around $4,200 with the top being 3,200 and the legs/frame 1,000.-Option 2 would be finished with Rubio Monocoat and you would have to do some maintenance on it. With the work you are doing on it you would have to probably re-apply a coat of it every 5 or 6 months. The price for that table would be around $3,500 with the top being 2,500 and the legs/frame being 1,000."
If it wasn't winter and the garage packed I'd give DIY a go at it. My next step is to try up kitchen places and see if I can get a countertop to my sizing and build the frame myself. -
@SpacePirateNeko shame the wings warped. Little, battle damage in order to cover it up?
Starting off 23 with a Wing... 4 kits kit-bashed into 1. AKA: clearing some old backlog.
Also got quotes on my workbench in... I've got to figure out a different solution. The cheapest is around $4200 USD!!!! I had a budget of closer to > $1200. sigh
-
21 hours ago, no3Ljm said:
Good to know. I haven't been to his site for years now. Last time I visited was probably mid-2010's. I used to love his customed MG Freedom's and RX-78's. Yeah, he's a big influence but sad to say my Gunpla days really didn't took off.
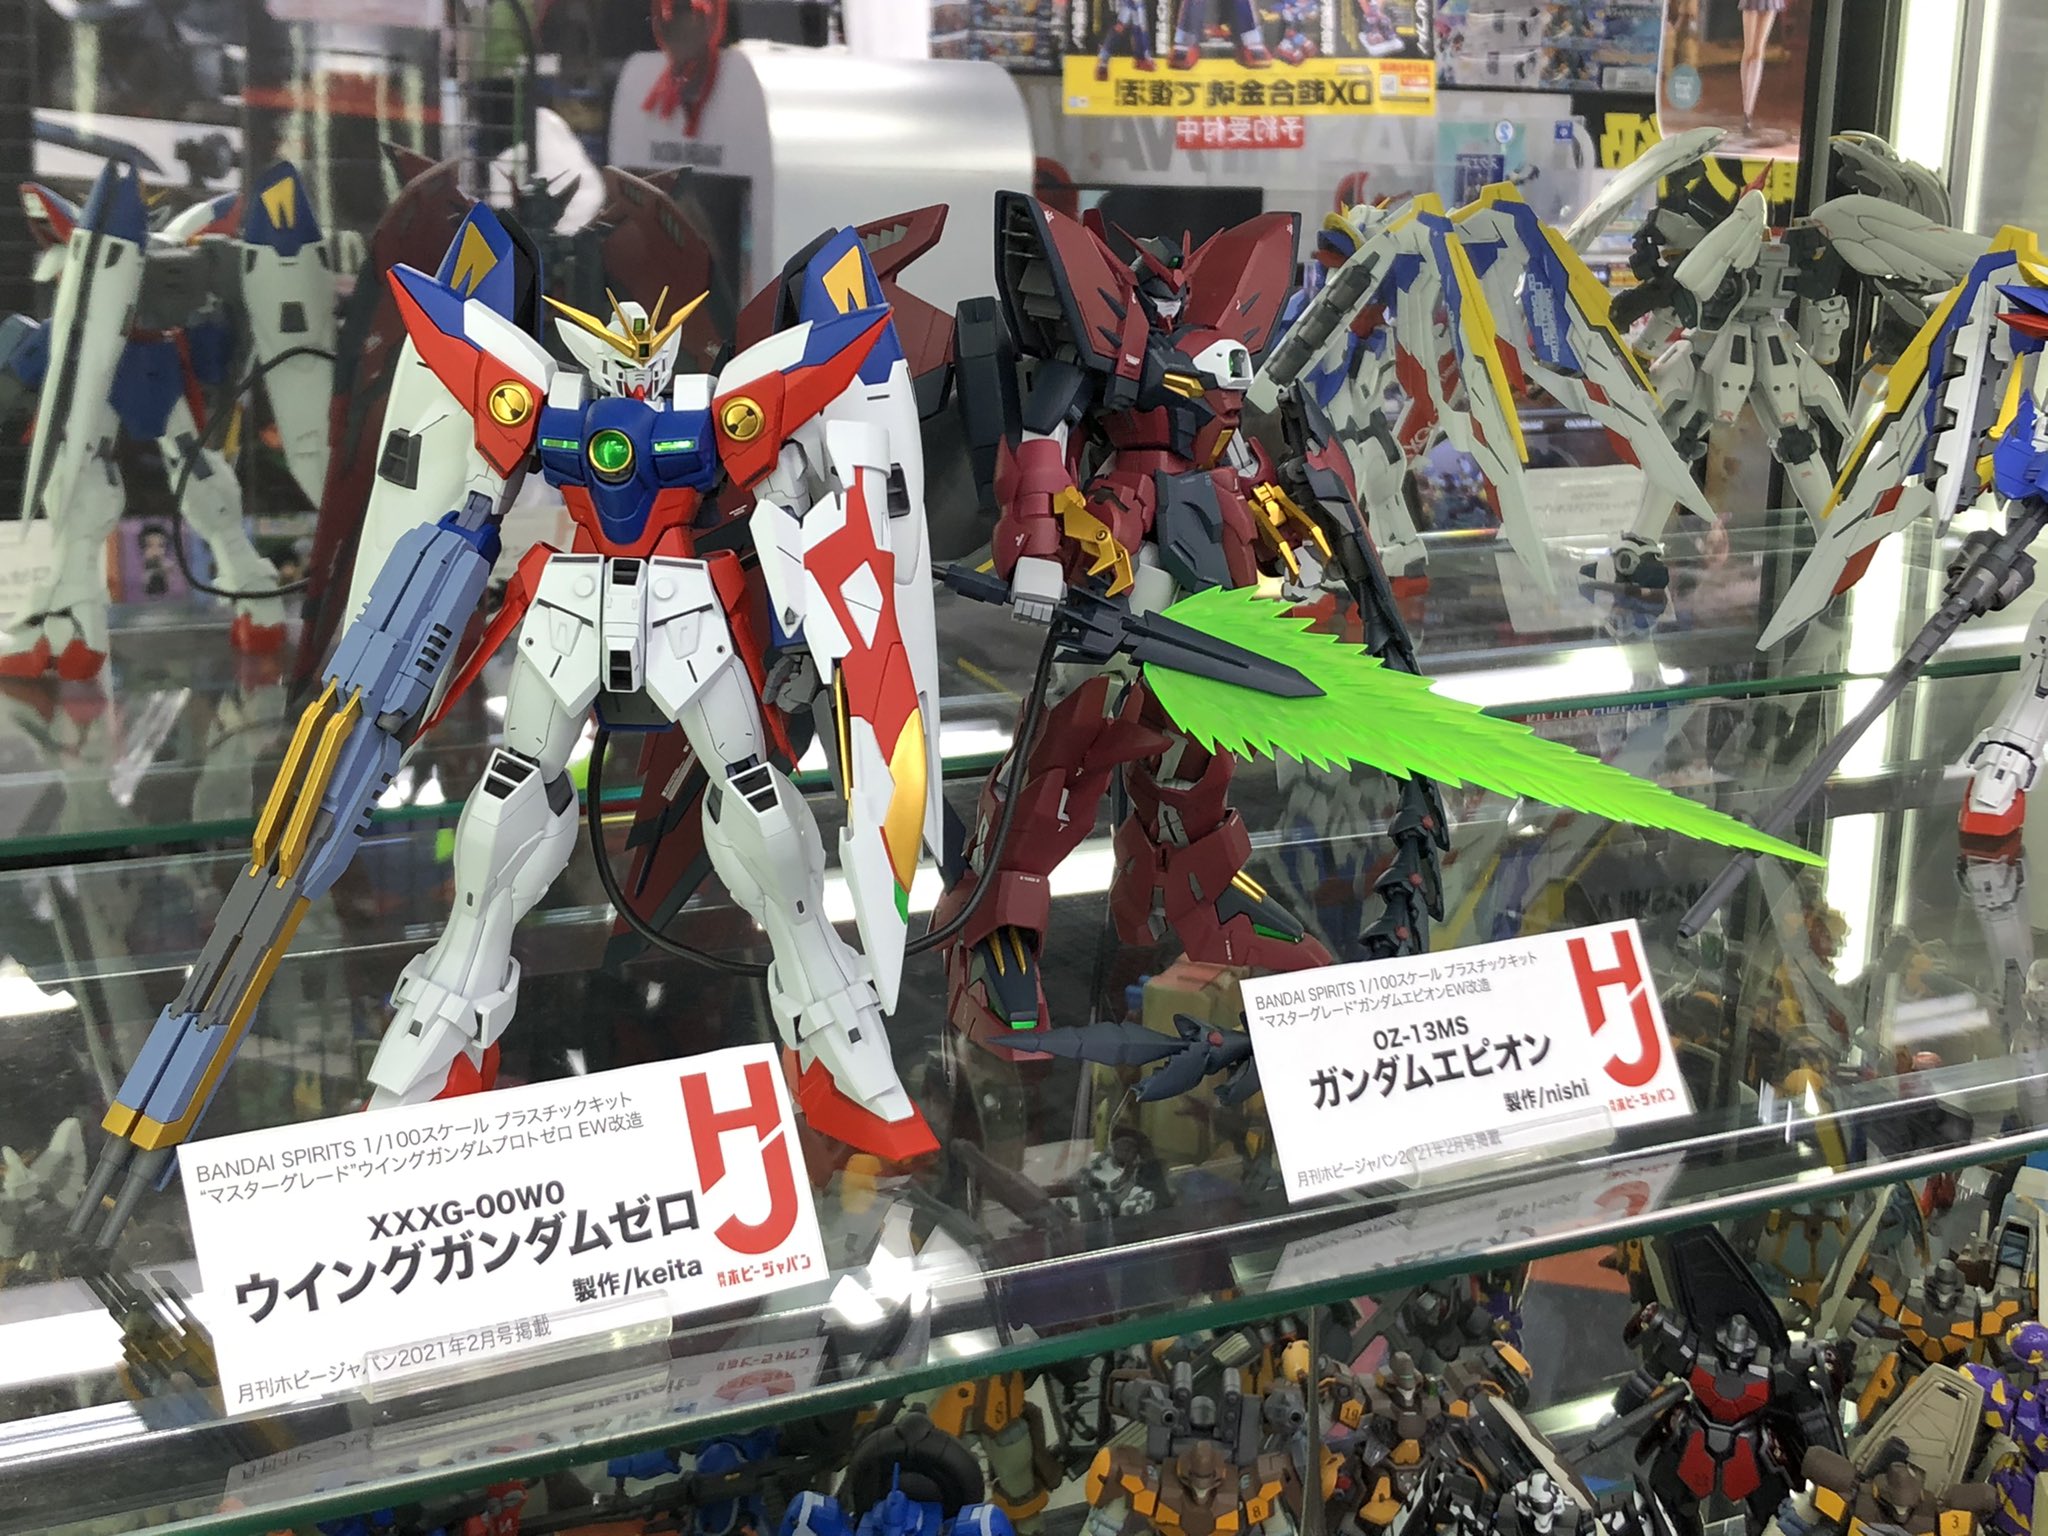
Here is one of his more recent, more involved works from last year. Converted the MG Proto Zero into the original TV design to go along side Nishi's TV styled Epyon.
-
1 hour ago, no3Ljm said:
I agree. It actually reminds me of those custom SD kits that Keita (WonderExcellence) used to do.
Fixed for yah.

Keita still builds he just does a few exclusively for Hobby Japan these days, leave the site with nothing. Sucks as he was a huge influence to me starting out. But that is getting more common for a lot of JP modelers. Quite a few go big winning things like Oro-Zaku championship of BAKUC (pre-GBWC) and disappear only to re-tweet their highlight reel from 10 years ago.
-
My workbench is on my workbench... Inception!
Talking with a few builders to see if I can get a custom desk done so I can ramp things up and not resort to the dining room table. Time to put on the afterburners!
-
@derex3592 I bought one too that should be here sometime soon. I went with the ivation because I thought it looked big enough to fit a base with a ton of alligator clips on it upright inside. I look forward to being able to cure enamels and oil paints in a few hours! I am curious to see it it effects masking tape if left on inside.
-
Bench cleared!
Few issues. Canopy popped someyime while painting. Glue held but, it is slightly raised on the corner. Secondly, got a better feel on shading these birds, just need to get a bit more comfortable with highlighting instead of replying somly on filters and preshading. I also need to spend a bit more time with decaling. I've had the process down but, painting OVER them and such is mixed. For example after 2 topcoats and doing a white/black dot filter you can see how the filter still managed to find the decals edges and react differently. Maybe mineralspirits is too strong for the acrylics/laquer topcoats.
I feel I hit a lot of my hobby goals in 2022... yeah still don't finish much but, I really wanted to break away from clean, solid paint jobs that 20 years of gunpla will do to 'ya. Really focused on improving my ground work (putty/primer,) moving away from grabbing that rattle can when to lazy to pull out the airbrush. Lastly a large goal of not buying every damn kit in sight! At one point I can say I had over 21 models of Wing Zero... lol
Anyways One more Tamiya cat left to go!
See you all next year!
-
That feeling when it is the dead of night.
When the only sound heard is audible sigh of relief,
As the end is finally in sight.
-
-
Prime1's new Powermaster Optimus statue @9:10
-
1 hour ago, MechTech said:
MERRY CHRISTMAS EVERYONE!
It's not snow, but this is how cold it was yesterday (and only that cold next to the window indoors):
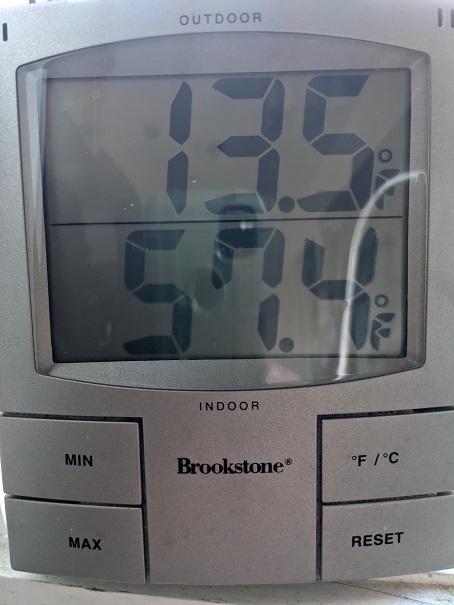
Same boat. (-1F currently with a high of +2F in a few hours.) I've been debating if I want to pop outside real quick and risk trying to topcoat my build today so I can get some more progress in.
-
-
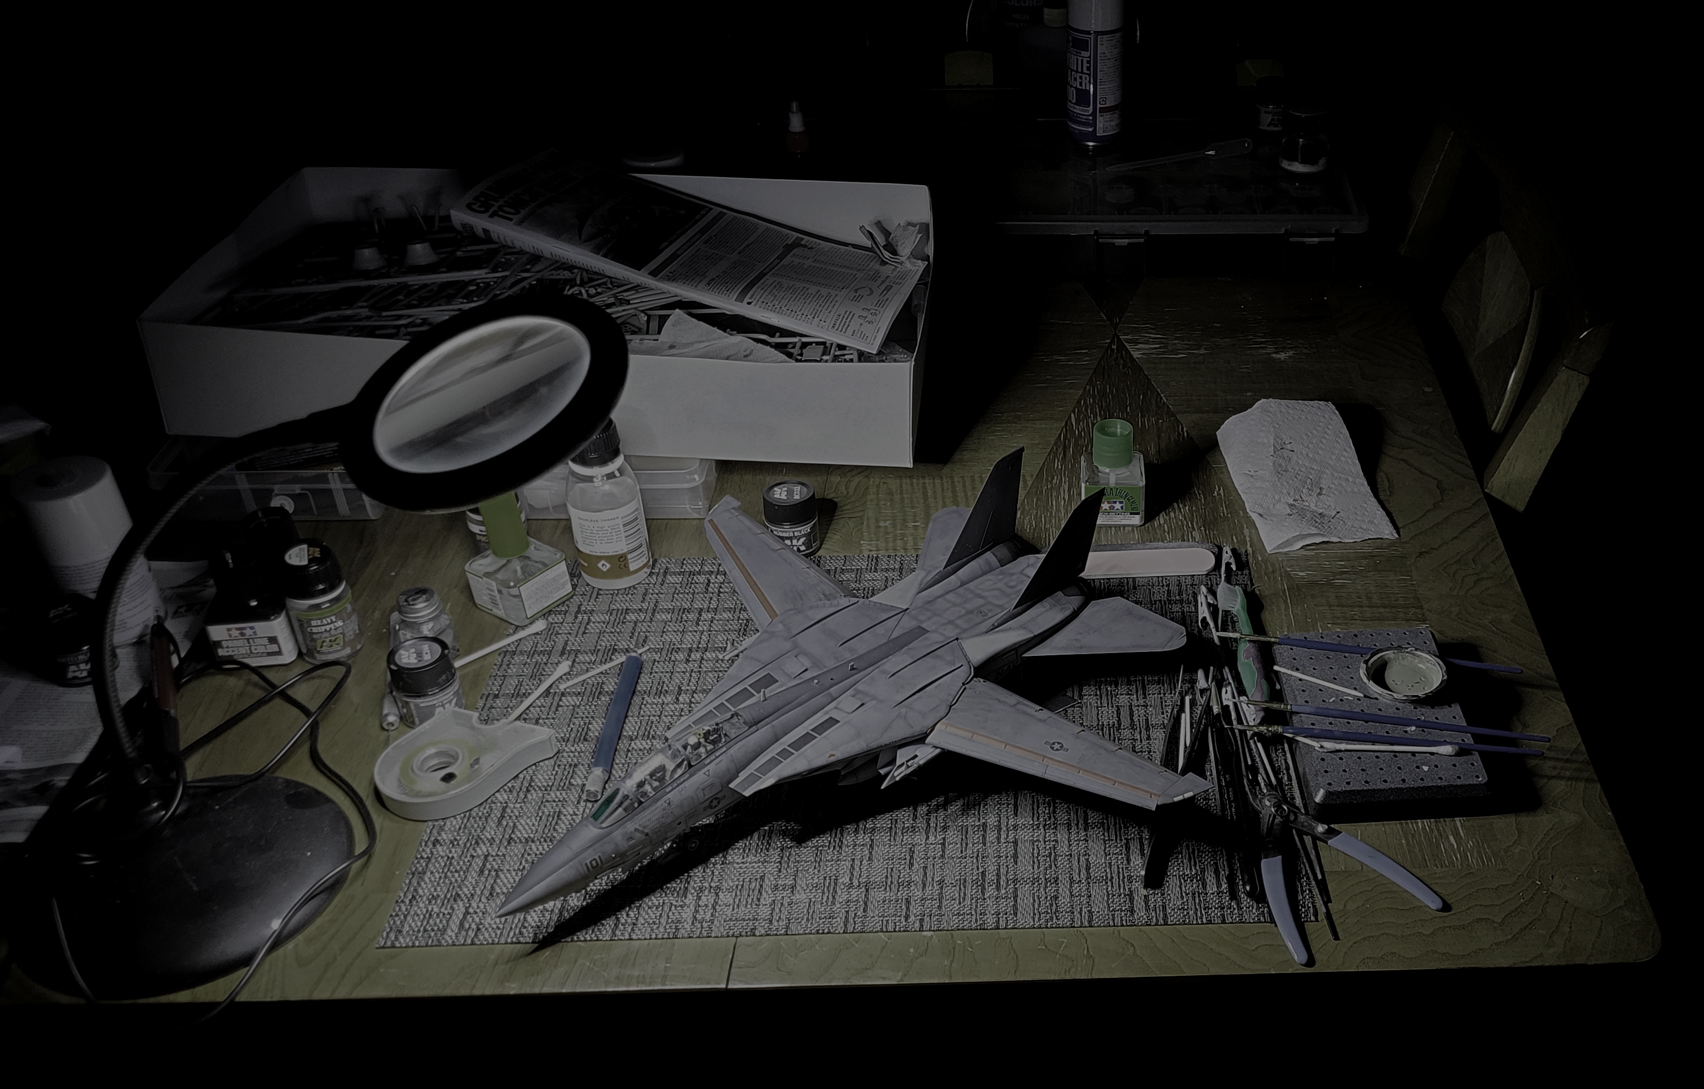
When outside is below 0F, we build, wheels down in 20! Seeing the little bits contrast the Light Ghost is really rejuvenating. Still dreading the ordnance's repetition to come. Must be done before she gets some oil.
-
On 12/11/2022 at 6:48 AM, Urashiman said:
Yeah, they are paper thin and bend around. Light coming through easily. Have to make them thicker to prevent the warping.
Really the answer is simply. You just need to scale it up to 1/48!

-
1 hour ago, Big s said:
Saw the special and it’s pretty fun for a little holiday thing, but like said above it’s not a necessary watch. It was far more entertaining than She Hulk and at the 45 minute runtime, it doesn’t overstay its welcome. I have the same question as mog
I may have missed a detail in one of the films or something where she took off or something. It’s getting a bit hard to keep track of everything these days. I don’t think she was in the recent Thor movie either
She 'left' in Avengers Endgame, she's not coming back.
-
1 hour ago, derex3592 said:
Yesterday's lesson in ship rigging lines ..... I tried yesterday to attach EZ Line to the deck from the smokestacks with just superglue and tweezers. That didn't go well and I was frustrated with myself and ended up with tiny ugly mounds of CA glue which I have now attempted to paint over. From the side view or at arms length you can't see them. Whatever. This morning I decided to build a better mousetrap!!! Tamiya tape and bluetack putty for the win. 🤣
This is the exact reason I avoid P.E. parts. It happens Ever. Single. Time. for me. Have you tried a PE applicator like a looper? I find them to be a little bit better than a toothpick. I've been working on trying other products. I know for rigging a lot use glues similar to white glue. I've been experimenting with Ammo/Mig's Clear Acrylic 'Ultra Glue' which is for Etch, canopies and rigging. For rigging I've also read that adding a drop of water/dish soap to the line changes the properties allowing the glue to soak more into the line.
1/48 VF-19A Excalibur [VF-X RAVENS]
in The Workshop!
Posted
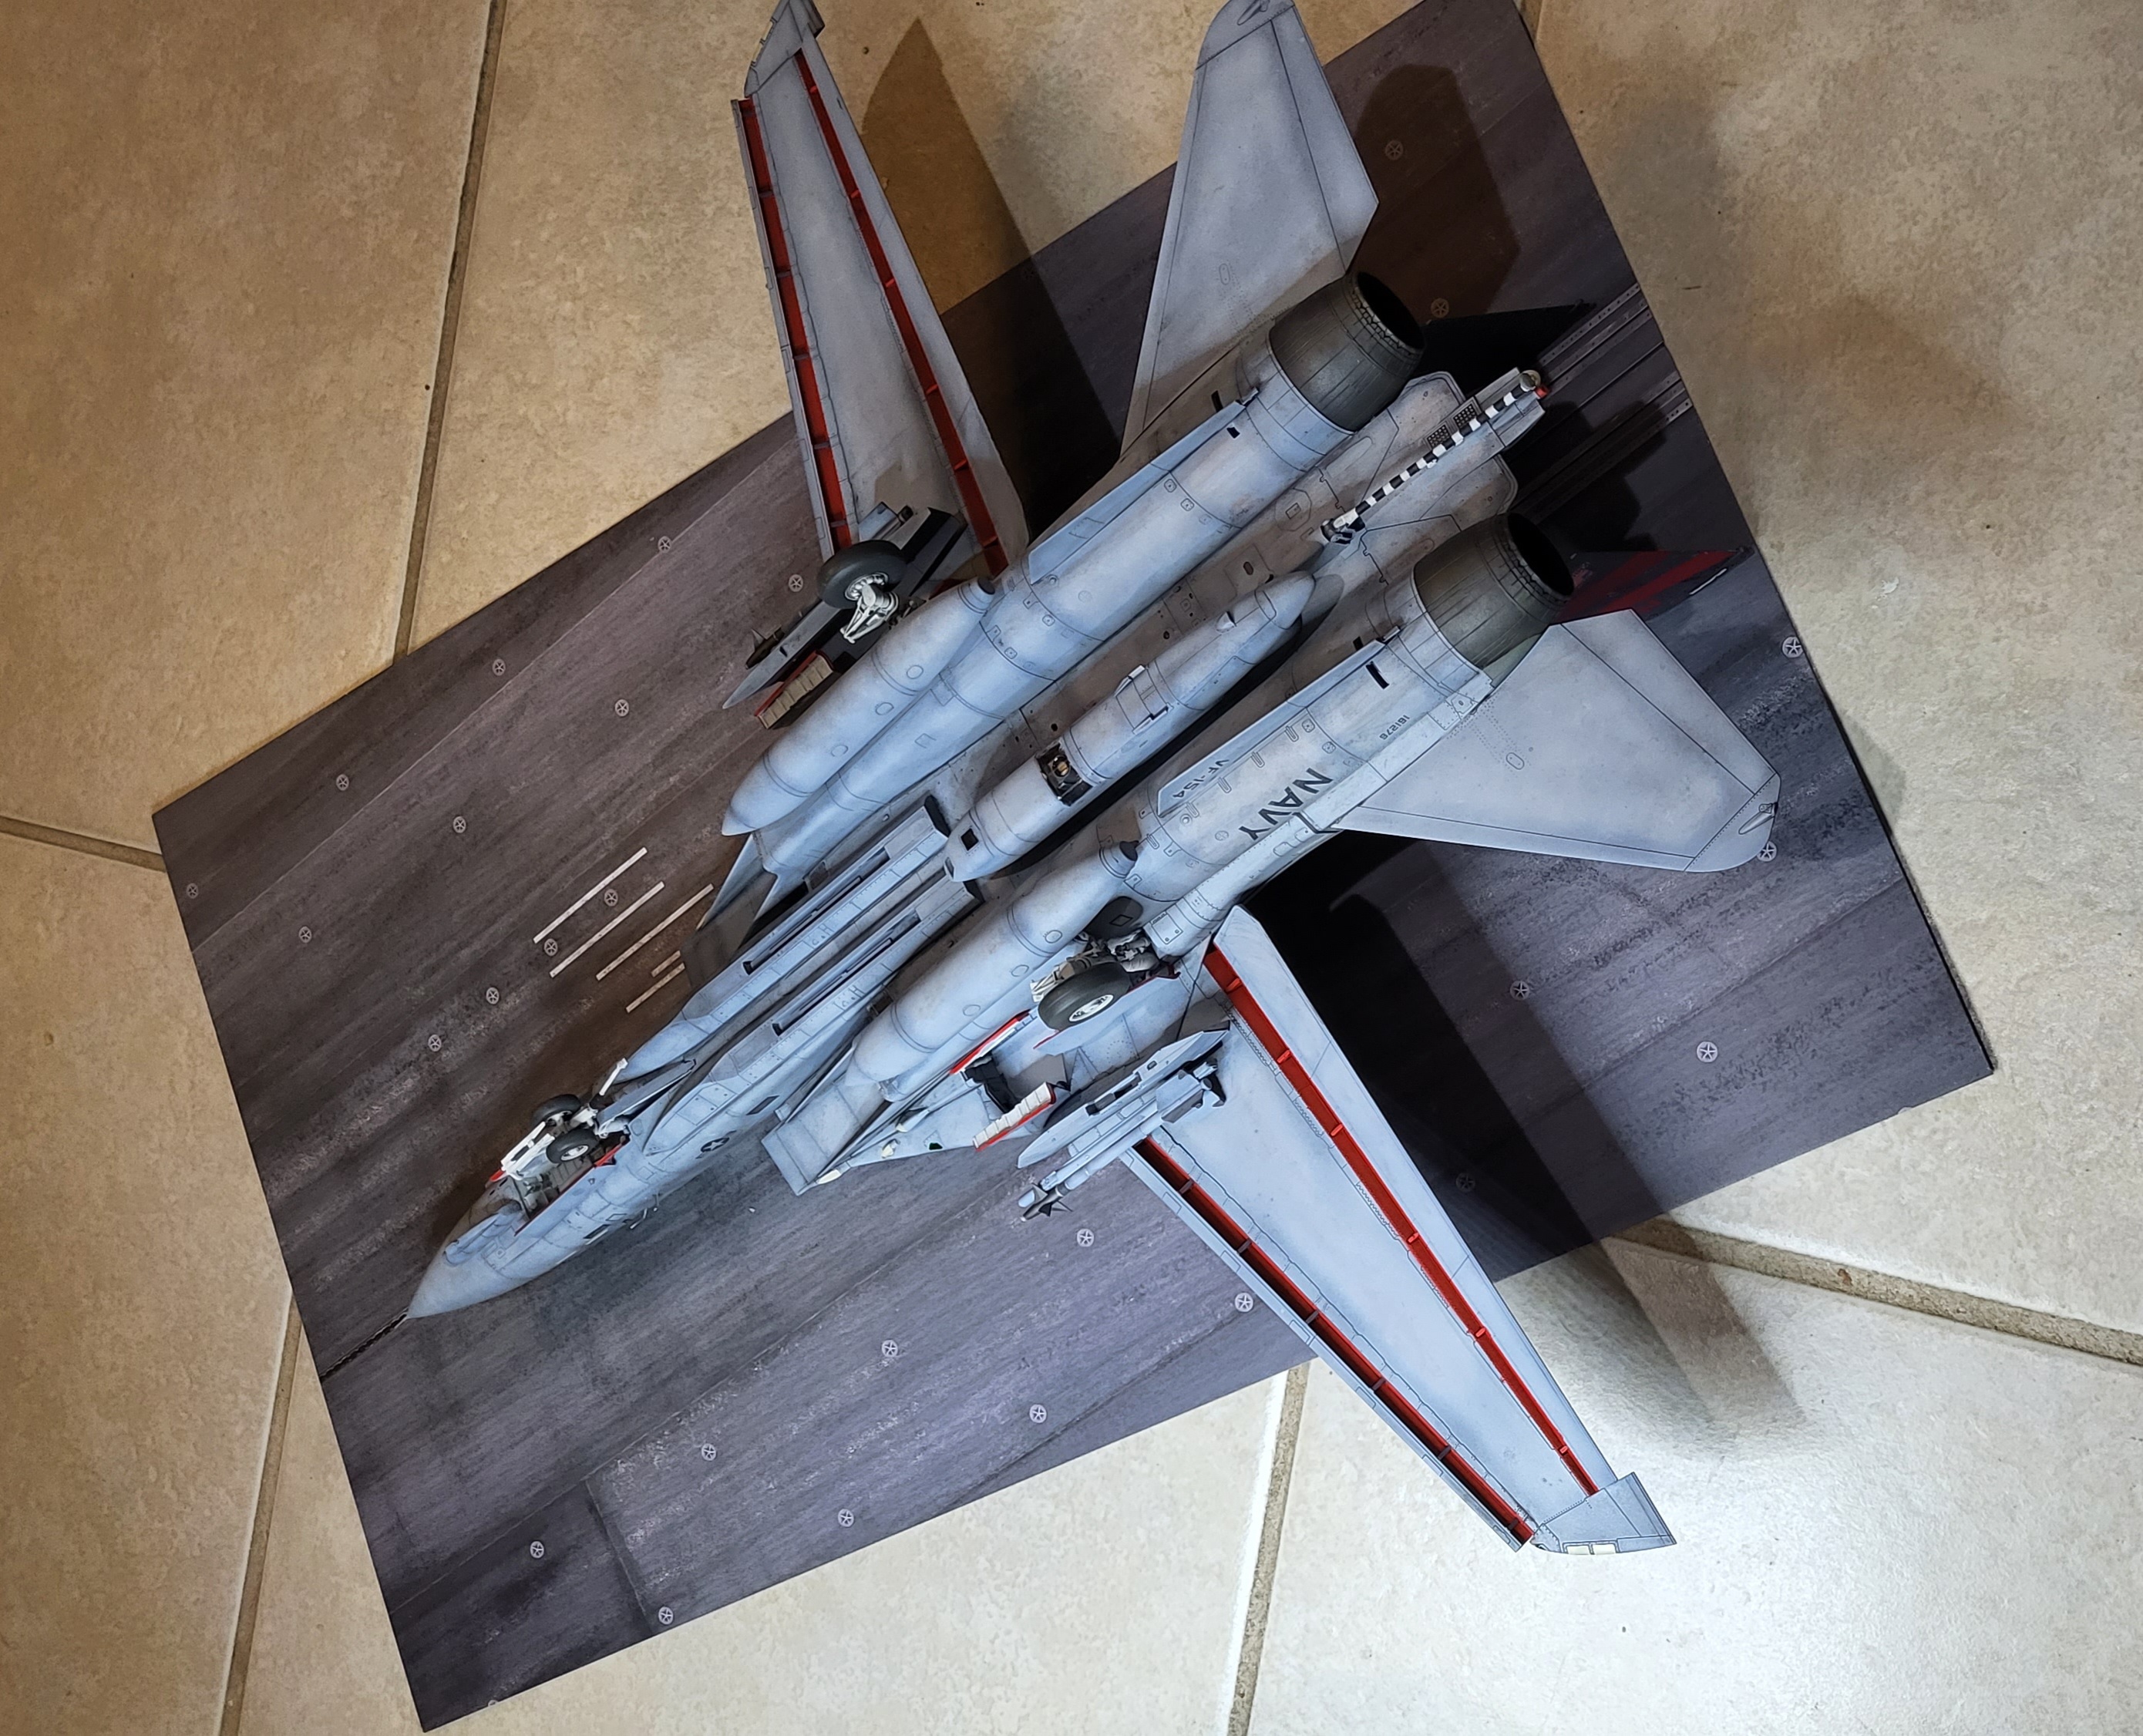
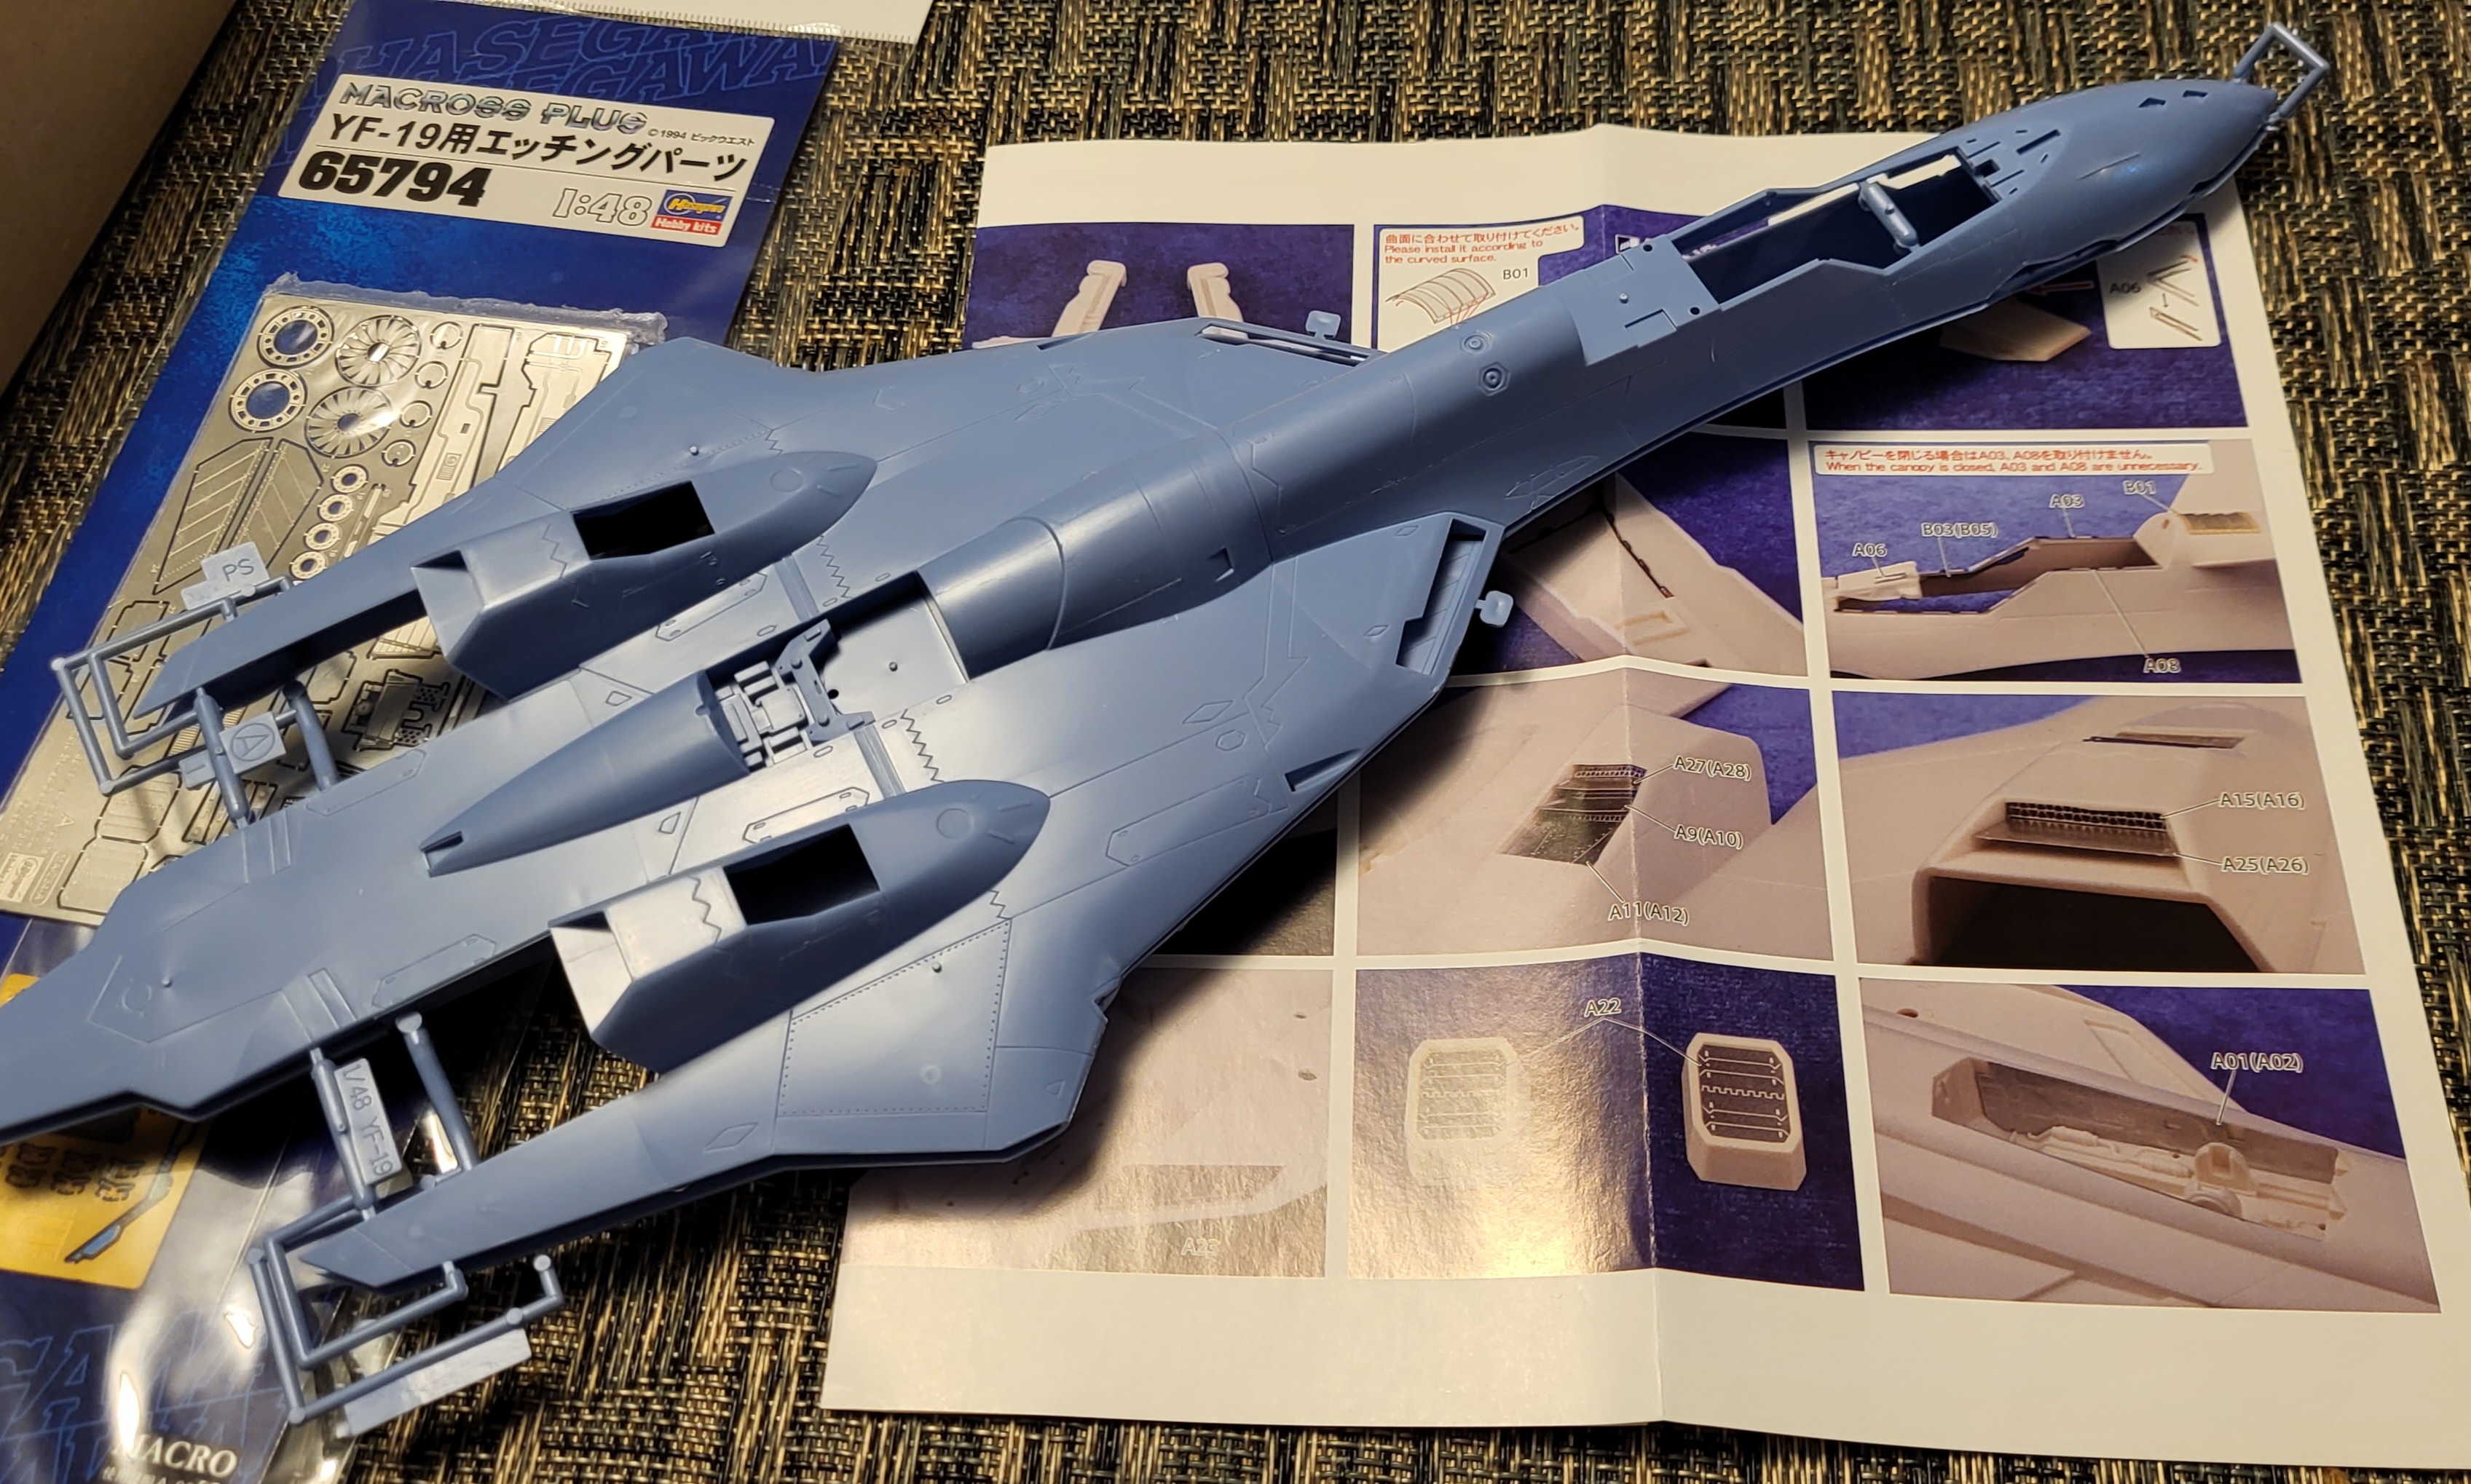
With the cockpit further along, my attention was turned to the fuselage. In typical 90's kit fashion the cockpit and various other parts all get sandwiched between the 2 halves. Before committing, I had to get the vents installed. This is the main area I wanted to improve and the main reason for buying Hase's photo etch set. You replace the big bulky plastic bits with some sleek metal vents/mesh! The vents are multiple pieces, right now I only have the backers installed as I worry about damaging the 'fins' in the process to come. Sadly I couldn't quite get the front vents to fit right. Both of them ended up slightly crooked. I attempted to remedy this by shaving down the mounting surface but, all this did was add a gap that I had to fill with CA Glue. If I ever try again with another build of this kit of the YF-19, I'd remove all the inside mounting surfaces and add my own to ensure flush fitment.
The kit really shows it's age with bad fitment, sink holes and injector pin marks everywhere. A bit of Mr. Surfacer and sanding got most of them. The entire fuselage seam from behind the cockpit to the wings required a few rounds of CA glue and 2 coats with Mr. Surfacer 500 brushed over them. I got them fixed but, it wasn't very fun. After around of Black Mr. Surfacer 1500 to verify my repair I'll have to rescribe all the panel lines around them. 😕 Today I got to use my new model kit paint booth, aka an iVation food dehydrator! Removes moisture, blows/recirculates air and heats up to 160F! I was able to 'bake' everything for about 20 minutes and then move onto the next layer. It took about 1 hour to get 3 layers of Mr Surfacer (unthinned and brushed on) fully cured and ready for sanding. I can't wait to try this with more difficult paint jobs in the future!