
![]()
$5
Carded Valkyrie Review
By Jeremy Housdan 10/10/00
jhousdan@hotmail.com
aka Skull
Leader on the Macross World Discussion Board
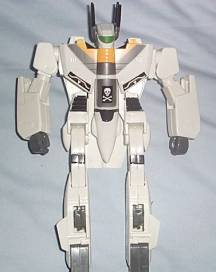
Carded
Valk Conversion Notes
Overview
At
first glance, these latest 1/55 knockoffs may seem to offer a lot of parts for
your next conversion, this addition to my last article is to show you more or
less what will or will not work when you mix these parts with those of a Bandai
or Joons valkyrie (a Takatoku was not on hand for testing, but presumably, the
same theories will hold true for them too
anyone that tests otherwise is more
than welcome to tell me about it, Ill change this accordingly)
Its
rather obvious from the outset that the plastic used on this valkyrie is cheap,
therefore its important to remember that parts WILL snap and screw-holes WILL
strip if not taken care with. There are also several mold-breaks located on
various parts of the valkyrie (shoulder, wings, legs, etc) If you plan on making
a custom out of this valkyrie alone, these areas will need to be sanded. The
entire valk is made of plastic, all the hinges, landing gears, and even the
leg swivels are plastic
the only metal items on the valk are the screws. Ratchet
gears were also noticeably absent from the valk, as well as springs usually
found in places such as the shoulders, elbows and legs (found in conjunction
with the ratchet gears). Also, there are no spring-loads on the landing gears
in
my eyes this has both its pros and cons; Ill get into those later. Now Ill
go into detail, section by section.
The head itself is surprisingly sturdy in its recasting, with only a few problems in the paint, while the way the neckpiece was casted prevents it from being a good fit in either the Bandai or Joons valkyrie nose pieces. The only serious issue that one should be concerned with is the head lasers they were placed separately in the head with no bar to connect them (they swivel independently)
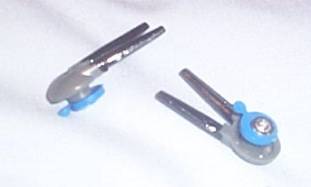
This causes them to be able to sit kind of crooked on the head (they can be tilted inward a little too much). On the upside, the absence of the independent screw-boss and spring causes this head to be easier to deal with than most (harder to screw up). If placed on the correct neckpiece, this head can look good on just about any vf-1s Valkyrie and is at least a cheaper alternative to some of the better custom-casted heads.
Well start with the good news. The Chest plate is perfectly usable with any other valk AS LONG AS YOU USE THE SLIDER FROM THAT VALK. The slider on the knockoff is of seriously inferior quality and easily breakable. On the back, the airbrake hatch does not want to swivel correctly when its open, it looks fine while closed, but the action while opening and closing it shows that it doesnt fit just right.
I can honestly say that Ive never tried using this piece on another valk, so I dont know if its the hatch that is badly casted or the back part of the torso that was bad . so beware when trying to use this piece on another valk.
Nose
Piece
Here is where the production company these cut the most corners this is also probably why they were so damn cheap to make. While the two halves fit reasonably well together, there is one serious issue that most anyone cant get past . the cockpit was molded onto the nose as a permanent heat shield, it cannot be removed, nor is there a cockpit seat under it as some have speculated. If youre doing a custom only meant to look good in battroid mode, this isnt an issue, paint it as you desire itll look good. A look on the under side of the nose reveals one of the worst qualities about this knockoff

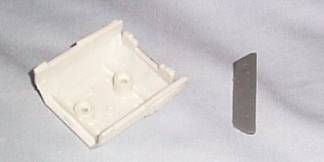
Note that the landing gear has only one wheel and there is no spring mechanism, you must pry it open by hand. When I opened the nosepiece to inspect closer, I noticed that the landing gear doesnt even sit in the grooves very well this can sometimes cause a problem opening the gear as it stows it crooked. Overall, unless youre making a custom battroid ONLY, I wouldnt recommend using the nosepiece for your conversion.
Legs
Well start at the top and work our way down. Probably the one thing I really liked about the legs was that the swivels are made of plastic and therefore easy to paint! When placed on another valkyrie, they click about as well as Joons swivels do, but this isnt too bad. Find some swivel caps off of a jetfire or another Bandai and these are ready to be painted for the infamous black stripe and UN insignia we all seek in our valkyrie conversions. On to the hips the only important thing to note here is that the vent sections do NOT separate from the rest of the intake, they casted them all in one piece. While this may not seem like a big deal at first, it makes the vents (which should be black, yet come bone-white) harder to paint. The thigh sections are just about identical to the Bandai Super Valkyrie thighs, the joints are also casted with the leg in white (like the Bandai) no real issues here, just remember that there are no ratchet joints... they move freely. The bottom part of the legs/thrusters are rather poorly done see for yourself:
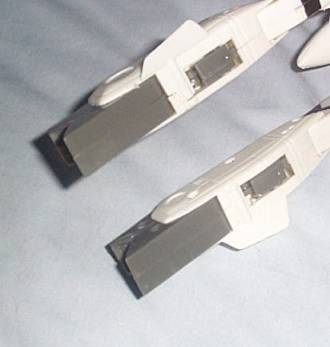
On one leg, the very bottom edges overlap and on the other, they dont even touch. A little sanding on one side and some putty on the other could fix this I suppose, but whats the bother? Use legs from another valkyrie trust me, youll be glad you did. The feet arent so bad, they just need a lot of sanding and filing, theres a lot of leftover mold-residue that really makes the feet look ugly, this is easily sanded down though, so no big deal. Overall, the legs arent much to write home about other than the hinges and maybe the feet, I wouldnt bother with using them on a custom valkyrie (unless I didnt have anything better to work with)
Arms
Nothing really picturesque here, just remember that there are no ratchet joints so all points of articulation move freely. The way the arms were casted restrict them from producing a tight fit when used with other valkyrie parts, they dont have the ratchet bevels to make them fit properly with Bandai or Joons arm parts. I DID like how the bicep section was installed upside down (with the swivel by the shoulder instead of the elbow), I think it looks better like that on the toy, despite the fact that its inaccurate with the TV series or movies. If you try to correct this, youll only meet with mild success, the arm will be really loose and no amount of screw tightening will change it. Another one of the nicer aspects of this valkyrie is that despite the inferior quality of the hands and their looseness in the forearm, the gun fits PERFECT in the trigger hand! This is probably the ONLY 1/55 that I can think of that wont have the gun fall out of the hand while playing with it.
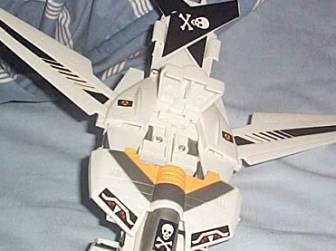
Tail
Pack
There are good and bad things about the tail packs on these valkyries. For starters, if your just doing a custom paint conversion on this valkyrie, one of the nicest qualities of all about the valk is that the tail pack on these valkyries will stay completely UP in battroid mode without ANY help. The rod used in the swivel is bigger than the one used on previous valkyries, so theres actually no looseness in it. The pack itself was molded after the 1990 VF-1S Bandai Super Valkyrie (the hump is actually in the tail pack, instead of being a sticker or part of the super armor). Here is another place they decided to cast a couple of pieces together. On most valkyries, the vernier thruster sections on either end come off, well, the slanted one that ordinarily would hold the swivel bar in has been casted with the back part of the pack, like so:
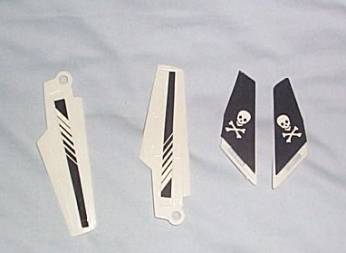
and does not come off. As for using this tail pack on another valkyrie, it was a serious PAIN IN THE ASS to get the swivel bar out and I almost didnt get it back in, so unless you have a lot of patience I wouldnt recommend using in a conversion. The tailfins, however, would be good for any DYRL conversion valk, they come with the infamous Skull stickers applied to them, which until recently were damn hard to emulate. This provides a cheap alternative to paying for a whole new sheet of decals. Overall, the tail pack fits on the valkyrie about as well as the Joons one (pretty bad, unless you file it down) but jetfire booster armor DOES fit on it (unlike the Joons tail pack which is too big in the wrong places)
Conclusion
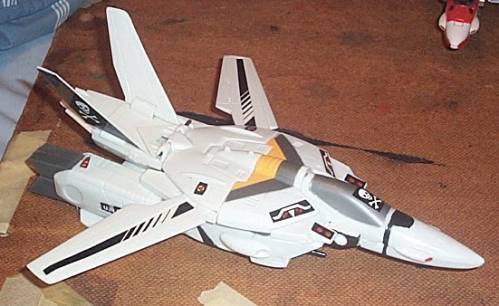
There arent many parts Id use off of this valkyrie if I were going for the immaculate conversion. As a stand alone, you make it look pretty good, if you dont mind not having a transparent canopy (paint it blue and draw the canopy lines on it) All in all, if youre going to cannibalize it, heres about the only stuff worth using on other valkyries:
At least, thats my opinion. Overall, for the money its not such a bad thing, something you wouldnt have to worry about your kid brother playing with on occasion (if he breaks it, youre out all of approximately $5). I thought it was a worthy investment for another 1/55 valkyrie that I didnt have to pay too much attention to (especially after I get some decals on it) I hope this helps some of my fellow customizers to see what they can get out of it. As soon as I get my hands on a Takatoku, I can complete this series on customizations!
-Jeremy Skull Leader Housdan
![]()