Xigfrid Posted November 21, 2018 Author Share Posted November 21, 2018 6 hours ago, Jasonc said: I just got the gun pod and landing gear, along with v.4 of the canard. I must say, I'm very happy with the gunpod. The fact that the handle collapses and the fin collapses is really great. I ordered it in black professional, and it looks ready to go right away, but I just primed it so that I can do cleanup on some parts. I'm looking forward to this being the first part I finish of this kit. I did manage to get some of my resin dyes and managed to mix a red with warm water. I soaked a couple of the WSF parts in it, and they seem to be a solid red color (minus parts I patched and smoothed out. I think this might be something to look into if you buy the WSF parts. I'm going to try this with some of the other WSF parts I have and just sand them before putting them in a dye. If this works, this may be the way I go. The dye I used is called So Strong, which can be bought through Smooth-On. They have red, black, yellow, brown, and all sorts of others. I'm going to test this out longer. Hi Jasonc, I am glad you like the gunpod too. Did you found the magnets in the end ? I will be looking closely to your results with this dying method, just when I was convinced that I should stick to HP plastic, if this dying method works great, that would completely change my mind. I am very bad at painting the large panels, and painting only the detailing would be an absolute plus to me. One thing though, how would you paint the white portions ? I was planning to prime my both copies in white then mask and paint in red (classic you would say) Quote Link to comment Share on other sites More sharing options...
Jasonc Posted November 23, 2018 Share Posted November 23, 2018 Heres how the dye came out. Mind you, I used putty on spots, so those are the off color sections, but it does work. Quote Link to comment Share on other sites More sharing options...
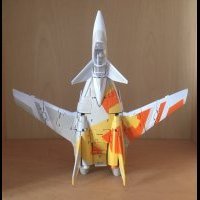
Xigfrid Posted November 29, 2018 Author Share Posted November 29, 2018 Hi Jasonc, it looks like it still needs an additional clear coat to obtain a great finish -or the focus on your camera was a bit off-. Otherwise it can also be a great base color for red painting. In the mean time, I have been lazy with my painting, pretending that I had to wait for the second V4 fins to install on my white VF-9 but managed to pose it kicking Kung Fu. Quote Link to comment Share on other sites More sharing options...
Xigfrid Posted November 29, 2018 Author Share Posted November 29, 2018 (edited) Edited November 29, 2018 by Xigfrid Quote Link to comment Share on other sites More sharing options...
valhary Posted December 9, 2018 Share Posted December 9, 2018 I also doing the miria version Quote Link to comment Share on other sites More sharing options...
Xigfrid Posted December 9, 2018 Author Share Posted December 9, 2018 Nice looking one @valhary. Quote Link to comment Share on other sites More sharing options...
Jasonc Posted December 18, 2018 Share Posted December 18, 2018 That looks great. Is that a paint you put on it, or is it a dye? I looks very uniform throughout the parts. I can't wait to see an update on your work. I started doing a lacquer primer on all the parts. Unfortunately, the dye didn't work as well as I wanted it to, so I just decided to sand the parts a little thinner, and then focus on a really good paint job free (as much as possible) of friction. I did decide to do the MtR version, although, still not at 100%. I'm not big on the character who pilots it in the series, and because I don't know it, I'm not sure yet. Maybe I'll do a second version, one with the early VF-9 Cutlas grey color. I had to order yellow and orange lacquer paint so I can mix and then pain the yellow and the red parts, so when that comes in, I'll start on the actual painting. Until then, just got a bunch of parts heavily coated in white primer to sand down and smooth out over several times. So far, the cockpit, and the leg section and head are ready for the colored paint. No pics at this time. Quote Link to comment Share on other sites More sharing options...
valhary Posted December 18, 2018 Share Posted December 18, 2018 Finally try the transformation and was very easy I love this bird!!!! Quote Link to comment Share on other sites More sharing options...
Xigfrid Posted December 19, 2018 Author Share Posted December 19, 2018 I have been lazy lately and still haven't painted mine! I just like to transform these VF-9 back and forth in all 3 modes. Quote Link to comment Share on other sites More sharing options...
Jasonc Posted December 22, 2018 Share Posted December 22, 2018 I'm building the one I have at a snail's pace. Mostly to make sure that what I do paint, stays painted, but the parts I have put together work very well, and seem quite solid. I've actually mixed the professional plastic with some of the WSF stuff, and it seems to work well. Where I need more detail, the Professional, and where I know I'll be moving a lot of parts, the WSF. I have to find where I put the gun though. I was finished with that part. Quote Link to comment Share on other sites More sharing options...
technoblue Posted January 28, 2019 Share Posted January 28, 2019 Wow. This thread is an inspiration. Fantastic work, @Xigfrid! So I'm joining the party late, but I've decided to complete a VF-9 kit using multiple orders (two or three should do it). *noobie question alert* I placed my first order over the weekend (which included some parts using Shapeways' grey professional plastic). Today, I got a note about the cockpit parts stating that there was an issue with printing that set using the grey plastic, and that Shapeways may cancel the order in 7 days. What does this mean? Should I re-order those parts using one of the more flexible plastics or is there a different version that I missed? Normally, I do small simple parts runs form Shapeways, so this is the first time I've seen this message. Thanks! Quote Link to comment Share on other sites More sharing options...
Xigfrid Posted January 28, 2019 Author Share Posted January 28, 2019 Hi @technoblue, thanks for committing an order for my VF-9! That rejection was unexpected because it as been numerously printed before. By the way, the rejection only concerned 1 item: VF-9 NOSE and HEAD. I have let Shapeways fix the file themself and I have checked the fix and it looks ok. What you need to do is: double check your order status, make sure that all parts are checked in GREEN, in particular the NOSE and HEAD part, because they can partially cancel 1 item and print the rest of the order. If you are not sure, send an email about your concerns to the service@shapeways.com with your order number. In the case that they cancelled the "NOSE and HEAD" part, don't worry: you can just place a new order with this single part and combine shipping with the initial order, the whole order will be delayed 1 day only. Quote Link to comment Share on other sites More sharing options...
technoblue Posted January 28, 2019 Share Posted January 28, 2019 Phew! That's a relief. Thanks for the update. I'l double-check my order status to see if the fix made it in for this order. If not, I'll add the nose and head (again) to my second order. I'm looking forward to building it, although this will be my first complete kit build in quite some time. I'll have to take it slow. I expect to be quite rusty diving back into the deep end like this. Quote Link to comment Share on other sites More sharing options...
Xigfrid Posted January 28, 2019 Author Share Posted January 28, 2019 You are welcome! If I were you, I would make sure to have the “head and nose” part on the first order, because the assembly is really easier (and more entertaining) if you begin with the nose and seating, with all the internal details and the head sculpt. Then continue with the hips portion just like it is described in the assembly manual. Quote Link to comment Share on other sites More sharing options...
valhary Posted February 1, 2019 Share Posted February 1, 2019 Thanks to Xigfrid we can offer a resin version for $120 USD (shipping not include) if are interested or have questions send me a PM Quote Link to comment Share on other sites More sharing options...
Xigfrid Posted February 1, 2019 Author Share Posted February 1, 2019 Hey this yellow version looks great! I hope you will sell well these copies. The resin material will be perfect for fixed pose, with little movements. I can imagine these kits as a fighter only pose, but with the feet able to move and the canopy that can open. Or as a battroid with moving arms and fingers. Quote Link to comment Share on other sites More sharing options...
David Hingtgen Posted February 3, 2019 Share Posted February 3, 2019 With the red being that deep a shade as a base layer----someone should do a Mirage-colored one. Quote Link to comment Share on other sites More sharing options...
valhary Posted February 5, 2019 Share Posted February 5, 2019 Besides this two variant will be added the Max and the M3 colors Quote Link to comment Share on other sites More sharing options...
Sanity is Optional Posted February 5, 2019 Share Posted February 5, 2019 On 2/1/2019 at 1:06 PM, Xigfrid said: Hey this yellow version looks great! I hope you will sell well these copies. The resin material will be perfect for fixed pose, with little movements. I can imagine these kits as a fighter only pose, but with the feet able to move and the canopy that can open. Or as a battroid with moving arms and fingers. So, resin probably won't survive transformation? That's a bit of a shame. Quote Link to comment Share on other sites More sharing options...
CHAVAKAISER Posted February 5, 2019 Share Posted February 5, 2019 9 hours ago, Sanity is Optional said: Entonces, ¿la resina probablemente no sobrevivirá a la transformación? Eso es un poco de vergüenza. Are you sure about that? Quote Link to comment Share on other sites More sharing options...
valhary Posted February 5, 2019 Share Posted February 5, 2019 Until now the transformation operated without problems Ignore how many transformation can handle but if you are extremely careful and change the mode once a while not very often I dont think would have issue and if there were an incident up you can get spare parts Quote Link to comment Share on other sites More sharing options...
valhary Posted February 8, 2019 Share Posted February 8, 2019 gerwalk love Quote Link to comment Share on other sites More sharing options...
valhary Posted February 8, 2019 Share Posted February 8, 2019 Also have tested the bandai missile and y see the battroid mode attach system Xigfrid engineering is amazing once lock in place is solid as hell (no pins or screws used) Quote Link to comment Share on other sites More sharing options...
Bolt Posted February 8, 2019 Share Posted February 8, 2019 Looks sweet! Quote Link to comment Share on other sites More sharing options...
valhary Posted February 8, 2019 Share Posted February 8, 2019 Seems to fail in the arm position must be left under the wings Quote Link to comment Share on other sites More sharing options...
Convectuoso Posted February 11, 2019 Share Posted February 11, 2019 (edited) @Xigfrid Some people are selling copies of this on a Facebook group https://m.facebook.com/groups/1571615176387211?view=permalink&id=2201879696694086&anchor_composer=false&refid=18&_ft_=qid.6656674834216639388%3Amf_story_key.2201879696694086%3Atop_level_post_id.2201879696694086%3Atl_objid.2201879696694086%3Acontent_owner_id_new.1295644207%3Acommerce_rank_obj.{"viewer_id"%3A657630664%2C"target_id"%3A2709730549068175%2C"target_type"%3A0%2C"primary_position"%3A0%2C"secondary_position"%3A0%2C"search_query"%3A""%2C"search_sid"%3A""%2C"session_id"%3A0%2C"typeahead_sid"%3A""%2C"ranking_signature"%3A1507896020985717079%2C"commerce_channel"%3A103%2C"commerce_type"%3A2%2C"ectr"%3A0%2C"value"%3A355.14602640941%2C"model_scores"%3A{}%2C"upsell_candidate_ids"%3A[]%2C"upsell_type"%3Anull%2C"metadata"%3A{}%2C"ad_imp_delivery_data_binary"%3Anull%2C"qp_renderer_type"%3Anull%2C"is_multi_advertiser_ad"%3Afalse%2C"multi_advertiser_ad_item_index"%3A0}%3Asrc.22%3Aphoto_id.10217618148987628%3Astory_location.6%3Astory_attachment_style.group_sell_product_item&__tn__=*W-R Edited February 11, 2019 by Convectuoso Quote Link to comment Share on other sites More sharing options...
Xigfrid Posted February 11, 2019 Author Share Posted February 11, 2019 1 hour ago, Convectuoso said: @Xigfrid Some people are selling copies of this on a Facebook group Hi thanks for watching my back. I think this sale is legit, at least concerning my VF-9 model. Just a note that none of the other models are my designs (X-9 included). I will just need @valhary who is in charge of these copies to confirm. Quote Link to comment Share on other sites More sharing options...
Convectuoso Posted February 11, 2019 Share Posted February 11, 2019 1 hour ago, Xigfrid said: Hi thanks for watching my back. I think this sale is legit, at least concerning my VF-9 model. Just a note that none of the other models are my designs (X-9 included). I will just need @valhary who is in charge of these copies to confirm. Sure. I know there was some mention about resin versions here, but since we use nicknames, I didn't know if it was the same person. Quote Link to comment Share on other sites More sharing options...
technoblue Posted February 11, 2019 Share Posted February 11, 2019 Welp...I placed my second order for the Shapeways parts. I wanted to get that done before the perfect storm of toy releases begins. The downside is that I wasn't able to take advantage of a good discount, so the parts are coming at premium price...no big deal, though. I'm pretty excited to see them up close--to see how easy they are to work with and how well they take primer and paint. In other news, I'm getting ready to pick up the neodymium magnets. I bought a test sample from this US source last week. https://www.magnet4sale.com/bar-block-magnet-neodymium-rare-earth-n50-5mm-x-2-5mm-x-2mm-15-pc/ The downside is that they are expensive here, so I want to make sure that I get the correct amount. Are 4 or 6 magnets required for the final assembly? In the transformation video I was able to spy 4 (and I was thinking of buying 8 to eventually build 2 Valkyries), but I understand that the design has had a number of revisions since its inception. I figure it's best to ask first. Also, is there a recommended type of glue that I should use to attach the magnets once I get to that step? Quote Link to comment Share on other sites More sharing options...
valhary Posted February 11, 2019 Share Posted February 11, 2019 Hi guys! thanks for your concern and yes is our sale don't worry;) Quote Link to comment Share on other sites More sharing options...
Xigfrid Posted February 11, 2019 Author Share Posted February 11, 2019 39 minutes ago, technoblue said: https://www.magnet4sale.com/bar-block-magnet-neodymium-rare-earth-n50-5mm-x-2-5mm-x-2mm-15-pc/ The downside is that they are expensive here, so I want to make sure that I get the correct amount. Are 4 or 6 magnets required for the final assembly? In the transformation video I was able to spy 4 (and I was thinking of buying 8 to eventually build 2 Valkyries), but I understand that the design has had a number of revisions since its inception. I figure it's best to ask first. Also, is there a recommended type of glue that I should use to attach the magnets once I get to that step? For some reason, I can't open the link, but considering this is the correct size (it looks like), you need 1 magnet per wing, 1 per arm and 2 for the gunpod. So a total of 4 without gunpod or 6 with the gunpod. I made also a display adapter (Yamato compatible) that can use 2 magnets to help secure the fighter for an upside down display. But You can just use a metal part if you want to save money on the display adapter Quote Link to comment Share on other sites More sharing options...
technoblue Posted February 11, 2019 Share Posted February 11, 2019 Thank you, Xigfrid. They are small, but I was off in my post above with the numbers. One order is for a 15-piece bar/block of 5 x 2.5 x 2mm neodymium magnets. The price isn't as bad as I thought. Quote Link to comment Share on other sites More sharing options...
valhary Posted February 13, 2019 Share Posted February 13, 2019 Asked me if can support the MDE missile (the heaviest) Quote Link to comment Share on other sites More sharing options...
valhary Posted March 6, 2019 Share Posted March 6, 2019 Finally finished the M3 version Quote Link to comment Share on other sites More sharing options...
Xigfrid Posted March 6, 2019 Author Share Posted March 6, 2019 that's a lot of VF-9 love ! Quote Link to comment Share on other sites More sharing options...
Recommended Posts
Join the conversation
You can post now and register later. If you have an account, sign in now to post with your account.