slide Posted March 16, 2017 Share Posted March 16, 2017 28 minutes ago, Mintox said: Oh yeah the RVF. I have both the base one and the one with the boosters. I'm curious does anyone know if they operationally use the back seat in the RVF or is it always used as a single seater? Yeah its small part city but it so detailed for a 1/72 kit I cant but be impressed by its engineering and level of detail. Its a gorgeous kit. Highly recommend it. I'm simul-building Luca's Hase Super, Hase Non-super, and the Bandai ghosts... that way my paint mix will be identical. I don't think Luca ever used his back seat, but I have an extra RVF-25 I plan on doing as a two-seater [in old-school E-2 colours]. imho all the VE and RVF should be two-seaters... it just feels right. Quote Link to comment Share on other sites More sharing options...
Mintox Posted March 17, 2017 Author Share Posted March 17, 2017 11 hours ago, slide said: I'm simul-building Luca's Hase Super, Hase Non-super, and the Bandai ghosts... that way my paint mix will be identical. I don't think Luca ever used his back seat, but I have an extra RVF-25 I plan on doing as a two-seater [in old-school E-2 colours]. imho all the VE and RVF should be two-seaters... it just feels right. I agree. Thats why I am saving one of the pilots from the base model to add to my RVF-25 Super. Quote Link to comment Share on other sites More sharing options...
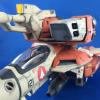
Mintox Posted March 20, 2017 Author Share Posted March 20, 2017 Test fitting stuff here. Its mostly finished in terms of painting now. I just need to add the decals to the legs, gloss and wash it then flatten the whole thing for some light dusting with pastels then to seal it again and assemble. Quote Link to comment Share on other sites More sharing options...
Mintox Posted March 23, 2017 Author Share Posted March 23, 2017 Missile pack. Quote Link to comment Share on other sites More sharing options...
Xigfrid Posted March 23, 2017 Share Posted March 23, 2017 Amazing painting job so far! So many details for a 1/72 scale! Quote Link to comment Share on other sites More sharing options...
Mintox Posted March 26, 2017 Author Share Posted March 26, 2017 Making slow progress to finish it off. Adding lots of small details to it like the navigation lights need painting, paint the clear parts including the canopy etc. Here are some other shots of me just testing fitting things and playing around while I wait for other stuff to dry. Quote Link to comment Share on other sites More sharing options...
mickyg Posted March 26, 2017 Share Posted March 26, 2017 (edited) Looking great! Mind sharing how you do the red missile tips? I really struggled with the ones on my Bandai VF-25G super kit. Edited March 26, 2017 by mickyg Quote Link to comment Share on other sites More sharing options...
Mintox Posted March 26, 2017 Author Share Posted March 26, 2017 2 minutes ago, mickyg said: Looking great! Mind sharing how you do the red missile tips? I really struggled with the ones on my Bandai VF-25G super kit. They are all decals. Mind numbingly small and extremely irritating to put on but worth the effort. I think I went crossed eyed several times. I did contemplate painting them and then doing a black wash as the small 'X' is moulded into the tops of the missiles so you could paint them and do it that way. Quote Link to comment Share on other sites More sharing options...
mickyg Posted March 26, 2017 Share Posted March 26, 2017 No kidding? I've got the kit you're building and didn't even notice on the decal sheet. Wow, that's definitely tedious work. Thinking of options for the Bandai armoured VF-25S kit I've also got. Those are moulded in red. Thought of painting them white and then just removing the paint at the tips somehow (sanding, carefully applying solvent there, using masking fluid, perhaps?). There are a fair few more missiles on the armoured variant though, decals would be crazy in that quantity. Quote Link to comment Share on other sites More sharing options...
Mintox Posted March 27, 2017 Author Share Posted March 27, 2017 11 hours ago, mickyg said: No kidding? I've got the kit you're building and didn't even notice on the decal sheet. Wow, that's definitely tedious work. Thinking of options for the Bandai armoured VF-25S kit I've also got. Those are moulded in red. Thought of painting them white and then just removing the paint at the tips somehow (sanding, carefully applying solvent there, using masking fluid, perhaps?). There are a fair few more missiles on the armoured variant though, decals would be crazy in that quantity. I'd probably go the masking fluid and touch up anything later. Seems that way you can probably get most of the missile caps done and only have to touch up a few. Quote Link to comment Share on other sites More sharing options...
Mintox Posted March 27, 2017 Author Share Posted March 27, 2017 (edited) Practically finished. Here it is fully glossed up prior to the washes. I then flatten it and do the small 'dirt' marks with chalks and oils and then seal it with a flat coat, usually Vallejo Matt Varnish. The back pack has been left off as I still need to permanently fix everything. Oh, and paint the pilot which I am not happy with. Hasegawa should be ashamed to provide a pilot that is nothing more than a lump of shapes. Edited March 27, 2017 by Mintox Quote Link to comment Share on other sites More sharing options...
chyll2 Posted March 28, 2017 Share Posted March 28, 2017 What a beauty. Can't wait to see the photo shoot on the completed work Quote Link to comment Share on other sites More sharing options...
Mintox Posted April 1, 2017 Author Share Posted April 1, 2017 Its not really evident here but all the weathering has been completed and I am waiting to put the landing gear doors on and then a final coat of clear matt and then to glue the engines exhausts on and the canopy and its finished. Quote Link to comment Share on other sites More sharing options...
derex3592 Posted April 1, 2017 Share Posted April 1, 2017 gorgeous!!! Quote Link to comment Share on other sites More sharing options...
Mintox Posted April 5, 2017 Author Share Posted April 5, 2017 Its finished! Wow I really enjoyed this kit. Complex paint scheme and hundreds of decals but it makes a great model and a pretty faithful reproduction of the VF25. I'll post proper shots of it soon.. Quote Link to comment Share on other sites More sharing options...
derex3592 Posted April 6, 2017 Share Posted April 6, 2017 absolutely gorgeous! Can't wait to see the official pics! Quote Link to comment Share on other sites More sharing options...
Mintox Posted April 14, 2017 Author Share Posted April 14, 2017 Well its finished and I've posted photos in the model kits section. Quote Link to comment Share on other sites More sharing options...
Recommended Posts
Join the conversation
You can post now and register later. If you have an account, sign in now to post with your account.