Mintox Posted February 13, 2017 Share Posted February 13, 2017 Hi All I've managed to make a start on my VF25. I'll probably do it as a VF25S SMS001 bird. These are the cockpit details. Just basic painted and decals at this stage. I'll gloss them again and apply washes and highlights. Quote Link to comment Share on other sites More sharing options...
slide Posted February 13, 2017 Share Posted February 13, 2017 Off to a good start! Quote Link to comment Share on other sites More sharing options...
chyll2 Posted February 14, 2017 Share Posted February 14, 2017 yey, another WIP thread from Mintox. Expecting the good stuff. Quote Link to comment Share on other sites More sharing options...
Mintox Posted February 14, 2017 Author Share Posted February 14, 2017 Some more progress shots. These have been coated in Mr Hobby Clear Gloss TopCoat and then a light black wash added and then cleaned up with some white spirits and various sizes of cotton buds (WAVE brand I think). Next will be to flatten them and then some light dry-brushing to bring out the highlights. Quote Link to comment Share on other sites More sharing options...
Graham Posted February 15, 2017 Share Posted February 15, 2017 Nice. Looking forward to seeing this build progress. Quote Link to comment Share on other sites More sharing options...
Mintox Posted February 17, 2017 Author Share Posted February 17, 2017 (edited) First shot is of the two body halves closed and glued with the dash and rear dash in place just for show. The other photos are where building this kit becomes a bit tricky because of the complex nature of the shape of the craft plus all the booster packs etc will make this a hard build to do and then paint. So I decided to split things up into sub assemblies and paint. Not much different than any other Macross kit really but there are some really complex curves on this kit that will be hard to mask off. Here I glued the two arms glued together as they will be fitted in place and glued and then painted with the underside of the body. Note most of the hands are hidden by the rear cover when I glue them to this piece. Here I have glued the two vertical stabilisers and the underside back cover for the hands. Still needs sanding around certain areas along the body edges. Edited February 17, 2017 by Mintox Quote Link to comment Share on other sites More sharing options...
Mintox Posted February 19, 2017 Author Share Posted February 19, 2017 Undercoating these parts in preparation of adding the panel highlights. You dont appreciate the details on this kit until it goes from white to grey then the details stand out. Thankfully sanding is minimal. Quote Link to comment Share on other sites More sharing options...
Mintox Posted February 20, 2017 Author Share Posted February 20, 2017 (edited) I've started painting the main colours. Here you can see the pre-shade for the panel lines. In the centre is the underneath colour (Mr Hobby H338). This is the back of where the head rests. This is the main colour, Mr Hobby H61 IJN Grey. You can see the pre-shaded panel lines coming through. With a pin wash and pastels these panel lines will really stand out. Edited February 20, 2017 by Mintox Quote Link to comment Share on other sites More sharing options...
derex3592 Posted February 20, 2017 Share Posted February 20, 2017 Looking great! Quote Link to comment Share on other sites More sharing options...
chyll2 Posted February 20, 2017 Share Posted February 20, 2017 Those fine lines are really good work on Hasegawa. Nice progress, thanks Mintox for sharing Quote Link to comment Share on other sites More sharing options...
Mintox Posted February 20, 2017 Author Share Posted February 20, 2017 8 hours ago, derex3592 said: Looking great! Cheers 7 hours ago, chyll2 said: Those fine lines are really good work on Hasegawa. Nice progress, thanks Mintox for sharing Yes I've noticed on the VF 25 they are far more 'finer' than on their 1/72 Valks. Unfortunately the photos, because I'm trying to keep the images down to a minimum size, dont show them clearly but once the weathering process starts and I take better shots it actually has some very nice details. I love this kit because while it seems to have a ton of parts there isnt that much to paint once all the sub-assemblies are done. One departure for me will be doing some of the decals half way through the build as the skull head emblem needs to be laid down before the booster back-pack can be permanently added. Quote Link to comment Share on other sites More sharing options...
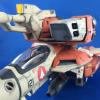
Mintox Posted February 22, 2017 Author Share Posted February 22, 2017 (edited) More Progress shots. Head is done. Details at this stage are hard to make out due to the various shades of grey on the kit. This is obviously the head unit. Again it'll have more detail once a wash is applied and some weathering. Down side is most of it will be covered up. I've yet to do the little red sensor thingy on the forehead but since it'll all be covered I might simply leave it off. Test fitting the head to its stored location. The IGN Grey gets washed out a lot by the light. Its much darker when viewed personally rather than as a photo. Next job will to be to mask all the black panelling on the nose and forward fuselage. Edited February 22, 2017 by Mintox Quote Link to comment Share on other sites More sharing options...
mickyg Posted February 22, 2017 Share Posted February 22, 2017 Looking real good! Quote Link to comment Share on other sites More sharing options...
Mintox Posted February 23, 2017 Author Share Posted February 23, 2017 Now the very tedious and eye straining task of masking off the area on the forward fuselage for all the black areas. I've started on the sides first and then will move onto the nose and cockpit section. Quote Link to comment Share on other sites More sharing options...
Mintox Posted February 25, 2017 Author Share Posted February 25, 2017 i've now made a start on the black markings around the forward fuselage. I think they came out looking good. Quote Link to comment Share on other sites More sharing options...
NZEOD Posted February 25, 2017 Share Posted February 25, 2017 yep,,, that has! Quote Link to comment Share on other sites More sharing options...
Mintox Posted February 27, 2017 Author Share Posted February 27, 2017 Slow progress. Added the cockpit details. I still have some work on the vertical stabilisers to do (the yellow markings) then I'll gloss the whole thing and start adding decals to it. Quote Link to comment Share on other sites More sharing options...
MechTech Posted March 3, 2017 Share Posted March 3, 2017 Looking great Mintox! - MT Quote Link to comment Share on other sites More sharing options...
kajnrig Posted March 3, 2017 Share Posted March 3, 2017 Ditto the above. I always love seeing a good mask job. Quote Link to comment Share on other sites More sharing options...
chyll2 Posted March 3, 2017 Share Posted March 3, 2017 loved the masking as well. I remember doing the normal 25S before and lining up the decals was hard for me back then. Quote Link to comment Share on other sites More sharing options...
Mintox Posted March 3, 2017 Author Share Posted March 3, 2017 7 hours ago, MechTech said: Looking great Mintox! - MT 6 hours ago, kajnrig said: Ditto the above. I always love seeing a good mask job. 4 hours ago, chyll2 said: loved the masking as well. I remember doing the normal 25S before and lining up the decals was hard for me back then. Yeah I prefer where possible on areas that have tight compound curves to paint them. There are some decal to be added to the area near and along the thick edge that should be ok with decal softener to hold and hug the curve but I have to wait for the yellow on the tails to dry before I spray some gloss clear to lay the decals down. Quote Link to comment Share on other sites More sharing options...
Mintox Posted March 4, 2017 Author Share Posted March 4, 2017 I made a start on the purple? parts. Test fitting it here to just see how it all looks before starting the decals. Quote Link to comment Share on other sites More sharing options...
electric indigo Posted March 4, 2017 Share Posted March 4, 2017 Nice shading at work there! Quote Link to comment Share on other sites More sharing options...
Xigfrid Posted March 4, 2017 Share Posted March 4, 2017 I admire the patience for masking everything... And the result worths it always! Quote Link to comment Share on other sites More sharing options...
Mintox Posted March 6, 2017 Author Share Posted March 6, 2017 I've started the panel washes. I prefer to use Tamiya Dark Brown Panel Line Accent Color on greys as it gives a more dirtier look. Black seems to simply be, well, black and looks wrong. Its old school too so I tend to shy away from using pure black anymore rather i'll mix a black with a grey to give a dirtier black. The top wing is finished but the lower one still needs cleaning up. You can see if you are careful you can streak it just right to leave some basic weathering effects. Combine this with chalks or artist oils etc and you have some very interesting effects. You could of course leave it like it is and it would look great but I tend to go back over and add more subtle streaks with some pastels. Quote Link to comment Share on other sites More sharing options...
Mintox Posted March 7, 2017 Author Share Posted March 7, 2017 After glossing and doing the pin washes I realised I hadn't put the decals on so re-glossed it and am now adding decals BEFORE I do any more washes. Quote Link to comment Share on other sites More sharing options...
derex3592 Posted March 7, 2017 Share Posted March 7, 2017 those wings look great!!! Quote Link to comment Share on other sites More sharing options...
Mintox Posted March 8, 2017 Author Share Posted March 8, 2017 (edited) This decal was something I was fretting over not going on easily. In the end with some careful nudging and copious amounts of decal softener (MicroScale Micro Set) it turned out to be relatively easy. It still needs to dry out so the decal softener can make the decal hug the plastic but by tomorrow I should be able so see more panel details and the decal should have smoothed out more. Edited March 8, 2017 by Mintox Quote Link to comment Share on other sites More sharing options...
derex3592 Posted March 8, 2017 Share Posted March 8, 2017 I would dread that as well! Came out great! Quote Link to comment Share on other sites More sharing options...
Mintox Posted March 9, 2017 Author Share Posted March 9, 2017 (edited) More progress shots of the decals being applied. Edited March 10, 2017 by Mintox Quote Link to comment Share on other sites More sharing options...
Mintox Posted March 16, 2017 Author Share Posted March 16, 2017 More shots of me 'playing' with it. God I cant wait to finish it so I CAN play with it. Quote Link to comment Share on other sites More sharing options...
derex3592 Posted March 16, 2017 Share Posted March 16, 2017 that is absolutely gorgeous!!! -- don't play with it...you might break it! Quote Link to comment Share on other sites More sharing options...
slide Posted March 16, 2017 Share Posted March 16, 2017 (edited) 5 hours ago, derex3592 said: that is absolutely gorgeous!!! -- don't play with it...you might break it! You... you mean I'm NOT supposed to build these so I can zoom them around the room? TOSH, I say! She's coming along very nicely Mintox. now that I've cracked open my RVF-25s, I'm even more impressed! this stuff is all smaller than my eyes remembered... Edited March 16, 2017 by slide Quote Link to comment Share on other sites More sharing options...
kajnrig Posted March 16, 2017 Share Posted March 16, 2017 Working with emblem decals always turns me into a nervous wreck. Actually, working on masking also turns me into a nervous wreck. Actually, I think it's fair to say that working on models in general turns me into a nervous wreck. Great job, keep it up. Quote Link to comment Share on other sites More sharing options...
Mintox Posted March 16, 2017 Author Share Posted March 16, 2017 8 hours ago, derex3592 said: that is absolutely gorgeous!!! -- don't play with it...you might break it! Cheers. I usually do a little zoom zoom (when the missus isnt watching of course :-) ) 5 hours ago, slide said: You... you mean I'm NOT supposed to build these so I can zoom them around the room? TOSH, I say! She's coming along very nicely Mintox. now that I've cracked open my RVF-25s, I'm even more impressed! this stuff is all smaller than my eyes remembered... Oh yeah the RVF. I have both the base one and the one with the boosters. I'm curious does anyone know if they operationally use the back seat in the RVF or is it always used as a single seater? Yeah its small part city but it so detailed for a 1/72 kit I cant but be impressed by its engineering and level of detail. Its a gorgeous kit. Highly recommend it. 2 hours ago, kajnrig said: Working with emblem decals always turns me into a nervous wreck. Actually, working on masking also turns me into a nervous wreck. Actually, I think it's fair to say that working on models in general turns me into a nervous wreck. Great job, keep it up. Oh decals. Lots of decals. My eyes go crossed eyed after a while and I have to stop. It does add another level of visual detail to the kit. This came today and I cant wait to start it: https://hlj.com/product/HSG65836 Quote Link to comment Share on other sites More sharing options...
Recommended Posts
Join the conversation
You can post now and register later. If you have an account, sign in now to post with your account.