wmkjr Posted June 25, 2016 Share Posted June 25, 2016 I tried looking for screenshots for color references. Maybe grey or black in the exhaust port and black in the 2 little dips in the rear? Quote Link to comment Share on other sites More sharing options...
Xigfrid Posted June 25, 2016 Author Share Posted June 25, 2016 Besides the reactor exhausts that can be greyish, and sometime I saw the top of the supers having yellow accents too, all red seems the official way. That's also my favorite color way Quote Link to comment Share on other sites More sharing options...
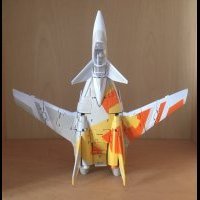
Xigfrid Posted June 27, 2016 Author Share Posted June 27, 2016 (edited) I tried looking for screenshots for color references. Maybe grey or black in the exhaust port and black in the 2 little dips in the rear? I just had a look at your pictures link, and couldn't resist not sharing this one... Such a great display and my favorite angle shot. Macross Plus 5 by Wm K, sur Flickr Edited June 27, 2016 by Xigfrid Quote Link to comment Share on other sites More sharing options...
spanner Posted June 27, 2016 Share Posted June 27, 2016 beautiful shot Xigfrid! That drone looks amazing! Quote Link to comment Share on other sites More sharing options...
derex3592 Posted June 27, 2016 Share Posted June 27, 2016 Yeeeeeeeees!!!! Xigfrid..what do i need to order to get the Ghost attached to a YetiStand??? Quote Link to comment Share on other sites More sharing options...
Xigfrid Posted June 27, 2016 Author Share Posted June 27, 2016 Yeeeeeeeees!!!! Xigfrid..what do i need to order to get the Ghost attached to a YetiStand??? Make sure that you got either the "Ya Banking" or "Ya Standing" adapter on your YetiStand, then you can buy from my Shapeways shop the "X-9 stand Adapter". To insert the adapter, you need the bottom/rear fin deployed and open the missile traps, once installed you can close the traps. beautiful shot Xigfrid! That drone looks amazing! These shots are from Wmkjr's Flickr! All the credits should go to him. Quote Link to comment Share on other sites More sharing options...
Xigfrid Posted July 6, 2016 Author Share Posted July 6, 2016 Edited first post with Wmkjr ghost photo and the following info. The production is finished.I have available in stock 2 Painted Ghosts and 6 last Unpainted Ghosts. Landing gears are also in stock.Feel free to PM me if you want one, even if this post don't get updates, I will be keeping the spare Ghost in a cool, dry place for the future until they got sold out. Quote Link to comment Share on other sites More sharing options...
derex3592 Posted July 6, 2016 Share Posted July 6, 2016 Here's my offering... Xigfrid did an absolutely fantastic job design wise on this. It was a fun, fairly quick build. I am thrilled to finally have one in my collection. Ordered the Yetistand adapter today and will definitely be putting up some beauty pics with my 19 and 21 when I get all them on a Yetistand in a couple of weeks. Thanks Xigfrid!!! Quote Link to comment Share on other sites More sharing options...
Xigfrid Posted July 6, 2016 Author Share Posted July 6, 2016 Here's my offering... Xigfrid did an absolutely fantastic job design wise on this. It was a fun, fairly quick build. I am thrilled to finally have one in my collection. Ordered the Yetistand adapter today and will definitely be putting up some beauty pics with my 19 and 21 when I get all them on a Yetistand in a couple of weeks. Thanks Xigfrid!!! Woah! I will now call you "Master of glossy finish"! Quote Link to comment Share on other sites More sharing options...
electric indigo Posted July 6, 2016 Share Posted July 6, 2016 Yeah, the paint job looks pretty perfect! Quote Link to comment Share on other sites More sharing options...
derex3592 Posted July 6, 2016 Share Posted July 6, 2016 I am not worthy of praise of that magnitude from "The Master".... "bows humbly and backs away".... Quote Link to comment Share on other sites More sharing options...
wmkjr Posted July 6, 2016 Share Posted July 6, 2016 Awesome job! Quote Link to comment Share on other sites More sharing options...
derex3592 Posted July 6, 2016 Share Posted July 6, 2016 Thanks wmkjr! Quote Link to comment Share on other sites More sharing options...
derex3592 Posted July 6, 2016 Share Posted July 6, 2016 Still having trouble getting these Fast Packs attached, I really don't wanna force anything and damage my paint job, Xigfrid, do I have the screw in parts in correctly? I'm not able to attach the Fast Packs securely, what am I doing wrong?? Quote Link to comment Share on other sites More sharing options...
Xigfrid Posted July 6, 2016 Author Share Posted July 6, 2016 Seeing this part, it reminds me that I use to sand a bit the inner part of the "plastic" part. Please check the "sanding.jpg" Apart from that, everything look good. To insert the Supers, I usually begin to insert the front portion, with plastic part first on the angle of the air intake. Then I insert the rear hook into the hole, I use a flat screw to check that the hook get inside the reactors thruster correctly. illustrated as below: STEP 1 STEP 2 Quote Link to comment Share on other sites More sharing options...
derex3592 Posted July 7, 2016 Share Posted July 7, 2016 GOT IT!!! Thank you so much for the quick response and especially the CAD drawings! Very helpful. I just had to loosen the screws a bit and then try again. I heard a tiny click and now they are on and solid! My Ghost is ready for flight..almost..last but not least, decals! Quote Link to comment Share on other sites More sharing options...
Chronocidal Posted July 7, 2016 Share Posted July 7, 2016 Just want to say, I hope someone finds a way to get this kit setup with injection molds some day, because it really is beautifully designed to go together easily. Got my painted kit a bit ago, and she's a beauty. Looking forward to finishing up the last few details on her. Quote Link to comment Share on other sites More sharing options...
derex3592 Posted July 7, 2016 Share Posted July 7, 2016 I'll never for the life of me understand why Yamato went to the trouble to do the freakin Macross 7 Sound Boostahh, with several very unnecessary bells and whistles and never did a 1:60 Ghost X9 after they did the 19 and 21. I would have gladly forked over about $100 for a Yamato 1:60 Ghost. Whatever! Xigfrid to the rescue! Quote Link to comment Share on other sites More sharing options...
Mr Jones Posted July 8, 2016 Share Posted July 8, 2016 Got my kit in -- looks great -- looking forward to doing a super detail-up build; may sacrifice a bit of the fancier functions to add in some lighting. Also need to buy some 1/60 YF19 and YF21s.. though I suppose I could get away displaying it with the 1/72 models in a bit of a forced perspective setup. Quote Link to comment Share on other sites More sharing options...
Xigfrid Posted July 8, 2016 Author Share Posted July 8, 2016 I will be looking to your build! Quote Link to comment Share on other sites More sharing options...
derex3592 Posted July 12, 2016 Share Posted July 12, 2016 Xigfrid's excellent 1:60 Ghost X9 Quote Link to comment Share on other sites More sharing options...
Ignacio Ocamica Posted July 12, 2016 Share Posted July 12, 2016 (edited) Congratulations!!! Turned out great!!! It's the perfect complement for the YF-21 and the YF-19. Edited July 13, 2016 by Ignacio Ocamica Quote Link to comment Share on other sites More sharing options...
Xigfrid Posted July 12, 2016 Author Share Posted July 12, 2016 Hi derex, your ghost is a real beast: the paint matches perfectly the official toys. Did you apply the belly decals ? Quote Link to comment Share on other sites More sharing options...
derex3592 Posted July 12, 2016 Share Posted July 12, 2016 Yes, I did. They went down perfectly. No issues. Thank you for the compliment. I posted some other pics in the YetiStand thread in the Toys section. Quote Link to comment Share on other sites More sharing options...
arbit Posted January 25, 2017 Share Posted January 25, 2017 Thanks Xigfrid. Looks great! Quote Link to comment Share on other sites More sharing options...
Xigfrid Posted January 25, 2017 Author Share Posted January 25, 2017 You are welcome! Quote Link to comment Share on other sites More sharing options...
Xigfrid Posted March 26, 2017 Author Share Posted March 26, 2017 (edited) Hi all, I recently had a commissionned painted Ghost X-9, and I made the inventory of the remaining sets I got. I got one last complete set (unpainted, with landing gears and clear canopy) that I can sell at the standard price and 3 rough sets I am willing $50 USD each. Because it takes time to prepare the resin part to clean/sand/prepare for painting, I want to sold out the remaining rough sets. They are un-refined, with small injection sprues as it is pictured in 1st page within a plastic bag. In order to clean the set, it requires a good knowledge of the assembled ghost, I would make this deal with people who previously ordered a ghost so they can have a comparison/guide to clean up the set. The rough sets once assembled are a complete ghost X-9 with super parts, except for the clear canopy, all the opening traps would need to be glued in fixed position. Or if you are courageous, I can make the missing parts needed for the moving parts and landing gears available in plastic and steel at shapeways or printableb 3D file that you can print yourself. Edited March 26, 2017 by Xigfrid Quote Link to comment Share on other sites More sharing options...
slide Posted March 27, 2017 Share Posted March 27, 2017 how difficult would one be to put together for an experienced resin modeler? Quote Link to comment Share on other sites More sharing options...
wmkjr Posted March 27, 2017 Share Posted March 27, 2017 (edited) Piece of cake for the experienced modeler. This was my 1st try at a model anything.There's minimum gluing needed (only to close the gear doors shut). Most of it is held by screws or friction. Edit: The assembly instructions are in the 1st post if you wanna take a look to judge. Edited March 27, 2017 by wmkjr Quote Link to comment Share on other sites More sharing options...
slide Posted March 27, 2017 Share Posted March 27, 2017 I'm down for $50... Quote Link to comment Share on other sites More sharing options...
Xigfrid Posted March 27, 2017 Author Share Posted March 27, 2017 Wmkjr received a set that was clean of the sprues, and all the holes were pre-drilled. Generally it takes about 40min to clean the sprues, test fit the parts and drilling the holes, a few parts can be slightly curved or torn, they need to be heated with an air dryer and then straighten. For an experience builder, with a rotary tool (or nail sander + vice pin) this should be a piece of cake of course. Quote Link to comment Share on other sites More sharing options...
Xigfrid Posted March 27, 2017 Author Share Posted March 27, 2017 Well I guess I can clean the last three sets, if that can be helpful Quote Link to comment Share on other sites More sharing options...
Jasonc Posted April 1, 2017 Share Posted April 1, 2017 I'm looking to do a metallic finish red on my build. I bought black base coat, then chrome, and then a clear red to go over it. I'll test a part out first to see how that goes, but I can't work on it now until the current project is done. Quote Link to comment Share on other sites More sharing options...
derex3592 Posted April 1, 2017 Share Posted April 1, 2017 can't wait to see that! Quote Link to comment Share on other sites More sharing options...
Xigfrid Posted April 1, 2017 Author Share Posted April 1, 2017 3 hours ago, Jasonc said: I'm looking to do a metallic finish red on my build. I bought black base coat, then chrome, and then a clear red to go over it. I'll test a part out first to see how that goes, but I can't work on it now until the current project is done. That would be an epic Ghost paint scheme! Quote Link to comment Share on other sites More sharing options...
Recommended Posts
Join the conversation
You can post now and register later. If you have an account, sign in now to post with your account.