Hikaru2 Posted July 28, 2012 Share Posted July 28, 2012 Nope, but you are giving me ideas to scout around the beverage isle looking for different possibilities. The answer is: Im so ghetto Quote Link to comment Share on other sites More sharing options...
danbickell Posted July 28, 2012 Author Share Posted July 28, 2012 Wow, if 3d printing is that expensive, I guess CNC milling your model from aluminum would be completely out of the question. Ever since I saw this model, I've been dreaming of seeing a VF-1 get the same treatment: Seriously, though, maybe you should try hitting up the members for donations. I'd be willing to throw in just to see your model come to life. Yeah, I've looked at a bunch of that guy's work. Really amazing stuff, but yeah, I imagine doing a VF-1 like that would break the bank. Given enough time, It would be awesome to try on CG model. After it is all built and "working", just deconstruct it further, separating all the panels, building the frame underneath it, and detailing everything inside. Some of the artwork done for the VF-X in the TV series would be a great starting point (though it doesn't all jive with the final VF-1 design and transformation). Im so ghetto Bright green 7-Up plastic would have been ghetto. The Perrier green is pure class and sophistication! Quote Link to comment Share on other sites More sharing options...
Kurisama Posted July 29, 2012 Share Posted July 29, 2012 Dude, if ur going to do an inner frame and components... May Enki have mercy on your soul. I did the Steelhaven cut away for the Transformers Animated Allspark Almanac 2 - the file got so big - it now no longer opens and was an exercise in dedication. But still, I'd love to see you do this! Quote Link to comment Share on other sites More sharing options...
danbickell Posted July 29, 2012 Author Share Posted July 29, 2012 Just finished uploading V2 of the 1/24 S head to Shapeways. Revisions: Additional subdivision iterations (higher resolution mesh to avoid faceting) Hollow gun barrels now have a 2mm air hole going all the way through to the inside (to help with the wax clogging issue) The small eye base is narrower, and the clam shells doors matched to get around visor clearance issues (I originally had to make the doors thicker to get around the minimum wall thickness for FUD). Thanks to Kurisama for the tip on zipping the file. The poly count went up to close to 2 million, and the .DAE file export jumped to almost 200 Mb, but it zipped down to 41 Mb (much smaller than the previously uploaded version!). I love it when I'm wrong like that! Now I just need to pull the trigger on ordering another head, and then consume myself with modeling while I wait another couple of weeks to see the result... Or not. Just got the email back from Shapeways about going over 1 million polys. Brain fart. I guess I'll just try to keep the extra geometry on the guns, since that was really the only place it was noticeable. Quote Link to comment Share on other sites More sharing options...
Hikaru2 Posted July 29, 2012 Share Posted July 29, 2012 Sweet. I figured building this thing up would get you back on the VF-1. Hope it worked Quote Link to comment Share on other sites More sharing options...
danbickell Posted July 29, 2012 Author Share Posted July 29, 2012 Ok, 2 tries later, Shapeways finally gave the OK. Somehow, 990k triangles was over the 1 million poly limit, but 980k was good. The unexpected benefit was that the price dropped 28 cents, because of the material removed from adding the ventilation tubes at the back of the gun barrels. That's 7 cents per hole, woohoo! Quote Link to comment Share on other sites More sharing options...
Zinjo Posted July 30, 2012 Share Posted July 30, 2012 (edited) Wow, if 3d printing is that expensive, I guess CNC milling your model from aluminum would be completely out of the question. Ever since I saw this model, I've been dreaming of seeing a VF-1 get the same treatment: Seriously, though, maybe you should try hitting up the members for donations. I'd be willing to throw in just to see your model come to life. I don't know about aluminum CNC milling, but I think his printing work would make incredible positives for resin casting!! Imaging computer precision in a resin kit! Edited July 30, 2012 by Zinjo Quote Link to comment Share on other sites More sharing options...
Zinjo Posted July 30, 2012 Share Posted July 30, 2012 Im so ghetto No Dude, that is"old school"!! Using Elmers on clear parts goes back to my old days of kit building... Quote Link to comment Share on other sites More sharing options...
danbickell Posted July 31, 2012 Author Share Posted July 31, 2012 No Dude, that is"old school"!! Using Elmers on clear parts goes back to my old days of kit building... This was a case of using Elmers AS the clear parts. And yeah, we're old. But, I ordered the V2 1/24 S head, and I also made and ordered a vac form buck for the visor, so hopefully we can take the 2nd one to the next level with a properly curved and bulged out visor. I put the lenses on the buck too, but they will still be so small that it might not be worth it. We'll see in a couple of weeks... Quote Link to comment Share on other sites More sharing options...
Hikaru2 Posted July 31, 2012 Share Posted July 31, 2012 No Dude, that is"old school"!! Using Elmers on clear parts goes back to my old days of kit building... Yeah I've had plenty of practice using Elmer's on clear parts, and AS clear parts for very small lenses and as solid pieces. This is the first time i tried it as a ridiculously thin lens with a LOT of airspace begind it. I hope it holds up, because it looks fantastic. This was a case of using Elmers AS the clear parts. And yeah, we're old. But, I ordered the V2 1/24 S head, and I also made and ordered a vac form buck for the visor, so hopefully we can take the 2nd one to the next level with a properly curved and bulged out visor. I put the lenses on the buck too, but they will still be so small that it might not be worth it. We'll see in a couple of weeks... Yeah we may be old, but arthritis hasnt set in yet, so bring that V2 on over when it shows up! Can't wait to see how THIS one turns out! What do you think, Max or Hikaru? Quote Link to comment Share on other sites More sharing options...
danbickell Posted July 31, 2012 Author Share Posted July 31, 2012 Yeah we may be old, but arthritis hasnt set in yet, so bring that V2 on over when it shows up! Can't wait to see how THIS one turns out! What do you think, Max or Hikaru? Heh. My hands have been going all crunchy crunchy swell swell after the first couple of hours for years, and I already had one wrist surgery. Too much mouse/keyboard and gamepads. In theory, the V2 should have less (or hopefully no) faceting, the gun barrels should clean out better, and better eye clamshell fit. I'm mostly curious to see what we can do with the clear parts. I ended up ordering the buck in frosted detail (FD, not FUD), because it should be nice and smooth and it can take 176 degrees F. Other materials seem to be some combination of not as smooth, not as accurate, and deform at lower temps. Hopefully we can make it work. I'm thinking Hikaru. Bodolza kill shot pose. You should do battle-damaged Max when you get one! Quote Link to comment Share on other sites More sharing options...
Hikaru2 Posted July 31, 2012 Share Posted July 31, 2012 Heh. My hands have been going all crunchy crunchy swell swell after the first couple of hours for years, and I already had one wrist surgery. Too much mouse/keyboard and gamepads. In theory, the V2 should have less (or hopefully no) faceting, the gun barrels should clean out better, and better eye clamshell fit. I'm mostly curious to see what we can do with the clear parts. I ended up ordering the buck in frosted detail (FD, not FUD), because it should be nice and smooth and it can take 176 degrees F. Other materials seem to be some combination of not as smooth, not as accurate, and deform at lower temps. Hopefully we can make it work. I'm thinking Hikaru. Bodolza kill shot pose. You should do battle-damaged Max when you get one! Sounds awesome. Can't wait man. Quote Link to comment Share on other sites More sharing options...
EXO Posted July 31, 2012 Share Posted July 31, 2012 There's a company in Italy that does nice clear 3D print out. They're called Fast3D... Been to afraid to find out how much they charge, but they use Objets. Quote Link to comment Share on other sites More sharing options...
danbickell Posted July 31, 2012 Author Share Posted July 31, 2012 There's a company in Italy that does nice clear 3D print out. They're called Fast3D... Been to afraid to find out how much they charge, but they use Objets. A good clear material is half of the problem, but the main problem is getting parts thin enough. The 1:1 visor is only 8 mm thick, and that's the thickest of the clear parts. That's already at the limit of FUD in 1/24, and my guess is that it would be way too thin and fragile to polish. Objets can't go that thin. I would have to re-do the details surrounding the visor (which create a slot that the visor fits into precisely all around) to allow for a thicker visor. Hopefully, we can stretch some acetate around this buck I made and get good results. The Perrier bottle (or 1 thin layer of it, since it was double layered) worked well enough, but just isn't the correct bubbled out shape. Quote Link to comment Share on other sites More sharing options...
Mommar Posted July 31, 2012 Share Posted July 31, 2012 The nice thing about this CG model turned real model is we're all getting a glimpse at just how miraculous it is some of these toy manufacturers are able to put out anything we want in 1/60 considering the crazy compromises that have to be made. Quote Link to comment Share on other sites More sharing options...
Hikaru2 Posted July 31, 2012 Share Posted July 31, 2012 The nice thing about this CG model turned real model is we're all getting a glimpse at just how miraculous it is some of these toy manufacturers are able to put out anything we want in 1/60 considering the crazy compromises that have to be made. Indeed. Quote Link to comment Share on other sites More sharing options...
EXO Posted July 31, 2012 Share Posted July 31, 2012 I think the veloclear is from a new connex machine from Objet. The offer a horizontal build layer of 16 microns. Shapeways don't have those types yet. Can you tell I'm trying to make you my guinea pig??? LOL! Quote Link to comment Share on other sites More sharing options...
Zinjo Posted July 31, 2012 Share Posted July 31, 2012 (edited) Yeah we may be old, but arthritis hasnt set in yet, so bring that V2 on over when it shows up! Can't wait to see how THIS one turns out! What do you think, Max or Hikaru? MAX, he's gotten no love for running the show in the squadron while Hikaru was out hobnobing with giants... Edited July 31, 2012 by Zinjo Quote Link to comment Share on other sites More sharing options...
grapetang Posted August 1, 2012 Share Posted August 1, 2012 Late to the game but wow! This thread is amazing! Can't wait to see more!!! Quote Link to comment Share on other sites More sharing options...
mildred Posted August 1, 2012 Share Posted August 1, 2012 can't really add more to what's been expressed in this thread, dan, other than you've made a serial lurker like me actually feel like i have no choice but to post my admiration for this project! great work! Quote Link to comment Share on other sites More sharing options...
Mommar Posted August 2, 2012 Share Posted August 2, 2012 MAX, he's gotten no love for running the show in the squadron while Hikaru was out hobnobing with giants... I'm with ZInjo. Max needs more love (maybe not, how many kids did he have again?) Quote Link to comment Share on other sites More sharing options...
Aurel Tristen Posted August 2, 2012 Share Posted August 2, 2012 It may have been suggested before (I tend to get excited and scroll for images from time to time on this threat) but what about sending your parts to someone who can make molds / making molds of the parts yourself? It'll cost a lot to print the whole thing, but in the end you could have a mold set ready to stamp out copies for a fraction of the price. I'm quite envious, as I've always wanted to have some of my models printed into reality. Super exciting stuff! Quote Link to comment Share on other sites More sharing options...
danbickell Posted August 2, 2012 Author Share Posted August 2, 2012 I would love to drop these parts in some RTV silicone and make resin copies, and I do have a bit of experience doing that over the years. However, I would need to go about these prints differently to make it work. As printed, it would be pretty impossible to mold that head. It would either need to be separated into 2 halves, or molded as a solid piece (with the inside filled in). The solid route would be problematic for fitting the eye detail (which has to go in from behind, sandwiching the visor), and also a problem for any neck articulation. Likewise, other features like the hollow gun barrels would need to be filled in. Part of what I wanted to experiment with trying 3D printing was doing stuff like that which can only be done by 3D printing. Even expensive injection molding couldn't really do gun barrels like that (again, without splitting them into halves). It would certainly mean compromises to the sort of seamless pieces with overhangs and hollow parts that you couldn't do with 2 part (or even 3 part) molds. And then there's the whole recaster scenario... One reason I might feel better about the idea of making this stuff available on Shapeways is that it would be so hard to mold and recast, as is. If somebody did try it, the results wouldn't be nearly as nice, and would have to have seams all over the place. And, at least in my experience (it's been some years since I've molded anything), all the silicone and resin and supplies aren't exactly cheap either. That's why resin kits cost as much as they do, and why you need to be able to sell so many of them to even break even. Quote Link to comment Share on other sites More sharing options...
Mommar Posted August 8, 2012 Share Posted August 8, 2012 The anticipation is killing me dude! Quote Link to comment Share on other sites More sharing options...
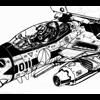
danbickell Posted August 8, 2012 Author Share Posted August 8, 2012 The anticipation is killing me dude! Me too! I'm expecting delivery of the V2 VF-1S head and the vac-form buck for the clear parts from Shapeways tomorrow. I also ordered a vac-form table appropriately sized for these parts and hopefully doing the actual canopy down the road. In the meantime, I've been quite busy with the VF-1 model still. I haven't progressed much with new parts, but I've been spending a lot of time converting the nose to a sub-d model to bring it up to speed with the S head, from what I've learned from the 3D printing process. I've ended up re-working it all quite a bit, refining the shape and details. Most of it might not even be that noticeable in a render, but the results on a 3D print would be night and day. Here's a render to illustrate the difference in the geometry topology, and what it looks like with a few subdivision iterations to crank up the poly count: As you can see, some parts get so dense with geometry that they render almost as if solid. I ended up doing yet another revision of the vernier thrusters, mostly because it became apparent that I was going to have clearance issues with the depth of the previous ones in places on the chest. These ones fit with room to spare, and are simpler and cleaner (and also sub-d, so they can get as perfectly round as needed): The latest area I've been addressing is the cockpit. Paying closer attention to scale now with the 3D printing efforts, I came to the conclusion that there were scale problems with the references I used when originally creating this stuff. Some of the ergonomics of the cockpit were problematic. I ended up scaling up the seat and controls a bit, and repositioning to get a nicer fit for a range of pilot sizes. Smaller pilots like Hikaru and Max would fit fine, and a taller guy like Fokker would fit snug like he should. This really helps the scale feel like it should for a fighter that is supposed to be as relatively small as it is. Here's a WIP shot of how I currently have parts scaled: I will be sure to show you guys the new parts as soon as I receive them. Quote Link to comment Share on other sites More sharing options...
mildred Posted August 8, 2012 Share Posted August 8, 2012 can't wait! Quote Link to comment Share on other sites More sharing options...
GMK Posted August 8, 2012 Share Posted August 8, 2012 Impressive. I'm looking forward to seeing the new parts & how you're going to solve the arm extension and attachment, especially in Gerwalk mode. Greg Quote Link to comment Share on other sites More sharing options...
EXO Posted August 8, 2012 Share Posted August 8, 2012 Wow! How do you say impressive in HD? IMPRESSIVE!!! Quote Link to comment Share on other sites More sharing options...
Mommar Posted August 9, 2012 Share Posted August 9, 2012 To be honest the 3D printing part is not what's killing me. Quote Link to comment Share on other sites More sharing options...
Ignacio Ocamica Posted August 9, 2012 Share Posted August 9, 2012 I can't find the words to describe how awesome this project is. Everytime you show some progress my jaw drops to the floor. Quote Link to comment Share on other sites More sharing options...
danbickell Posted August 9, 2012 Author Share Posted August 9, 2012 (edited) To be honest the 3D printing part is not what's killing me. I understand, and I'm in the same boat about wanting to get the rest of the valk done too. I'm dying to get around to texturing this all, and I've been resisting the urge all along to start texturing what I've already completed. That's when all of this will REALLY come alive, and the fun will begin. And once the base set of textures are complete, making all the different paint schemes and levels of weathering and such will be a breeze. Getting into the 3D printing certainly has slowed things down, but it is ultimately a very good thing for the project. It has forced me to re-examine my approach to it all, which is a good thing because I really have very little experience doing this sort of high resolution work. As a game developer, my skills have always been tailored to making low poly moldels look as good as possible when rendered, and the needs of 3D printing take all of my tricks of the trade out of the picture, forcing me to build (and re-build) this the way it should have been from the start. The more I have progressed, the more I have started building more and more high-poly, and the sub-d version of the VF-1S head that was needed for a better 3D print established a new standard for the rest of the model to come. There isn't much point in proceeding until the parts of the model made earlier are brought up to the same standard. Wouldn't it suck if the whole thing was complete, but the most important part of the whole thing was substantially lower quality than the rest? Here's another new shot of the sub-d model, showing some details close up: This part of the old model could never have held up this close. The fact that it should 3D print nicely is something of a bonus. When I saw the faceting that showed up on the S head print (despite already being substantially higher resolution), I had a sick feeling in my gut about what the old nose model would look like if printed. I know the renders don't really show it, but if you look back at the old wireframes I've posted, you can see how low poly it actually was. A 3D print of that would have surely disappointed us all. Like I said in the beginning, this will be a slow project. I'm happy to have more time to spend on it lately, but it is still slow progress, even though I find time to work on it just about every day. Hopefully, the end results will justify it all. I do hope this will be *the* definitive model for some time (and I seriously hope it motivates some young talent to produce something even better!), but I have to be patient about it and make sure it is done the right way, even if that means going back and re-doing the stuff I have already done. Patience is the ultimate attribute that makes this as good as it is. There's nothing special about any of the modeling. I don't have any magical skills that other modelers don't have. It all just comes down to having the patience to take it slow and get it right. Accept no compromises, and cut no corners. As anxious as I get to make more progress, I am still really enjoying the ability to not have the time-constraints that my professional work always has to have. Edited August 9, 2012 by danbickell Quote Link to comment Share on other sites More sharing options...
Hikaru2 Posted August 9, 2012 Share Posted August 9, 2012 I understand, and I'm in the same boat about wanting to get the rest of the valk done too. I'm dying to get around to texturing this all, and I've been resisting the urge all along to start texturing what I've already completed. That's when all of this will REALLY come alive, and the fun will begin. And once the base set of textures are complete, making all the different paint schemes and levels of weathering and such will be a breeze. Getting into the 3D printing certainly has slowed things down, but it is ultimately a very good thing for the project. It has forced me to re-examine my approach to it all, which is a good thing because I really have very little experience doing this sort of high resolution work. As a game developer, my skills have always been tailored to making low poly moldels look as good as possible when rendered, and the needs of 3D printing take all of my tricks of the trade out of the picture, forcing me to build (and re-build) this the way it should have been from the start. The more I have progressed, the more I have started building more and more high-poly, and the sub-d version of the VF-1S head that was needed for a better 3D print established a new standard for the rest of the model to come. There isn't much point in proceeding until the parts of the model made earlier are brought up to the same standard. Wouldn't it suck if the whole thing was complete, but the most important part of the whole thing was substantially lower quality than the rest? Here's another new shot of the sub-d model, showing some details close up: This part of the old model could never have held up this close. The fact that it should 3D print nicely is something of a bonus. When I saw the faceting that showed up on the S head print (despite already being substantially higher resolution), I had a sick feeling in my gut about what the old nose model would look like if printed. I know the renders don't really show it, but if you look back at the old wireframes I've posted, you can see how low poly it actually was. A 3D print of that would have surely disappointed us all. Like I said in the beginning, this will be a slow project. I'm happy to have more time to spend on it lately, but it is still slow progress, even though I find time to work on it just about every day. Hopefully, the end results will justify it all. I do hope this will be *the* definitive model for some time (and I seriously hope it motivates some young talent to produce something even better!), but I have to be patient about it and make sure it is done the right way, even if that means going back and re-doing the stuff I have already done. Patience is the ultimate attribute that makes this as good as it is. There's nothing special about any of the modeling. I don't have any magical skills that other modelers don't have. It all just comes down to having the patience to take it slow and get it right. Accept no compromises, and cut no corners. As anxious as I get to make more progress, I am still really enjoying the ability to not have the time-constraints that my professional work always has to have. I'll drink to that, brother. Quote Link to comment Share on other sites More sharing options...
EXO Posted August 9, 2012 Share Posted August 9, 2012 Man. It's so crisp and clean. If you hold your nose up to the screen. <sniff> you can almost <sniff> almost smell that new valk smell. <sniff> <sniff> Quote Link to comment Share on other sites More sharing options...
Mr March Posted August 9, 2012 Share Posted August 9, 2012 Patience is the ultimate attribute that makes this as good as it is. There's nothing special about any of the modeling. I don't have any magical skills that other modelers don't have. It all just comes down to having the patience to take it slow and get it right. Accept no compromises, and cut no corners. As anxious as I get to make more progress, I am still really enjoying the ability to not have the time-constraints that my professional work always has to have. Just wanted to highlight this paragraph because it's an opinion I really agree with that I have tried many a time to impart upon fans who like what I do with the Macross Mecha Manual. While there is a little skill to be developed over time, I am by no means exceptional with art. The most important "skills" to develop are patience and persistence (and research). That's all. Simply dedicate some time to a project and keep at it, even if it's just in small portions every day and the work will get done. There's no magic, just effort. If a complete novice like me can install photoshop and color line art, anyone can do it. Keep up the great work danbickell! Quote Link to comment Share on other sites More sharing options...
Zinjo Posted August 9, 2012 Share Posted August 9, 2012 (edited) If a complete novice like me can install photoshop and color line art, anyone can do it. SOOO TRUE!! Edited August 9, 2012 by Zinjo Quote Link to comment Share on other sites More sharing options...
Recommended Posts
Join the conversation
You can post now and register later. If you have an account, sign in now to post with your account.