funaka Posted January 26, 2011 Share Posted January 26, 2011 Hello! My name is Dan I go by Funaka online. I posted about this build on the Hobby Fanatics forums and member PetarB suggested I visit this forum and post my work here as well. I mostly build Gundam kits, but that's because there are more Gundam kits and they're generally easier to build compared to Macross kits. But I LOVE Valkyries and I'm finally getting over the lazies and building one. I'm combining Hasegawa'a VF-1D and Super VF-1A kits to create a Super VF-1D. I'm going to use the Hasegawa Minmay Guard decal set on it and come up with a custom paint scheme for it. Here's what I have so far, more or less: Here's the page from my website with a lot more detail of the work I have done: Super VF-1D Progress Click the link above to see the progress so far. Quote Link to comment Share on other sites More sharing options...
505thAirborne Posted January 26, 2011 Share Posted January 26, 2011 Welcome to the Model forums funaka! Looks like your VF-1D is off to a great start so far, this will be one of the first Fast Pack VF-1D's posted in quite a while & with Minmay Guard decals this should really be awesome, keep us posted with WIP pics! Quote Link to comment Share on other sites More sharing options...
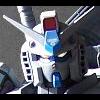
funaka Posted January 30, 2011 Author Share Posted January 30, 2011 I decided to switch over to the full pictorial mode and put the whole update here... So, one of the last things I have to do before I start priming is to retract the rear wheels. To do this I had to modify the "legs" is to add a plastic shim inside the wheel well to support the rearmost gear door otherwise it just falls into the wheel well. Up front, I had to cut out the support from the landing light mount. The landing light is like a third landing gear door that opens forward so that the landing light can shine forward. Unlike the actual landing gear doors that fit pretty good in the well, the landing light "doors" were too long, too wide and too thick. I had to file down the landing light door to the right dimensions and also file the edges so that it could sit flush on top of the "rails" that were left when I cut out the center of the door mount. Now the doors fit pretty well. Like the nose gear door, I can't do the final fit until I glue the halves of the legs together. Next was the foot exhausts. The way the kit is made the feet are sandwiched between the legs and have to be masked off. That also means you have to paint them and everything inside before you glue the legs together. I didn't want to do this so I shaved the circular shapes off the sides of the feet that hold them in place. I thought I would have to make some kind of mounts for the feet but it turned out that when I test fit them they fit pretty snugly and touched the plate with the molded in exhaust detail inside the leg well enough that I decided I could just glue them in place after the model was done. They sit slightly deeper than intended, but you can't really tell. Here's the comparison to the stock mounting: I love it when mods just kind of work themselves out. That's why test-fitting is so important. It's amazing how many things fit that aren't even necessarily meant to fit together. The last thing was to glue the photoetched deteail inside the feet: Now I'm ready to wash all the parts I've worked on for priming. The next thing I did was to get back on the computer and work out my color scheme. I wanted to go with a stripes and sunburst pattern. It's a real classic with airplanes. But it's too classic. It looks right on a Super Cub, or Decathalon. These are fabric-covered airplanes from the middle of the 20th century so I wanted something to modernize the look of the color scheme. I first thought of fading them out with the airbrush but thought that would be kind of lame since the pattern would just kind of disappear. But I liked the idea of the pattern starting strong towards the center of the plane and then breaking up as it got out towards the extremities. I don't know when I made the connection, but I decided to do it with little white strips like the pattern was being cut to ribbons. I think the idea comes from what Gamerabaenre did with the patterns of blue and pink in his Gouf Cstom and Zaku II (http://gamerabaenre.com/gouf_conv.htm) but the pattern is applied in a gradient from one end to another. Here's the mock-up: The UN Spacy is upside down on the gunpod because it just bugs the heck out of me to see it upside down when carried in battroid mode, especially when that makes it rightside up in fighter mode WHEN IT'S RIGHT NEXT TO THE UN SPACY LOGO ON THE LEG!!! Why have it all rightside up in one mode and all upside down in the other??? It's like the Zaku shield, it should really be on the left shoulder for right-handed pilots since that way it would deploy forward in the typical two-handed firing stance. Quote Link to comment Share on other sites More sharing options...
PetarB Posted January 30, 2011 Share Posted January 30, 2011 Great work! Covering the rear wheel well correctly is one of the real issues with this kit, a real pain. In the end I just covered the whole area with putty and rescribed. Perhaps a bit of overkill! Looking forward to more. Quote Link to comment Share on other sites More sharing options...
jardann Posted January 31, 2011 Share Posted January 31, 2011 I like the look of that color scheme! It gives it a nice amount of color and interest without being overwhelming. Looks like you're on the right track with this build. Keep up the great work! I'll be waiting for more. Quote Link to comment Share on other sites More sharing options...
funaka Posted February 27, 2011 Author Share Posted February 27, 2011 Well, I kind of disappeared with this project... A big part of that is just life getting in the way. In the last few weeks I've had to fight with my insurance company and the body shop that didn't fix my car right to get them to fix it right. I've also battled a colony ants that moved into my bedroom wall. I've had to study for a promotional job interview (I got the job!). I've had to do online traffic school. I took a test in the class I’m taking and I made an "Intro to Mecha Modeling" presentation to the local IPMS club. But also, I'm just to the point of fixing the 20-odd seam lines on this kit and it's not something I look forward to all day at work. I am almost ready to prime, however. Anyway... I thought I’d be painting the cockpit soon since it needs to be painted before I close up the fuselage, but I started assembling some sub-assemblies and as I began to test fit some parts, I found a lot of small issues that needed attention. Some of these fixes are still in-progress, and I bounced around quite a bit from one small task to another but I’ll try to present it in an orderly fashion. I test-fit the VF-1D head that tucks into the bottom of the cockpit and found that the head sits too low so that rim of the gun turrets on the side of the head stick out above the actual head. A lot! To fix this I added some plates on the bottom of the head to shim it upwards (technically downwards since it’s on the bottom of the plane, but...) and now the guns sit flush with the top of the head. Next was the Super booster packs. The very first thing I did was cut the tabs off the main thrusters so that they could be painted separately and slid into place afterwards. The booster packs had some fit issues as the main thrusters didn’t fit inside them well without splitting the packs apart at the seams. If you look in the picture above, you can see the bulges on the inside on the right side that house the small maneuvering thrusters on the sides of the packs. These interfere with the fit of the main thrusters so I sanded them upper bulge down a bit and the side of the booster as well. Next I looked at the way the packs mount to the backpack. The mounts have a really small contact point that doesn’t allow much glue to hold these relatively large structures to the plane. Even worse, there isn’t a positive fit that keeps them aligned, so you could mount them really crooked. I’ve seen Valks with this problem, even some of Hasegawa’s own prototype models can be spotted with crooked booster packs. To fit this I used a 1.5mm brass rod and CAREFULLY drilled matching holes into the mounts for the booster packs. This rod will go through a plastic rod, which will be securely glued inside the backpack, which should give a secure and straight fit. The downside is that this will all have to be glued in place and aligned after painting is done. Had to break this up... too many pictures, lol. The next fix for the boosters was the gaping hollow spaces visible behind the main thrusters when viewed from behind: To remedy this I added some small strips of plastic as brackets to mount some plastic plate: Once these brackets were in place I used trial and error to make a set of upper and lower formers to block off the hollow space and glued them in. I’ll add some detailing greebles to them before painting. I’m also going to add some plaplate or strips around the inside backs of the booster pack because there’s a lot of blank space visible around the main thrusters. I test-fit the arms and discovered a big hole in the hollow “elbows” that will be visible once the plane is all assembled. It’s not horrible since you would only see it from certain angles, but still, it’s an easy fix so I blocked it off with some thin plaplate. With the legs glued together, I went ahead and installed the landing gear doors. They still required a bit of filing but I got a pretty good fit. I’ll probably still need some filler here and there but I’m pretty happy with the results so far. The question is how much putty I’ll have to use to smooth them out and how much I’ll have to rescribe the door outlines. That’s it for now. I hope to post pictures of a primed model with a painted cockpit in the near future. I’ll probably have a decent bit of work to do rescribing the panel lines that were lost in the seam-fixing process, but after that I can get to painting and hopefully the work will go faster. Quote Link to comment Share on other sites More sharing options...
PetarB Posted February 27, 2011 Share Posted February 27, 2011 I really like your brass tube fix for the booster packs. I've always thought this was a huge weakness of the kit. Quote Link to comment Share on other sites More sharing options...
Recommended Posts
Join the conversation
You can post now and register later. If you have an account, sign in now to post with your account.