Skull-1 Posted October 30, 2008 Share Posted October 30, 2008 (edited) Due to popular request and the fact that the thread this originally appeared in is misleading... I am re-posting a clearer version of the BIC Pen Swivel Thigh Mod for 1/55s. All you need is a 1/55 thigh, a saw, some BIC Roundstick Pens, Sandpaper, Masking Tape, 2 C-Clamps, and some JB Weld. Here we go! Edited October 30, 2008 by Skull-1 Quote Link to comment Share on other sites More sharing options...
Skull-1 Posted October 30, 2008 Author Share Posted October 30, 2008 (edited) Step One: Glue the the thighs together with JB Weld or Super Glue. Pay particular attention to the black thigh parts--glue them down so they don't break off when you saw the thigh. Be careful not to get any glue on the Spring or ratchet assemblies but you do need to glue these areas down. (NOT SHOWN IN THESE PICTURES... This is a good time to fill the screw hole in the middle of the thigh. Place tape over it to smooth it out once you've filled it with JB Weld.) Step Two: Saw so that you are cutting the part from low to high and front to rear (low/front to high/rear). The forward part of the thigh is the lower end of the cut. (I'm repeating myself because this is crucial. If you don't do it this way, the A Stance won't work as it will swivel the heels together instead of the legs outward!) Step Three: After allowing the JB Weld/Super Glue to dry, core out the insides of the thigh segments using an X-Acto Knife and wire cutters (the latter are particularly useful for removing the remnants of the the screw channel in the middle of the thigh). Then lightly sand the edges [] where the thighs meet on a flat nail board or with sandpaper on a flat surface. Lightly. Don't go crazy. We are just wanting these to be relatively flat and smooth so the edges are tight when they touch. Do not be alarmed that the thigh openings are not the same size--we will fix that later. Step Four: Grab your Pens and Clamps... You will be test fitting them at this point. *** ABOVE: This Part Will Be Referred to as the "PEN TIP" -- the Bevel at the Widest Point is the "PEN LEDGE". *** (Yes I know, it should be the "Tip Ledge" but I don't want to confuse people so I named it somewhat improperly in order to protect speed readers from confusing "Tip Ledge" with "Tip"! ) The pen tip goes into the lower part of the thigh (which is usually the smallest). Trim this part down so that it fits inside the thigh fully with the pen ledge of the pen tip slightly below and parallel to the cut in the thigh. You will want it to fit inside the opposing thigh part with enough room for the pen tube to go over it. (Do not JB Weld just yet, but this is what it looks like when you finish the next step.) Edited November 2, 2008 by Skull-1 Quote Link to comment Share on other sites More sharing options...
Skull-1 Posted October 30, 2008 Author Share Posted October 30, 2008 (edited) Step Five: Clip a section off the PEN TUBE, slide this over the PEN TIP, then trim the PEN TUBE until flush. (NOTE: I have shown an assembled version for clarity. The thighs should not be attached to anything yet. Test fit the PEN TUBE/TIP combo inside the hollowed out upper thigh. It should fit inside it fully. Step Six: Once the part is seen to fit properly, remove the PEN TUBE and carve some scallops into it. These will assist the JB Weld in holding the part securely. Step Seven: Read this section carefully before proceeding. a) Mix some JB Weld (JB Kwik actually works better if you work fast as it dries quickly) and fill the lower thigh with it. Then stick the PEN TIP down inside the thigh, wiping away any excess. Don't let the JB Weld flow over the top of the thigh cut. b) Place the PEN TUBE over the PEN TIP and use the upper thigh to align. Press the parts together keeping the PEN TIP section of the thigh on the bottom so the JB Weld doesn't flow out of the opening and wait for the JB Weld to stiffen. When it does harden some use MASKING TAPE to hold the entire thing together. NOTE: WE ARE NOT CONCERNED WITH PERFECT ALIGNMENT OF THE OPENINGS RELATIVE TO FORE AND AFT OR LEFT TO RIGHT--WE WANT THEM FLUSH AT THE CUT WITH A *VERY* VERY TIGHT SEAM. We will sand the excess that sticks out like a notch later. TO BE CONTINUED... Edited November 2, 2008 by Skull-1 Quote Link to comment Share on other sites More sharing options...
Texan29 Posted October 30, 2008 Share Posted October 30, 2008 Awww man, cliff hangers always leave me antsy! Quote Link to comment Share on other sites More sharing options...
Jasonc Posted October 30, 2008 Share Posted October 30, 2008 I did this same type of mod several years ago. It does work, and works very well. It's probably one of the easiest mods to do that will have a definite awesome effect on a 1/55. Great pics and how to. Good stuff. Quote Link to comment Share on other sites More sharing options...
Texan29 Posted October 30, 2008 Share Posted October 30, 2008 I did this same type of mod several years ago. It does work, and works very well. It's probably one of the easiest mods to do that will have a definite awesome effect on a 1/55. Great pics and how to. Good stuff. Yeah, me too...except I cut mine straight across and cannibalized an old transformer toy for the ratcheting movement, and I didn't actually finish. Quote Link to comment Share on other sites More sharing options...
Skull-1 Posted October 30, 2008 Author Share Posted October 30, 2008 (edited) I did this same type of mod several years ago. It does work, and works very well. It's probably one of the easiest mods to do that will have a definite awesome effect on a 1/55. Great pics and how to. Good stuff. Thanks, Jc. I did this in mid-2003 or so using canibalized elbow parts off of 1/55s. It worked, but was a lot of effort. The BIC Pen is easier because they are ubiquitous and allow more margin for error. I think my first BIC swivel thigh came out in Jun 2006. I've since done about 12 pair of 'em and it gets easier each time. The original thread didn't have the BIC explanation until several pages in. It was therefore not very user friendly or easy to find. Hopefully this will do more for people. Edited November 2, 2008 by Skull-1 Quote Link to comment Share on other sites More sharing options...
big F Posted October 31, 2008 Share Posted October 31, 2008 Thanks Skull.. We do need to maybe sort out the various 1/55 threads and glean from them the how toos etc. Then may be they'll let us have our own thread. Quote Link to comment Share on other sites More sharing options...
Jasonc Posted November 1, 2008 Share Posted November 1, 2008 I put up a thread sometime ago with a custom VE-1 Elintseeker that I did this mod on. The pics are somewhere on this site, but here they are. Since the last pics you'll see, they've been imporved quite a bit. They're also not the greatest pics, but here they are. you might have to rotate the pics too. Quote Link to comment Share on other sites More sharing options...
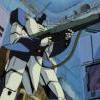
Skull-1 Posted November 2, 2008 Author Share Posted November 2, 2008 (edited) I put up a thread sometime ago with a custom VE-1 Elintseeker that I did this mod on. The pics are somewhere on this site, but here they are. Since the last pics you'll see, they've been imporved quite a bit. They're also not the greatest pics, but here they are. you might have to rotate the pics too. Excellent photos. This highlights the effect of a flatter cut on the stance of the Valk. If Battloid/Battroid mode is the one you prefer to display it in then a flatter cut is better. If you prefer Gerwalk mode then a steeper cut is better. Both have their drawbacks sadly. Here's an aggressively slanted cut (left) compared to a flatter one (right). Note that the flatter cut appears to tuck the "heels" inward. Edited November 2, 2008 by Skull-1 Quote Link to comment Share on other sites More sharing options...
Jasonc Posted November 2, 2008 Share Posted November 2, 2008 Yep, with an absurd amount of 1/55 parts, I tested different cuts and angles. It was a pain to find an angle that would benefit Gerwalk and battroid... in conclusion, my cut angle. I wish I remembered the type of pen that I used, cause I used one that had a nice, stiff connection. I have another let worked out that actually has knee joints, courtesy of MB4M, and tweaked by myself. Someday, I will work on my last custom 1/55 and show the swivel 1/55 leg with adjustable feet and movable knee joint. The Elintseeker custom was my 2nd attempt at the pen swivel custom, and it is an easy, yet simple customizing trick to get that awesome "A" stance from your 1/55s. I do miss the days when 1/55 customs were all over the place here. With the new Yamato 1/60s, even 1/48s, they are so articulated, there's not much needed for modding now. It's more painting now, but reading threads like these are great. Makes me want to get my tools out and work. Quote Link to comment Share on other sites More sharing options...
Skull-1 Posted November 2, 2008 Author Share Posted November 2, 2008 (edited) Yep, with an absurd amount of 1/55 parts, I tested different cuts and angles. It was a pain to find an angle that would benefit Gerwalk and battroid... in conclusion, my cut angle. I wish I remembered the type of pen that I used, cause I used one that had a nice, stiff connection. I have another let worked out that actually has knee joints, courtesy of MB4M, and tweaked by myself. Someday, I will work on my last custom 1/55 and show the swivel 1/55 leg with adjustable feet and movable knee joint. The Elintseeker custom was my 2nd attempt at the pen swivel custom, and it is an easy, yet simple customizing trick to get that awesome "A" stance from your 1/55s. I do miss the days when 1/55 customs were all over the place here. With the new Yamato 1/60s, even 1/48s, they are so articulated, there's not much needed for modding now. It's more painting now, but reading threads like these are great. Makes me want to get my tools out and work. Found it for you (c. July 2006). http://macrossworld.com/mwf/index.php?showtopic=19786 Interesting that we both made the same cut initially. (From c. Sept. 2003). http://macrossworld.com/mwf/index.php?showtopic=1608 I found my original attempt at this (c. April 2003) but I cannot find a date. It had to be sometime around mid-2003 but I can't nail it down. I bet I posted this on the old forum somewhere. Man look at how bad these pics are with a truly attrocious digital camera LOL! Edited November 2, 2008 by Skull-1 Quote Link to comment Share on other sites More sharing options...
mojacko Posted November 10, 2008 Share Posted November 10, 2008 whooooa......this is intersting.....i want to try this thing out....but how the upper n lower leg supported??? arent the lower leg gonna fall??? juz curios....... long live the chuncks!!! Quote Link to comment Share on other sites More sharing options...
big F Posted November 10, 2008 Share Posted November 10, 2008 whooooa......this is intersting.....i want to try this thing out....but how the upper n lower leg supported??? arent the lower leg gonna fall??? juz curios....... long live the chuncks!!! They dont as there is what is known as an interfearence fit betwwen the two parts of the pen. This is because the lid is only fractionally bigger than the pen body. Its the same thing that makes snap fit poppers on clothing stay put. Quote Link to comment Share on other sites More sharing options...
Skull-1 Posted November 13, 2008 Author Share Posted November 13, 2008 They dont as there is what is known as an interfearence fit betwwen the two parts of the pen. This is because the lid is only fractionally bigger than the pen body. Its the same thing that makes snap fit poppers on clothing stay put. What he said. Those pen tubes hold the pen tip very tightly. You have to pull them apart with your teeth sometimes. Also, if you have a looser one you can bend the pen tube into a slightly oval shape to add friction before JB Welding is completed (more on that later). You can hold a modded 1/55 inverted by the feet and it won't break loose. The modded thighs are pretty tough. Quote Link to comment Share on other sites More sharing options...
Skull-1 Posted February 10, 2010 Author Share Posted February 10, 2010 Oldie but goodie. *PUNT* Quote Link to comment Share on other sites More sharing options...
VF5SS Posted February 11, 2010 Share Posted February 11, 2010 those poor jetfires Quote Link to comment Share on other sites More sharing options...
nightmareB4macross Posted February 11, 2010 Share Posted February 11, 2010 Oldie but goodie. *PUNT* Nice move cryptkeeper. How about you place a link in your sig and if anyone's interested let them look for themselves. I was hoping you had something new...but nothing new since 2003 to 2008. Quote Link to comment Share on other sites More sharing options...
Skull-1 Posted February 15, 2010 Author Share Posted February 15, 2010 those poor jetfires Are you kidding me? They've been rebuilt, refurbished, restored, and returned to a glory greater than they had when new. They're out there now defending the world from the evil Zentraedi horde. Quote Link to comment Share on other sites More sharing options...
Skull-1 Posted February 15, 2010 Author Share Posted February 15, 2010 Nice move cryptkeeper. How about you place a link in your sig and if anyone's interested let them look for themselves. I was hoping you had something new...but nothing new since 2003 to 2008. New members may not have been aware of the evil deeds perpetrated by the Chunky Monkey Mafia... Just keeping the word out there. (Nobody reads sig files any way or you'd know this link is in mine.) Quote Link to comment Share on other sites More sharing options...
mojacko Posted February 18, 2010 Share Posted February 18, 2010 New members may not have been aware of the evil deeds perpetrated by the Chunky Monkey Mafia... Just keeping the word out there. (Nobody reads sig files any way or you'd know this link is in mine.) Hooooray for the Chunky Monkey Mafia.....long live the classics Quote Link to comment Share on other sites More sharing options...
big F Posted February 18, 2010 Share Posted February 18, 2010 (Nobody reads sig files any way or you'd know this link is in mine.) Yeah and I'd have a nice scan of some Jetfire decals. Even if I dont have the time to do anything about it, Quote Link to comment Share on other sites More sharing options...
Jasonc Posted February 19, 2010 Share Posted February 19, 2010 Ahhh, I remember this. It was good times. Except for about 21/2 jetfire/bootlegs still left, I haven't worked on any of these in ages. It's still nice to look at them though, and remember when these were the hot items. I didn't really expect anything new in this thread, but thanks for the nostalgia fix. Quote Link to comment Share on other sites More sharing options...
Skull-1 Posted February 19, 2010 Author Share Posted February 19, 2010 Ahhh, I remember this. It was good times. Except for about 21/2 jetfire/bootlegs still left, I haven't worked on any of these in ages. It's still nice to look at them though, and remember when these were the hot items. I didn't really expect anything new in this thread, but thanks for the nostalgia fix. Wish I had more to update, but being homeless doesn't lend itself to customizing much. I have a vision in my head though....that soon....I will have my own place... And I will have a Valk work bench with parts drawers and shelves... It's gonna' be grand. But still a few months off, sadly. Working on 1/55s is so relaxing to me. I really miss doing it. Quote Link to comment Share on other sites More sharing options...
mojacko Posted February 19, 2010 Share Posted February 19, 2010 Wish I had more to update, but being homeless doesn't lend itself to customizing much. I have a vision in my head though....that soon....I will have my own place... And I will have a Valk work bench with parts drawers and shelves... It's gonna' be grand. But still a few months off, sadly. Working on 1/55s is so relaxing to me. I really miss doing it. yeah in a couple of months from now im gonna be in the same situation as your skull.....im gonna be migrating to Canada w/ my family ....gonna start @ ground zero....will be looking for a job and a home as well.....but for the meantime im gonna stay with my brother.... Quote Link to comment Share on other sites More sharing options...
big F Posted February 20, 2010 Share Posted February 20, 2010 Ah it seems we are all in the Doldrums at the mo. Since moving I have not even looked at my awaiting 1/55's and kits etc. its all in boxes in my Parents attic. I am working longer hours for less money and have loads to do to the house before I even get a chance. But at least the stuff wont age and I guess that some of the boots could be used for kids toys etc to keep em off my model displays. Basically its like this :- Work gets in the way of life Life gets in the way of spare time Spare time is never enough. You never have enough money or time. You always have more than enough hope! Quote Link to comment Share on other sites More sharing options...
Mazinger Posted March 17, 2016 Share Posted March 17, 2016 So I'm curious, how have the thigh mods held up after 6 years? Have they gone all loosey goosey? Quote Link to comment Share on other sites More sharing options...
Mazinger Posted April 20, 2016 Share Posted April 20, 2016 Bumpety bump bump... Actually I have a question and am hoping someone who has tried this is still on the forums. So, did you glue/weld the thigh haves together with the springs and ratchet plastic parts inside? It seemed like the guide was suggesting actually glueing the ratchet parts to the thigh halves, which seems less optimal if you have the springs available. Quote Link to comment Share on other sites More sharing options...
Jasonc Posted April 29, 2016 Share Posted April 29, 2016 To answer both of your questions. The last I had one was about 2 years ago. the modification still held up as if I just put it in. The key is finding a pen to cut up with a really tight socket for the pen, and sturdy plastic that is still soft enough to not crack or break. As for the construction method, the upper thigh part has virtually nothing in the middle of it, so the top and bottom halves still keep their integrity to the toy itself. It will still ratchet and move the part attatched to the lower leg and the part that connects to the cockpit. I miss them to some extent, but for an easy mod, this is a very good way to jazz up the chunky monkeys. In re-reading this thread, I never did post up pics of the modified feet, which were able to swivel with a bit of vector thrust. Quote Link to comment Share on other sites More sharing options...
Mazinger Posted May 12, 2016 Share Posted May 12, 2016 Well here's my contribution to examples of this method. Admittedly, this was my first experience with cutting plastic (used a hand saw) and epoxy-ing stuff. Quote Link to comment Share on other sites More sharing options...
Jasonc Posted May 12, 2016 Share Posted May 12, 2016 Well here's my contribution to examples of this method. Admittedly, this was my first experience with cutting plastic (used a hand saw) and epoxy-ing stuff. Looks like it came out quite well. Congrats on a well done job. Quote Link to comment Share on other sites More sharing options...
big F Posted May 22, 2016 Share Posted May 22, 2016 Good to see the mod holds up well. Quote Link to comment Share on other sites More sharing options...
mojacko Posted May 24, 2016 Share Posted May 24, 2016 Wow...never thought someone is still doing this kind of mods....keep em coming. Will have to look for an el cheapo Jetfire...lol Quote Link to comment Share on other sites More sharing options...
Recommended Posts
Join the conversation
You can post now and register later. If you have an account, sign in now to post with your account.