Shun Posted April 2, 2008 Share Posted April 2, 2008 (edited) hmmm i dunno much about decals or scanning but is it a good idea to place a ruler beside the decal so that we can use the ruler as a reference for scaling? just a suggestion. Edited April 2, 2008 by Shun Link to comment Share on other sites More sharing options...
miriya Posted April 2, 2008 Share Posted April 2, 2008 Yes, Thank you Arthurius. Appreciated that you did this for us. Link to comment Share on other sites More sharing options...
Scream Man Posted April 2, 2008 Share Posted April 2, 2008 very sweet dude. id totally buy some reprolabels of these. Im not a decals fan, but Id use them too ina pinch. Link to comment Share on other sites More sharing options...
Twoducks Posted April 2, 2008 Share Posted April 2, 2008 (edited) The Beagle looks awesome but not US$600 awesome. Some shots of the MH with the leftover parts (front shocks and handles… and the head) attached to the back. Also of the CM in the Bandai action stand II. The CM looks great. I hardly notice all the screws it has (just the ones on the boxes). The bad thing is that transforming can be a bit irritating. Bike mode is fiddly whereas the MH not (too bad since the CM looks a lot better in this mode than the MH). The MH kinda let me down at first. The mate finish looks nice but for some reason I don’t like how the paint feels in my fingers. Transformation is a Lego explosion (even of parts that shouldn’t be remove pop off) and you only feel everything is tight in bike mode. Can’t get it to stand either, the thing is incredibly back heavy. The face is awesome though. I like em but I don’t have a clear favourite. The MH didn’t reach my high expectations whereas the CM exceeded my low expectations. Edited April 2, 2008 by Twoducks Link to comment Share on other sites More sharing options...
Alex Posted April 2, 2008 Share Posted April 2, 2008 (edited) That's REALLY COOL! Can you give us a step by step of your process thus far? I would also like to know what kind of doll you used so maybe I can try my hand at one. THANKS!!! Thanks. But it's difficult to post WIP pics because of the way I work. I often change the way i'm doing something half way through. I'm going to put faux leather on the seat too. I also have three sets of interchangeable hands. And the face will be fully painted (although it's from a prepainted figure I had lying around ) I'm also using Revoltech joints to hinge the armor plates. The "Mandoll" is just some cheapie thing Im picked up from Kotobukiya. Didn't even have any stickers on its clear plastic baggie. Sorry. But you can find similar in most Toys r Us' probably. Edited April 2, 2008 by Alex Link to comment Share on other sites More sharing options...
Kin Posted April 2, 2008 Share Posted April 2, 2008 (edited) Yacolog's report I've been out for a while, from which manufacturer is that? It's the best I've ever seen so far (otherwise cm) This one got the tires size right! ...o wait It's a beagle but a newerversion??? Edited April 2, 2008 by Kin Link to comment Share on other sites More sharing options...
Alex Posted April 2, 2008 Share Posted April 2, 2008 I bought a 1/15 ride armor kit the other day in order to upgrade my MH. I'm going to give them the proper tinted helmets and I used the sticker sheets from those instead of the elusive MH ones. Look like they'll work just as well. Link to comment Share on other sites More sharing options...
Scream Man Posted April 2, 2008 Share Posted April 2, 2008 what are u going to change on the MH? Link to comment Share on other sites More sharing options...
magicsp00n Posted April 2, 2008 Share Posted April 2, 2008 (edited) Well, seems i forgot my parents had a scanner, but max picture size i can put is 10 meg, so here is one at 1200 dpi at 3.6 meg. Otherwise, i have one at 2600 dpi at 11.3 megs that i made, but cant attach here. Hope its enough: They include a moustache sticker?! Edited April 2, 2008 by magicsp00n Link to comment Share on other sites More sharing options...
Alex Posted April 2, 2008 Share Posted April 2, 2008 (edited) what are u going to change on the MH? Well I already gave Ray bigger wheels (go back a few pages for pics) and I will give them the blue, clear visors from the kits. And of course i'll give them the stickers from the kits. I have so many bloomin Mospeada customs going right now what with this and my 1/12. Edited April 2, 2008 by Alex Link to comment Share on other sites More sharing options...
misterryno Posted April 2, 2008 Share Posted April 2, 2008 Well I already gave Ray bigger wheels (go back a few pages for pics) and I will give them the blue, clear visors from the kits. And of course i'll give them the stickers from the kits. I have so many bloomin Mospeada customs going right now what with this and my 1/12. That sounds fantastic. PLease post some pics. Also...what 1/15 kit are you using. BTW....thanks for the info on the "man doll" I will be looking out for this. Link to comment Share on other sites More sharing options...
misterryno Posted April 2, 2008 Share Posted April 2, 2008 Twoducks, Those are some GREAT poses mate!!! Would you mind also posting them in the "Strike a pose-Mospeada version"? I'm gonna look more in depth to them later for right now I am at work . Link to comment Share on other sites More sharing options...
misterryno Posted April 2, 2008 Share Posted April 2, 2008 Arthurius, The scan is GREATLY appreciated!!! THANKS!!! Link to comment Share on other sites More sharing options...
Lonely Soldier Boy Posted April 2, 2008 Share Posted April 2, 2008 The ET sticker in the MH sheet suggests we will see a Mint figure after all. I hope it's a poseable one Link to comment Share on other sites More sharing options...
misterryno Posted April 2, 2008 Share Posted April 2, 2008 The ET sticker in the MH sheet suggests we will see a Mint figure after all. I hope it's a poseable one I don't know enough about Mospeada to know what the "ET" sticker means. Can you elaborate for me please? THANKS Link to comment Share on other sites More sharing options...
Lonely Soldier Boy Posted April 2, 2008 Share Posted April 2, 2008 Mint, the hyperactive girl sidekick-for-comedic-relief, wears a cap with the ET logo on it. We've already seen a prototype figure of her with the first color pics of the bikes. She was riding the bike behind Rey. It was a solid piece (i.e. no joints) and some of us were speculating whether MH was to pack her with one of the bikes or not. I hope the ET sticker means that she is still in the pipeline. If that's the case we may get to see some more support characters Link to comment Share on other sites More sharing options...
misterryno Posted April 2, 2008 Share Posted April 2, 2008 Mint, the hyperactive girl sidekick-for-comedic-relief, wears a cap with the ET logo on it. We've already seen a prototype figure of her with the first color pics of the bikes. She was riding the bike behind Rey. It was a solid piece (i.e. no joints) and some of us were speculating whether MH was to pack her with one of the bikes or not. I hope the ET sticker means that she is still in the pipeline. If that's the case we may get to see some more support characters THANKS for the insight! It would be a surely sneaky way for them to tell us yet not tell us what is on its way out. THANKS AGAIN! I need to get "Genesis Climber Mospeada" Link to comment Share on other sites More sharing options...
Fly4victory Posted April 2, 2008 Share Posted April 2, 2008 They include a moustache sticker?! The mustache and sunglasses are to make MAJ/COL Johnathan "WOLF". I know he was a Major in GCM but a Colonel in Robotech. Think the Wolf part is Robotech only. Link to comment Share on other sites More sharing options...
hutch Posted April 2, 2008 Share Posted April 2, 2008 Got my processing info from BBTS today for the MegaHouse today! YAH! Link to comment Share on other sites More sharing options...
misterryno Posted April 3, 2008 Share Posted April 3, 2008 Got my processing info from BBTS today for the MegaHouse today! YAH! WOW BBTS took a while eh?!? Link to comment Share on other sites More sharing options...
markramsay Posted April 3, 2008 Share Posted April 3, 2008 If you guys find someone that wants to make decals for everyone, then i can send him the higher res pic. i've been working on a set for a few weeks now, using a lower res scan of this, and an IMAI model kit set of decals. I have also created original decals so "scott" and "rand" can personalize their bikes. So far the set is going to be both on clear stock, and opaque as some of the decals cover up some of the pre-stamped details on Stick's bike. i've even used the RPG books as reference for some, and added a few UN SPACY, and REF logos and macross symbols. if you can send me a higher rez scan, ill be able to get more details. Link to comment Share on other sites More sharing options...
Lonely Soldier Boy Posted April 3, 2008 Share Posted April 3, 2008 Coolio! Link to comment Share on other sites More sharing options...
hutch Posted April 3, 2008 Share Posted April 3, 2008 WOW BBTS took a while eh?!? INDEED! My thoughts as well, but better late than never. Link to comment Share on other sites More sharing options...
jenius Posted April 4, 2008 Share Posted April 4, 2008 I finally got my Ride Armor review up! Click the link in my sig to check it out Link to comment Share on other sites More sharing options...
Scream Man Posted April 4, 2008 Share Posted April 4, 2008 Arthurius or someone who has the stickers: Does it suggest where to put them? Link to comment Share on other sites More sharing options...
markramsay Posted April 4, 2008 Share Posted April 4, 2008 i've noticed in EVERY single review of the Megahouse ride armor, and in every pic ive seen, they have mis-trsansformed the feet, or rather, NOT transformed them at all. The instructions are very poor, and only mention the feet swivel out some, but infact, the heels seperate from the toes, to give the foot a longer stance, and MUCH MUCH MUCH better balance. Link to comment Share on other sites More sharing options...
Fly4victory Posted April 4, 2008 Share Posted April 4, 2008 Jenius, Thanks for the review and advice to the US customers to possibly wait for the Toynami re-release. More importantly, the warnings and the inventory of little bits that like to pop-off. Link to comment Share on other sites More sharing options...
jenius Posted April 4, 2008 Share Posted April 4, 2008 The foot separates from the heel?? That must take a lot of force 'cause I putzed around with that foot quite a bit. Do you have a pic? Link to comment Share on other sites More sharing options...
Tober Posted April 4, 2008 Share Posted April 4, 2008 The foot separates from the heel?? That must take a lot of force 'cause I putzed around with that foot quite a bit. Do you have a pic? The foot pulls forward about 5mm away from the heel. It's in step 12 of the instructions. Link to comment Share on other sites More sharing options...
jenius Posted April 4, 2008 Share Posted April 4, 2008 The foot pulls forward about 5mm away from the heel. It's in step 12 of the instructions. Well yeah, I figured that out, but this: The instructions are very poor, and only mention the feet swivel out some, but infact, the heels seperate from the toes, to give the foot a longer stance, and MUCH MUCH MUCH better balance. I need to see a pic of that. Link to comment Share on other sites More sharing options...
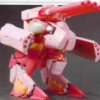
markramsay Posted April 4, 2008 Share Posted April 4, 2008 here you go. according to the instructions, the pic implies that the foot simply swivels forward a bit on its ball joint, but there is actually a ratchet mechinism inside that allows the toes to pull forward. Link to comment Share on other sites More sharing options...
promethuem5 Posted April 4, 2008 Share Posted April 4, 2008 Yeah, the toe pulls forward, when in reality what would fix the balance right up is if the ankle pulled down to gain more movement, and the heel had a fold out spur like lots of Transformers figures have. Link to comment Share on other sites More sharing options...
jenius Posted April 4, 2008 Share Posted April 4, 2008 (edited) Thank you for that, I'll have to try this out and see if I can't get some better poses down and update the post. EDIT - Yeah, it seems bass-ackward looking at it here. What needs to happen is for the heel to go backward, not the toe to go forward... I don't really know how the toe moving forward would help all that much but I'll give it a try. Edited April 4, 2008 by jenius Link to comment Share on other sites More sharing options...
protostar8 Posted April 4, 2008 Share Posted April 4, 2008 Okay, just making everyone aware that pulling the toes forward on mine definitely stressed the thin plastic sides of the slide joint. There are now white stress marks visible, so be careful. It also didn't really help the balance at all on mine (or at least from what I could tell). Link to comment Share on other sites More sharing options...
misterryno Posted April 5, 2008 Share Posted April 5, 2008 Okay, just making everyone aware that pulling the toes forward on mine definitely stressed the thin plastic sides of the slide joint. There are now white stress marks visible, so be careful. It also didn't really help the balance at all on mine (or at least from what I could tell). PHEW!!! I am glad that you mentioned this. I was JUST about to grab mine and try it out. I WILL be careful. THANKS. Link to comment Share on other sites More sharing options...
Recommended Posts