broadshore Posted April 19, 2005 Share Posted April 19, 2005 She looking pretty hot there man. keep it up! Quote Link to comment Share on other sites More sharing options...
Viceland Posted April 20, 2005 Share Posted April 20, 2005 I can't think of anything right now but before and after the fix pictures would definatelyhelp. I'm pretty sure the current molds are shot since it has pulled 2-3 runs already. We can fix the masters and get better molds made.Everyone who wants on on MW will get "hooked up" if the project is a go. Anyone hear from Neova lately about this?? Was the project to fix the UD Masters and cast new kits abandoned or did I miss something?? Cause I would'nt mind at all getting "hooked up" with at least 2 UD VF-1s... I really hope this project happens Quote Link to comment Share on other sites More sharing options...
JoLe727 Posted April 20, 2005 Share Posted April 20, 2005 Last time I heard from him via PM that he mentioned that he needs 15 orders before the project takes off. I think he has at least 7 or 8 so far. PM or email him if you are interested. Quote Link to comment Share on other sites More sharing options...
HWR MKII Posted April 20, 2005 Share Posted April 20, 2005 I just finished disassembling my other 1/48 UD. Im going to make it the rarely seen max 1S. Does anyone know if Devin makes a sheet of true Dyrl decals? The ones that came with the Gsystem one dont have all the stencils and smaller markings like the skulls for the tails and the Skull squadron emblem that go behind the cockpit. You can see that in the movie during his fight with millia. Im combining the leftovers from the Gsystem kit with the ClubM one i already have. so far the fit is great. Quote Link to comment Share on other sites More sharing options...
Viceland Posted April 20, 2005 Share Posted April 20, 2005 (edited) Last time I heard from him via PM that he mentioned that he needs 15 orders before the project takes off. I think he has at least 7 or 8 so far. PM or email him if you are interested. I e-mailed him (or PM'ed, can't remember) last week about this but received no reply thus far, hense my question of whether or not someone had heard from him lately (he hasn't posted on MW in a while), maybe he's on vacation or something, or figured out he's not a Macross fan anymore . I'll send another PM but if someone close to Neova can get him to contact me I would appreciate it . edti: fixed some gibberrish Edited April 20, 2005 by Viceland Quote Link to comment Share on other sites More sharing options...
zeo-mare Posted April 20, 2005 Share Posted April 20, 2005 is there a possibility of the kit being recasted by Neova? Quote Link to comment Share on other sites More sharing options...
Viceland Posted April 20, 2005 Share Posted April 20, 2005 (edited) Actually, I think Neova wants to approach G-System about letting him fix their UD masters and get them to make new molds so new kits can be made available (especially to us ). The actual casting would be handled by G-System, thanks to efforts made by Neova. Edited April 20, 2005 by Viceland Quote Link to comment Share on other sites More sharing options...
zeo-mare Posted April 20, 2005 Share Posted April 20, 2005 that would be awesome, i would definelty pick one up chris Quote Link to comment Share on other sites More sharing options...
jadefalconguard Posted April 20, 2005 Author Share Posted April 20, 2005 As always to late, I can confirm that there are talks of recasting the UD VF1. Neova asked me for some pictures from the alternations I made on the cockpit. I'll normally will get this completely finished within a couple of days. So yes, if Neova gets 15 confirmed orders there will be a recast. Quote Link to comment Share on other sites More sharing options...
zeo-mare Posted April 20, 2005 Share Posted April 20, 2005 does anyone know the price of it? chris Quote Link to comment Share on other sites More sharing options...
HWR MKII Posted April 20, 2005 Share Posted April 20, 2005 275 USD at hobbyfan.com Quote Link to comment Share on other sites More sharing options...
zeo-mare Posted April 20, 2005 Share Posted April 20, 2005 (edited) but will this reproduction be the same as them? i have the seen the Hobbyfan one but isnt this a slight upgraded? chris Edited April 20, 2005 by zeo-mare Quote Link to comment Share on other sites More sharing options...
jadefalconguard Posted May 8, 2005 Author Share Posted May 8, 2005 Finally some extra pics..... As previously mentioned the weathering is done and the decalling started. After that I gave it a dull coat finish with some VERY thinned light gray to get a bit lighter total finish Quote Link to comment Share on other sites More sharing options...
jadefalconguard Posted May 8, 2005 Author Share Posted May 8, 2005 Other view Quote Link to comment Share on other sites More sharing options...
jadefalconguard Posted May 8, 2005 Author Share Posted May 8, 2005 (edited) Close up of the wing.......be carefull, the dull coat is still wet wich is evident from the white dots you see under the Macross Logo.....once the dull coat dries it's gone edit: forgot the pic Edited May 8, 2005 by jadefalconguard Quote Link to comment Share on other sites More sharing options...
jadefalconguard Posted May 8, 2005 Author Share Posted May 8, 2005 (edited) And ofcourse, the nicest angle to view this bird Edited May 8, 2005 by jadefalconguard Quote Link to comment Share on other sites More sharing options...
zeo-mare Posted May 8, 2005 Share Posted May 8, 2005 awesome pictures, isnt working with resin fun chris Quote Link to comment Share on other sites More sharing options...
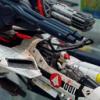
jadefalconguard Posted May 8, 2005 Author Share Posted May 8, 2005 Now for the next step : adding the slats. The first dry runs showed that the copper guides are again to large and they portrude extremely far out. Guess I'll need to scratchbuild some new guides for the slats. Besides this little hick up the slats themselves are extremely wrapped and twisted to all sides so I'll have to straighten them out Once these are all done I'll be painting the insides red as will the inside of the fowler flaps. Till then, please let me know what you guys think so far G. Quote Link to comment Share on other sites More sharing options...
jadefalconguard Posted May 8, 2005 Author Share Posted May 8, 2005 awesome pictures, isnt working with resin fun chris Now I can straiten out my wrapped pieces in the morning between my two boiled eggs..... Quote Link to comment Share on other sites More sharing options...
zeo-mare Posted May 8, 2005 Share Posted May 8, 2005 awesome pictures, isnt working with resin fun chris Now I can straiten out my wrapped pieces in the morning between my two boiled eggs..... Quote Link to comment Share on other sites More sharing options...
HWR MKII Posted May 8, 2005 Share Posted May 8, 2005 Looking great man. You should try taking the pics in natural light it may enhance the quality and show off details too. It helps with darker subjects. Sean Quote Link to comment Share on other sites More sharing options...
jadefalconguard Posted May 8, 2005 Author Share Posted May 8, 2005 Looking great man. You should try taking the pics in natural light it may enhance the quality and show off details too. It helps with darker subjects. Sean Those were in daylight. Just got a crappy camera and I can't decide between a new camera or a Resin kit from an ATLAS battlemech from Armorcast. BUT i also used my old reflex. See if I can scan in some pictures Quote Link to comment Share on other sites More sharing options...
HWR MKII Posted May 8, 2005 Share Posted May 8, 2005 Ah i see what you mean now. Looks like all you actually need is filler light coming from the other side to balance the contrast from the sunlight. I had that same problem taking pics of my monster. Quote Link to comment Share on other sites More sharing options...
jadefalconguard Posted May 8, 2005 Author Share Posted May 8, 2005 Now I really went out of my way for you guys.... I drove a full 20km to get my father in law's camera and take some decent pics So here goes : overview Quote Link to comment Share on other sites More sharing options...
jadefalconguard Posted May 8, 2005 Author Share Posted May 8, 2005 OMG these are huge another overview Quote Link to comment Share on other sites More sharing options...
jadefalconguard Posted May 8, 2005 Author Share Posted May 8, 2005 Now how about some view of the Squadron Insignia : VFA86 Sidewinders. I took the markings of a CAG bird and used the logo on the left chest area so the be able to recognize this bird in battloid mode Quote Link to comment Share on other sites More sharing options...
jadefalconguard Posted May 8, 2005 Author Share Posted May 8, 2005 I also took a sidewards frontview to show of the head in Fighter mode so you could get a view at the color of the headlasers. I think they came out quit nice Quote Link to comment Share on other sites More sharing options...
zeo-mare Posted May 8, 2005 Share Posted May 8, 2005 ohhh looking real good now i cannot wait to see the final Quote Link to comment Share on other sites More sharing options...
jorawar_b Posted May 10, 2005 Share Posted May 10, 2005 I would like 2 kits please put me down. Quote Link to comment Share on other sites More sharing options...
HWR MKII Posted May 10, 2005 Share Posted May 10, 2005 I just noticed you didnt put the little photoetch detail in the open port to the rear of the upper left ECS duct. other than that its looking good man. Quote Link to comment Share on other sites More sharing options...
jadefalconguard Posted May 10, 2005 Author Share Posted May 10, 2005 @ HWR MkII : please do enlighten me I searched like h#ll but I couldn't find what you mean..... Do you mean the truster exit port behind the canopy ?There was an option for a round vanes piece or a truster piece. It thought it looked cooler with the exhaust. But then again, I'm not sure if that's what you mean..... Plesa don't keep me in suspense Quote Link to comment Share on other sites More sharing options...
HWR MKII Posted May 10, 2005 Share Posted May 10, 2005 Its a small piece not even 1/4 inch on each side and fits in the flat spot in the wedge shaped depression. It took me a bit to find too both times i built the kit. If my camera had better focus id take a pic but i cant so ill give you the part nimber for the photoetch fret to see if you can find it there. Its part E17 and is shown on the part list. Funny though it isnt in the instructions for this kit as an option just in the old club M ones. Quote Link to comment Share on other sites More sharing options...
jadefalconguard Posted May 10, 2005 Author Share Posted May 10, 2005 Damned, just took a look at my PE Fret, the nr 17 is a part inside the cockpit and still needs to be installed... Is that the one you are referring to ? I get itchy to think I forgot one...... Quote Link to comment Share on other sites More sharing options...
HWR MKII Posted May 10, 2005 Share Posted May 10, 2005 (edited) yup #E17 is the one. You glued it in the cockpit? it actually goes under the access door i only found out after studying ALOT of pics of the kit and the instructions. That was 2 years ago when i built my first one(which came apart perfectly)cant wait to do a Max DYRL? 1S in maintenance. Taking a break right now and finishing a model of my actual car. Edited May 10, 2005 by HWR MKII Quote Link to comment Share on other sites More sharing options...
jadefalconguard Posted May 11, 2005 Author Share Posted May 11, 2005 Cool, it isn't installed yet........ I'm still deciding if I'm going to use the inboard ladder or a spare from an F-15 kit. It's kind of need with the F15 stair. Oh well, choices, choises. I spend more time deciding wich option to install or open up then to actually build the model Thhx for the assist HWR Mk II. One day we'll have to make a groupshot Quote Link to comment Share on other sites More sharing options...
Recommended Posts
Join the conversation
You can post now and register later. If you have an account, sign in now to post with your account.