HWR MKII Posted May 11, 2005 Share Posted May 11, 2005 Actually if your doing a 1S you need the internal F-15 one. Its another one of those things Gsystem left out that club M had in it. if you want i can draw you some line art of an actual USAFE F-15 boarding ladder that we use. Im going to scratch build the internal one for my Gsystem kit. Quote Link to comment Share on other sites More sharing options...
jadefalconguard Posted May 11, 2005 Author Share Posted May 11, 2005 Cool, If you could do me the pleasure, they would be really appreciated. Quote Link to comment Share on other sites More sharing options...
HWR MKII Posted May 11, 2005 Share Posted May 11, 2005 (edited) Actually i was able to find you a pic of one so you can salvage the little one off the kit and make the one we use here. If you need more details i can sketch them out. Edited May 11, 2005 by HWR MKII Quote Link to comment Share on other sites More sharing options...
jadefalconguard Posted May 11, 2005 Author Share Posted May 11, 2005 Thanks a lot. I've got an Hase F-15E kit in 1/48. Have to check if that's sufficient enough. Quote Link to comment Share on other sites More sharing options...
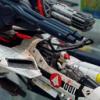
jadefalconguard Posted May 17, 2005 Author Share Posted May 17, 2005 Finally got some time over to do some things. This time I took on the fast packs. The fastpack with the beamcanon will be closed up, so only minimal adaptions were done. However, I opted to leave the cover from the missile launcher open to display the fuel tank and thruster parts. So various cables will be running around there. I've been woking on this for a few hours and all I got to show fore are 5 wires. So here goes.... BTW the bright colored things are UTP Cat cabling Quote Link to comment Share on other sites More sharing options...
jadefalconguard Posted May 17, 2005 Author Share Posted May 17, 2005 another one Quote Link to comment Share on other sites More sharing options...
jadefalconguard Posted May 17, 2005 Author Share Posted May 17, 2005 one more Quote Link to comment Share on other sites More sharing options...
jadefalconguard Posted May 17, 2005 Author Share Posted May 17, 2005 (edited) last one. This one is the Fast Pack itself. I added two fuel lines to the small thrusters and let them run to the front of the fuel tank. I felt that the 'exhaust' part of the F.P. was way to empty. So I added some sheet styrene to have some structure around there. Edit : forgot the pic again Edit 06/06 : new pic Edited June 6, 2005 by jadefalconguard Quote Link to comment Share on other sites More sharing options...
HWR MKII Posted May 17, 2005 Share Posted May 17, 2005 Well you just came up with the same idea i did. Looking good man Quote Link to comment Share on other sites More sharing options...
jadefalconguard Posted May 19, 2005 Author Share Posted May 19, 2005 (edited) Finished up to Fast Pack enhancements and the boostezr enhancements. The left FP is ready to be primed and preshaded. I also beefed up the right FP but as this will be closed you won't see much of it once finished. Ah well, I know it's there Edit :6/6 new pic Edited June 6, 2005 by jadefalconguard Quote Link to comment Share on other sites More sharing options...
jadefalconguard Posted May 19, 2005 Author Share Posted May 19, 2005 (edited) FP mated with thruster pack..... Edit 6/6 : new pic Edited June 6, 2005 by jadefalconguard Quote Link to comment Share on other sites More sharing options...
jadefalconguard Posted May 19, 2005 Author Share Posted May 19, 2005 (edited) Edit 6/6 New Pic, this shot shows off the update with plastic Edited June 6, 2005 by jadefalconguard Quote Link to comment Share on other sites More sharing options...
jadefalconguard Posted May 19, 2005 Author Share Posted May 19, 2005 (edited) Now, I'm not gonna count the amount of filler I needed to get the exhausts parts on the FP to fit nicely, but just to give you an idea, I have discovered a new model technique : sculpting with filler edit To give you a feel for this, the grayish goo around the exhaust is apr. 2 to 4 mm of filler Edited May 19, 2005 by jadefalconguard Quote Link to comment Share on other sites More sharing options...
jadefalconguard Posted May 19, 2005 Author Share Posted May 19, 2005 (edited) After this was done I started on the leg FP. The outer shell was a bit wrapped and smaller then the back part. I was able to get it to conform for 98%..... The main problem is the end part wich doesn't fit as it should. With some sheet styrene I was able to get a better fit. Still need to do the tips. Edit 6/6 new pic Edited June 6, 2005 by jadefalconguard Quote Link to comment Share on other sites More sharing options...
Viceland Posted May 19, 2005 Share Posted May 19, 2005 Just got a crappy camera and I can't decide between a new camera or a Resin kit from an ATLAS battlemech from Armorcast. BUT i also used my old reflex. See if I can scan in some pictures OK Jade, forget the battlemech for now and get a decent digital camera... please!!! Quote Link to comment Share on other sites More sharing options...
jadefalconguard Posted May 19, 2005 Author Share Posted May 19, 2005 (edited) Thx for the support in making a choice Viceland. As a go between I'm working on a step by step guide. I look into detail what I did and how a did it. But the next posts will include better pics The Fuselage As with all my fighter kits I start by selecting my desired subassemblies. In case of the Valk it was quite easy as the cockpit area was completely detached from the main body. The legas make up the aft fuselage together with the arms. Because I’m building the Strike version, the tail assembly is folded forwards. This gives an extra subassembly. Assembly guide Step 1 The first step was to straighten out the two wings. The first step in the assembly guide is to make the assembly to sweep the wings back and forth. Piece a6 holds two nuts (pieces A4) that are pressed with an endplate (A7). I used clamps to get a good bond as this assembly is glued inside the topside of the main fuselage (A1). Assembly guide Step 4 Lower fuselage There are two intakes (B13/14) that are equipped with two PE vanes (E18). These vanes are under an angle inside B14. I found out the easiest way to install these are to make 2 incissions with my X-acto knive along the side of B14/13. This way you’ll get an nice grove to bond the PE part with the resin and guides it in the right angle. M18 is recasted onto the lower fuselage half, so don’t search for it. The guides for pieces B14/B13 have some reserves, so make sure you dry fit the two intakes to guid a nice fit with the upper fuselage. Upper fuselage I left off the PE Parts 19 to 25 as these are acessdoors. In order to get the PE parts 55/56 to fit tight I cleaned out the opening with the X-acto knive. Make sure you put them in with the right angle (you should have a small indent towards the straight end). I closed the speedbrake (H9) but it was to small to get it to conform to the curves of the fuselage. Some sheet styrene solved this problem followed by a coat of filler and carefull sanding. The two antennas where added and I decided to use the two airguides N34 instead of the N39/N40 assembly. Mating of the lower and upper fuselage I didn’t take in account that the lower fuselage was a little warped. I had to clamp the two pieces together in order to get a nice fit. This resulted in a fracture in the lower fuselage half. Filling an sanding solved this problem, but gave me a next challenge! You have a clear sight of the back of the wingassembly from the first step. I didn’t clean this to well, so you can see the seem! Take care of this part BEFORE you glue in the wings or you’ll have a hard time cleaning this up. After this mating, you’ll need to fill the seems between L1 and A1. These are minor seems, but ruin the total look of the fuselage. EDIT : I'll try to make a write up up to the point where I am right now. This gives me time to get the reflex pics developed and scanned Edited May 19, 2005 by jadefalconguard Quote Link to comment Share on other sites More sharing options...
HWR MKII Posted May 19, 2005 Share Posted May 19, 2005 Camera,Camera,Camera. Quote Link to comment Share on other sites More sharing options...
jorawar_b Posted May 20, 2005 Share Posted May 20, 2005 for eveyone that is one this thread, I do not want to take buiness away from anyone, but I just want to provide a chance for people to get this kit fast. I am sorry and no disrespect to anyone or the people who started this thread, but lets get things going, if people are interested in thei kit, please update your name to the following thread : http://www.macrossworld.com/mwf/index.php?...pic=14786&st=0& So this way whoever can get this the ball rolling we all win. Quote Link to comment Share on other sites More sharing options...
jadefalconguard Posted May 22, 2005 Author Share Posted May 22, 2005 (edited) Finally some decent pics : a group shot of the dorsal Fastpack and the leg fast pack. You can see the amount of filler that's needed to get the thruster pieces to conform nicely and the end result. As mentionend earlier, the leg Fast Pack needs some extra attention to get a complete curve Edited June 6, 2005 by jadefalconguard Quote Link to comment Share on other sites More sharing options...
jadefalconguard Posted May 22, 2005 Author Share Posted May 22, 2005 (edited) Updating the insides of the dorsal FP with UTP CAT5 cabling......now thats what 'structured cabling' means sorry professional habbit. Same pic from previous page Glad to have the new camera Edited June 6, 2005 by jadefalconguard Quote Link to comment Share on other sites More sharing options...
jadefalconguard Posted May 22, 2005 Author Share Posted May 22, 2005 (edited) And while we are ad it, why not update the engine itself edit 6/6 : top of the updated engine Edited June 6, 2005 by jadefalconguard Quote Link to comment Share on other sites More sharing options...
jadefalconguard Posted May 22, 2005 Author Share Posted May 22, 2005 (edited) edit 6/6 sideview of the engine Edited June 6, 2005 by jadefalconguard Quote Link to comment Share on other sites More sharing options...
jadefalconguard Posted May 22, 2005 Author Share Posted May 22, 2005 (edited) Little preview, folded tail incl. markings but lacking the detail painting of the fin tips. These will prob. be in glossy black. edit 6/6 new pic Edited June 6, 2005 by jadefalconguard Quote Link to comment Share on other sites More sharing options...
jadefalconguard Posted May 31, 2005 Author Share Posted May 31, 2005 (edited) OK, HWR MKII & Viceland, you guys win I went and get a new camera this weekend. So I experimented a bit with the macroshots and this is the result. The VF1 seat. As soon as the kids are better (ear infection - the only thing worse than a little kid from 11months with an ear infection are TWO kids from 11 months with an ear infection ) I'll get to building again, till then... edit : typo again Edited May 31, 2005 by jadefalconguard Quote Link to comment Share on other sites More sharing options...
Viceland Posted June 3, 2005 Share Posted June 3, 2005 OK, HWR MKII & Viceland, you guys win I went and get a new camera this weekend. So I experimented a bit with the macroshots and this is the result. The VF1 seat. Glad we could be of service ... you have reacted well to our peer pressure, you are now totally under our mind control You will receive further instructions once you have taken many more excellent pics of your 1/48 UD, please standby. Quote Link to comment Share on other sites More sharing options...
HWR MKII Posted June 3, 2005 Share Posted June 3, 2005 ALL YOUR VALK ARE BELONG TO US. Quote Link to comment Share on other sites More sharing options...
jadefalconguard Posted June 3, 2005 Author Share Posted June 3, 2005 OK, HWR MKII & Viceland, you guys win I went and get a new camera this weekend. So I experimented a bit with the macroshots and this is the result. The VF1 seat. Glad we could be of service ... you have reacted well to our peer pressure, you are now totally under our mind control You will receive further instructions once you have taken many more excellent pics of your 1/48 UD, please standby. By your command Oops wrong forum Quote Link to comment Share on other sites More sharing options...
HWR MKII Posted June 3, 2005 Share Posted June 3, 2005 He He Just think of how much more of your work you will be able to show off now. Quote Link to comment Share on other sites More sharing options...
jadefalconguard Posted June 3, 2005 Author Share Posted June 3, 2005 Guilty as acussed. Got a lot of pics already taken from the VF1, but I don't want to clogg the thread with the same old pictures, unless there's a real intrest, I can post them Quote Link to comment Share on other sites More sharing options...
HWR MKII Posted June 4, 2005 Share Posted June 4, 2005 You can edit the pics in your old posts so you dont have to post a buttload of new pics or you can do a yahoo photoalbum for free online and link to that. Quote Link to comment Share on other sites More sharing options...
jadefalconguard Posted June 6, 2005 Author Share Posted June 6, 2005 @ HWR MkII, thanks for the tip. I went back and edited some pics. Feel free to take a look everyone. Now you can see the things I've done Anyway, the gundpod. I've been working on this piece of resin and tried to give some more texture to it. Took out the scrap box and added some PE parts I had laying around Quote Link to comment Share on other sites More sharing options...
promethuem5 Posted June 7, 2005 Share Posted June 7, 2005 Alright...I've got an itty bitty question after following this thread for a while but mostly just for the pictureds I can see that you are doing ALOT of work to this bird before even painting it so I ahve to ask: Was the kit like, really relaly effed up in the box when you got it, or are you jsut rediclously anal retentave and redoing all the details yourself? I mean, you've done an assload of work thus far, and I'm trying to figure out why.... Quote Link to comment Share on other sites More sharing options...
HWR MKII Posted June 7, 2005 Share Posted June 7, 2005 I dont know how jades version came to him(warped pieces etc...) but if you get a good casting its a decent kit. A little frustrating in some areas but all in all a good build. Great detail and plenty of options, too many in fact. It gave new life to my old valk though. Using the leftover pieces i was able to make my old strike into a new fighter variant with an exposed nose structure. Now i have a clean fighter and the beefy strike to display,once their finished of course. Quote Link to comment Share on other sites More sharing options...
jadefalconguard Posted June 7, 2005 Author Share Posted June 7, 2005 (edited) Alright...I've got an itty bitty question after following this thread for a while but mostly just for the pictureds I can see that you are doing ALOT of work to this bird before even painting it so I ahve to ask: Was the kit like, really relaly effed up in the box when you got it, or are you jsut rediclously anal retentave and redoing all the details yourself? I mean, you've done an assload of work thus far, and I'm trying to figure out why.... I'm anal retentave..... Noppe, I'm just completely freaked with detailling my kits. This is one reason the building of thios bird takes so long. I try to instill a certain reality to this bird wich is only possible with extra detailling. So basicly this means redoing all the details except the basics 1/72nd P51D Mustang. Even my small kits like this Tamiya takes almost forever to build Edit : BTW the kit came in GREAT scaper, only some minor wrappage Edited June 7, 2005 by jadefalconguard Quote Link to comment Share on other sites More sharing options...
HWR MKII Posted June 7, 2005 Share Posted June 7, 2005 he he I have a picture back in the states of my grandfather working on that same P51 back in WWII. Good job man. Quote Link to comment Share on other sites More sharing options...
Recommended Posts
Join the conversation
You can post now and register later. If you have an account, sign in now to post with your account.