Firesped
-
Posts
68 -
Joined
-
Last visited
Content Type
Profiles
Forums
Events
Gallery
Everything posted by Firesped
-

Hasegawa announces a TV SDF-1 and a Super Messiah!
Firesped replied to cool8or's topic in Model kits
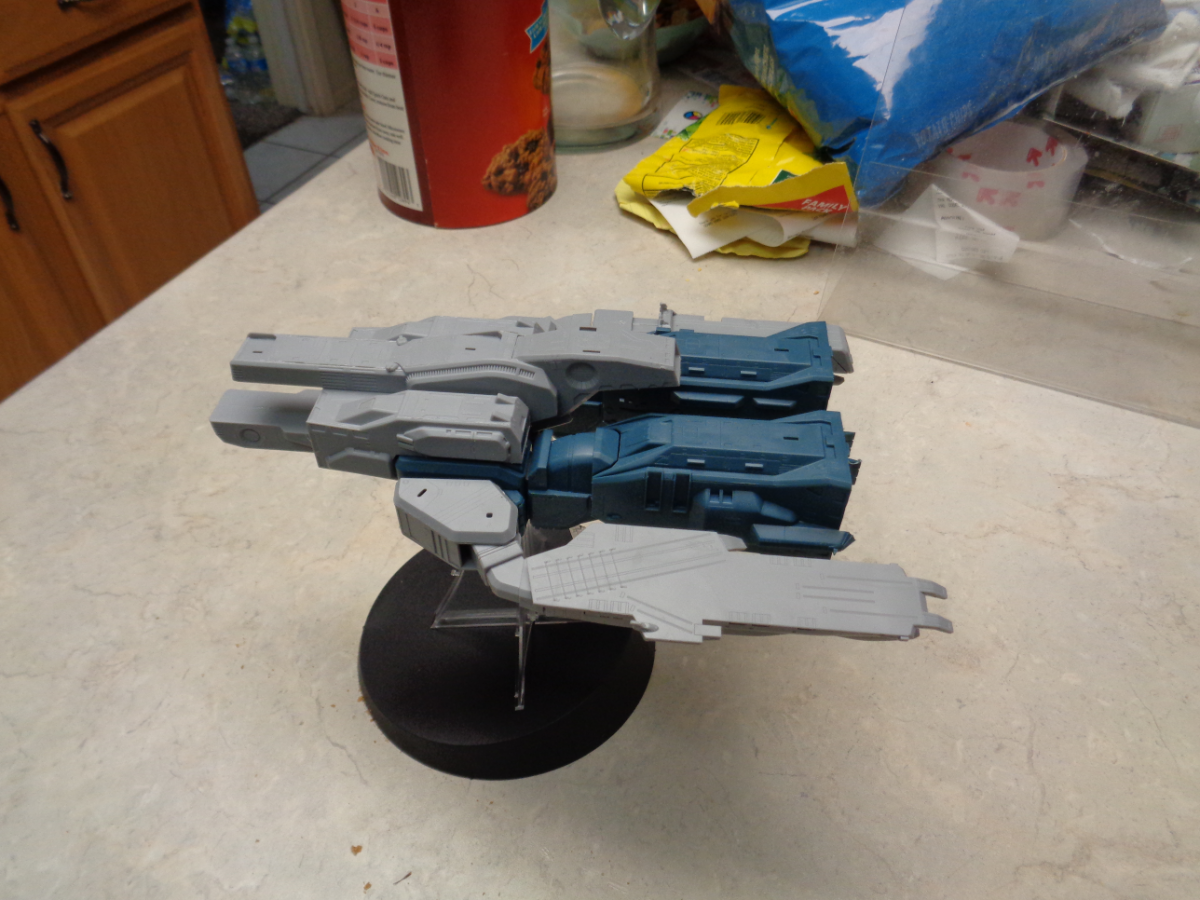
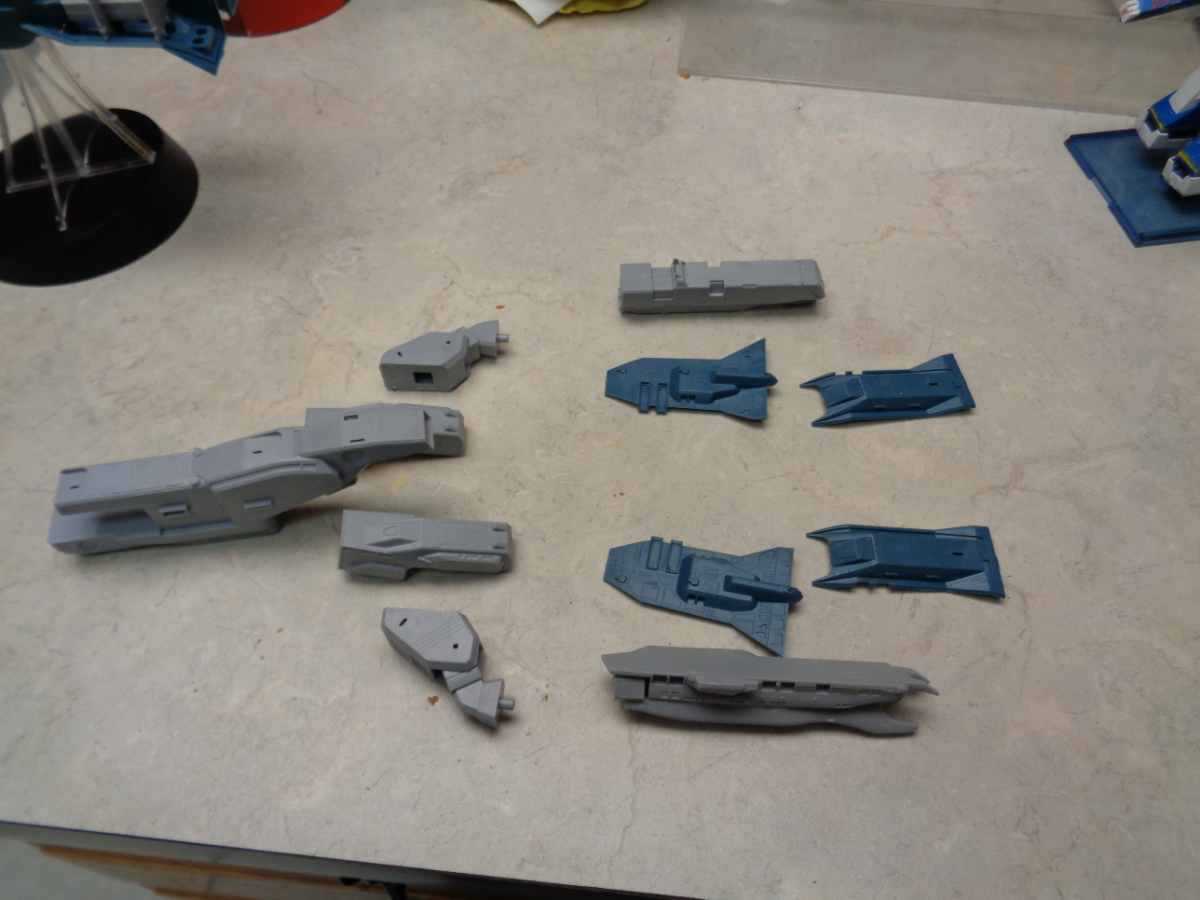
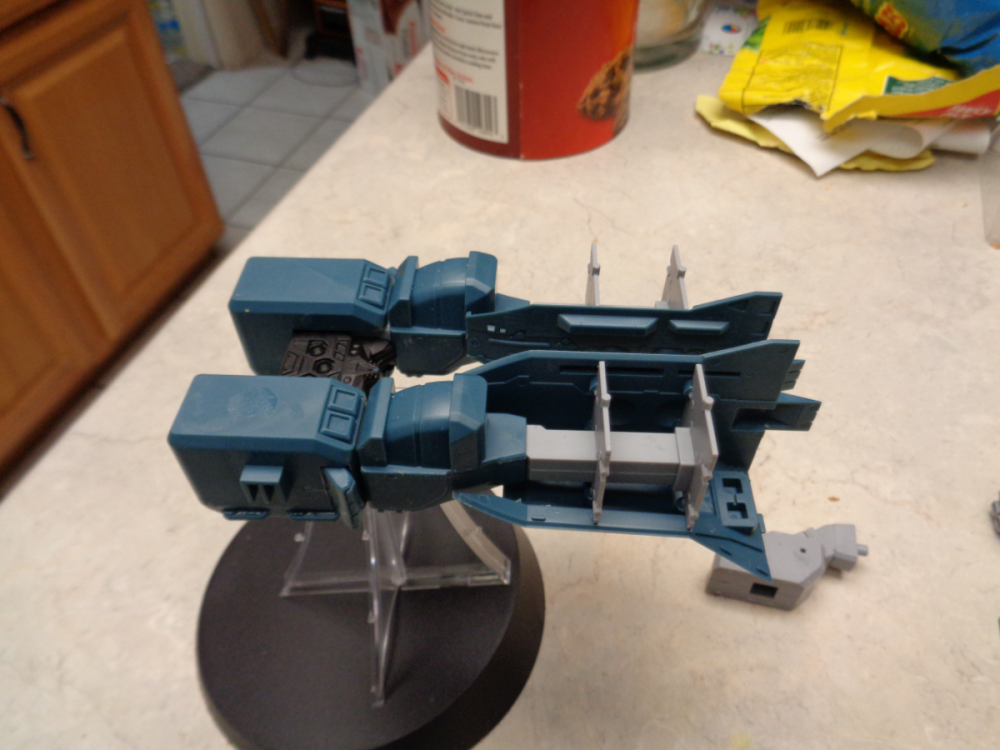
Here is where I am at with the ship. the ship is just holding itself together right now. I took all the loose parts apart afterward and took some pictures. the legs are not glued in tho, all those parts are free moving as well at the momment. I found the sliding bar fit a lot better on this kit then my DYRL kit. the inside and bottom plates for the legs are glued to the square boxes.

-
Hasegawa announces a TV SDF-1 and a Super Messiah!
Firesped replied to cool8or's topic in Model kits
so I have basically now determined that the TV series and the DYRL versions of the SDF-1 are radically different ships. the only thing that may be the same is the central body and even then I'm not sure. parts can be made to fix some of the issues though. a new outside side panel would make the leg more acceptable. also an extension ring for the leg/foot thruster probably needs made to add in a detail not in the kit. the chest/shoulder thrusters were not redone as well. there is a part in the back that comes up to the height of the main gun part. I've already assembled that part of the kit not realizing this until it was too late. That means the entire main gun needs to be redone as well. Also note, the instructions assumes there are holes for all the extra guns they added, which there are not. PART list outside plate for each leg to remove fancy DYRL details. extention ring for each foot/thruster to add in the recessed details. replace back part of chest/thrusters to put detail back in. main gun needs to be redone except for the front tip. i'll take pictures when I get home. gotta go to work now. even though it looks like it is solid at the moment, everything is not actually glued together yet. I'm not sure if this kit is worth the trouble atm to make new parts for. once I get a 3D printer, that would change tho. there is just too much that needs fixed. -
Hasegawa announces a TV SDF-1 and a Super Messiah!
Firesped replied to cool8or's topic in Model kits
built the prometheus, it is 113.57 mm long. 1/4500 scale is 113.77 mm. so the ARMD mk 2 and the prometheus are 1/4500 scale. does that mean they shortened the Daedalus from the 488m length? edit: did some math and if the Daedalus is 1/4500 scale as well, they reduced the length to 449.325 m long, making it 38.675 m shorter then it should be. I'm trying to think of why they would have reduced the length. the only thing I can think of is that they considered the extendable ramp to be part of the length of the ship. a 38.675 m ramp would be 8.594444mm long in 1/4500 scale. The issue I see is that this drawing from macross mecha manual, shows the front of the ships extending to the same place. macross-attack-crosssection.gif however, the cruiser mode schematic does show it shorter. macross-cruiser-schematics.gif I guess it is an inconsistency in the lineart then. I am building the model except for the gun part. I'm going to paint it up, unlike I did with the DYRL version. I did paint my 1/8000 scale SDF-1s. I think the front of the gun can be saved but not that entire part from the kit. I'm going to put lights in the main leg thrusters. not sure if I want to put the "windows" in with lights. It's already too late for me to light up the bridge. -
Hasegawa announces a TV SDF-1 and a Super Messiah!
Firesped replied to cool8or's topic in Model kits
Daedalus 99.85mm long deck is 21.15mm tall from bottom raised part is 24.15 mm 27.37 to to of the command bridge. door is 10.73mm tall so the scale is off calculations put it at 1/4887 scale. that's pretty bad. -
Hasegawa announces a TV SDF-1 and a Super Messiah!
Firesped replied to cool8or's topic in Model kits
I've started some assembly of the kit, but I really want to paint it up. I need to figure out the right paint colors -
Hasegawa announces a TV SDF-1 and a Super Messiah!
Firesped replied to cool8or's topic in Model kits
I haven't started building it yet and the Daedalus will have to be built to see the size. if my thought on the true scale is correct, it should be 108.444 mm long. the Prometheus should be 113.777 mm long. if it was true 1/4000 scale, the Daedalus would be 122 mm long and the Prometheus would be 128 mm long. the ARMD mk 2 from the DYRL version came out to be 1/4500 scale in size. I'm still mixed on weither to wait on corrected parts for the main gun. looking at the model kit has shown that the correction is in more parts then I originally thought and I am not even sure how some of the parts would be corrected. I'm also backing a kickstarter for a 3D printer right now as well, so that has my money tied up. I'd like to get another one of this kit and the DYRL kit, to eventually build into the other mode. -
Macross Δ (Delta) - announcement thread
Firesped replied to renegadeleader1's topic in Movies and TV Series
could be, I read somewhere that Miku Hatsune is one of the idol's voices. -
Hasegawa announces a TV SDF-1 and a Super Messiah!
Firesped replied to cool8or's topic in Model kits
looking at a 3d model of the SDF-1 and the kit, the arc extends into the front part of the model kit as well. actually most of the arc would be on that part. comparing the 3d model to the kit now that I look at it, they moved details forward on the bottom of the kit, the top plate has some details moved forward but others in the right place. I'll look at it more later, gotta go into work now -
Hasegawa announces a TV SDF-1 and a Super Messiah!
Firesped replied to cool8or's topic in Model kits
It's here. -
1/350 Scale thread... Mospeada, Southern Cross and more!
Firesped replied to EXO's topic in Anime or Science Fiction
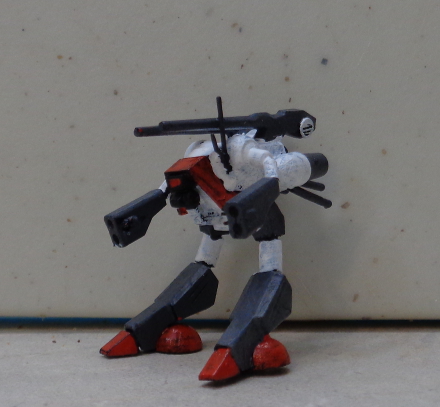
I'd have to say it is eyeballed at this point. When I made the Legioss the offical size, it was too big next to the tread. so I decreased the size of the Legioss by 10%. the tread is at the proper size it should be. which is why I didn't increase it. -
1/350 Scale thread... Mospeada, Southern Cross and more!
Firesped replied to EXO's topic in Anime or Science Fiction
I think i have the Legios sized to the right height to work with the beta. fixed the gun so it should be attached to the hand, on the prototype I printed, i had put a handle on the gun. well, the handle didn't print and it came as a detached part. of the soldier and diver mode prototypes, i ended up breaking one of the guns and lost all those parts to the floor x.x I designed up the extra missile pod tho. right now I am going into the mess and fixing issues. also trying to paint up the alpha and seeing if a full color print is possible.
-
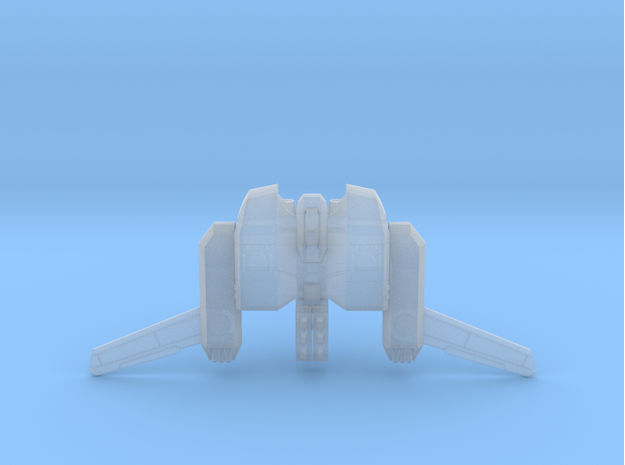
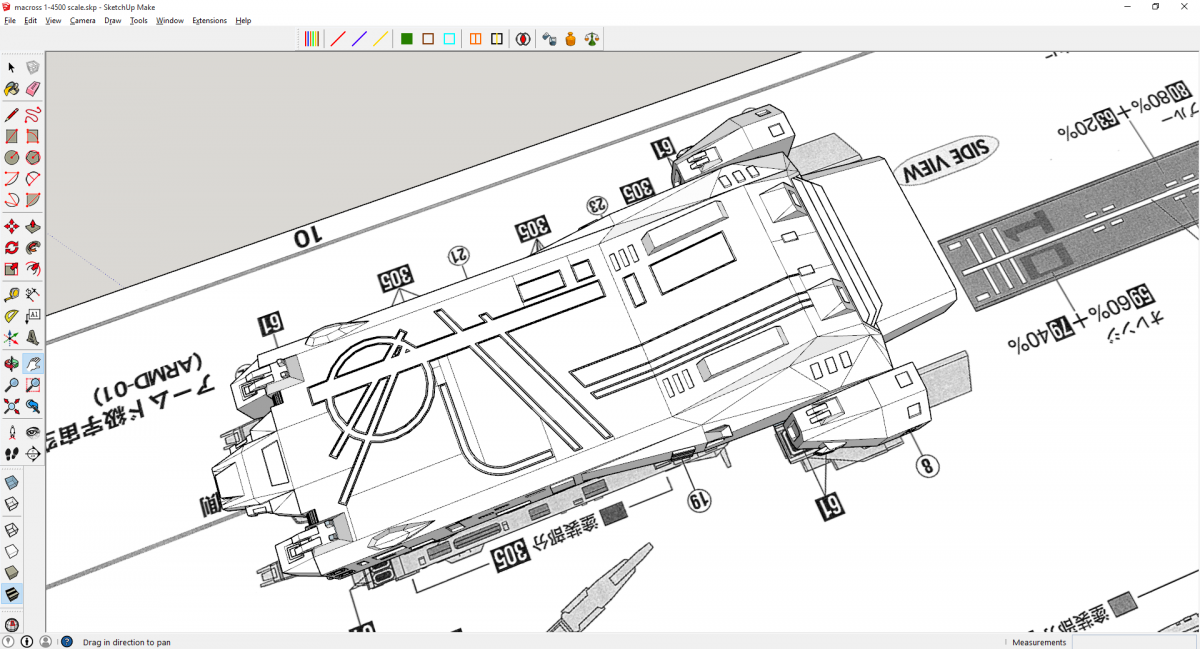
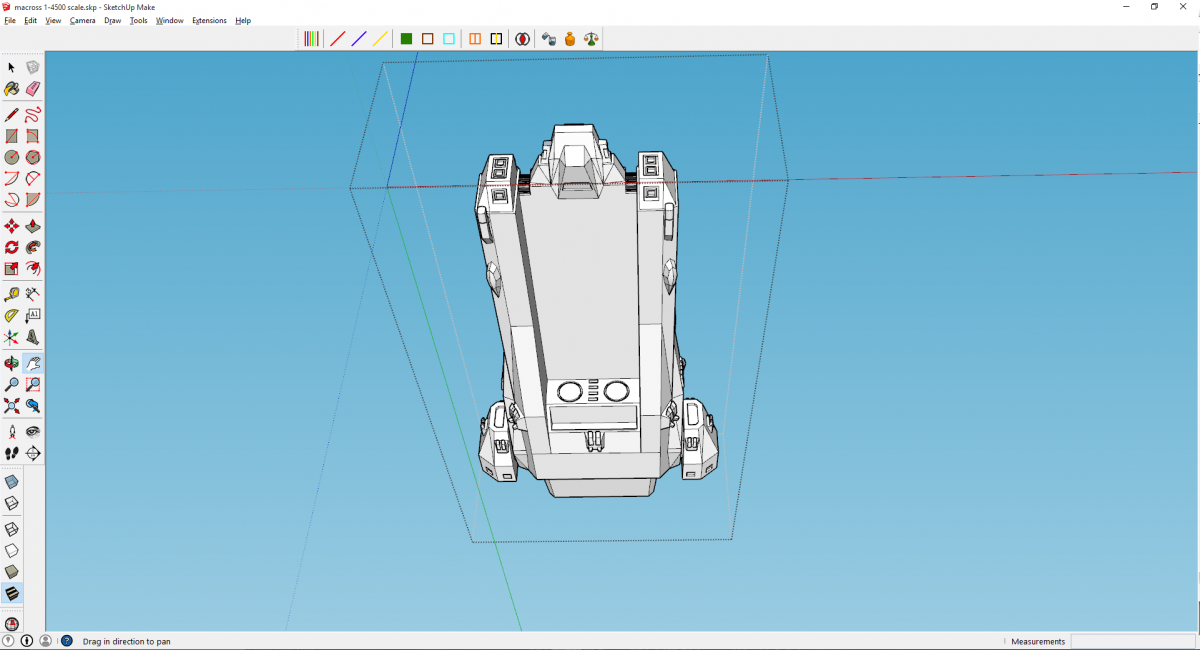
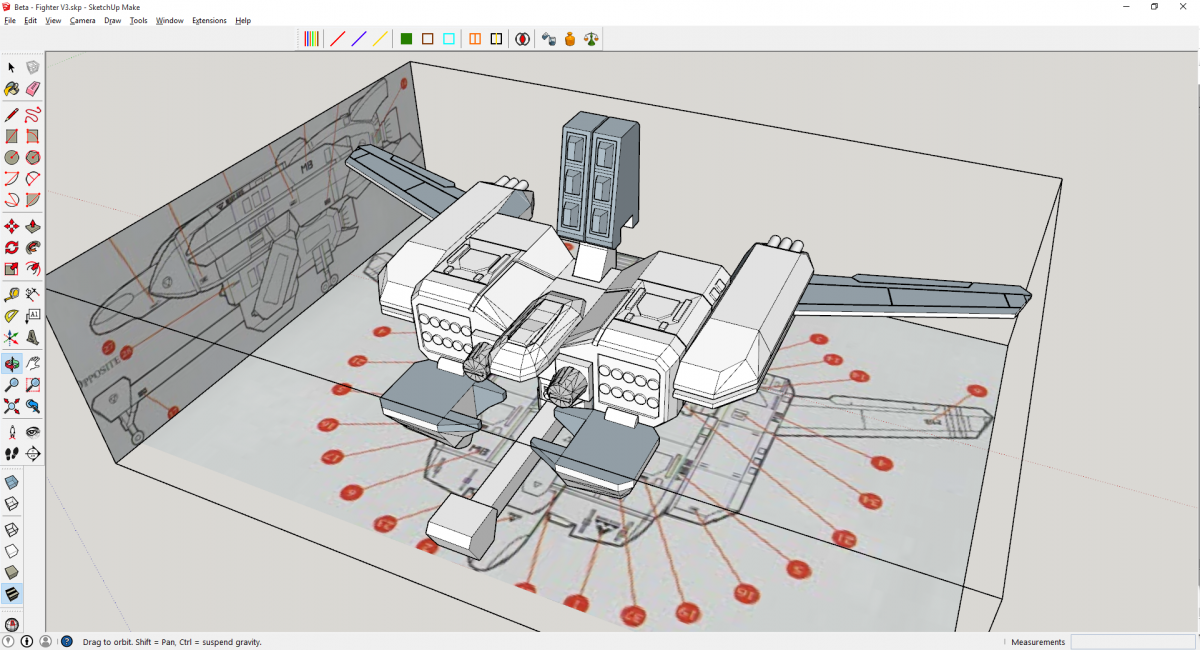
did more work on this today, working on the 1/4500 scale model for the SDF-1 Macross. I had setup a file with the instructions from the 1/4000 scale kit for the movie version that should be to scale. I placed the ARMD mk 1 over the ARMD mk 2 to get an idea of how it would match up. This has given me an idea on how to break the ship into parts so the poly cap from the kit can be placed inside. I have a 3D model of the polycap so when I get to that part, I can make it work. right now I am leaning towards making the central thruster be a removable part to reveal the polycap moved the deck stripes detail back 2.5mm on the deck, placing them a bit behind the guns. changed that detail from a raised detail to panel lines. I redid the how the upper angled deck works, more happy with it now. put in a lot more detail for panel lines on the top. not sure if I want to put in the raised detail that is below 90 degree arc deck stripe. also added the nubs on the 5 main turrents, I need to do a correction on gun barrels because they are coming up with thin edge issues. I'm still not sure what to do to get the 3rd barrel on the little guns. then we have the bottom, I haven't done much detail work on this yet. But there are some things I have inferred from the line art. I put in a recessed compartment right above the lower gun. In the line art, there is a big black mark there and I thought it may be the main fighter launch bay on this version of the ship.


-
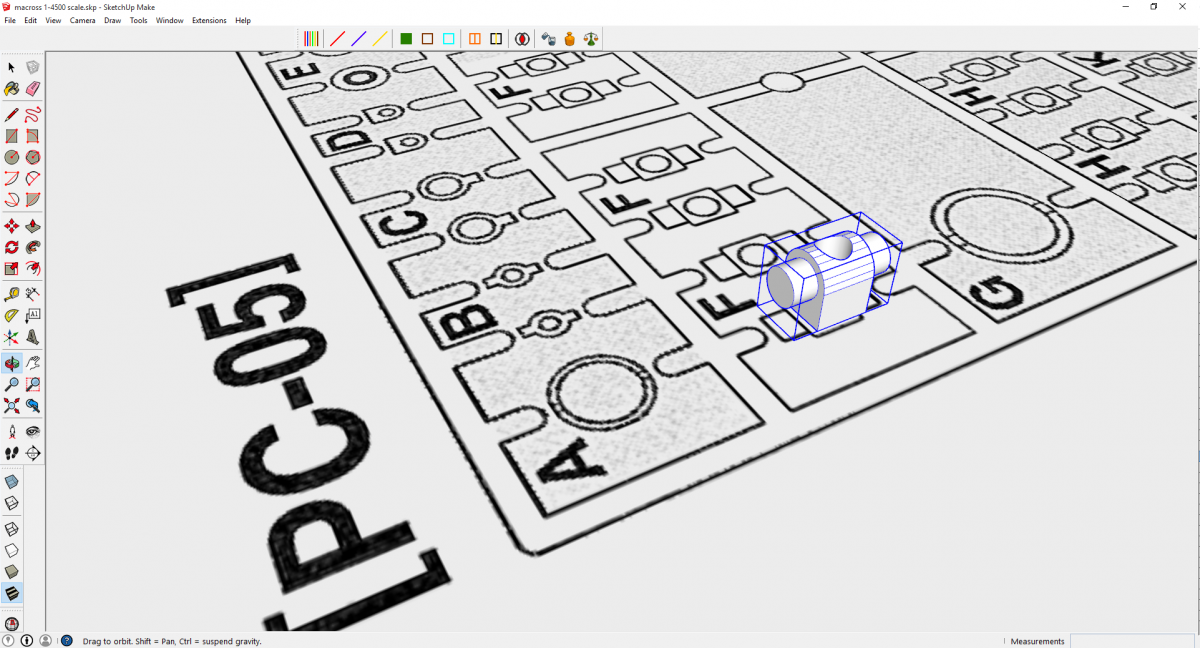
so I decided to render out some blue prints from the Hasegawa SDF-1 Macross Movie Edition kit today so I could make the important part needed to make this work as arms for those kits. part F on spruce PC-05.

-
1/350 Scale thread... Mospeada, Southern Cross and more!
Firesped replied to EXO's topic in Anime or Science Fiction
Tlead 1/350 scale Finally redid the head on this and scaled it down to 350 scale, making it actually the correct size. Not sure how to pose it exactly yet. I have not done a Diver mode for the Tlead yet.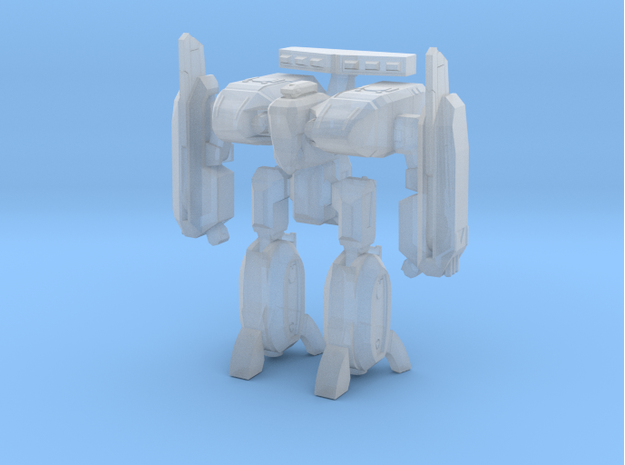


-
Hasegawa announces a TV SDF-1 and a Super Messiah!
Firesped replied to cool8or's topic in Model kits
I got it too. yay now I just need to figure out how to 3D model part F from PC-05 to build the ARMD mk 1. -
1/48 MOSPEADA LEGIOSS RESIN KIT: FINAL SHOT
Firesped replied to captain america's topic in Anime or Science Fiction
is it too late to sign up for one of these? -
Hasegawa announces a TV SDF-1 and a Super Messiah!
Firesped replied to cool8or's topic in Model kits
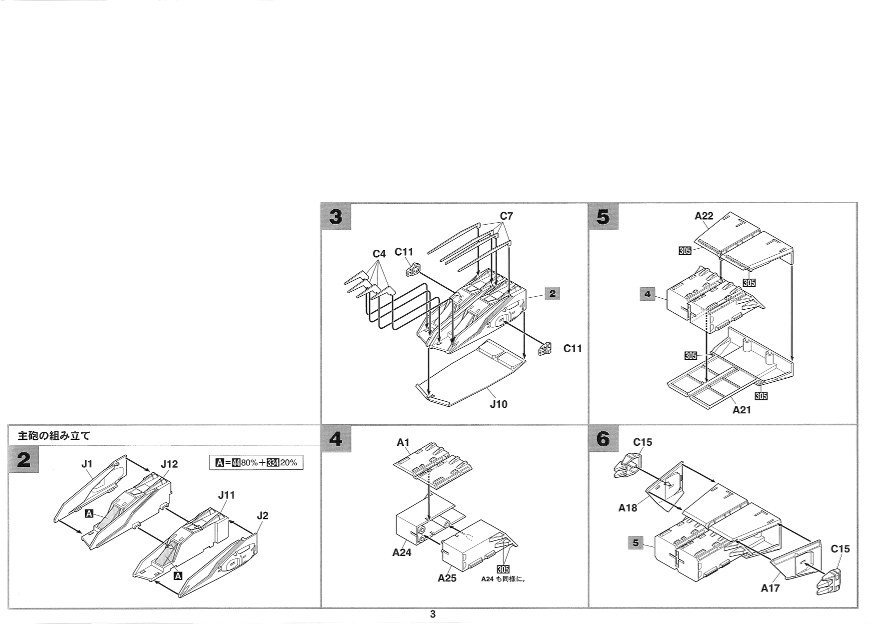
Here is a scan of page 3 from the 1:4000 scale SDF-1 Macross Movie Edition from Hasagawa Hobby Kits. I deleted some of the information from the page to only show what pretains to this. Steps 2, 3, 4, 5, 6 and 10 are the assembly of the "main gun." The top pieces are single part and would have to be cut in half, but the lower parts in this kit were not. splitting the main gun is the primary thing to be done for making the Storm Attacker mode. After that is figuring out how the parts go together. the poly-cap spruce included with the kit included far more parts then need for the kit. also the stand also included a part that was not needed. On the new kit, it looks like they changed out the front part from step 2 and 3 to match the TV version, the parts from steps 4, 5, and 6 do not match. It is more then just the cut out from the bottom that is wrong. cut out part is step 4, part from 5 and 6 is also wrong. the good news, the back of the book include hi-resolution painting/decal guide showing all of the parts in scale with each other. (slightly off scale to the model itself, which is actually 1/4500 scale) Looking at your pictures of the model, the bar the legs are on is straight where the bar for the movie edition had an angle in it. they must have changed the rear center thruster to do that. Not entirely sure but It might not 100% be the same leg as the DYRL version. I noticed they painted the yellow stripe at the base, I expect panel lines there to show where to paint, which are not present on the DYRL version.
-
Hasegawa announces a TV SDF-1 and a Super Messiah!
Firesped replied to cool8or's topic in Model kits
let me see if I can find the instructions, it's kinda hard to explain without the kit on the spruce -
1/285 Fan-Made Models for RPG Tactics.
Firesped replied to Firesped's topic in Anime or Science Fiction
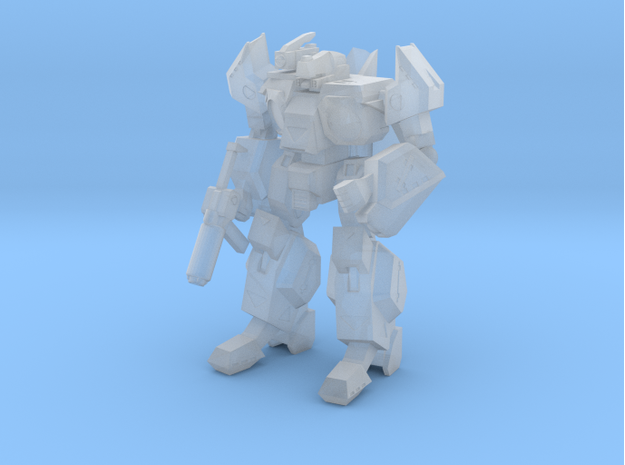
got the OBP-Z2 back and i have it painted up now with at least an initial cost of paint. had some issues with the legs spanning off so I went back into the model and thickened up the leg connectors. It doesn't stand on its own, so I need to put it on a base.
-
Hasegawa announces a TV SDF-1 and a Super Messiah!
Firesped replied to cool8or's topic in Model kits
They used the same mold for the DYRL version on the front of the ship. So it doesn't have the curve on the bottom. on a side note, has anyone built the DYRL version in storm attacker mode? When I was putting that together it seemed like you could modify the kit into that mode. -
Hasegawa announces a TV SDF-1 and a Super Messiah!
Firesped replied to cool8or's topic in Model kits
looks like the release on the Macross got pushed back to November now. -
1/350 Scale thread... Mospeada, Southern Cross and more!
Firesped replied to EXO's topic in Anime or Science Fiction
found some stuff I need to fix. and I still need to add details and put in the hands.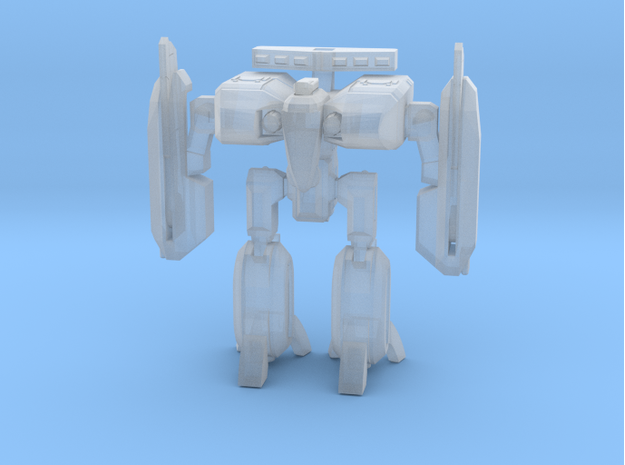
-
1/350 Scale thread... Mospeada, Southern Cross and more!
Firesped replied to EXO's topic in Anime or Science Fiction
a few parts left and I can start transforming it.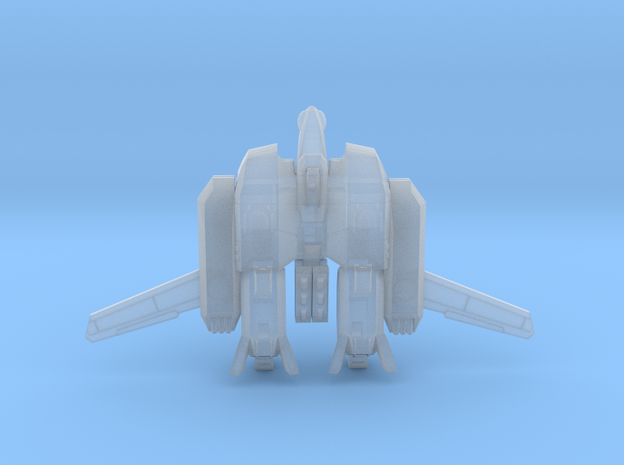
-
1/350 Scale thread... Mospeada, Southern Cross and more!
Firesped replied to EXO's topic in Anime or Science Fiction
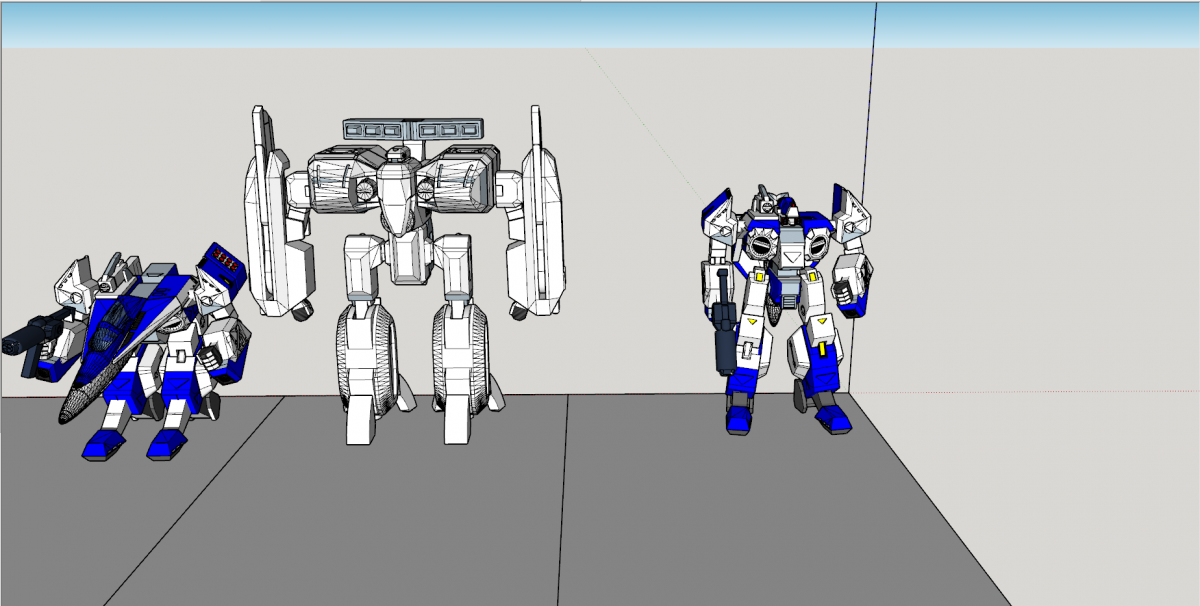
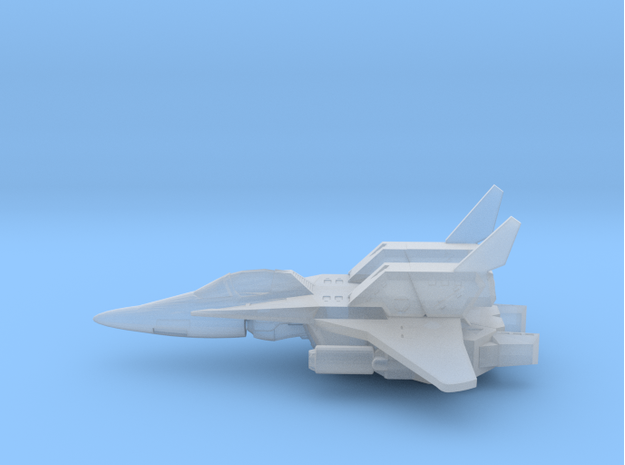
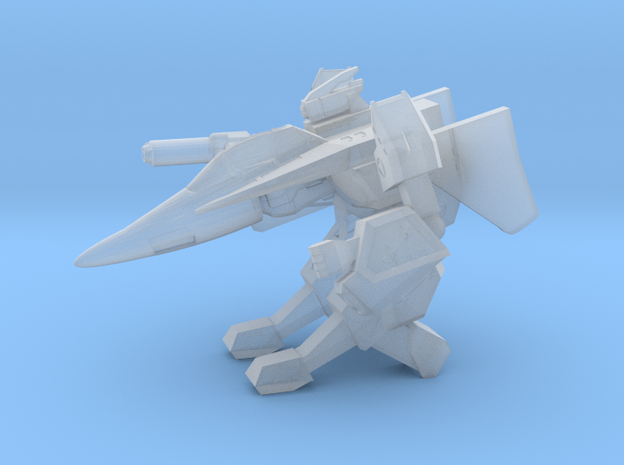
got the book for Mospeada, so I fixed some design errors on my part on the Legioss. also got some information on why there are 2 sizes for stats. here are the renders of version 5. I made the cockpit longer, which let me make the head longer. I had upgraded the pose gearing on the soldier mode. I move that over to the Diver mode, along with the longer cockpit/head. made the foot configuration match more like it is supposed to be. Unfortunately I had merged the heel and thruster because they were parts that were not working together to show up during 3d print rendering. moved the longer head to the soldier mode.

-
1/350 Scale thread... Mospeada, Southern Cross and more!
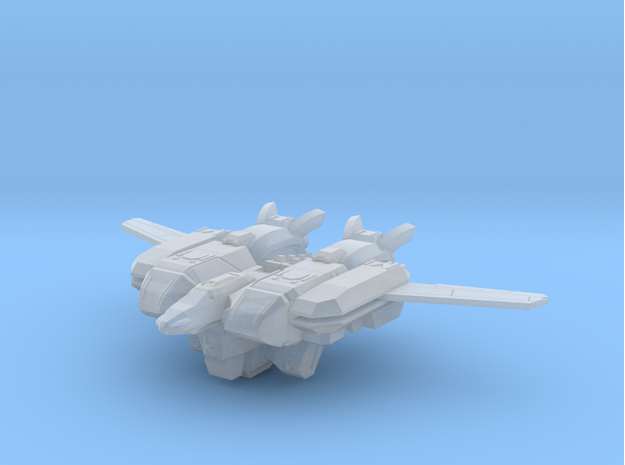
Firesped replied to EXO's topic in Anime or Science Fiction
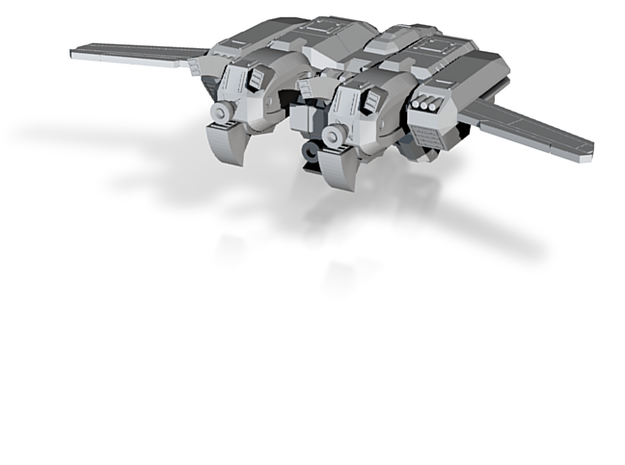
the Tread/Beta so far.