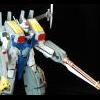
Majestic Posted November 9, 2009 Share Posted November 9, 2009 (edited) 1/48 SDP-1 Stampede Valkyrie Complete! Pictures on page 2! I have been working on this for a couple of years now off and on, finally ramping up the process as of late. It's a project that has to compete for my time along with a family of four (including a 4-year old and a 4-month old) a full time job, and 8 units of real estate classes! This is my first ever scratch built project so it lacks the polished, precise engineering of some of this message board's much more talented scratchbuilders, who I hope might be convinced to build a better version. While I use a precision ruler and studied all the available and limited drawings/pictures, the proportions and armor measurements are both my best guesstimate along with design accomodations made for transformation, etc. There is a lot of "anime magic" going on with the dorsal missle launcher pods - I had to build a complicated folding mechanism for the pods to fold up and over the shoulder in Battroid mode...a design that took me weeks to get right. The build makes use of what seems like a million magnets, including: 64 removable missles, each held on by a magnet. Handmaking 64 missles is about as fun as it sounds. Magnets to hold the dorsal missle pods in place in fighter mode. Magnets embedded in the chest for removable chest armor. Magnets to hold the inner and front-leg armor in place (not pictured. Magnets to hold the nose cone assembly together. The bottom/back "quarter panel" of the nose assembly is removable to allow for transformation. I still have a great deal of sanding and detail work that needs to be done (i.e. some panel lining, detail work at the hinge joint for the vernier "fins") along with the obvious weapons systems that mount on the sides of the fast packs. You can see I've started on the triple-barrel gatling gun. I apologize for the terrible pictures. More as the project develops. Edited February 7, 2011 by Majestic Quote Link to comment Share on other sites More sharing options...
Majestic Posted November 9, 2009 Author Share Posted November 9, 2009 (edited) A couple more pictures, including a terribly blurry one of a fast pack battroid mode test fit. The test fit lacks the chest armor installed, so the shoulder missle pods will actually sit a bit higher. Note that the antennae on top of the vernier fins is a temporary placeholder build - I'll be replacing those with a more "accurate" version later. Edited November 9, 2009 by Majestic Quote Link to comment Share on other sites More sharing options...
Thom Posted November 9, 2009 Share Posted November 9, 2009 Though I'm not a fan of the Stampede, what you've done so far looks superb. As of yet, I've only done one VF, with plans for many more. Including a scratch/bash of several line drawings. Its aways great to see more none SOB(Straight-Outa-Box) work. Keep up the great work! Quote Link to comment Share on other sites More sharing options...
Majestic Posted November 9, 2009 Author Share Posted November 9, 2009 I'm trying to find a 1/48 nosecone and non-broken BP-8 for this project. See here: http://www.macrossworld.com/mwf/index.php?showtopic=31574 Quote Link to comment Share on other sites More sharing options...
MaveRick Posted November 9, 2009 Share Posted November 9, 2009 looking good so far majestic.. you beat me to it.. i've been contemplating of doing either this or an Atmospheric Booster after i'm done with my current scratchbuild.. keep it up and thanks for sharing Quote Link to comment Share on other sites More sharing options...
Majestic Posted November 9, 2009 Author Share Posted November 9, 2009 i've been contemplating of doing either this or an Atmospheric Booster after i'm done with my current scratchbuild.. Oh man please make the Stampede your next project. Your skills are amazing and I'd like to see how a professional interprets the design. Quote Link to comment Share on other sites More sharing options...
Kicker773 Posted November 9, 2009 Share Posted November 9, 2009 I like =) Quote Link to comment Share on other sites More sharing options...
miriya Posted November 9, 2009 Share Posted November 9, 2009 Very Cool! I have always loved the Stampede Valk! Quote Link to comment Share on other sites More sharing options...
anime52k8 Posted November 9, 2009 Share Posted November 9, 2009 looking good so far majestic.. you beat me to it.. i've been contemplating of doing either this or an Atmospheric Booster after i'm done with my current scratchbuild.. keep it up and thanks for sharing make it in 1/60, recast it and sell it. would be the coolest add on ever. Quote Link to comment Share on other sites More sharing options...
nightmareB4macross Posted November 10, 2009 Share Posted November 10, 2009 That looks awesome. Keep going on this project. If it helps would you like me can send you free recasted 1/48 BP-8 and nosecone. As long as you keep this up and finish it is no problem at all. Quote Link to comment Share on other sites More sharing options...
Majestic Posted November 22, 2009 Author Share Posted November 22, 2009 Working on the sliding grips for battroid mode (metal detail work parts courtesy of mechaskunk). Also, a shot of the leg armor - armor at the front of the leg is not yet complete. You can see the tiny magnets on the inner leg armor that will hold the removeable front leg armor in place. This whole panel has to be removeable for landing gear to deploy. Quote Link to comment Share on other sites More sharing options...
Majestic Posted January 28, 2010 Author Share Posted January 28, 2010 Minor update. 90% finished with the starboard particle beam weapon with sliding mechanism for grip. I'm working now on the port-mounted gatling gun. WANTED I'm looking for a jewel-eye piece (similar to a zaku eye for gundam kits) that is 8-10 mm in diameter to complete the scope mounted on top. I'm having trouble finding one in that size...any suggestions for where I can find a scope lens that is the right size? Also, as always I'm still looking for a 1/48 BP-8 part and a 1/48 v.2 nosecone. Quote Link to comment Share on other sites More sharing options...
big F Posted January 31, 2010 Share Posted January 31, 2010 (edited) Your work so far is awesome. Might be able to help with the jewel bit, I have a friend who makes jewellery mostly costume stuff. I'll ask her a see what she can come up with. Edited January 31, 2010 by big F Quote Link to comment Share on other sites More sharing options...
PetarB Posted February 1, 2010 Share Posted February 1, 2010 What an amazing project... not my favourite Kamawori design, but you're going to really turn some heads with that one. Great work! Quote Link to comment Share on other sites More sharing options...
MechTech Posted February 3, 2010 Share Posted February 3, 2010 Check a local craft store. They are used in all kinds of home made crafts. Are you in the states or elsewhere? I might be able to help you if Big F can't. - MT Quote Link to comment Share on other sites More sharing options...
Majestic Posted March 4, 2010 Author Share Posted March 4, 2010 (edited) Update! Built the port 35mm tri-barrel gatling gun. The tri-barrel gun rotates freely. Next comes figuring out the method of attachment to the boosters for both the gatling and the particle beam weapon. Edit: Thanks to Dax415 for sending me a 1/48 nosecone and BP-8 part - just what I need to keep this project going. Edited March 15, 2010 by Majestic Quote Link to comment Share on other sites More sharing options...
Majestic Posted May 13, 2010 Author Share Posted May 13, 2010 (edited) Additional detail added to leg armor and an in-progress shot of the head. Front of leg armor still detaches in order to allow for landing gear extension in fighter mode. "Stiletto" foot extensions are also removable. I'm using Mr. Surfacer 500 to help find imperfections in scratch-built parts, hence the smudgy-grey appearance. Not pictured, but the particle beam weapon and gatling gun now attach to the sides of the boosters via magnets. The project is about 85% done at this point. Up next is scratchbuilding the VE-1 style wingtips and the dorsal antennae. The dorsal antennae are a real puzzle since I'm not casting custom parts. Not sure yet if I will tackle the ventral propellant tank or not. Metal mechaskunk vernier nozzles are on the way to replace the temporary plastic verniers mounted on the dorsal vernier clusters. I'm still looking for an 8-10 mm jewel eyepiece (like a convex zaku eye) for the starboard particle beam weapon. Edited May 13, 2010 by Majestic Quote Link to comment Share on other sites More sharing options...
nightmareB4macross Posted May 13, 2010 Share Posted May 13, 2010 Wow this project is looking great!! Keep it up, and finish it. Quote Link to comment Share on other sites More sharing options...
Kanedas Bike Posted May 17, 2010 Share Posted May 17, 2010 Im.pres.sive. I wish I had 1/10 of the skill you and the other resident MW modeler/customizers do. I really can't wait to see the finished product. -b. Quote Link to comment Share on other sites More sharing options...
Majestic Posted May 20, 2010 Author Share Posted May 20, 2010 Unemployment has its benefits, namely getting things done on this project. Here are the VE-1 -style wingtips, which were surprisingly easy to make: New thruster bells on the dorsal verniers courtesy of mechaskunk. These look really great and I probably won't paint them to keep the shiny aluminum look: And here's a shot showing fully mounted weapons on the fast packs, attached by magnets. Took forever to get the alignment right. Battroid mode looks great brandishing the particle beam and gatling gun. Metal posts attached to the forearms help poor Battroid wield them. The gatling gun turned out slightly lengthier than I would have liked, so extends out further than the lineart. It should be about an inch shorter, but then that throws off the proportions of the back of the weapon (anime magic in the lineart): Profile shot: I'm working now on the ventral fuel tank, then I'll go back to puzzling over how the hell to build the dorsal antennae. Short of casting them somehow, I'm really stumped on those antennae. They're pretty prominent so I want to make sure they look good and are adequately detailed. Painting I'm going to try to avoid the gundam-ish bright colors in the lineart. The final paint job will roughly match the color scheme, but in more realistic, slightly weathered and muted tones, Katoki-style I guess. I might commission somebody to paint the valkyrie separately. Quote Link to comment Share on other sites More sharing options...
Dax415 Posted May 28, 2010 Share Posted May 28, 2010 Wow this is coming along really well! I was curious how you molded the nose cone? Was it an extension of the 1/48 nose cone grafted to another nose cone? Was also wondering how you did the vent covers on the leg? Was it scratch built or a piece from a model kit that was modified? Was also wondering how you did the molding for the extra missiles on the leg (not the missiles themselves, but the additional half cone shapes that form up the shape holding the missiles)? I actually wanted to build the other gundamish vf-x-3 starcrusader in 1/72 scale at some point cause its only a 2 mode valkyrie my skills might have a chance at pulling off Quote Link to comment Share on other sites More sharing options...
Majestic Posted May 29, 2010 Author Share Posted May 29, 2010 Wow this is coming along really well! I was curious how you molded the nose cone? Was it an extension of the 1/48 nose cone grafted to another nose cone? Was also wondering how you did the vent covers on the leg? Was it scratch built or a piece from a model kit that was modified? Was also wondering how you did the molding for the extra missiles on the leg (not the missiles themselves, but the additional half cone shapes that form up the shape holding the missiles)? I actually wanted to build the other gundamish vf-x-3 starcrusader in 1/72 scale at some point cause its only a 2 mode valkyrie my skills might have a chance at pulling off The nose cone originally started as the rocket nosecone from an Estes model rocket nosecone. I had to split the rocket nosecone open a bit to widen it, then added sheet styrene, some epoxy and putty to fill in the rest, trying as best I could to mold it around the existing 1/48 nosecone. It has an internal frame to center it around the existing nose. I started with the nosecone because I figured it would be the hardest to make (and it was!). The bottom "quarter panel" of the nosecone is removable so that it can be transformed to battroid. The 1/48 nosecone you gave me was then glued inside once I was satisfied with the fit. The vent covers on the leg were scratchbuilt from sheet styrene. I created box shapes that would fit snugly inside the leg vents, then built up styrene on top of and around that. I sandwiched styrene in a rough pyramid shape and sanded down to fit. The half cone shapes for the leg missles was made using the same Estes rocket nosecone(s) used for the nose. Curved and cone shapes are definitely difficult to scratchbuild unless you're casting them somewhow. I'm sure carving some of these shapes from wood and then casting them in resin would be much easier...but having never done that I decided to just use what I could find. Like I posted earlier, I'm still puzzling over how to scratchbuild the dorsal antennae. I think I might actually buy a jet fighter kit and adapt missles or fuel tanks in order to achieve the needed shapes. I would kill to have access to a big pile of assorted molded styrene shapes. Quote Link to comment Share on other sites More sharing options...
Majestic Posted June 9, 2010 Author Share Posted June 9, 2010 (edited) Ventral Propellant Tank Created from flat sheet styrene and a challenge to both build and calculate the cone shapes for the ends. 8x verniers are Kotobukiya Burner Nozzles. Other than the dorsal antennae, all parts are done and are undergoing the initial Mr. Surfacer priming to find and fill imperfections. Edited June 9, 2010 by Majestic Quote Link to comment Share on other sites More sharing options...
Froy Posted June 11, 2010 Share Posted June 11, 2010 How did you molded the styrene to get that perfect cilindric shape !?! I'm tempted to build the rocket boosters for my VF-11 but didn't know that the styrene could be molded like that from a flat sheet. Quote Link to comment Share on other sites More sharing options...
leading edge Posted June 12, 2010 Share Posted June 12, 2010 How did you molded the styrene to get that perfect cilindric shape !?! I'm tempted to build the rocket boosters for my VF-11 but didn't know that the styrene could be molded like that from a flat sheet. Wow very difficult given the type of craft chosen but looking good. Do you have other plans for future scratch/conversion projects. Quote Link to comment Share on other sites More sharing options...
Majestic Posted June 12, 2010 Author Share Posted June 12, 2010 How did you molded the styrene to get that perfect cilindric shape !?! I'm tempted to build the rocket boosters for my VF-11 but didn't know that the styrene could be molded like that from a flat sheet. I used this calculator to figure out how to cut out cone shapes from flat styrene. I then slowly bent the styrene around a broom handle, using friction to keep the shape, then joined the ends with locking pliers and bonded with superglue. I had to shape the cylinders by hand after bonding to get the desired circular shape. The propellant tank is actually very slightly teardrop shaped, which allows it to fit up under the fuselage better. Not sure what the next project might be, maybe an armored gerwalk or the platypus valkyrie. I have a soft spot for "ugly" valkyrie variations. Quote Link to comment Share on other sites More sharing options...
Froy Posted June 13, 2010 Share Posted June 13, 2010 Wow, that's very useful. Thanks. Is there any way to download that calculator? or is only avalible on the web site? Quote Link to comment Share on other sites More sharing options...
kanata67 Posted June 14, 2010 Share Posted June 14, 2010 sweet. I've only seen the one pic of a stampee and your looks to be spot on so far Quote Link to comment Share on other sites More sharing options...
Majestic Posted June 22, 2010 Author Share Posted June 22, 2010 I'm thinking about custom decals to indicate kill markings for zentran ships and am experimenting with profile silhouettes like the following. I'm having trouble finding good quality profile images of zentran and meltran ships, preferably on a single size chart, any suggested links/images? Quote Link to comment Share on other sites More sharing options...
Majestic Posted July 15, 2010 Author Share Posted July 15, 2010 Some progress photos. All parts are done. A few minor tweaks and fixes and it will be ready for painting, decals, etc. Quote Link to comment Share on other sites More sharing options...
PetarB Posted July 15, 2010 Share Posted July 15, 2010 That looks EXTREMELY awesome. Can't wait to see it put together! Quote Link to comment Share on other sites More sharing options...
jenius Posted July 15, 2010 Share Posted July 15, 2010 That is incredible work. Quote Link to comment Share on other sites More sharing options...
nightmareB4macross Posted July 15, 2010 Share Posted July 15, 2010 Beatiful work. I can hardly wait to see it painted. Quote Link to comment Share on other sites More sharing options...
claude grant Posted July 15, 2010 Share Posted July 15, 2010 Kudos on doing this...phenomenal scratchbuild! Quote Link to comment Share on other sites More sharing options...
Mommar Posted July 15, 2010 Share Posted July 15, 2010 Some progress photos. All parts are done. A few minor tweaks and fixes and it will be ready for painting, decals, etc. Wow, the faithfulness to the lineart is incredible. How the heck does that thing transform? Quote Link to comment Share on other sites More sharing options...
Recommended Posts
Join the conversation
You can post now and register later. If you have an account, sign in now to post with your account.