
![]()
Example Head & Canopy Exchange
Needed items:
1) small Phillips
screwdriver
2) Completion
of Chris's parts preparation guide-at very bottom of this page.
3)
15 minutes of your time
.
NOW LISTEN PLEASE. I am not going to tell you to take your mint in box $900 VF-1S Strike Valkyrie and change it into a VF-1A. The bottom line is you do this transplant at your own risk. Chris and I assume no responsibility for anything you may break on disassembly or any devaluation you experience when making that VF-1D Armored Elintseeker Hybrid from your nightmare last night. These instructions are just a guide-follow them at your own risk. This is a strong toy and if you break something you really need to slow down and take a few deep breaths Hercules.
Save this whole guide to your hardrive to do off-line here. It's in a Zip file-size is 379k
 |
 |
 |
|
1)
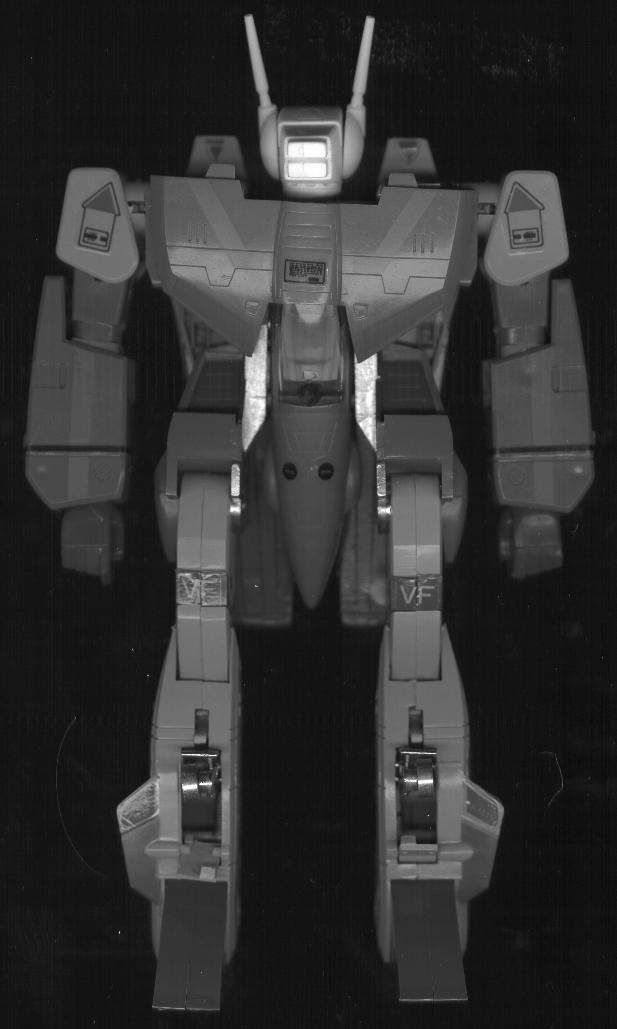
Open and flatten Valkyrie into position as shown.
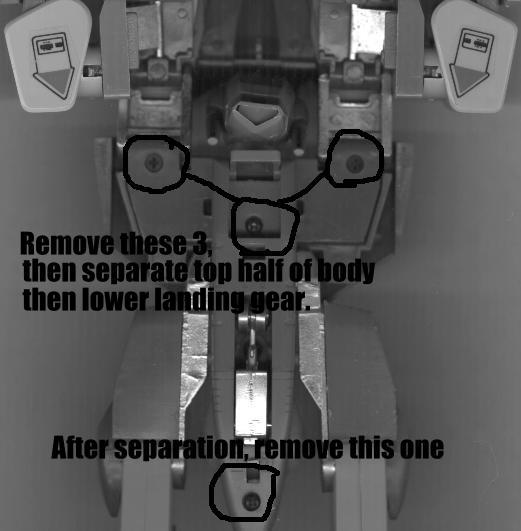
2) Remove 3 upper screws and separate the upper body. 3) Extend the front landing gear |
4)
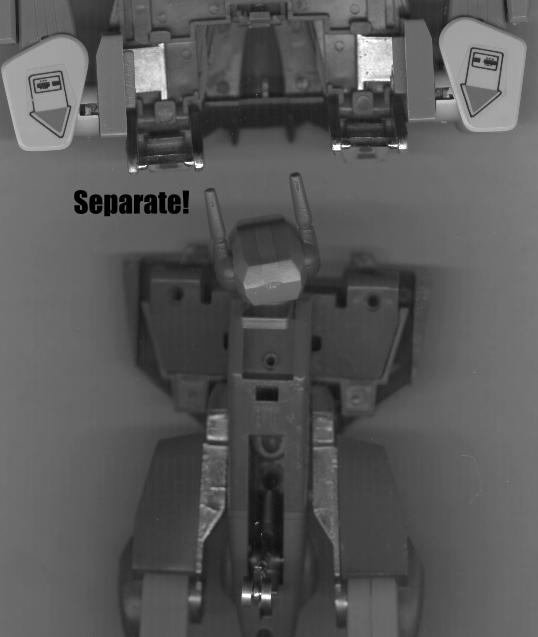
This shows upper body separation
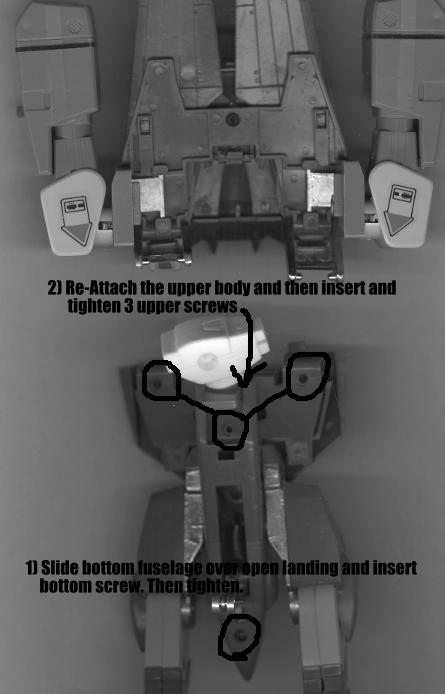
5) Remove bottom screw and GENTLY lift off the lower fuselage. |
6)
We are in pieces now! Don't worry about the front landing gear lock-we'll
put that back on reassembly
|
 |
 |
 |
|
7)
Loosen screw holding the spring a few turns and gently lift off landing
gear off the perch. At this angle it will unhook from the spring easily.
8) Remove the screw completely and turn the toy over so cockpit is facing up |
9)
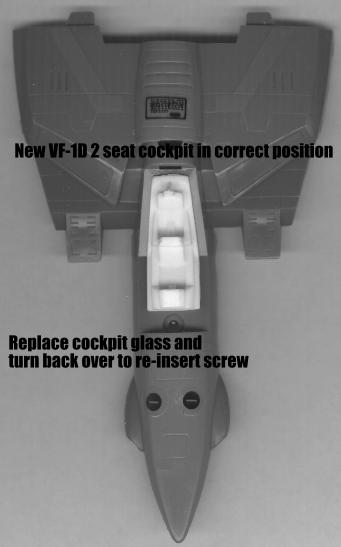
Remove the cockpit glass (it snaps out) and remove single seat
10) Here is the VF-1D 2 seat cockpit in place. |
11)
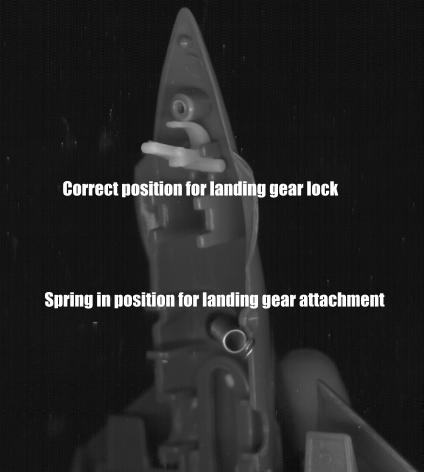
Turn over cockpit and insert the screw holding the spring. Insert
the landing gear lock as shown. Leave the screw a little loose, clip
the landing gear back on(see step 7) and replace onto the perch
|
 |
|
 |
|
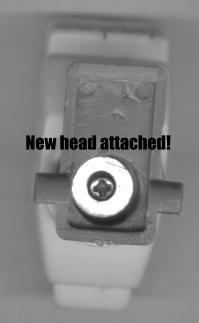
12)
When changing heads do not re-use the spring. It will place unneeded
pressure on the resin screw boss. Attach the new head!
|
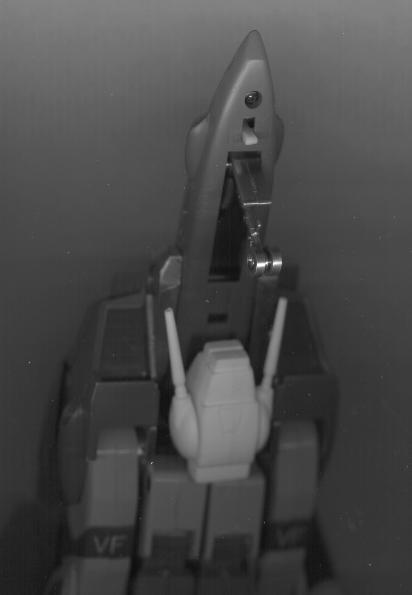
13)
Here is the correct position for the head mounting bracket.
14) Lay the legs back into the upper fuselage section 15) Slide the lower fuselage over the landing gear and secure it using the bottom screw(at the tip of the nosecone) |
16)
Re-attach the upper body and secure the 3 upper screws.
17) Done!! Enjoy! |
 |
 |
 |
|
Here
is the VF-1D in fighter mode
|
Another
angle
|
Bitchin!
; )
|
|
|
 |
 |
|
Transformation
beginning. Pay attention to head laser angle when transforming.
|
Looking
good Mac-daddy!
|
Attach
Canopy cover...
now cough! |
How to prep your Custom parts
1) Gently wash your parts with a little soap & water using a toothbrush. ***Be very careful with the head lasers!***Dry them carefully with a paper towel.
2) Use 300 grit sandpaper (you can get this at Lowes, your local hobby shop, or any auto parts store) to sand off any seam lines or remaining pieces of sprue. If sprue is too thick to remove with your sandpaper, use a flat needle file or gently & slowly carve it away with an Xacto knife. ***Be VERY carefully not to cut yourself. We are not responsible for any injuries.***
3) If any air holes are present, fill them with spot putty, green Squadron putty, or Testor's white putty. (You can pick these up at any hobby shop or model dept.) Let putty dry thoroughly. Read directions for proper drying time. After drying, follow steps from Step #2. If hole STILL persists, repeat Step #3 until hole is filled.
4) Check all parts for fit! Use care when initially lining up parts. Some minor sanding/adjusting may be necessary
5)
Painting!! Before painting wipe your parts down with a damp paper towel to
remove any dust or dirt. Dry it thoroughly. You can paint your parts with!
***I recommend using Model Master, Tamiya, or Gunze. All of these are acrylics.
You can order any of these paints from Phoenix Model Company. Their web address
is www.phoenix-model.com.***
You may use a clear coat spray to protect your paint, but it is not necessary. You can get this at the website mentioned or your local hobby shop. They come in gloss, semi gloss or flat. Ask for the Testor's brand.
And finally-keep the heads out of direct sun light and heat-as the parts could yellow and warp.
Chris is always available for questions-email him directly at Stonewell_Bellcom@Hotmail.com
![]()